Leaderboard


Popular Content
Showing content with the highest reputation on 10/19/2019 in all areas
-
hey check this kext https://github.com/jyavenard/Vega5KFixup/releases3 points
-
Here are binaries of the latest build which I'm using for test purposes. Please use this as an intermediate solution as long as there is no official release. BrcmPatchRAM-2019-10-17.zip3 points
-
Check out Hackintool v2.8.2. It now has the new Clover download location as well as OpenCore support2 points
-
You might have some issues with residual Clover files. Maybe try removing them, by running the following from a Terminal window: sudo rm -rf /etc/rc.boot.d sudo rm -rf /etc/rc.shutdown.d sudo rm -rf /Volumes/EFI/nvram.plist sudo rm -rf /etc/rc.clover.lib sudo rm -rf etc/rc.boot.d/20.mount_ESP.local sudo rm -rf /etc/rc.boot.d/70.disable_sleep_proxy_client.local.disabled sudo rm -rf /etc/rc.boot.d/80.save_nvram_plist.local lastly, look for and remove this file if present: Library/PreferencePanes/Clover.prefPane *** As for your EFI file, you got IntelMausiEthernet.kext in your kext folder but IntelMausi.kext in your Kernel section. (I'm not certain how useful BrcmPatchRAM2.kext is, but it probably isn't keeping you from booting; I think AirportBrcmFixup.kext is more useful.) ExternalDiskIcons, ThirdPartyTrim and XhciPortLimit are usually best "No". In regard to the latter, you're using USBInjectAll.kext, but I don't see a SSDT-UIAC file. So I don't see a proper way you're limiting USB ports (aside from depending on XhciPortLimit, which is best not used). A simple addition when using USBInjectAll would be to add a boot argument (NVRAM section) like this: uia_exclude=HS09;HS10;HS13;SSP3;SSP4;SSP7;SSP8;USR1;USR2 (obviously changing these values to ports you wish to exclude). I prefer not using USBInjectAll (and the above boot arg), and instead use a USBPortsMap kext file to inject the desired USB ports. Hackintool can create this file for you. In your PlatformInfo section, you've removed DataHub, PlatformNVRAM and SMBIOS sections. I kept all and leave Automatic as No. Maybe copy these from the Sample.plist file, and and fill-in with your data. I don't use any DSDT.aml file and have no issues booting with OC. Finally, the OC docs suggest leaving AvoidHighAlloc as YES for GA-Z77P mobos; maybe this holds true for your GA-Z77X?2 points
-
Thank you. Looks like it's using Pike's patch, which did work for me, too. I ended up using agdpmod=pikera with WEG, and that seems to have done the trick. Once again, thank you very much for the kext. I did not know about it.2 points
-
From where? Releases on github are pretty old... EDIT: nvm, found it!2 points
-
Yes I did notice that. Will need to do an update.2 points
-
@PepsiColaNYC Why are you asking us? Ask your kernel logs! You'll find the answer there!2 points
-
Running here with agdpmod=pikera perfectly 3647/3175X and Radeon VII
 2 points
 -
It also did the trick for me (Z170-P/i7 6700/Sapphire Nitro+ RX 580). Thx.2 points
-
My MacPro3,1 (not Hackintosh) runs Catalina without SSE4.2. Catalina AMD graphics drivers may require SSE4.2 (or a workaround). I use dosdude1's Catalina Patcher. https://forums.macrumors.com/threads/macos-10-15-catalina-on-unsupported-macs.2183772/ Something similar may be needed for old Hackintosh PCs.2 points
-
1 -Create a USB bootable Use this tool and download Catalina or Big Sur from Apple servers installScript_1016fullapp.zip Credits: crazybirdy Copy Catalina / Big Sur installer to Applications folder, open terminal and run Catalina Big Sur Monterey If you want check one step by step, check here -Opencore Vanilla Tutorial https://tinyurl.com/y2dmt5af -Clover Vanilla Tutorial https://tinyurl.com/rcy7muu4 2- EFI folder USB installation -EFI OpenCore or Clover Folder Intel Processors Paste this EFI folder in EFI partition in your USB STICK https://tinyurl.com/ybr968w3 3- EFI folder SSD -EFI OpenCore or Clover Folder Intel Processors Paste this EFI folder in EFI partition SSD https://tinyurl.com/ybr968w3 4- Start Fine Tune Run this app and post full dump here for full ACPI solution RunMe.app https://tinyurl.com/y9562hz7 If you like a SSDT way, here we go (SSDT is a incomplete way) SSDT-OLARILA.aml.zip 5- USB Solution https://tinyurl.com/bkmcj4ua --DSDT PATCHES-- -FIX ERRORS AND WARNINGS -FIX ACPI ERRORS -REMOVE UNUSED SCOPES / DEVICES -HIGH PRECISION EVENT TIMER -SATA SERIE ID -DMAC -REMOVE LINES, PROBLEMATIC and UNUSED -FIX K.P in REBOOT -NVRAM -REAL TIME CLOCK -SLPB -DARWIN / WINDOWS -XHCI -PLUGIN TYPE -HDEF -ARTC -IPIC -TIMR -SBUS -BUS1 -MCHC -ALS0 -SHUTDOWN -UAR1 -LAN -FWHD -USBX -PMCR -PPMC -XSPI -kUSBCompanionIndex -io-device-location -IMEI -EC -PNLF -ARPT -GFX0 -NVME -ACPI-WAKE-GPE -DTGP -HDMI / HDAU --SCREENSHOTS-- -If you want to buy me a beer - Donations with PayPalhttps://tinyurl.com/r2bvzm7 Big Thanks to XLR and your Badass Motherboard, Ultrafast CPU, Coolest Heatsink, Huge Graphics Card, Tonnes of RAM, Gigantic Hard Drive, Lightspeed Disk Burner, Professional Sound Card, Massive LCD Display. -Credits and thanks to the old and new people in the community who developed patches, kexts and bootloaders! Slice, Kabyl, usr-sse2, jadran, Blackosx, dmazar, STLVNUB, pcj, apianti, JrCs, pene, FrodoKenny, skoczy, ycr.ru, Oscar09, xsmile, SoThOr, RehabMan, Download-Fritz, Zenit432, cecekpawon, Intel, Apple, Oracle, Chameleon Team, crazybirdy, Mieze, Mirone, Oldnapalm, netkas, Elconiglio, artut-pt, ErmaC, Pavo, Toleda, Master Chief and family, bcc9, The King, PMheart, Sherlocks, Micky1979, vit9696, vandroiy2013, Voodoo Team, Pike R. Alpha, lvs1974, Austere.J, CVad, headkaze, onemanosx, erroruser, Jenny David, Sampath007, Facebook Hackintosh community, Facebook Olarila community, SchmockLord, daliansky and many, many, many others! We're all here to have fun and learn from each other!1 point
-
macOS kext_rtsx Hi, making a new thread. This driver is for Realtek SDHC card readers on a pci/pcie bus, most commonly found in laptops. I would like to get testers. The driver is not yet finalized, but I'm making the tread now anyway since there was interest. expect this post to change in the future. [read below for current status] -- sinetek things to fix eventually - get more pci id's in plist - async task in its own thread instead of blocking the os - prealloc DMA buffer? - cards with sector_size != 512, haven't been tested at all. - clean up src. git push. - power management? what happens when you sleep the machine? - the eject button in finder is broken, do not use for now. - spams the syslog with debug messages. release config? - basic namespace pollution a bit out of hand Update 1: Power management support on the way: see post #43. Latest version from Cholonam1 point
-

Version 2.0
29,965 downloads
Please read me: Ever since macOS Mojave came out (I mean the first DP) Apple removed the support for Atheros based WiFi Adapters from the IO80211Family.kext, so to fix it we need to add the AirPortAtheros40.kext to the Extensions manually. After each clean install the AirPortAtheros40.kext needs to be installed and after clean installing Mojave DPs after few times I decides to create this app to save some time. How to use it: This application will install the missing AirPortAtheros40.kext into /System/Library/Extensions and after the installation is done and once you reboot your computer the Atheros based WiFi adapters will be enabled. The installation is the first step of the process and it is fast but the next steps which are repairing the permission on /System/Library/Extensions and rebuilding the system caches might take a while so please wait until you were asked to reboot your computer. I'm using a TP-Link WDN4800 with an Atheros chipset and it works on other similar hardware. If this app helped you please consider donating; any amount is appreciated.1 point -

Version 10.12 L
98,747 downloads
This download is only for users who have a laptop with a 2010 Intel® Arrandale Processor with Intel® HD Graphics: 1st Generation Intel® Core™ Processor with Intel HD Graphics (Arrandale only) Intel® Celeron® Processor with Intel® HD Graphics (Arrandale only) Intel® Pentium® Processor with Intel® HD Graphics (Arrandale only) Make sure the Device ID and Vendor ID match with the following: Device ID: 0042 or 0046 Vendor ID: 8086 In here you will find my QE/CI and CI only packages for your 1st Generation Intel HD Graphics IGPU for OS X Mountain Lion, OS X Mavericks, OS X Yosemite, OS X El Capitan, macOS Sierra, and macOS High Sierra. Choose your package: Download the Intel® HD Graphics QE/CI package if your laptop is using the LVDS connector. This package has the necessary kexts to enable Quartz Extreme with Core Image (QE/CI). This enables full hardware/graphics acceleration. or Download the Intel® HD Graphics CI package if your laptop is using the eDP connector. This package enables Core Image (CI) only. This enables partial acceleration. Note: CI only (CI) is only available on OS X Mavericks 10.9.5 and below. Future releases of macOS requires full graphics acceleration (QE/CI) for optimal performance and stability. For more information about 1st Generation Intel® HD Graphics, everything is explained in my guide: http://www.insanelymac.com/forum/topic/286092-guide-1st-generation-intel-hd-graphics-qeci/1 point -
I had same issue of difficulty getting into BIOS (on both ASUS and GB mobos). I kept re-booting while tapping the "Delete" key (entry for ASUS mobos) and eventually I got in. (Removing NVME and SATA drives is okay at this stage.) I'd already prepared a USB flash drive on another computer and had it inserted into the correct USB port (check your manual; there is one port that is correct for flashing BIOS for each mobo). One other thing to consider that can make getting into BIOS difficult is bad memory. So check your DDR4 sticks. When the worse BIOS corruption happened to me, it was compounded by a bad DDR4 stick. My clue was a change in LED colors. All of the DDR4 sticks had LEDs and one displayed colors different than the rest; so I removed that stick along with its mate (keeping correct pairs), and then I easily got into BIOS, and was subsequently able to re-flash it.1 point
-
I just uploaded the prebuilt binaries of version 2.5.0 to the downloads section here on IM. Have fun!1 point
-
That would be interesting... just perform a FW update and, if there is such a prompt, refuse to carry on previous settings.1 point
-
I have to create new tag and only after that make new compilation. There is a time between new release and actual files. Check again.1 point
-
My set up is similar: I usually boot from an NVME drive, no NVRAM is used, but I do not have Fire Vault enabled. I use ScanPolicy of 3080963 as mentioned earlier. With this I can boot from NVME or SATA drives (I have no Windows active so cannot comment). And setting the System Preferences/Startup Disk works perfectly in either Mojave or Catalina. When you mentioned difficulty getting into BIOS, I've seen that with corrupted BIOS. Maybe re-flash BIOS. Another possibility is a corrupted config file; are you using XCode for editing? I once had a corrupted EFI drive that gave weird boots (your issue doesn't sound this bad). My only recourse at the time was to reformat and use a backup to restore.1 point
-
Update Utility useful for WIFI Support Drivers utility RT3572,RT3072,RT3070,RT3573,MT7610,MT7610,MT7610, RT5370,RT2870,RT3071,RT2770,RT3573,RT5572,RT3573, RT3573,RT5572,RT3572 WIFI-Dlink Catalina-Panel-V2 Enjoy1 point
-
Ok, now it reaches the OC menu, but it still fails to read the NVME containing macOS opencore-log.txt @Download-Fritz the part that looks more strange to me is that if I put ScanPolicy to 0 the macOS entry on NVME is correctly detected and everything works fine. Couldn't it be possible that the NVME partition is detected as something different from APFS and HFS+ and for that reason is ignored? (Please note that I've fire vault enabled)1 point
-
Yeah I got them working now, just had to do a re-install from release to b2, now all my SATA ports are working.1 point
-
@bittantone sorry, I had two copy+paste mistakes: https://github.com/acidanthera/OcSupportPkg/commit/0c20f3f5cf860d51961d8b0c1bbcaf36eee6e571 but considering the first branch is not even reached, I get the feeling this will not work either. Please report back whether it works, but a different kind of workaround is going to take a bit more time to implement1 point
-
@bittantone Indeed, I could have sworn I saw a decimal log call, but it's hex, so your setup is correct. What fails is retrieving the necessary information of the disk as indicated by: I'll push a workaround idea to a test branch soon. Are you familiar with compiling OC yourself? I do not have a verified build environment (I'm on Windows and we had interesting quirks with builds from there before). Otherwise you'll have to wait for someone to wake up to compile it.1 point
-
I fixed the instant reboot but still have cursor lag. config.plist1 point
-
If you mean the Thunderbolt Firmware update 1.2 try this app it might help to disable the update. Thunderbolt Firmware Update Disabler.zip1 point
-
Sorry, I thought that BootApple was a property that I could set to force OC to load macOS by default. Unfortunately I don't have the NVRAM, so actually each time I boot up I need to choose macOS by pressing 2 within the timeout. This is really annoying, is there a way to set macOS as the default boot option? Default boot drive seems to work only when native NVRAM is supported, isn't it? Theoretically, the default scan policy 0xF0103 should imply that APFS partition located on NVME are scanned...so I can't see why in my case it is not finding macOS Catalina1 point
-
I got it all working yesterday, it seemed. I just changed resolution, and checked some news sites and shutdown the computer. This morning when I booted up, it booted to black screen... I removed an old AGDP-patch I had, and entered the agdpmod=pikera, and now it works. Hope it holds now.1 point
-
Ok got it works. I remove the graphic card, clean it and reinsert. Boom, it works. No boot argument in config.plist1 point
-
My laptop has 8 series and I updated from release - .1 b1 - b2 no issues. No tweaking needed. Sent from my iPhone using Tapatalk1 point
-
@Slice no release.pkg just source files for r5097?1 point
-
Shure. Why not?1 point
-
Yes I'm using that release(5093, Dids). 5096 https://github.com/CloverHackyColor/CloverBootloader/releases has been buggy for me it crashed my system and forced me to reinstall Catalina using(Dids 5093 release)1 point
-
It doesn't matter if I would use iMacPro1,1 or MacPro7,1... I use MacPro7,1 which is perfect for my system. I don't have any issues no matter if I Work in Resolve or any other Software... Everything runs perfectly on my builds1 point
-
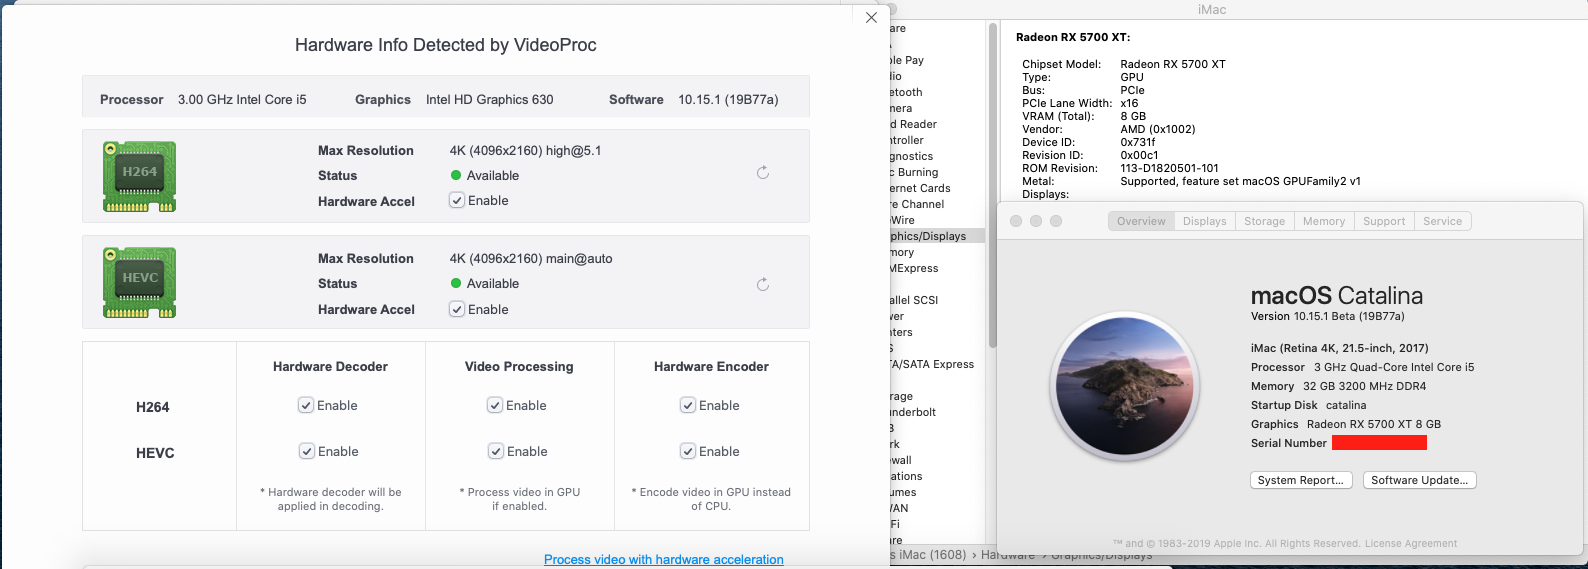
10.15.1 beta 2 up and running with a RX 5700 XT and the agdpmod=pikera flag on Clover. Works like a champ, all accelerated features seems working almost fine: there are some minor artifacts every now and then I suspect are from the first iteration of the RDNA driver, since it was not doing it with my old R9 280X on this very same hardware.
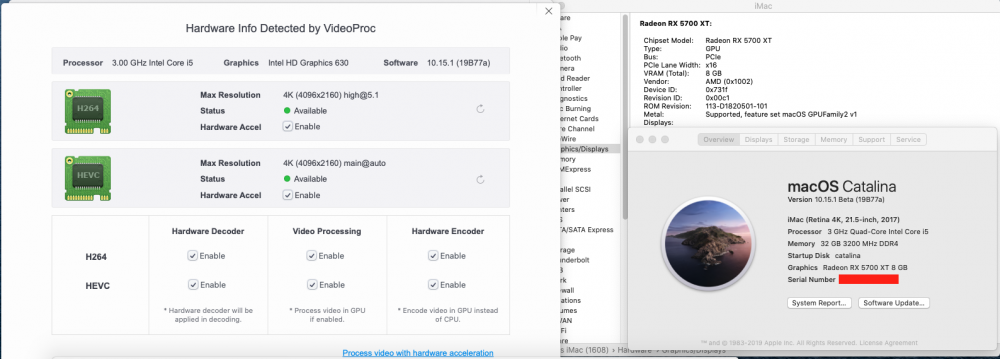 1 point
 -
Here: RX 5700 XT.zip1 point
-
@Roran90 Sounds more like a DHCP related problem. Anyway, check the kernel logs to see what's going on! @Henry2010 Yesterday I ordered one of these RTL8125 add-on cards on aliexpress but it won't be delivered before mid of November.1 point
-
DP is problematic at the moment for all Mac users right now it's not related to the Hackintosh. Many real mac users using HDMI right now. Probably it will fix to next update. You can find detail about that issue on MacRumors.com.1 point
-
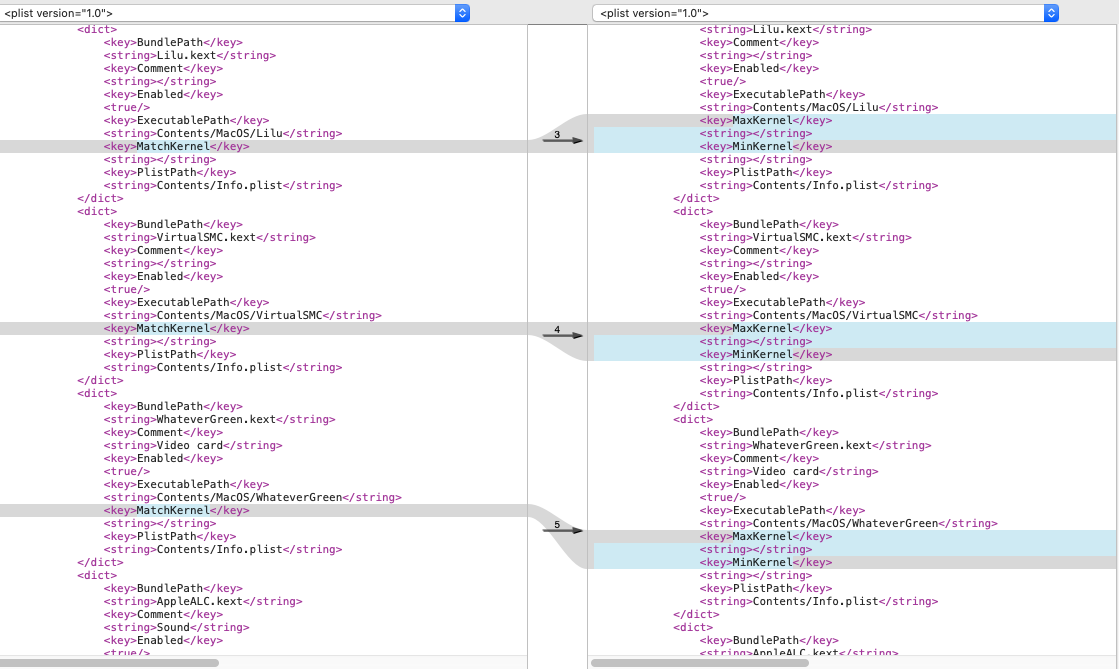
There's a really easy way to see quickly the changes that have occurred between OC Versions. ( I also recommend reading the docs ) Rename every sample.plist that are attached in OC releases/ Docs / sample.plist with their version: Ex: opencore 5.0 -> OC50sample.plist opencore 5.2 -> OC52sample.plist Put both configs in your home folder, open terminal and type: opendiff OC50Sample.plist OC52Sample.plist Xcode will open Filemerge app. The changes are highlighted in blue ( see example below ) Make the changes of your new config.plist accordingly.
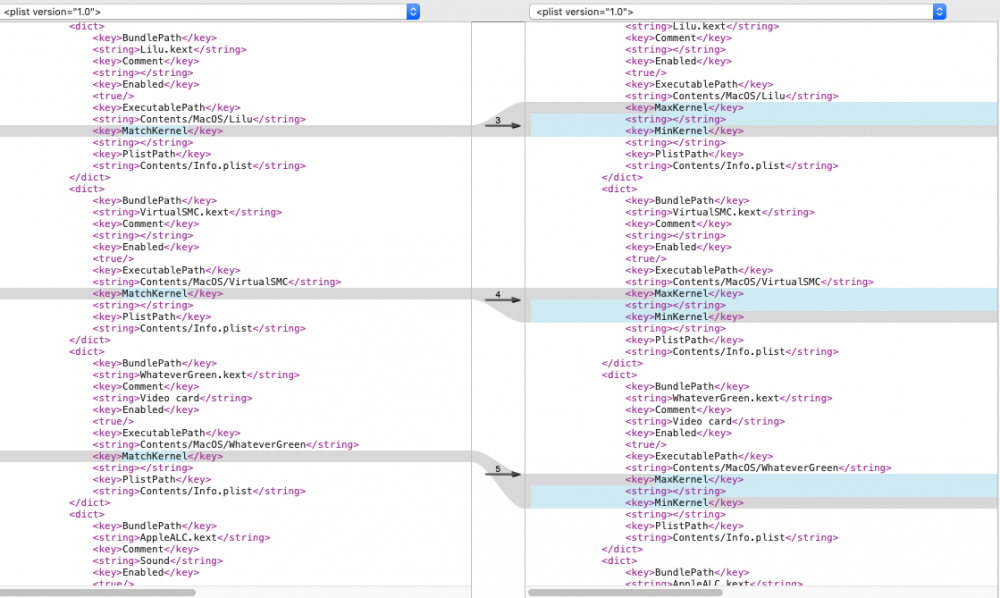 1 point
 -
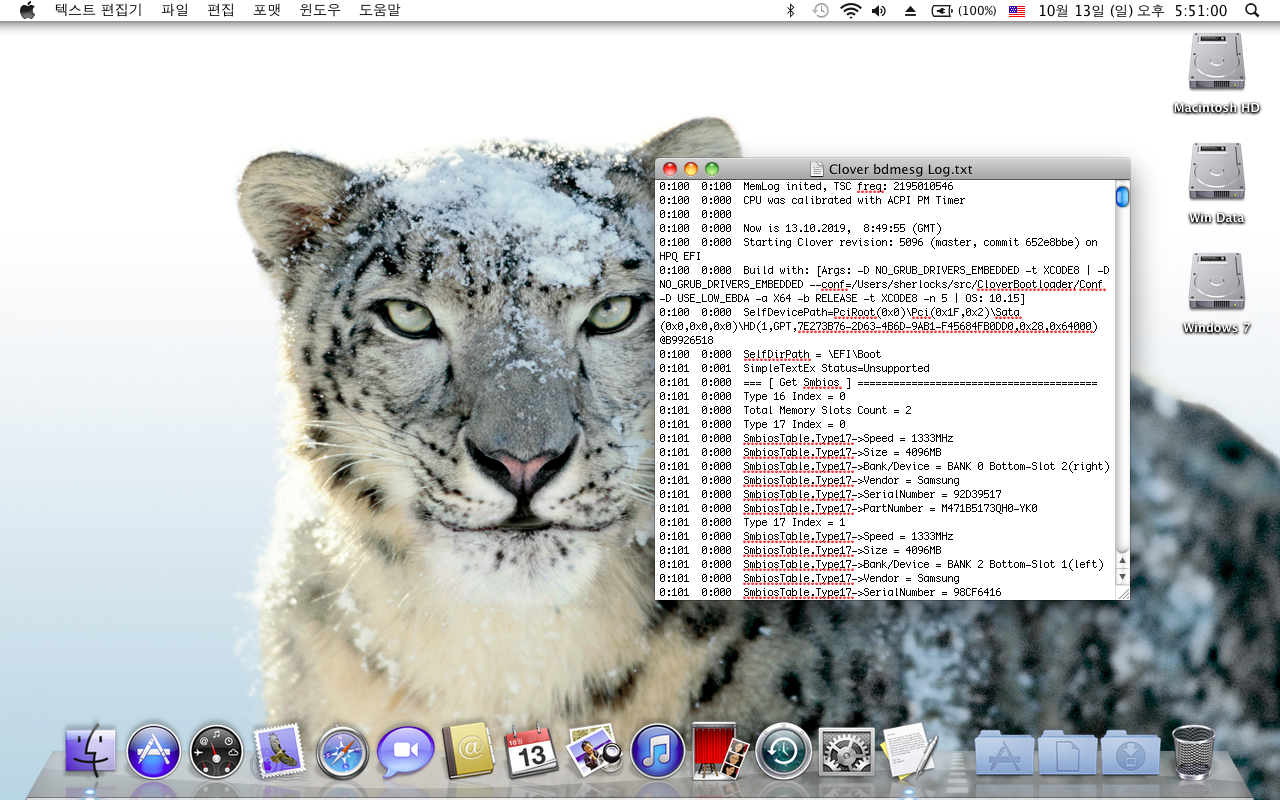
today, i tested snow leopard on latest clover r5096 github. everything is good working.
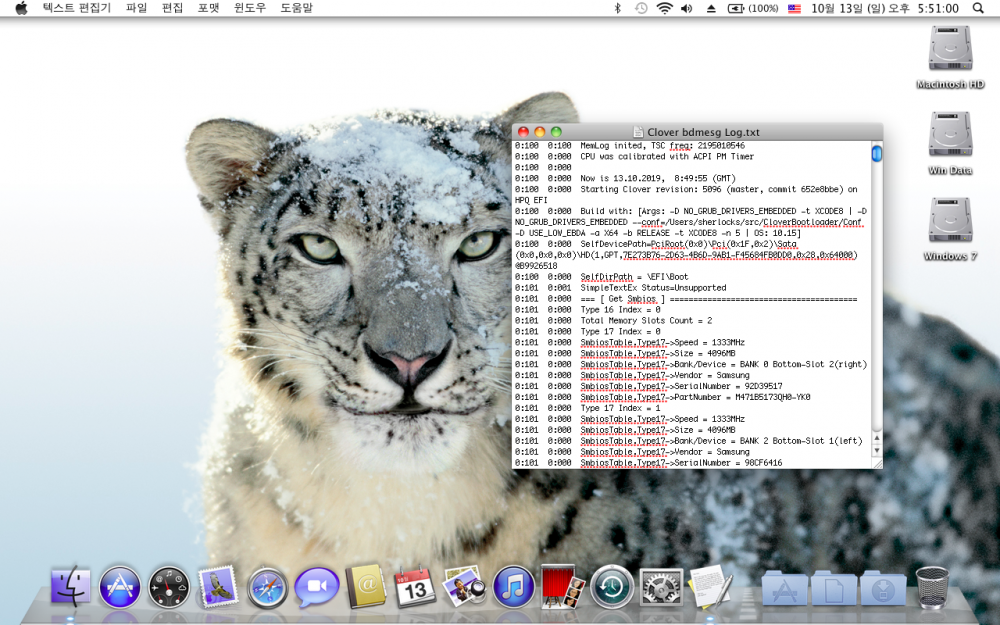 1 point
 -
That case needs to come to Brazil!!1 point
-
Ok, here is the latest build, version 2.3.0d1, in which I changed two things: Added an option to enforce handshake mode by setting bpr_preresetdelay=0 in order to test, if your device supports this mode of operation. Everybody is encouraged to try it. Please let me know, if it works on your device or not. Register for PM event notifications earlier in startup as it seems to speed up firmware upload a little bit. Good luck testing! BrcmPatchRAM3-V2.3.0d1.zip1 point
-
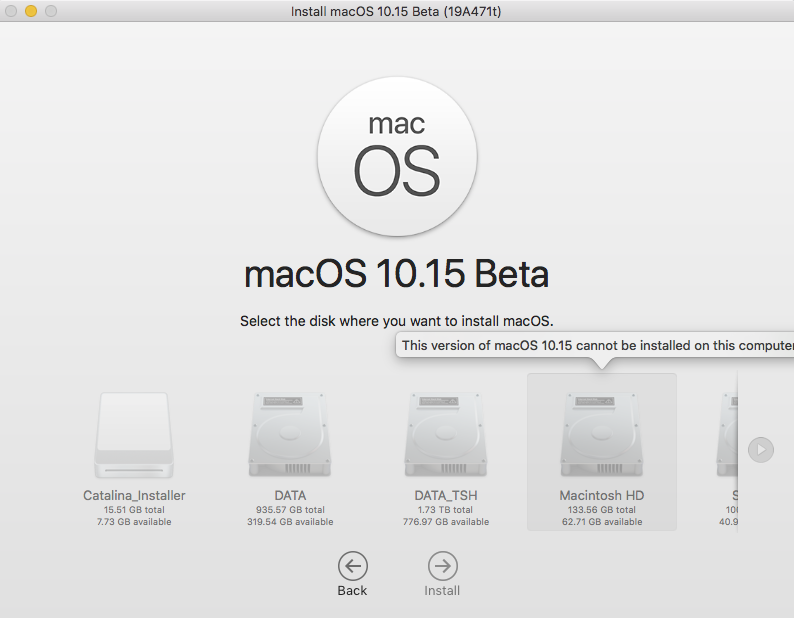
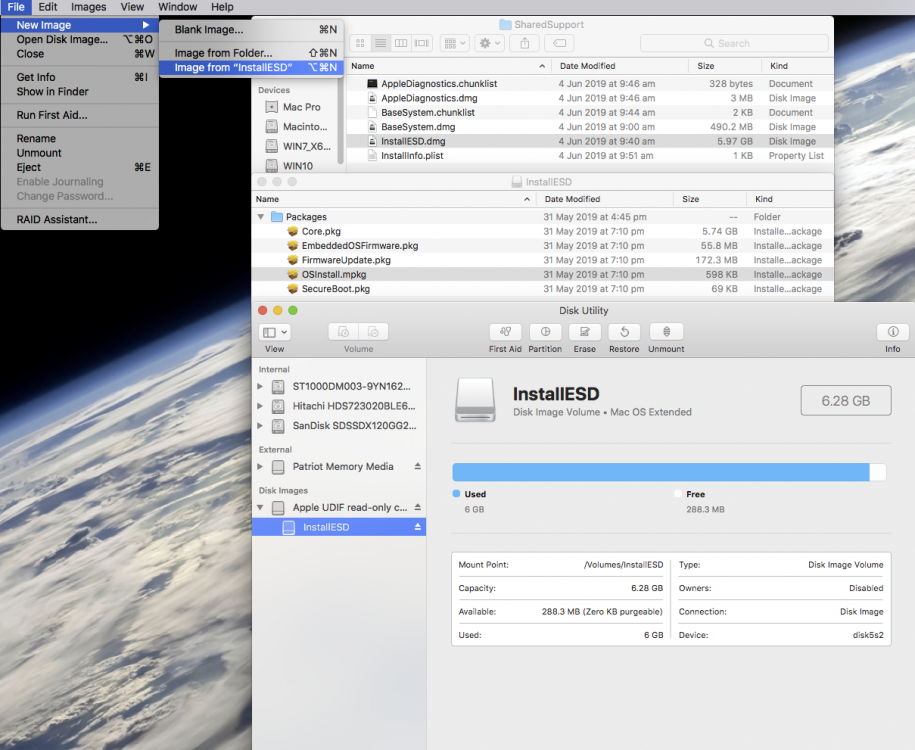
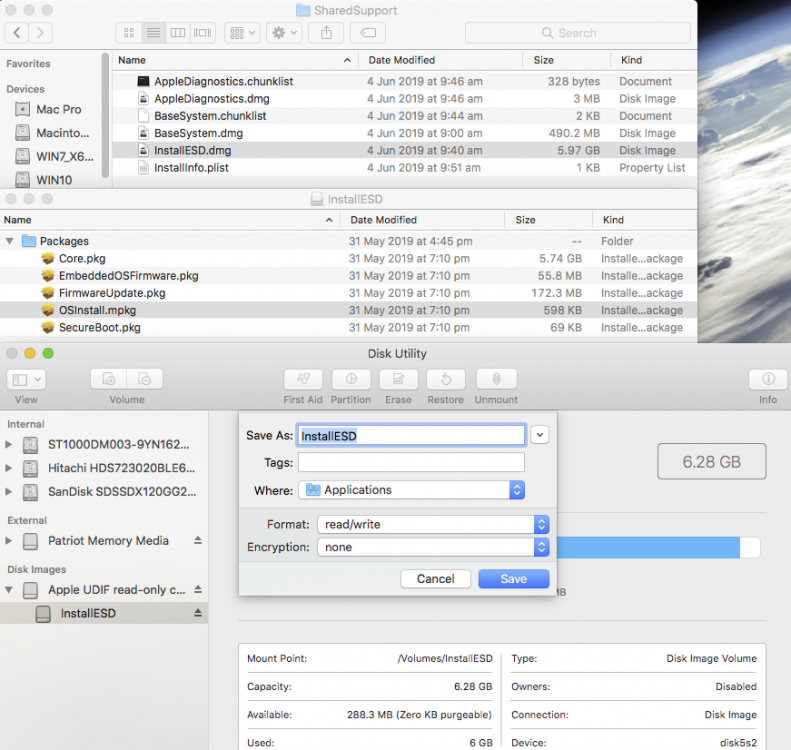
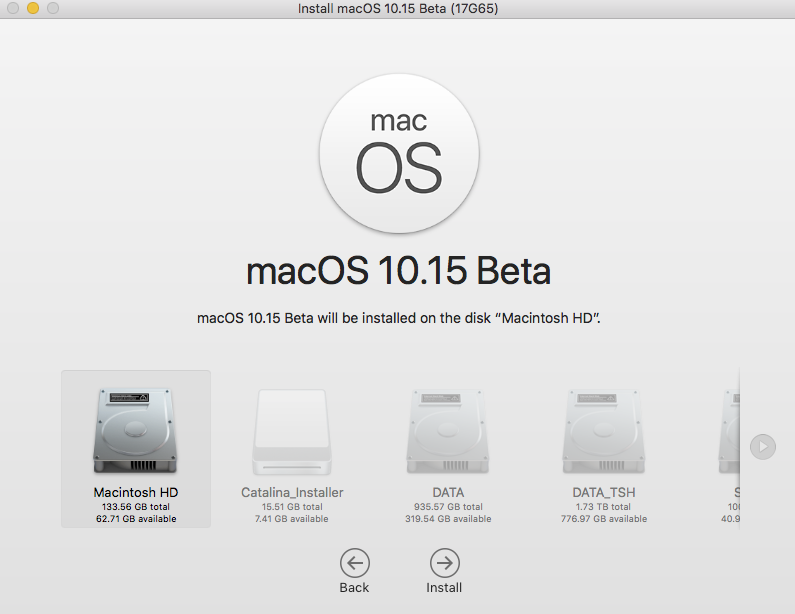
Patch Catalina or Mojave macOS Installer App for Unsupported Machines Often for economic reasons, Apple prevents the Installer.app for its latest macOS from installing on older machines perfectly capable of running it eg macOS 10.14 Mojave on Unsupported Macs Thread. In Mojave 10.14, @ASentientBot posted a method to patch the distribution file in OSInstall.mpkg to enable the Mojave installer to install on unsupported machines (with or without graphics card metal support). In Catalina 10.15beta, the above method no longer works since Apple is checking OSInstall.mpkg for its file signature and the mandatory requirement in Catalina to install to 2 separate apfs volumes necessitates using the original Catalina macOS Base System Installer. Fortunately, it is still possible to substitute High Sierra’s Apple Signed OSInstall.mpkg inside the Catalina or Mojave InstallESD.dmg by making it R/W. The procedure below will allow Macs or Hacks able to install High Sierra to also install Catalina or Mojave (eg SMBIOS MacPro5,1, iMac11,3, MacBook Pro7,1 which have been unsupported in macOS 10.14.x and 10.15beta) -credit to @ASentientBot's post. Prerequisites 1. Mac or Hack capable of and running High Sierra 10.13.x 2. An original, untouched copy of OSInstall.mpkg from High Serra InstallESD.dmg - attached OSInstall_10.13.6.mpkg.zip save to your ~/Downloads folder 3. macOS Installer App eg for Catalina beta or Mojave downloaded to /Applications 4. Add NVRAM boot arg (or Clover config.plist boot arg on a hack) -no_compat_check to enable system to boot to final completed Mojave or Catalina install. Procedure 1. Open Terminal and type the following open /Applications/Install*/Contents/SharedSupport/InstallESD.dmg (assuming the Catalina or Mojave Installer App is in /Applications) 2. Open Disk Utility, click File|New Image|Image from ‘InstallESD” 3. Save as read/write image, no encryption in /Applications 4. Unmount InstallESD in DU by clicking the "eject" icon next to it 5. Open the R/W InstallSD.dmg in /Applications and replace Catalina’s/Mojave's OSInstall.mpkg with High Sierra’s version by typing in terminal open /Applications/InstallESD.dmg cp ~/Downloads/OSInstall_10.13.6.mpkg /Volumes/InstallESD/Packages/OSInstall.mpkg 6. Unmount InstallESD in DU by clicking the "eject" icon next to it 7. Replace original Catalina/Mojave InstallESD.dmg with our patched one, making a backup of the original. In terminal, type sudo mv /Applications/Install*/Contents/SharedSupport/InstallESD.dmg /Applications/InstallESD_orig.dmg sudo mv /Applications/InstallESD.dmg /Applications/Install*/Contents/SharedSupport/ 8. Test the newly patched installer!…
 1 point
 -
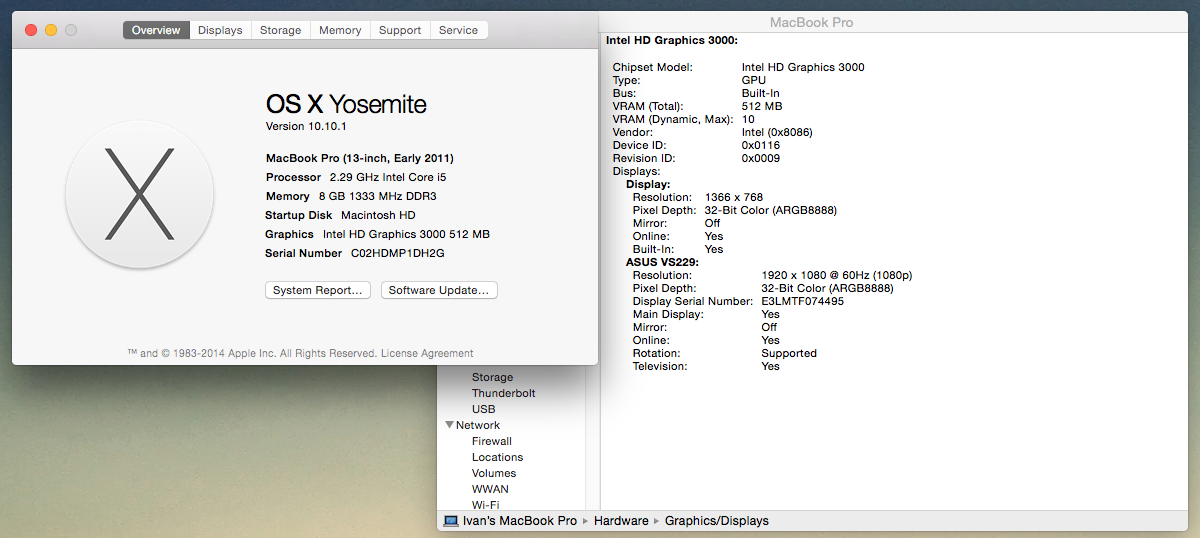
Hi all I got an ASUS U41SV with a discrete NVIDIA graphics card, and I have reached a solution to disable it in OS X. Spec of the laptop CPU: Intel Core i5-2410M 2.3 GHz Memory: 8GB DDR3 1333 MHz Chipset: Intel HM65 Graphics: Intel HD3000 + NVIDIA GeForce GT540M Display: 14" 1366 x 768 Audio codec: Realtek ALC269 WiFi: Atheros 9285 OS X Configuration Niresh's distro of Yosemite A whole SSD reserved for OS X Chameleon bootloader SMBIOS: MacBookPro8,1 (13-inch, Early 2011) Updated to 10.10.1 via App Store Disabling Optimus The guide here does not fit this laptop, but after some modifications, it works on U41SV. I first extracted DSDT under Windows with AIDA64 Back to OS X, I used MaciASL to edit the DSDT extracted from Windows At the begging of the file, I added the following line: // ... DefinitionBlock ("iASLnv4Cgf.aml", "DSDT", 1, "_ASUS_", "Notebook", 0x00000000) { // the line below was added External (\_SB_.PCI0.PEG0.GFX0.SGOF, MethodObj) // ... Then I added the following method before Method (_WAK, 1, Serialized) // ... Method (M_OF, 0, NotSerialized) { If (CondRefOf (\_SB.PCI0.PEG0.GFX0._OFF)) { \_SB.PCI0.PEG0.GFX0._OFF () } If (CondRefOf (\_SB.PCI0.PEG0.GFX0._PS3)) { \_SB.PCI0.PEG0.GFX0._PS3 () } If (CondRefOf (\_SB.PCI0.PEG0.GFX0.SGOF)) { \_SB.PCI0.PEG0.GFX0.SGOF () } } // ... Then called the method M_OF in the method _WAK // ... Method (_WAK, 1, Serialized) { M_OF () // calling M_OF () WAK (Arg0) Return (Package (0x02) { Zero, Zero }) } // ... And called the method M_OF again in the method _INI // ... Scope (_SB.PCI0) { Method (_INI, 0, NotSerialized) { Store (0x07D0, OSYS) M_OF () // calling M_OF () If (CondRefOf (\_OSI, Local0)) { If (_OSI ("Linux")) { Store (0x03E8, OSYS) } // ... Finally clicked compile in MaciASL, and saved the DSDT as /Extra/DSDT.aml And now NVIDIA Optimus is disabled. Edit: HDMI output working, VGA untested, able to adjust brightness of built-in display And here is my edited DSDT. ASUS-U41SV-DSDT.aml.zip Credits Thanks to Whit3Spirit for the guide here
 1 point
 -
Anyone have any suggestions on getting the AHCI Controller for a Asus Z9PE-D8 WS to work in beta 2? It’s a C602 Chipset.0 points