Leaderboard


Popular Content
Showing content with the highest reputation on 03/26/2019 in Posts
-
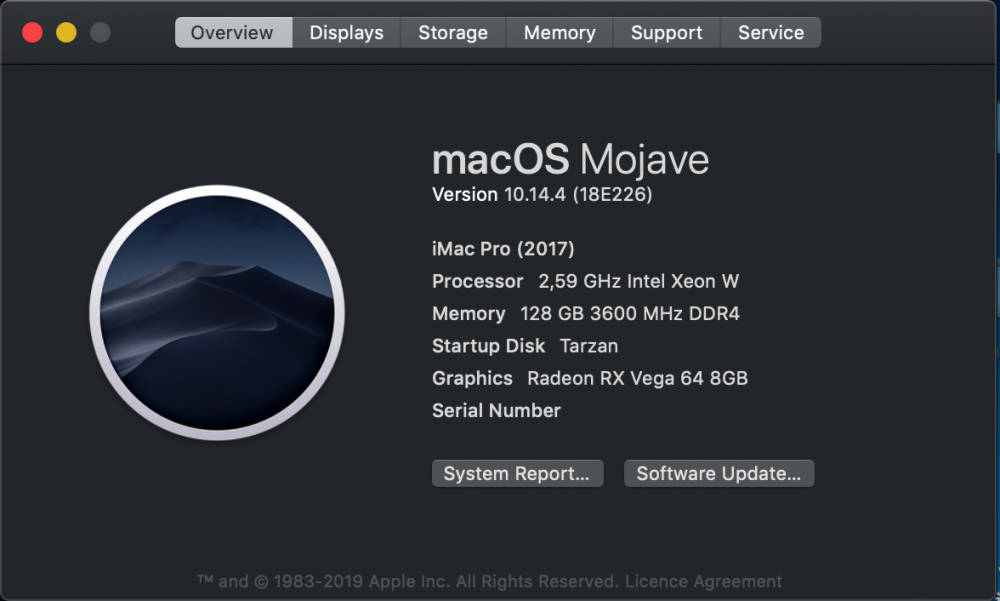
The macOS Mojave 10.14.4 update adds support for Apple News+, includes bug fixes and improvements, improves the stability and reliability of your Mac, and is recommended for all users. Apple News+ Apple News+ is a new subscription service that extends the Apple News experience with hundreds of magazines and top newspapers Our editors handpick top articles and magazine issues, and you also get personalized recommendations on the topics most interesting to you Automatic downloads make it easy to read magazine issues offline Apple News is now available in Canada, with a free experience that includes handpicked Top Stories, a personalized Today feed, and support for both English and French Apple News+ is available in the U.S. and in Canada, with dozens of additional Canadian magazines Safari Adds Dark Mode support for websites that support custom color schemes Streamlines website login when filling credentials with Password AutoFill Allows push notification prompts only after interacting with a website Adds a warning when an insecure webpage is loaded Removes support for the expired Do Not Track standard to prevent potential use as a fingerprinting variable; Intelligent Tracking Prevention now protects against cross-site tracking by default iTunes Shows more editorial highlights on a single page in the Browse tab, making it easier to discover new music, playlists, and more in Apple Music AirPods Adds support for new AirPods (2nd generation) More Supports Air Quality Index in Maps for US, UK and India Improves the quality of audio recordings in Messages Supports real-time text (RTT) for phone calls made through a nearby iPhone on Mac Provides enhanced support for external GPUs in Activity Monitor Fixes an App Store issue that may have prevented adoption of the latest versions of Pages, Keynote, Numbers, iMovie, and GarageBand Improves the reliability of USB audio devices when used with MacBook Air, MacBook Pro and Mac mini models introduced in 2018 Corrects the default screen brightness for MacBook Air (Fall 2018) Fixes a graphics compatibility issue that may occur on some external displays connected to Mac mini (2018) Resolves Wi-Fi connection issues that may occur after upgrading to macOS Mojave Fixes an issue where re-adding an Exchange account may cause it to disappear from Internet Accounts Fixes an issue where AOL user passwords may be frequently requested in Mail Update Combo View full article
 6 points
 -
4 points
-
ola... feito... c.frio
 2 points
 -
here is the 10.14.4 DVMT patch: Haswell 4th:AppleIntelFramebufferAzul.kext Kext: com.apple.driver.AppleIntelFramebufferAzul Find: 763548FF 05A22005 Repl: EB3548FF 05A22005 Comment: Disable minStolenSize less or equal fStolenMemorySize assertion, 10.14.4 (based on Austere.J patch by Ricky) 复制代码 Broadwell 5th :AppleIntelBDWGraphicsFramebuffer.kext Kext: com.apple.driver.AppleIntelBDWGraphicsFramebuffer Find: 762E48FF 05778907 Repl: EB2E48FF 05778907 Comment: Disable minStolenSize less or equal fStolenMemorySize assertion, 10.14.4 (based on Austere.J patch by Ricky) 复制代码 Skylake 6th:AppleIntelSKLGraphicsFramebuffer.kext Kext: com.apple.driver.AppleIntelSKLGraphicsFramebuffer Find: 764048FF 05008F07 Repl: EB4048FF 05008F07 Comment: Disable minStolenSize less or equal fStolenMemorySize assertion, 10.14.4 (based on Austere.J patch by Ricky) 复制代码 Kabylake 7th:AppleIntelKBLGraphicsFramebuffer.kext Kext: com.apple.driver.AppleIntelKBLGraphicsFramebuffer Find: 764648FF 05132009 Repl: EB4648FF 05132009 Comment: Disable minStolenSize less or equal fStolenMemorySize assertion, 10.14.4 (based on Austere.J patch by Ricky) 复制代码 Coffelake 8th:AppleIntelCFLGraphicsFramebuffer.kext Kext: com.apple.driver.AppleIntelCFLGraphicsFramebuffer.kext Find: 764648FF 051F1B09 Repl: EB4648FF 051F1B09 Comment: Disable minStolenSize less or equal fStolenMemorySize assertion, 10.14.4 (based on Austere.J patch by Ricky)2 points
-
Yep, i will update my rig on the last Mojave update 10.14.6 or 10.14.7. For now, i stay on 10.14.3. Cheers sent from my iPhone2 points
-
2 points
-
9 minutes too slow to report the final version of 10.14.4. Good job Wayang-NT!2 points
-
AMD OS X is proud to announce that native macOS is available on Ryzen CPUs thanks to AlGrey. No need to use a patched kernel/prelinkedkernel. This is currently being classed as beta support and other CPUs are being worked on. https://github.com/AMD-OSX/AMD_Vanilla1 point
-
Installing macOS® Sierra® on Gigabyte GA-Z170X-Gaming 5 rev 1.0 Intel® Core i7 6700K nVidia® Graphics Maxwell® or Pascal® Disclaimer: This guide will assume that you know what you are doing and also assumes that you have already made a backup of your data before making any changes to your hardware or software. If you have not made a backup STOP HERE! and create one. I will not be held responsible for any data loss or any damage you might cause to your computer in the process of installing macOS® on your computer. By following this guide, you acknowledge that installing Mac OS X® and macOS® on any hardware that is not produced by Apple® is illegal and you will be responsible if you break any laws. All the trademarks and copy rights belong to their respective owners. This guide is only for your personal use and your information, therefore if you break any laws by using this manual you will be responsible for it not me. Any commercial use of the contents of this guide is prohibited. If I forget to mention your name or someone else’s name in the credits section forgive my negligence and feel free to contact me and I will add your name/s. This guide is written specifically for the hardware specifications I’m using, but the principal in general might apply to other hardware with similar specs with the exception of DSDT and SSDT files. Important Notes: 1. Always backup your data before making any changes to your hardware or software. 2. Always keep a bootable Clover USB disk with the latest working configurations just in case. 3. I suggest you use another bootable USB for testing and not to edit the EFI folder on the hard drive. 4. Preferably use the latest BIOS (F21 at the time of writing) version and the latest version of Clover EFI bootloader (4077 at the time of writing). 5. There are two main versions of Clover EFI bootloader available in this package. One for the users with a nVidia GPU and the other one is for the users with IntelHD 530 GPU. 6. So many parts of this tutorial are universal and they apply to all Hackintosh and Apple computers, like creating the Bootable USB disk drive or mounting the EFI partition. So, you can use them on all the computers that run macOS or even use them for installing macOS on other Hackintosh computers. 7. The config.plist, the DSDT.aml file and the SSDT tables are specifically created for the GA-Z170X-Gaming 5 motherboard so do not use them on other hardware because they simply won’t work or even if they do you might experience some problems and errors. 8. This tutorial is based on my personal experience. So, you might need to make some extra adjustments. Downloading the macOS® Sierra installer from App Store: Download the version of macOS® you want to install on your computer from App Store, macOS® Sierra. For downloading the macOS® installer you’ll need an Apple® computer or a working Hackintosh and a valid Apple ID. Although downloading macOS® Sierra® doesn’t require an Apple ID but if you are going to use your Hackintosh for day to day use you’re going to need a valid Apple ID. You can download the macOS® Sierra® installer by using the link below: macOS® Sierra® 10.12.5: https://itunes.apple.com/us/app/macos-sierra/id1127487414?mt=12&ls=1 You can also use App Store directly for downloading it. The “Install macOS® Sierra.app” will be saved to the following path once downloaded: /Applications/ Creating bootable USB Disk for macOS®: Plug in a USB flash drive (8Gb or larger) and launch disk utility to format the flash drive. To create a bootable USB drive for macOS®, everything must be exactly as shown in the picture below. Once you successfully formatted the flash drive, open Terminal from /Applications/Utilities: Copy and paste the following command into terminal without the “”: For macOS® Sierra®: “sudo /Applications/Install\ macOS\ Sierra.app/Contents/Resources/createinstallmedia --volume /Volumes/Untitled --applicationpath /Applications/Install\ macOS\ Sierra.app —nointeraction” Press return/enter to run the command. You’ll be asked to give your password and once you type your password press return/enter and the process will start. Depending on the speed of the USB drive you are using it will take about 5 to 30 minutes to complete the process. It took about 5 minutes on my computer to create the bootable disk on a USB 3.0 flash drive. How to mount the EFI partition using command line: Launch the terminal application again if you closed it previously. Type “diskutil list” and press return/enter You’ll see list of all the Internal and the external hard drives Type “diskutil mount /dev/diskXsX” and press return/enter First X is the number of the disk and the second X is the number of the partition In this case the command will be: e.g. diskutil mount /dev/disk2s1 Now you can see the EFI partition of disk6 is mounted on the desktop, if you can’t see the partition on the desktop you can find it in finder window’s “Sidebar” under “Devices” BIOS Settings: Now it’s time to configure the BIOS before installing macOS®. First of all, it’s better to “Load Optimized Defaults” settings on the BIOS so we could start from scratch without having any misconfigurations. You need to make the following changes to get macOS® working on your pc: BIOS: Fast Boot = Disabled Windows 8/10 = Windows 8/10 WHQL or Other OS CSM Support = Disabled Secure Boot = Not Active Attempt Secure Boot = Disabled Peripherals Initial Display Output = PCIe 1 Slot (Only If you are using a nVidia GPU, if you are using an AMD GPU you’ll need to enable IGFX and set it to primary in order to boot into macOS® Sierra®) Trusted computing, Security Device Support = Disable Super IO Configuration, Serial IO = Disable USB Configuration, Legacy USB Support = Enabled USB Configuration, XHCI Hand-off = Enabled USB Configuration, USB Mass Storage Drive Support = Enabled USB Configuration, Port 60/64 Emulation = Enabled SATS And RST Configuration = AHCI Chipset VT-d = Disabled (If you need it add “dart=0” flag to config.plist under Boot section) Internal Graphics = Disabled (Only If you are using a discreet GPU if you are using an AMD GPU you’ll need to enable IGFX and set it to primary in order to boot into macOS® Sierra®) In Chipset, IOAPIC 24-119 Entries = Disable If you are using Intel Graphics or IGFX In Chipset, Internal Graphics = Enabled In Chipset, DVMT Pre-Allocated = set it to 64 In Chipset, DVMT Total Gfx Mem = set it to max Save and Exit. Installing Clover EFI Bootloader: In order to boot successfully into macOS® you’ll need to install a Bootloader on the drive you are using as the main bootable device whether is a flash drive or a hard disk drive. There are number of bootloaders that could be used to boot up the macOS® on a PC computer or a Hackintosh but we will only use Clover EFI Bootloader and here is how to properly install and configure Clover EFI Bootloader on your computer. In this section, we will be installing the UEFI version of the Clover so if you are using the Legacy BIOS version for whatever reason this guide is not for you. You can download the latest version of Clover EFI Bootloader from: https://sourceforge.net/projects/cloverefiboot/ As I mentioned before in the first page of this manual the latest version of the Clover EFI Bootloader is Clover_v2.4k_4077. Stage 1: Once you have downloaded the bootloader double click the installer package to start the installation process. The process will only take few minutes and after that you need to customize or optimize the contents of the EFI partition which you’ve installed clover into. Please make sure you select the USB drive you created earlier as shown below and not the HDD of the computer you are using. If you see the following dialog after double clicking the installer package, all you need to do is to right click on the Clover_v2.4k_r4077.pkg and from the menu select open and once more click the open button. Click continue and read the “Important Information” or not and then click continue once more. You need to select the location that you want to install Clover EFI Bootloader to. Make sure that you are installing clover to the right location, basically you must choose the drive that you have installed macOS® Sierra® onto unless you want to install the bootloader on another drive, say a flash drive. Now you need to customize which components of the bootloader to be installed, if not you won’t be able to boot into macOS® at all. Check the following items and then click install: 1. Install for UEFI booting only (Unified Extensible Firmware Interface) 2. Install Clover in the ESP (EFI System Partition) or (Extensible Firmware Interface System Partition) 3. Install can also choose a theme for your clover bootloader and the CloverThemeManager.app to change or modify the themes later. 4. Install Drivers64UEFI that apply to your system you will need at least these two drivers: 1. EmuVariableUefi-64 2. OsxAptioFix2Drv-64 You can also choose other drivers if they apply to your computer and if you need them, otherwise you’re good to go. 5. You can also install the RC script on the target volume to enable the shell command prompt in clover’s boot screen. Once the installation is started, the EFI partition of the hard disk or USB drive that you are installing clover to will be mounted on the desktop, if you can’t see the partition on the desktop you can find it in the finder window’s “Sidebar” under “Devices” Stage 2: In this stage, you need to configure the config.plist and the other components on the EFI partition either by modifying the config.plist inside the /EFI/Clover/ folder using “TextEdit” or any other text editor application that you like or using “Clover Configurator” (recommended) application which has a GUI for editing the config.plist and it has some other useful built-in apps such as EFI mounter or a Base64 to HEX converter etc. or you can just simply replacing the “Clover” folder with the one that is provided with this guide. At this moment you might not be familiar with all the settings and options inside the config.plist file and Clover Configurator, no need to worry. You can easily replace the whole “Clover” folder inside the “EFI” folder on the EFI partition of your bootable disk (hard disk drive or USB flash drive) with the folder included with this guide and you’ll be good to go as along as your main components specifically your CPU and GPU are the same as mine. Otherwise you might need some additional settings and flags to be added to the config.plist. For instance, if you are using a NVMe SSD disk drive you’ll need to add proper patches in order to get it to work. You can find more about clover and its settings at: https://clover-wiki.zetam.org/Home and you can find “Clover Configurator” at: http://mackie100projects.altervista.org How to enable kext using Clover EFI Bootloader: In this section I will briefly explain how to install kexts that are needed to make your macOS® work more properly and efficiently. As you know all the hardware components in a computer need a so called “Driver” to operate correctly in the operating system. The same principle applies to macOS® and Mac OS X®. We call them “Kext” files or “Extension” files. By default, Apple provides all the required kext files with the operating system to run on a legitimate Apple computer. On the other hand, on a Hackintosh you need to install some extra kext files created by the community to obtain full functionality of your computer. You can either install them directly to “System/Library/Extensions” folder of macOS® Drive or you can place them into the EFI folder on the EFI partition of your bootable drive, which is a better way because if those files are the modified version of an original kext file that Apple is provided after each major update they will be replaced is the OS and you’ll lose the functionality of that particular component or more components. For example, Maxwell and Pascal GPUs have the “Boot to black screen” issue with some SMBIOS settings like iMac17,1, iMac15 and MacPro 6,1 system definitions. It means if you use one of those system definitions your computer will show a black screen after loading macOS® even after installing the nVidiaWebDrivers. So, you’ll need to either change the SMBIOS definition or you need to patch the “AppleGraphicsDevicePolicy.kext” to avoid the black screen. Once you patch the file with whatever method, if you install macOS® update you’ll need to apply the patch all over again. Besides changing the system files in macOS® will mix up the file permission of the files and if it’s not properly installed or if you forget to fix the permission of the files you might render the whole operating system useless and you’ll need to either fix the permissions on the /System/Library/Extensions or for short /S/L/E or you might need to reinstall the whole operating system from scratch. For each version of macOS®, there is a folder inside the following path: /EFI/Clover/kext/ So, you can copy the kexts you need inside the folder that correlates with the version of macOS® you are using. Even if you update the OS, the files inside that path won’t get changed. How to properly adding kext file to /System/Library/Extensions: There are several ways to install additional kexts on macOS, but I will only discuss two methods that are the easiest ways to install kext without having to type any commands in terminal. Using Kext Utility: By using kext utility you can easily install kext files inside /System/Library/Extension. All you have to do is to open the Kext Utility app, type in your password and drag the kext file you want to install into the app’s window and it will install them in to the path give above. The good thing about this app is that it will automatically repairs the permission of the /System/Library/Extension folder and the kext files inside it. Once the process is done you can reboot the system and see the results. Kext Wizard: Kext wizard is another handy tool with more functions built into it, you can select the path for installing the kexts files even to another operating system on another volume. You can repair the permissions and rebuild system kext cache. You can even load kexts files and test them or list the kext that are already loaded in the system. Post Installation: To have a fully functional Hackintosh you need to add the following kext files and DSDT/SSDT files and tables. Kexts: FakeSMC.kext https://bitbucket.org/RehabMan/os-x-fakesmc-kozlek/downloads/ Audio: AppleALC.kext https://github.com/toleda/audio_CloverALC Lilu.kext https://github.com/vit9696 CodecCommander.kext v2.4.0 for Audio after sleep https://bitbucket.org/RehabMan/os-x-eapd-codec-commander/downloads/RehabMan-CodecCommander-2015-0522.zip Note: Install CodecCommander.kext v. 2.4.0 inside /System/Library/Extensions/ and set darkwake=8 in config.plist to solve the audio after sleep issue. I tried installing it inside /EFI/Clover/kexts/10.12 and /EFI/Clover/kexts/Other and it didn’t work. I also tried other versions of CodecCommander.kext but none of them worked except for the v. 2.4.0. If you don’t want to use Lilu.kext and AppleALC.kext and see the read the “Other methods for activating audio section”. realtekALC.kext with https://github.com/toleda/audio_RealtekALC/blob/master/audio_realtekALC-120.command.zip audio_cloverHDMI-120_v1.0d.command for HDMI Audio: https://github.com/toleda/audio_CloverHDMI/blob/master/audio_cloverHDMI-120.command.zip Ethernet: AppleIntelE1000e.kext https://sourceforge.net/projects/osx86drivers/files/Kext/Snow_or_Above/AppleIntelE1000e.kext.zip/download or IntelMausiEthernet.kext https://bitbucket.org/RehabMan/os-x-intel-network/downloads/RehabMan-IntelMausiEthernet-v2-2017-0321.zip Graphics: IntelGraphicsFixup.kext https://sourceforge.net/projects/intelgraphicsfixup/ if you are using the Intel Integrated Graphics Lilu.kext https://github.com/vit9696 NVidaiGraphicsFixup.kext https://sourceforge.net/projects/nvidiagraphicsfixup/ USB 3.0 USBInjectAll.kext https://bitbucket.org/RehabMan/os-x-usb-inject-all/downloads/RehabMan-USBInjectAll-2017-0517.zip Note: I also tested the system without USBInjectAll.kext and all my USB 2.0 and USB 3.0 ports were fully functional so it’s up to you whether to use it or not. VERY IMPORTANT NOTE: Before you start using macOS® Sierra®, you need to change the SMBIOS of the config.plist: You have to change the SMBIOS settings before starting to use macOS® Sierra®, because the config.plist that is included in this guide doesn’t have a serial number for your Hackintosh, so you won’t be able to use any of Apple’s services without a serial number and a hardware UUID. It’s imperative to do so specially if you are going to use your Hackintosh for daily use. If you don’t change the serial number you won’t be able to use App Store, iCloud, iMessage etc. It’s highly recommended that you use iMac 17,1 SMBIOS as your default. iMac 17,1 and iMac 17,2 models use Skylake processors in Apple's original iMacs. For changing the SMBIOS you can use the built-in wizard inside “Clover Configurator” under SMBIOS Section. To open the wizard, click the small magic wand on the right side of the window to use the wizard. Audio: By using the EFI folder included with this guide and by using the patched DSDT/SSDT tables, “AppleALC.kext” and “Lilu.kext” you won’t need to do much to make the audio active on your Hackintosh. Just install the macOS® Sierra®, copy the EFI folder and audio is activated by default, HDMI audio will be active once you install nVidiaWebDrivers and restart the computer. If the audio didn’t work, you can rebuild prelinked kernel and kexts cache by using the following commands in terminal: 1. sudo nvram -c 2. sudo purge 3. sudo rm -f /System/Library/Caches/com.apple.kext.caches/Startup/kernelcache && sudo touch /System/Library/Extensions && sudo kextcache -u / sudo update_dyld_shared_cache -force Or you can use “Kext Utility” to repair permissions on /System/Library/Extensions and /Library/Extensions and also it will also rebuilds the system cache for you. Kext Utility could be found at: http://www.insanelymac.com/forum/index.php?app=core&module=attach§ion=attach&attach_id=186603 Note: If you see the following output in terminal it means that you forgot to mount the EFI partition, mount it and run the command again. Other methods for activating the Audio: 1. audio_codecdetect.command This command will give you useful information about the audio chipsets and devices that are available on the system, after you run the command, the output will be like this: This means that the audio chipset is supported and you can go to the next step of installing the audio using Toleda's scripts. 2. audio_cloverALC-120_v1.0f3.command Type in the password and press return/enter All you need to do now is to reboot the system and you’ll have audio! 3. HDMI Audio For activating the HDMI Audio for you need to run audio_cloverHDMI-120.command This command will detect the audio codec for you integrated graphics and discrete GPU and will add the proper SSDT table to /EFI/Cover/ACPI/patched folder Audio Troubleshooting: If after running the audio_cloverHDMI-120_v1.0d.command you see the following statement It means you either don’t have a patched DSDT.aml file or SSDT tables and no patches are present inside the config.plist so you need to either add the DSDT/SSDT tables or add patches yourself. Don’t be alarmed it’s so easy. Open clover configurator and after mounting the EFI partition, open the config.plist and add the following patch : Under ACPI, DSDT patches select “change HDAS to HDEF” from “List of Patches” and this will add the following code in the config.plist </dict> <key>Comment</key> <string>change HDAS to HDEF</string> <key>Disabled</key> <false/> <key>Find</key> <data> SERBUw== </data> <key>Replace</key> <data> SERFRg== </data> </dict> or Comment: change HDAS to HDEF Find*[HEX] 48444153 Replace*[HEX]48444546 Graphics: This section will be dedicated to nVidia GPUs specially Maxwell and Pascal. If you are using any other nVidia or AMD graphics you can skip this section. We tested these instructions on an EVGA 1070 Superclocked GPU and a Gigabyte nVidia GeForce GTX960 GAMING-4GB (Please include the brand for reference). As you might know the 10 series nVidia GPUs or Pascal are not compatible with Mac OS X El Capitan and earlier versions of macOS® but 9 series and Maxwell are compatible and they both need nVidiaWebDrivers to be fully functional. For macOS® Sierra® 10.12.5 you’ll need to download 378.05.05.15f01 https://images.nvidia.com/mac/pkg/378/WebDriver-378.05.05.15f01.pkg Solution 1: If you are looking for an easy way to get the GPU working all you have to is to copy the Lilu.kext and nVidaiGraphicsFixup.kext inside the kext folder in clover EFI bootloader. The full path is /EFI/Clover/kext/10.12 Once you finished installing macOS® and nVidiaWebDrivers you’ll need to add the following flags and setting to the config.plist Under “Boot” section add or remove nvda_drv=1 if necessary. I don’t need to use it on my computer. You don’t need to inject anything in “Graphics” section Under “System Parameters” check “NvidiaWeb” When installing Clover EFI bootloader under “Drivers64UEFI” install “EMUVariableUefi-64” // I also use OsxAptioFix2Drv.efi, never tested without it. and that’s it! Solution 2: If you don’t want to use nVidaiGraphicsFixup.kext you only have two options: 1. Run AGDP-fix.app to edit the “AppleGraphicsDevicePolicy.kext” to fix “Boot to Black Screen” issue 2. Or you can edit the “AppleGraphicsDevicePolicy.kext” manually using terminal. If you choose the second solution for any reason remember after each major update you need to apply the patch all over again. Wi-Fi: TP-Link WDN4800 works out of the box without any hassle. The only problem that you might encounter with it is "ATHR: unknown locale: 21" error in the verbose boot. The Atheros patch is to avoid the series of "ATHR: unknown locale: 21" messages in the verbose boot which they will be registered in message console's logs and they will make the log file bigger. The patch will fix the WiFi location and will stop the error and therefore there will be no more logs. Without the patch, the WiFi will work just the same but with lots of messages in the log. If you don’t use the TP-Link WDN4800 you can remove the patch or simply leave it as disabled. USB 3.0: Under Kernel and Kext Patches add the following to “KextsToPatch”: This patch will raise the limit of the USB ports from 15 to 26. For macOS® Sierra Name*: AppleUSBXHCIPCI Find* [HEX] : 83bd74ff ffff10 Replace [HEX] : 83bd74ff ffff1b Comment: Raise change 15 port limit to 26 in XHCI kext (100-series) MatchOS: 10.12.x You also might need to add RehabMan’s “USBInjectAll.kext” to the following path under “/EFI/Clover/kexts/10.12” for macOS® Sierra Note: If you are using a patched DSDT or SSDT tables you don’t need to use any DSDT patches in clover and the “USBInjectAll.kext” you will have full functional USB 2.0 and USB 3.0 ports. I didn’t test USB 3.1 ports because I have no USB 3.1 device to test it! The port limit patch must only be temporary, you will need to create your own custom SSDT-UIAC to only inject the ports you use. Custom SSDT-UIAC: A quick rundown on how to create a custom SSDT-UIAC. Add the following patch to your config.plist if you don’t already have the patch. <dict> <key>Comment</key> <string>change 15 port limit to 26 in XHCI kext (100-series)</string> <key>MatchOS</key> <string>10.12.x</string> <key>Name</key> <string>com.apple.driver.usb.AppleUSBXHCIPCI</string> <key>Find</key> <data>g710////EA==</data> <key>Replace</key> <data>g710////Gw==</data> </dict> or Name*: AppleUSBXHCIPCI Find* [HEX] : 83bd74ff ffff10 Replace [HEX] : 83bd74ff ffff1b Comment: Raise change 15 port limit to 26 in XHCI kext (100-series) MatchOS: 10.12.x The USBInjectAll.kext provided in this guide needs to be and stay installed. Download ioregistryexplorer Version 3.0.3 from http://mac.softpedia.com/get/System-Utilities/IORegistryExplorer.shtml or download IOJones which is an alternative to IORegistryExplorer at: https://sourceforge.net/projects/iojones/ Download MaciASL from https://bitbucket.org/RehabMan/os-x-maciasl-patchmatic/downloads/RehabMan-MaciASL-2017-0117.zip and extract, drag MaciASL.app into /Applications. (Credit RehabMan) Download OS-X-USB-Inject-All Master from: (Credit RehabMan) https://github.com/RehabMan/OS-X-USB-Inject-All/archive/master.zip and extract the zip file. Inside the OS-X-USB-Inject-All-master folder you will find SSDT-UIAC-ALL.dsl, copy it to your desktop. Open ioregistryexplorer and find your device id by typing XHC in the search field. Open SSDT-UIAC-ALL.dsl with MaciASL and find your appropriate device id section. Remove all other sections in the SSDT-UIAC-ALL.dsl that do not correspond with your device id leaving just the one section. Skylake does not have a EHCI controller so “HUB1”, ”HUB2”, ”EH01”, "EH02" can be removed and in my case I can also remove "8086_1e31", "8086_8xxx", "8086_9xxx", "8086_9cb1", "8086_9d2f" and "8086_a2af". Compile the file to make sure there are no errors in the code and then save the file with “ACPI Machine Language Binary”. Now we turn our attention to ioregistryexplorer, while you have ioregistry open go to the XHC section and take note of the HSxx or SSxx locations that have devices attached. Now plug in a USB 2.0 device into all USB 2.0 you NEED and do the same with USB 3.0 ports with USB 2 and 3 devices and take note of them all. Returning back to the SSDT-UIAC-ALL.dsl you will see all ports listed, you need to remove the ones you did not take note of and you can also add a comment to the ones you keep. UsbConnector values = USB 2.0 = 0, USB 3.0 = 3. Internal = 255 USB 2.0 devices plugged into USB 3.0 ports HSxx are still marked as USB 3.0 = 3. Internal devices such as Bluetooth etc are marked as 255 Once you gone through and done this to all the devices you need and removed the ones you don’t you can save your SSDT-UIAC-ALL.dsl in MaciASL. Make sure you rename it to SSDT-UIAC and that the file format is ACPI Machine Language Binary Copy and paste the resulting SSDT-UIAC.aml into your EFI/EFI/CLOVER/ACPI/patched folder. Disable the port limit patch in config.plist and add SSDT-UIAC.aml into SortedOrder if needed. Reboot. Open ioregistryexplorer and test the ports you left enabled USB 2 & 3. The number of ports you should see in ioreg should be significantly reduced as they are not being injected anymore. Special Thanks to: I would like to thank MaLd0n for providing the patched version of DSDT and SSDT tables and SavageAUS for doing such a great work on helping me to write this tutorial and testing the files and also writing the “Custom SSDT-UIAC” section. I also would like to thank: Vit9696 for Lilu.kext RehabMan for CodecCommander.kext FakeSMC.kext, IntelMausiEthernet.kext, USBInjectAll.kext. Toleda for AppleALC.kext, Audio commands and kexts netkas for FakeSMC.kext lvs1974 for IntelGraphicsFixup.kext and NvidiaGraphicsFixup.kext hnak for AppleIntelE1000e.kext Mieze for IntelMausiEthernet.kext apianti, blackosx, blusseau, dmazar, slice2009 for Clover EFI Bootloader http://mackie100projects.altervista.org for Clover Configurator Apple Inc. for macOS® and great many other products. And many other great people whom make Hackintosh possible! The hardware I use in my computer: Gigabyte GA-Z170X-Gaming 5 Intel Skylake Core i7 6700K @ 4.0 GHz 32 GB (4x8 GB) 2666 GSKILL Ripjaws EVGA GTX 1070 SC 8 GB - I switched to AMD RX 580 Dual Display 23.5" Kingston HyperX 240GB SATA III SSD 250 GB Samsun EVO 850 SSD TP-Link WDN4800 PCIe Wireless Network Adapter CoolerMaster Silencio 452 Case CoolerMaster Nepton 120XL Liquid Cooler CoolerMaster V750 Watts Power Supply 2x24" Samsung LED Displays + 32" TV SavageAUS's hardware that was used for testing: Gigabyte GA-Z170X-Gaming 5 Intel Skylake core i7-6700k @ 4Ghz 32Gb (4 x 8Gb) DDR4 3200 G.Skill Ripjaws Gigabyte GTX960 GV-N960WF2OC-4GD 240Gb Intel SSD 240Gb Kingston HyperX Savage SSD TP-Link WDN4800 WiFi Corsair H110i AIO Liquid Cooler Corsair RM850i PSU Corsair 760t Case 24" single display Benq GL2450 Please download the PDF version which includes pictures on this guide. I hope you find this tutorial helpful. Best Regards, Cyberdevs GA-Z170X-Gaming 5 Release 01 DSDT and SSDT nVidia Version.zip GA-Z170X-Gaming 5 Release 01 DSDT and SSDT IntelHD 530 Version.zip Installing macOS Sierra on GA-Z170X-Gaming 5 - Final.pdf IORegistryExplorer_3.0.3.zip Updated Clover folders can be found at this post: Updated Folders for macOS High Sierra Updated Folder For macOS Mojave 10.14 OpenCore 0.6.0 Thanks to @5T33Z0 OC 0.6.3 GA-Z170X-Gaming 5-Big Sur EFI.zip1 point
-
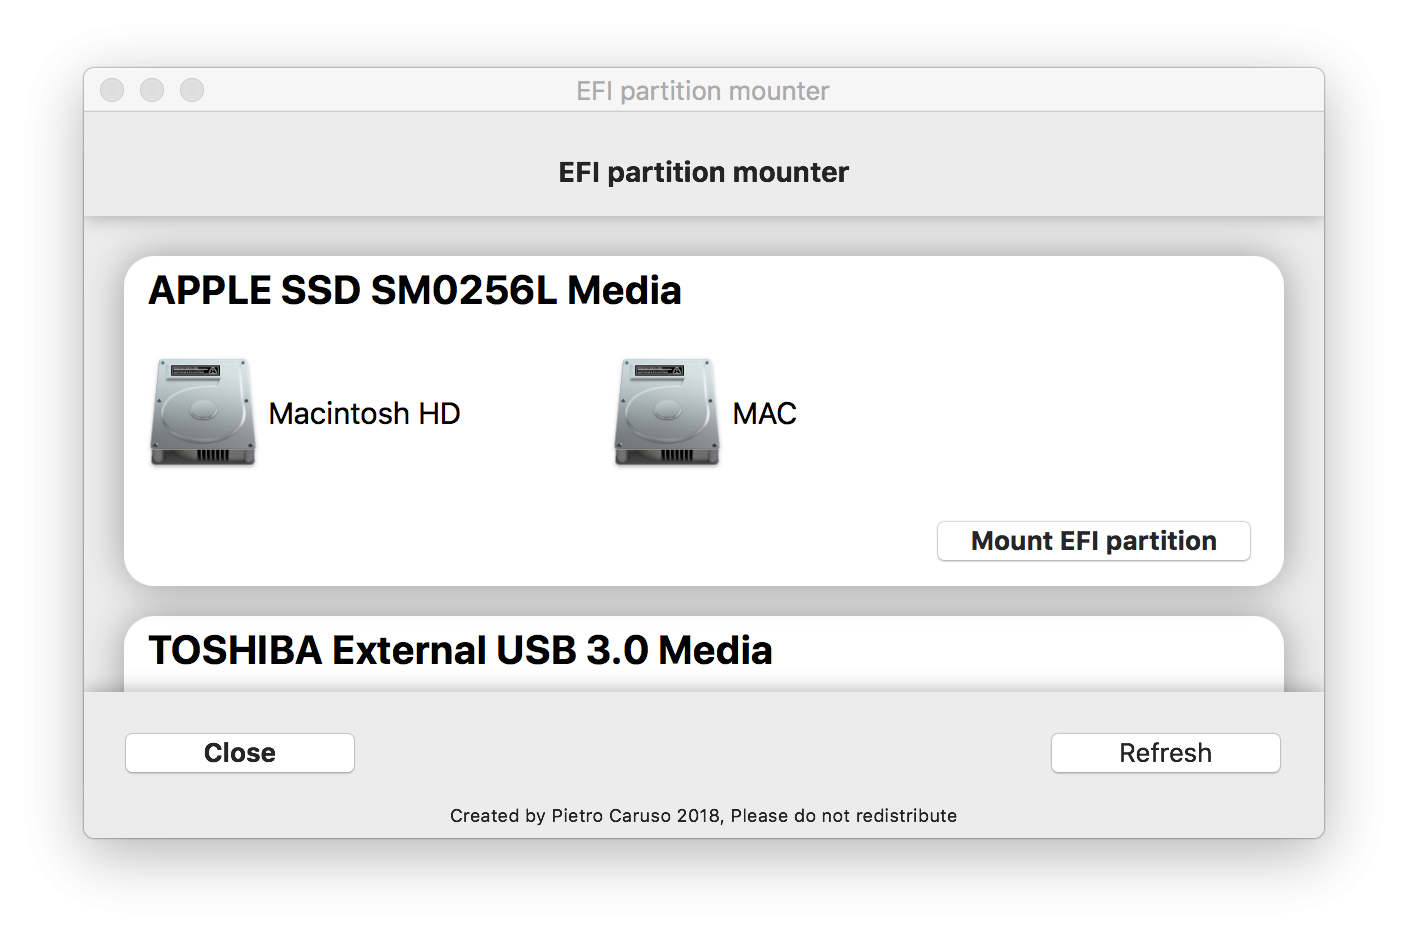
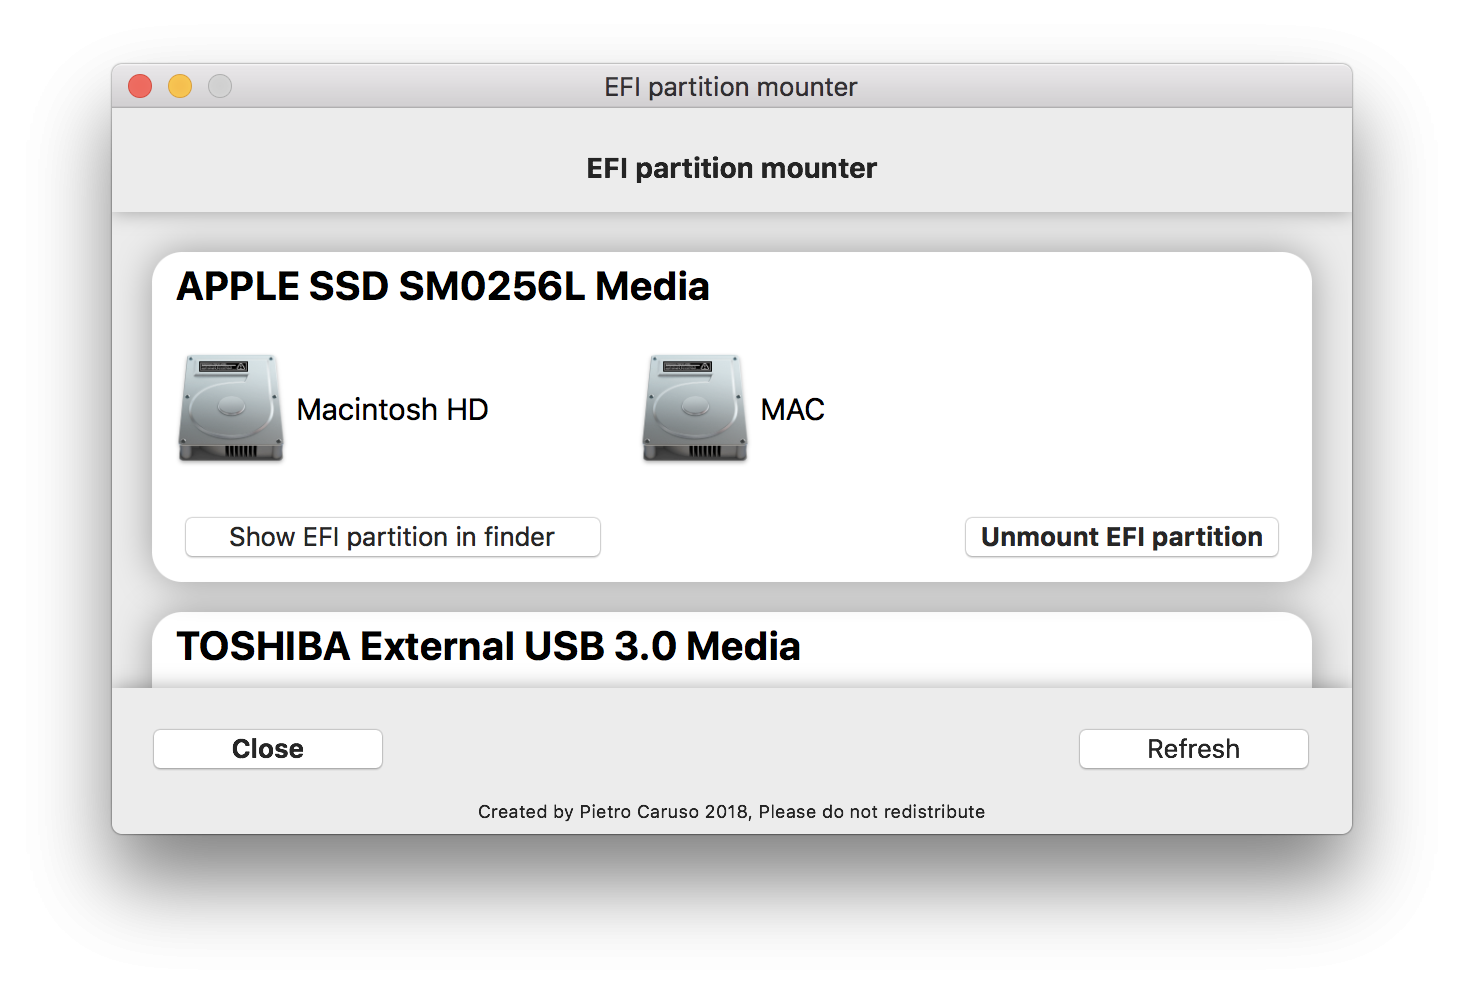
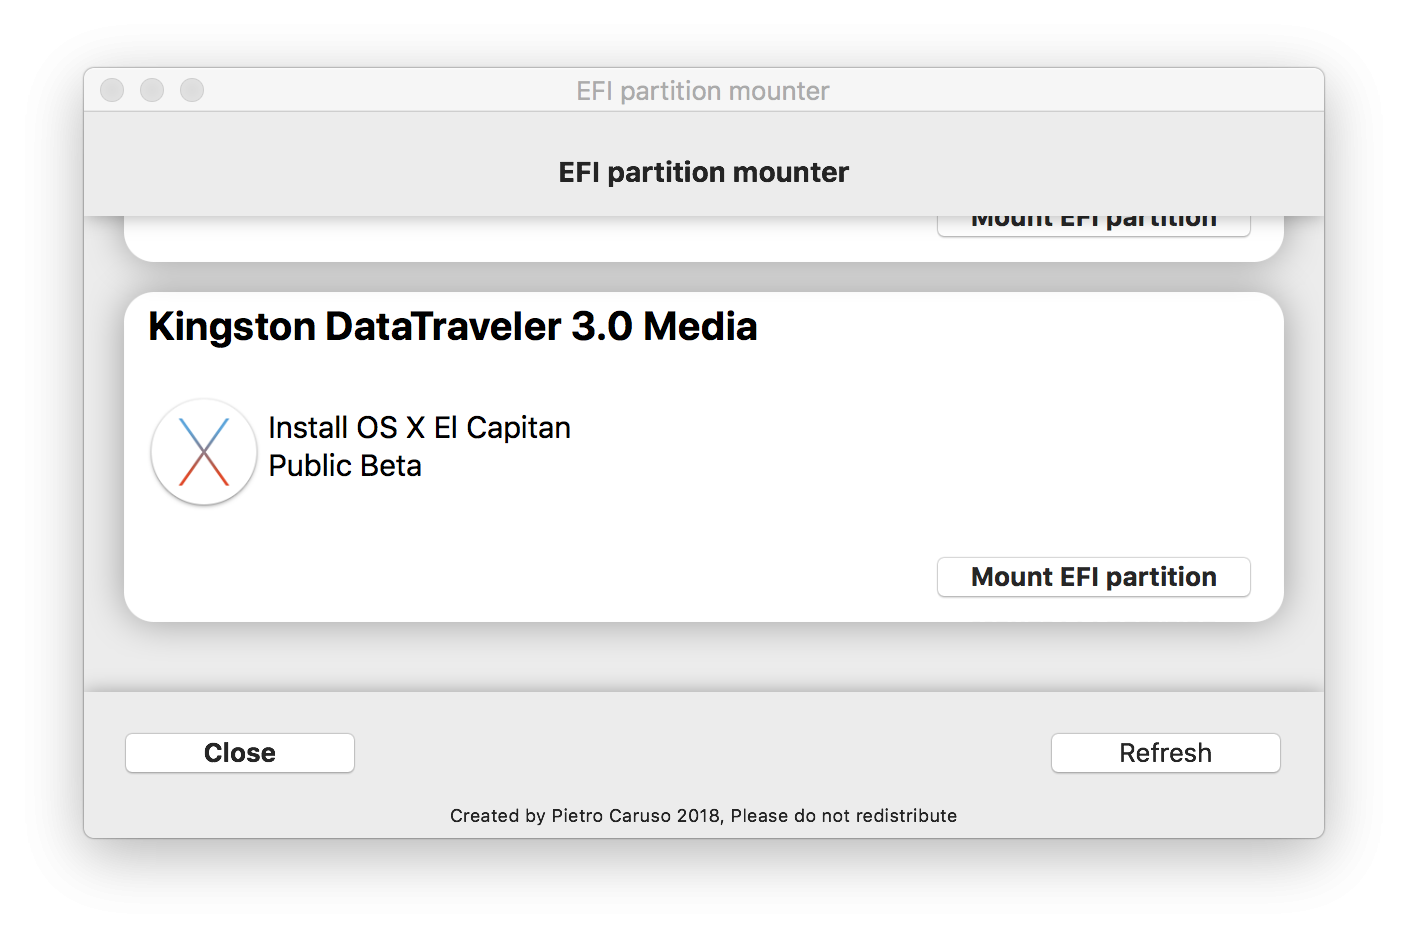
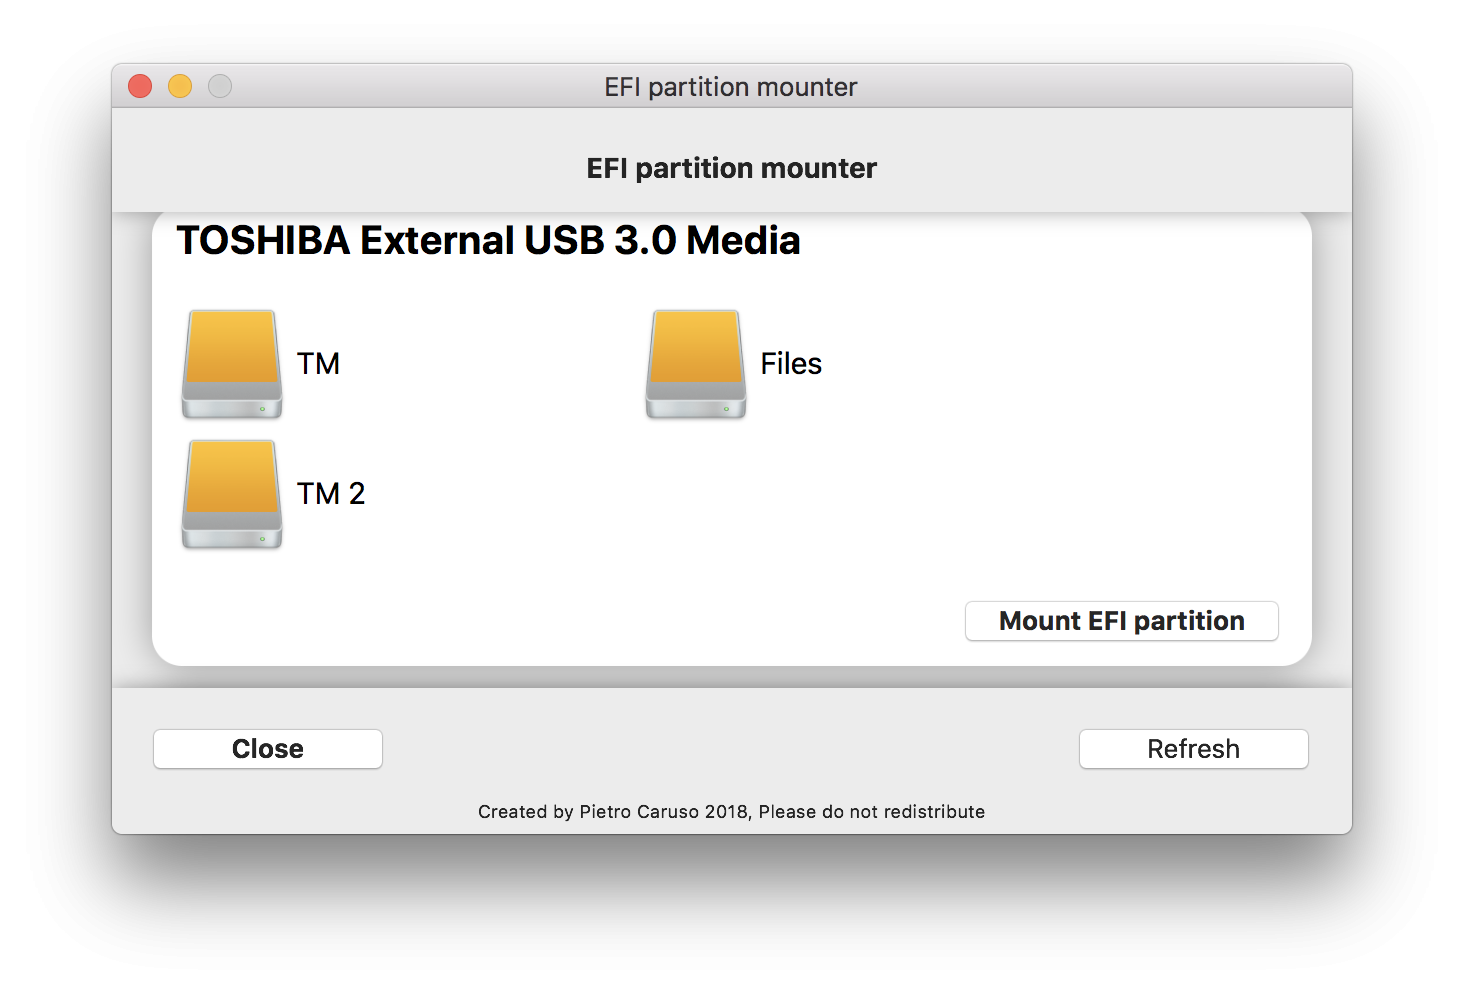
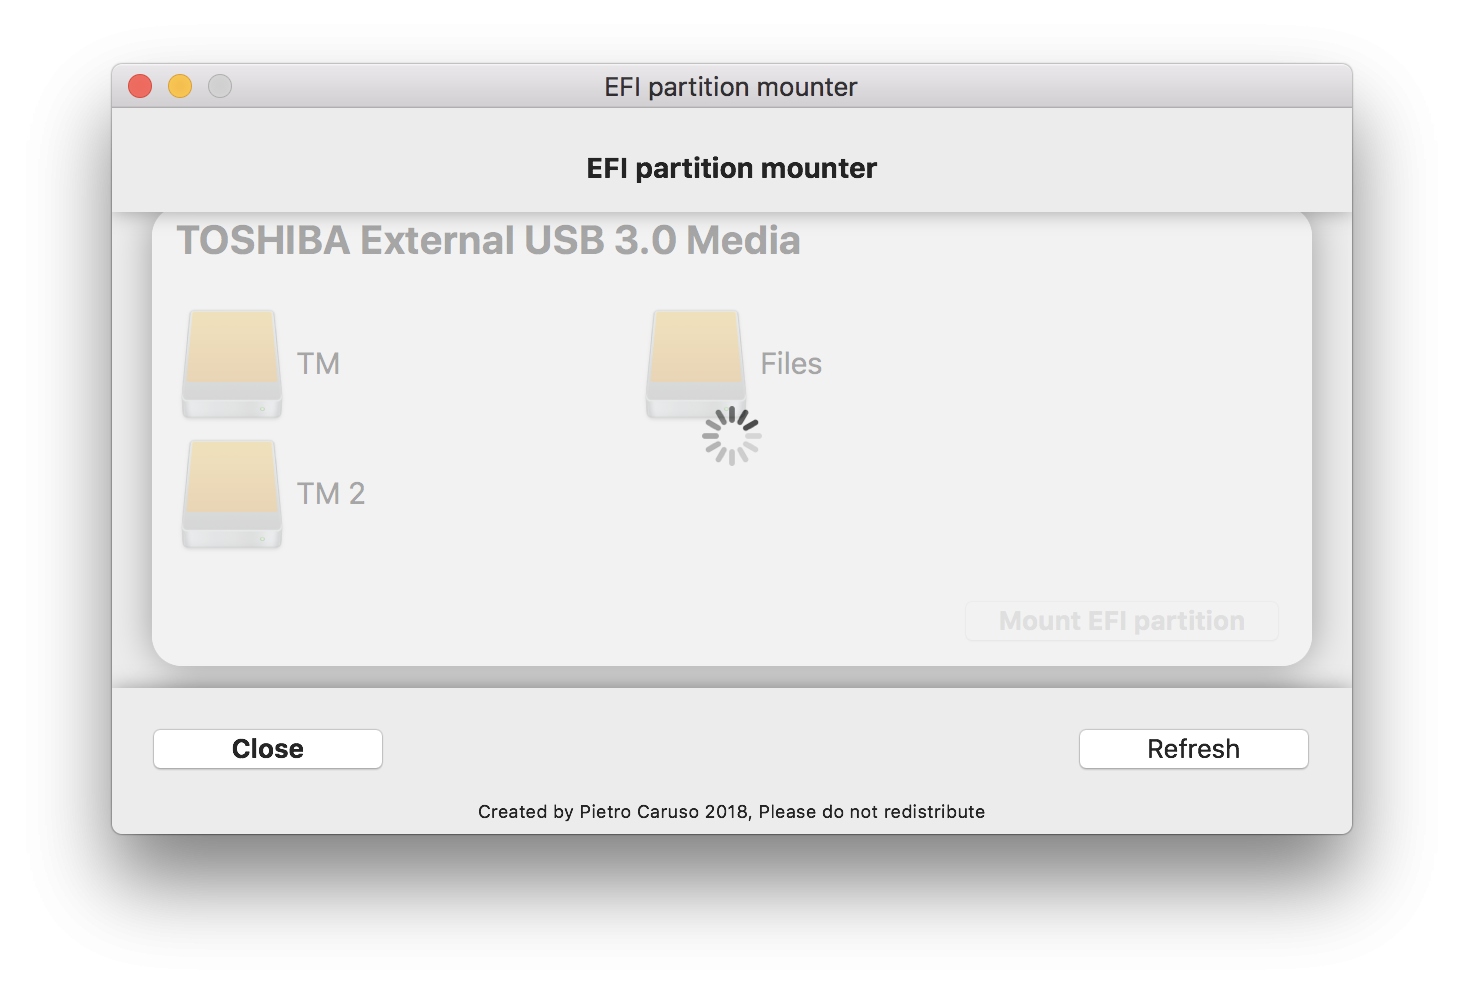
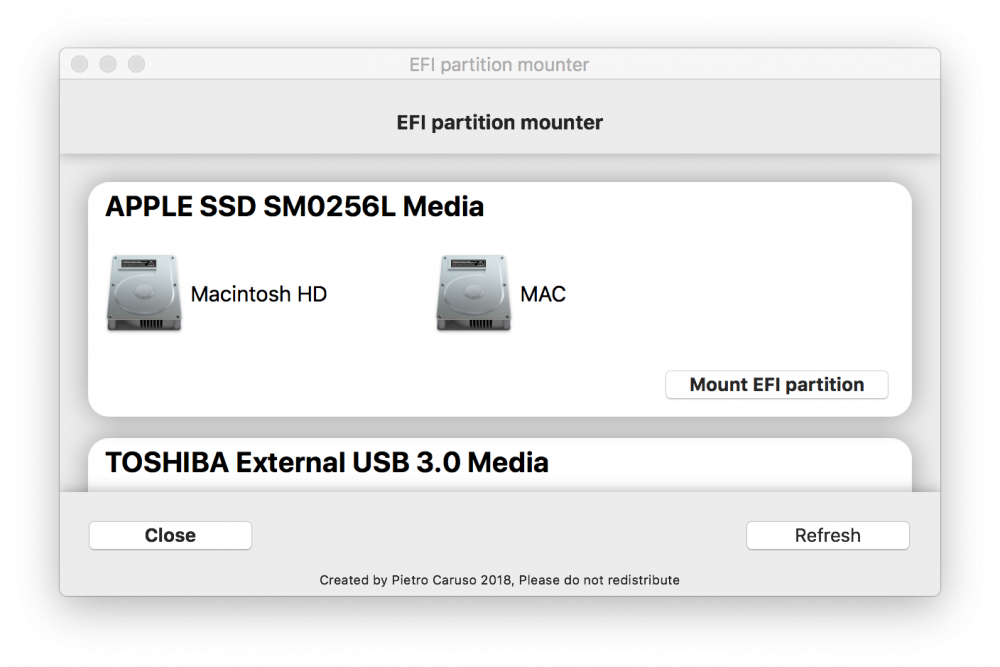
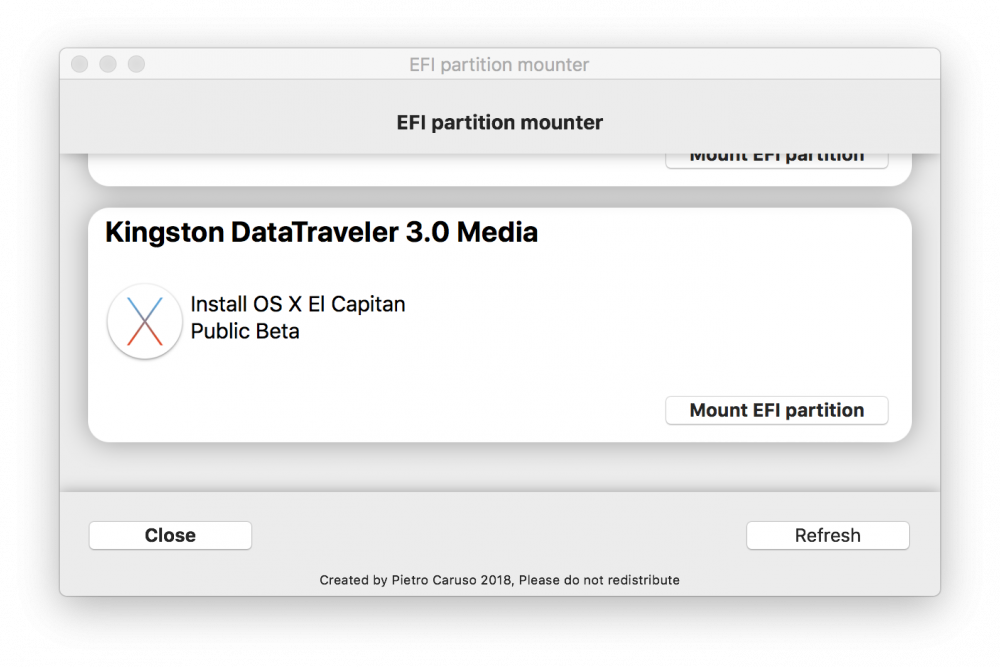
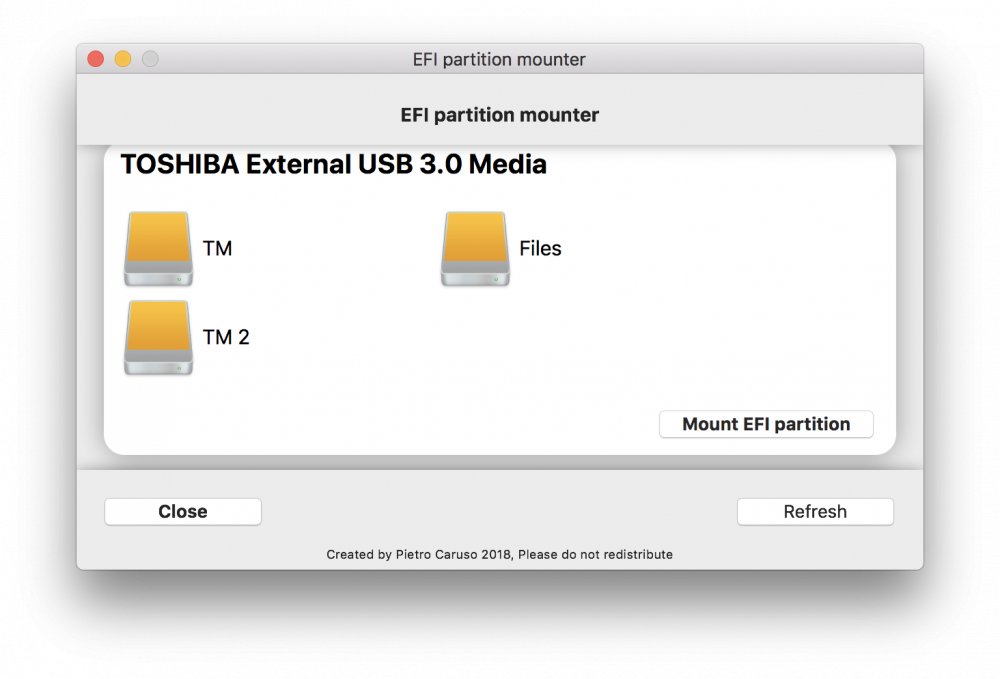
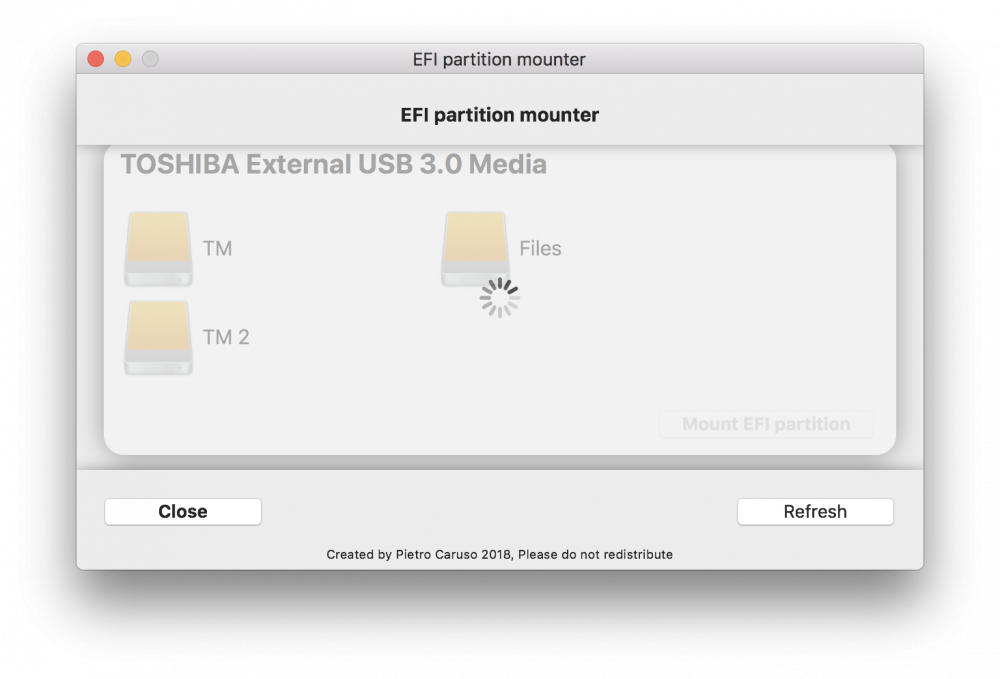
Hi guys i start this new thread to annunce you my new tool, an EFI Partition Mounter tool. Why a new tool? I am creating this new tool because i don't like the UI of existing tools and i want to make something which is mostly future proof and easy to use, and also i already have most of the code done from my other tool TINU, so because of that i just ported the needed to code to a new app and added what's missing to make it a standalone app. The tool is designed to work on both macs and hackintoshes and it's made to be fast, future proof and easy to use, the goal is to make a new generation of tools, with simple and easy to use user interface and grat performance, and also to have the app translated in multiple languages. The app will also work as a windowed app or as a toolbar app, for quick EFI partition mounting, and also it will have very low memory usage and cpu usage (and almost 0% cpu usage when running in background) The app will be pubblished on github as an open source app and under the GNU GPL v3 license. There will be soon a first release of the app, meanwhile i have some screenshots for you of an early version of the app running on my macbook with an usb thumb drive, and an extrernal hard drive connected.

 1 point
 -
@Slice, From that code, NetName is not referenced anywhere else in code, why does it exist? @Badruzeus, The difference is that it changed from fixing the device name and injecting properties to merely just fixing the device. The properties are added with hda injection enabled instead.1 point
-
https://mackie100projects.altervista.org/download-clover-configurator/ L'update i kext per aggiornarli vai in mount efi con tasto destro ottieni informazioni sui tuoi kext e vedi se c'è una versione aggiornata qui https://www.macos86.it// dal menù a tendina hai tutti i link dei kext1 point
-
https://forums.macrumors.com/threads/macos-10-14-mojave-on-unsupported-macs-thread.2121473/page-497#post-271527911 point
-
1 point
-
^^^^You really don't need that. Just completely remove the previous Web Driver, and allow Gatekeeper to allow the installation of Web Driver 108. Those kind of patches can cause OS issues down the road. Lou1 point
-
<key>PP_PhmSoftPowerPlayTable</key> <data>tgIIAQBcAOEGAAAILAAAGwBIAAAAgKkDAPBJAgAyAAgAAAAAAAAAAAAAAAAAAAIBXABPAkYClACeAb4AKAF6AIwAvAEAAAAAcgIAAJAAqAJtAUMBlwHwSQIAcQICAgAAAAAAAAgAAAAAAAAABQAHAAMABQAAAAAAAAABCCADhAO2A+gDGgRMBGUEfgQBAUYFAQGEAwAIYOoAAABAGQEAAYA4AQAC3EoBAAOQXwEABAB3AQAFkJEBAAbA1AEABwEI0EwBAAAAgAAAAAAAAByDAQABAAAAAAAAAABwpwEAAgAAAAAAAAAAiLwBAAMAAAAAAAAAAMDUAQAEAAAAAAAAAABEIwIABQAAAAABAAAA8EkCAAYAAAAAAQAAAKhVAgAHAAAAAAEAAAAABWDqAAAAQBkBAACAOAEAANxKAQAAkF8BAAAACChuAAAALMkAAAH4CwEAAoA4AQADkF8BAAT0kQEABdCwAQAGwNQBAAcACGw5AAAAJF4AAAH8hQAAAqy8AAADNNAAAARobgEABQiXAQAG7KMBAAcAAWg8AQAAAQQ8QQAAAAAAUMMAAAAAAIA4AQACAADEgAEABQAAAQgAmIUAAEC1AABg6gAAUMMAAAGAuwAAYOoAAJQLAQBQwwAAAgDhAACUCwEAQBkBAFDDAAADeP8AAEAZAQCIJgEAUMMAAARAGQEAgDgBAIA4AQBQwwAABYA4AQDcSgEA3EoBAFDDAAAGAHcBAAB3AQCQXwEAUMMAAAeQkQEAkJEBAAB3AQBQwwAAARgAAAAAAAAAC+QSvAIkEy0ACgBUA5ABkAGQAZABkAGQAZABAAAAAAACCDEH9wD3APcAUQEAAFkAaQBKAEoAXwBzAHMAZABAAAAAl2CWAJBVAAAAAAAAAAAAAAAAAAAAAAACAtQwAAACEGDqAAACEA==</data> <key>PP_DisablePowerContainment</key> <integer>1</integer> <key>PP_FuzzyFanControl</key> <integer>0</integer> <key>PP_ThermalAutoThrottlingEnable</key> <integer>1</integer> <key>PP_DisableDIDT</key> <integer>1</integer> <key>PP_DisableULPS</key> <integer>1</integer> I've been using the above, on my vega fe air, since the crashing issue surfaced. Zero crashes for weeks now.1 point
-
Webdriver 108 works with new update.
 1 point
 -
The issue has been fixed. The board's ME firmware was corrupt. Modding the BIOS to fix ME in conjunction with directly flashing the non-corrupt firmware to the ME region using FTK did the trick. Note that Windows was used for the fix. What was the issue? macOS currently expects a functioning ME device (HECI/IMEI) for Intel graphics to fully load. Because the firmware was corrupt, the kexts only loaded halfway and kextd stalled. On Windows, the ME device was "disconnected" in Device Manager. This is why even with IMEI in the IOReg, correct Clover settings and FramebufferAzul and HD5000Graphics kexts loaded in kextstat I could not get QE/CI, or even a proper graphics output. Once the firmware was restored, the ME coprocessor booted completely and the hack gets full acceleration now. For future note: should this method fail, the only option is to buy a new preflashed BIOS chip. Proceed with care. after.BMP before.BMP
 1 point
 -
Guide update to 10.14.4 (18E226) completed New 10.14.4 EFI-Folder distribution EFI-X299-10.14.4-Release-iMacPro1,1-250319.zip in the X299 EFI-Folder Github repository. Clover_v2.4k_r4903 and new 10.14.4 USB port limit patch implementation. Updated FakeSMC and HWSensor distribution. One should also implement latest Lilu.kext, AppleALC.kext and Whatevergreen.kext distributions.Still no native vanilla Radeon VII macOS implementation (still no default Radeon VII device-ID 0x66AF1002 in the vanilla AMDRadeonX5000.kext).Also note new Xcode 10.2 and Xcode 10.2 Command Line distributions.Enjoy and have fun,

 1 point
 -
Apple has released High Sierra 2019-002 Security Update. NO Web Driver yet. I will keep an eye out for the new Web Driver and THEN Update both the Hackintosh and the Mac Pro.1 point
-
Long story short questions:1.) Is the MSR register in your BIOS locked o unlocked? If locked, you have to check "Kernel PM" and enable xpcm_core_scope. The need of xpcm_pgk_scope would imply that your CPU is not fully natively implemented by macOS. Drop Table DMAR should be fine also in your case. Also note that respective XCPM patches change from 10.13 to 10.14.2.) You should use AppleALC.kext, Lilu.kext and WEG.kext in your EFI-Folder, otherwise neither HDAU nor HDEF will be properly implemented.3.) Under "System Parameters" you have Nvidia Web checked although you seem not to use any Nvidia GPU.4.) You are using USBInjectAll.kext and SSDT-1-SMCI--MB for XHCI USB. You might ask for help in the respective thread. I recommend to create and use a board specific XHC USB kext instead and even provide a dedicated guideline to do so. BTW.. what is SSDT-2-SpsNm for? And finally, I never recommended at any place do use a DSDT in /EFI/CLOVER/ACPI/patched.5.) You do not use SSDT-DTPG.aml and you did not properly adopt SSDT-Vega64.aml to your system. The implemented SSDT-Vega64.aml is for PC02.BR2A while your ACPI table reads PC03.BR3A. I am also missing a properly adapted SSDT-RX560.aml in your EFI-Folder. The current GFX0 and GFX2 ACPI implementation of your two GPUs is solely thanks to WEG.kext and not due to any SSDT implementation. Also all other System SSDTs provided in the X299 Github library (yet to be properly adapted to your system) are be missing in your current EFI-Folder distribution.6.) Concerning TB, I did not find any traces of any TB adapter in your IOREG.save, which rather suggests that either your TB adapter is not installed at all or at least not properly enabled in your BIOS. Once the TB adapter will be part of your ACPI table, you anyway should use a properly adapted SSDT-TB3HP.aml in /EFI/CLOVER/ACPI/patched.For properly adapting available system SSDTs to your motherboard and particular PCIe slot population, might be helpful in any case (standard sentence, repeated dozens of times). Else it might be beneficial to repeat reading also the main guide in your case. Else it is would be more than sufficient to post your perspective questions in one forum only. It just requires additional work at my side to respond with identical answers to identical questions in both forums at the same time. Good luck,KGP1 point
-
Okay. I will take another picture and will try to do the box thing you mentioned. I'm looking at the center of the webcam. It's off center when i look at it from there. [edit] i guess it's center according to the screenshot i took with F10. sorry? maybe it's just my eyes?


 1 point
 -
here friend https://www9.zippyshare.com/v/MFUSPWDb/file.html1 point
-
Ummm... Make searching work correctly for both content and users. One doesn't allow you to narrow the search even though it provides those options and the other says Not found most of the time but randomly with show users.1 point
-
Ciao buon di certo ti aiutiamo , ma postaci dati su cui lavorare , elenca in maniera dettagliata HW e posta cartella EFI della USB se devi istallare ancora o quella dell' SSD\HD se hai già istallato1 point
-
@apianti, well, obviously, it is not (constantly) in SMM, just constantly busy-loops in 0 ring within SmmCommProtocol->Communicate (you may check its src). Should have been slightly more clear. The functions are pretty much irrelevant, though I am aware of them. Unmapping of UEFI Runtime cannot happen. For all the others: you have no other choice but AptioMemoryFix + EmuVariableEfi. Other insanity will doom you.1 point
-
GTX610 may be Fermi or may be Kepler. Kepler will work as we see in topic. Fermi has no chances.1 point
-
In this guide I will go through some steps to prepare a bootable partition or USB installer to upgrade existing macOS Sierra or install new macOS High Sierra. I used and tested this method to upgrade an existing Sierra 10.12.6 and to install a new macOS High sierra in an empty partition. Before anything make sure you backed up your data, from your SSD/HDD/USB or any-kind of storage you use. - Why this guide? Do you have a problem upgrading existing Sierra, a problem like a cross circle sign when you directly upgrade from sierra to High Sierra using Apple installer ? Do you have a problem with your HDD driver or old SATA driver not loaded while using the official CreatInstaller method, and you do not need to buy a new SSD and stick with your old HDD ? Do you have a problem with OSInstall.mpkg not found and you want to find an easy way to solve it ? While I was trying to upgrade my existence 5 series motherboard with both of my old HDD drivers (1 TB WD Blue and 500 GB WD Green) to macOS High Sierra I faced the cross circle problem when I tried to directly upgrade using the Apple Installer, So the next thing I did is to create a USB installer using CreatInstaller method and start fresh but it did not work and again a suffering point but with more hope as I successfully reached the installer but disk utility unable to detect both of my HDD, So what is the problem ??? The problem was for number (1) that the installer unable to detect the filesystem to start upgrading, for number (2) the new AppleAHCIPort kext is unable to detect my old HDD drivers. So What do we need to solve these problems ? we need another way of creating an Installer to be able to inject or replace AppleAHCIPort, so Why CreateInstaller method is useless in that case ? because the installer process loads from BaseSystem.dmg a read-only image which can not be injected or replaced in the CreatInstaller method without breaking it's checksum which will corrupt your installer. so now we have a lead and that lead is BaseSystem.dmg in this method I will follow HowToInstall method from http://www.insanelymac.com/forum/files/file/762-high-sierra-mbr-and-firmware-check-patch/ but with special tweaks without mbr patch or firmrware patch(no need). A special thanks to crazybirdy for such a method that will give us the ability to directly deal with BaseSystem.dmg without breaking it's checksum and with using it as magic tool to build a bootable partition or USB. - What we need: You need to have a running macOS. You need to download macOS High Sierra Installer from Apple Store. You need at least 3 GB partition or USB. An EFI partition ready with clover will be amazing. - Critical and important points: 1) From Disk Utility make sure there are no dmg or disk images mounted in your system. 2) ShowHidden Files defaults write com.apple.finder AppleShowAllFiles TRUE;\killall Finder 2) If you already clicked on and proceed till restart using "Install macOS High Sierra.app" Check the volume that you selected during this process and delete any folder named "macOS Install Data" and a hidden file named ".IAProductInfo".also Check and Delete if they exist in all of your Volumes before moving to Lets Start, this is a ver important step. Or you can run this line from Terminal.app will output if any of your "/Volumes" has one of them or both of them so you can go and check yourself. for i in /Volumes/*;do if [[ -d $i/macOS\ Install\ Data || -f $i/.IAProductInfo ]];then echo "folder macOS Install Data and/Or file .IAProductInfo exists in: \"$i"\";fi; done - Hard Disk or USB preparation: From First point in What we need assuming that you already in a running macOS or OSX. 1) If you want to upgrade from Sierra to High Sierra you just need a bootable-helper partition/OR USB and your existence Sierra partition: If you want to use a bootable HDD partition using your current HDD shrink/resize an existence partition with Disk Utility and format as Mac OS Extended (Journaled) with a minimum 3 GB size name it BootablePartition. Rename your current Sierra Partition to HighSierra. If you want to use a bootable USB just erase it using Disk Utility with GUID Partition Table and HFS+ Partition name it BootablePartition check (2.2) bellow. 2) If you want to Install a new High Sierra in a new or cleaned HDD or SSD you just need a bootable-helper partition/OR USB and a cleaned HFS+ partition to install High Sierra. 2.1) A bootable partition and installation partition USING HDD From Disk Utility Erase the HDD with Name: HighSierra, Format: Mac OS Extended (Journaled), Scheme: GUID Partition Map If you do not want to create a bootable partition in your HDD proceed to (2.2) and cancel the next point After creating the HighSierra partition click on it and select Partition next to first Aid then click on the Plus in the bottom to add a new partition resize it till it will be 3 GB name it BootablePartition. 2.2) Preferable: A bootable USB partition: From Disk Utility Erase the USB Name: BootablePartition, Format: Mac OS Extended (Journaled), Scheme: GUID Partition Map. - Lets Burn the BaseSystem and Start The Fun: This point assumes that you completed all the preparation and you have all What we need. 1) Go to /Application/Install macOS High Sierra.app 2) Show Package Contents. 3) Go to Contents/SharedSupport you will find BaseSystem.dmg 4) Make sure that you checked and you do not have anything left from (1) & (2) in Critical and important points. 5) Double click on BaseSystem.dmg to mount it, Finder will pop out with it's content so close it. 6) After (5) and assuming that you already checked and you do not have anything left from (4) the BaseSystem.dmg will be the only mounted image in Disk Utility. 7) From the method that you choose from Hard Disk or USB preparation click on BootablePartition, Restore and chose OS X Base System be aware that this will erase all the content of the selected partition so TAKE CARE do not chose a wrong partition that's why I gave a special name to mark the partition that we want to deal with. 8) After successfully restoring BaseSystem from (7) your BootablePartition will be renamed to "OS X Base System" rename it back to BootablePartition 9) Open BootablePartition, Go to /System/Installation you will find a broken link called Packages DELETE IT. rm -rfv /Volumes/BootablePartition/System/Installation/Packages 10) Create a new folder instead of the broken link and name it Packages. mkdir -v /Volumes/BootablePartition/System/Installation/Packages 11) Go back to (3) and under Shared Support you will find InstallESD.dmg mount it by double clicking and go to Packages and you will find OSInstall.mpkg copy it to the new folder we created under BootablePartition/System/Installation/Packages, cp -v /Volumes/InstallESD/Packages/OSInstall.mpkg /Volumes/BootablePartition/System/Installation/Packages/ 12) Clover Preparation: This point has two main things: If you want to use the USB from Hard Disk preparation to be your Clover Bootable media, That's fine Download Clover https://sourceforge.net/projects/cloverefiboot/ and install in BootablePartition. same bellow methods apply. If you want to user your existence EFI same bellow methods apply 1) For AppleAHCIPort 1.1) Inject on the fly method: Fixing Disk I/O Error by using Clover KernelAndKextPatches>KextToPatch then add item to the array, Thanks to @sunKi http://www.insanelymac.com/forum/topic/327488-macos-high-sierra-final-release-is-out-17a365/page-10?do=findComment&comment=2505086 <dict> <key>Comment</key> <string>fix IO error ICH10 for 10.13, credit SunKi</string> <key>MatchOS</key> <string>10.13.x</string> <key>Disabled</key> <false/> <key>Name</key> <string>AppleAHCIPort</string> <key>Find</key> <data>RYX2D5XCiciD4P5mhcl4D4TSdQs=</data> <key>Replace</key> <data>iciD4P5mhckPmMFBCMyQkJCQdQs=</data> </dict> <dict> <key>Comment</key> <string>fix hotplug ICH10 for 10.13, credit SunKi</string> <key>MatchOS</key> <string>10.13.x</string> <key>Disabled</key> <false/> <key>Name</key> <string>AppleAHCIPort</string> <key>Find</key> <data>icglQGACAD1AIAAAdQyB4b9///+Ji1EBAAA=</data> <key>Replace</key> <data>kJCQkJCQkJCQkJCQkJCQkJCQkJCQkJCQkJA=</data> </dict> 1.2) Replace Kext method Download this kext and replace it with BootablePartition/System/Library/Extensions: Thanks to @fusion71au http://www.insanelymac.com/forum/files/file/815-appleahciportkext/ and Importantly is to update the kext cache, fix ownership and permissions. Copy all at once and paste it in your terminal. sudo chown -R 0:0 /Volumes/BootablePartition/Library/Extensions/AppleAHCIPort.kext && \ sudo chmod -R 755 /Volumes/BootablePartition/Library/Extensions/AppleAHCIPort.kext && \ sudo touch /Volumes/BootablePartition/System/Library/Extensions && \ sudo kextcache -u / or line by line: # Fix ownership using chown sudo chown -R 0:0 /Volumes/BootablePartition/Library/Extensions/AppleAHCIPort.kext # Fix permissions using chmod sudo chmod -R 755 /Volumes/BootablePartition/Library/Extensions/AppleAHCIPort.kext # Touch kernel Extensions folder to cache it. sudo touch /Volumes/BootablePartition/System/Library/Extensions # Rebuild kernel Extenstions cache. sudo kextcache -u / 2) For any extra post installation your are free to tweak it in clover or if you want to add extra kext, repeat the above 1.2 with your kext, then fix permission, ownership and update the kernel cache. 3) Copy apfs.efi copy it under "/Volumes/BootablePartition/usr/standalone/i386/apfs.efi" to your clover installation drivers64uefi/ or drivers64/ in legacy BIOS (This method will convert only SSD otherwise it will not convert any HDD as tested with my old 5 series and my HDD did not convert to apfs). - Final touch 1) Before finishing this point make sure you passed all the Critical and important points. Go to /Applications/Install macOS High Sierra.app and double click to open then proceed till you reach "Select the disk you want to install macOS." and chose HighSierra Volume wonder what is HighSierra check Hard Disk or USB preparation. this point "Install macOS High sierra.app" will create a Helper folder Called "macOS Install Data" and a hidden file called ".IAProductInfo" and these two will lead the BootablePartition to install macOS High Sierra in that partition using these Helpers. 2) After (1) your computer will restart and In Clover your will find HighSierra Partition and BootableParition chose BootablePartition, If everything goes well the installer will start directly without Disk Utility or any preparation we already did all of that. Please make sure you booted from the BootablePartition not HighSierra - Knowns Problem: 1) After Final touch point (2), The mouse cursor will not be found or of course movable Don't worry. check pikeralpha https://pikeralpha.wordpress.com/2017/08/05/osinstall-mpkg-appears-to-be-missing-or-damaged/ in the end of the topic after Thank's Apple so it's not just you. edited: typo. 2) Upgrading from my Sierra 10.12.6 took so long using this method but also Don't worry. I did upgrade without losing any data, Just you have to tweak your clover config.plist to not conflict with the High sierra specially if you injected any S/L/E kext Like audio post installation so it's preferable to keep your config.plist clean from Post Installation and just for a booting process and of course with Clover Preparation. - Summary: Burn BaseSystem.dmg to a partition or USB , Direct the BaseSystem partition to your HighSierra Partition to complete the installation using Install macOS High Sierra.app Helper folder "macOS Install Data" and the little hidden file .IAProductInfo1 point
-
There's still no WebDriver even after 10.14.4 released, right?0 points
-
We could try reducing the line spacing a little bit, the content does get too much spacing, especially the signatures0 points