Leaderboard


Popular Content
Showing content with the highest reputation on 11/30/2018 in all areas
-
Vector themes for Clover are new and currently still under development. Setting out to re-create my BGM theme to vector I realised there was some learning needed in order to create a theme.svg file for Clover to use. As SVG files are text based, I quickly realised that they could be manipulated from the command line and looking at the Clovy theme I decided to break it down in to parts for creating other themes. As a result, I've been working on Clover SVG Theme Builder https://bitbucket.org/blackosx/cloversvgthemebuilder Current Version: 0.4.5 Overview The idea is to allow a theme designer to work on individual images and not worry about the required overall file structure which Clover expects. The designer can populate a Theme directory with a settings file and individual .svg files and let the script generate a final theme.svg file for using with Clover. I've created a basic sample theme to help demonstrate the script. https://bitbucket.org/blackosx/cloversvgthemebuilder/downloads/Theme.zip The Theme directory contains Adobe Illustrator and SVG files for each image in the required folder structure for the script. Using this sample theme, the script will generate this theme from the files. The idea is these can be used to build new themes and I'm currently using it to build my BGM_SVG theme. I can imagine far more complicated themes will be generated in the future, but for now I hope this may serve to help kickstart basic vector theme development. Notes: • Clover's SVG theme development is still underway and things are likely to change so this script and it's supporting template file will need to change with Clover. • I've only tested this using SVG files saved from Adobe Illustrator using the following settings, for files from other apps may need added support. • For the script to correctly inject SVG code in to the template, each SVG image must contain a group of elements. • Font files are currently not included in the final theme file but this can be an option. • In time, maybe other templates can be added which have different layouts?? These are early days, so I'll update this post when necessary.4 points
-
All the best! @bs0d2 points
-
Great to see your theme is SVG variant! I made support for missing icons: All missing macOS will be replaced by common os_mac icon All missing linuxes (?) with os_linux. Not sure about different linux names. Also I continue working on proper alignments.2 points
-
The hardest thing about installing this update was downloading it from a coffee shop with only a DSL connection.2 points
-
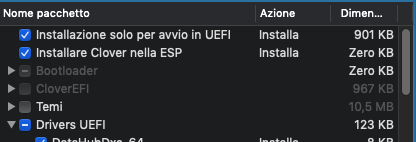
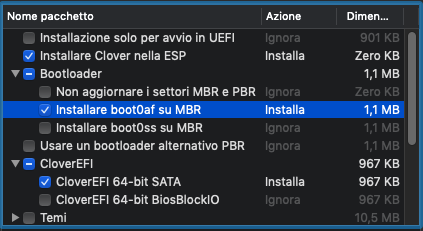
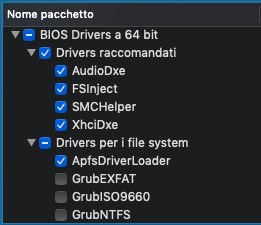
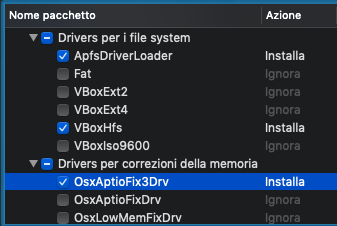
Ciro82==>>Thanks Uno dei tre Requisiti: Hack funzionante Mac vero Macchina virtuale Impostazioni Bios per il boot: Cercate una voce del tipo “Sata Mode”e settatela in AHCI Secure Boot: disabilitare o altri sistemi operativi CSM: UEFI o LEGACY, oppure a secondo del tipo di installazione VT-x / VT-d disable *Nota: Secure boot e csm valido solo per bios UEFI Materiale Occorrente "OS X (Versione App.Store)” USB 8GB *nota: nel caso di usb superiori dovrà essere partizionata, in modo da avere una partizione su cui "lavoreremo,di questa dimensione ShowAllfiles kext Wizard Bootloader Clover_2.3k_r xxx: http: //sourceforge.n.../cloverefiboot/ Clover Configurator: http: //mackie100proj...a.org/download/ FakeSmc.kext: https://github.com/kozlek/HWSensors/releases In allegato,a fondo pagina troverete un "pacchetto" contenente : ShowAllfiles, Kext Wizard, FakeSmc.kext: App alternative: ESP Mounter Pro: per montare la partizione EFI Vi illustrerò tre metodi per creare la usb, ma sono ben distinti… quindi usatene soltanto uno Metodo 1: “Install Mac_OS_X.command” Metodo 2: “Create Install Media di Apple” Metodo 3: Metodo Manuale Alla fine delle preparazione dell’installer, tutti i metodi necessitano l’installazione del Bootloader Clover sulla a vostra USB. “CONDIZIONI OBBLIGATORIE” PUNTO 1: che la vostra usb sia stata preventivamente nominata USB (caratteri maiuscoli) Tabella di partizione GUID e la formattazione in Mac esteso Journaled. PUNTO 2: che l’installer di OSX si trovi in Applicazioni Utility Disco Selezionate la pendrive, andate su “partizione”, selezionate “1 partizione”, impostate Mac OS esteso journaled e date il nome USB, poi in basso cliccate su opzioni e scegliete Tabella partizione (GUID), poi “applica”. Immagine Riporto nuovamente l’operazione sopra citata adoperando dal nuovo Utility Disco introdotto su El Capitan. Rimane ovviamente invariato nome della usb in ==>> USB (maiuscolo), la formattazione in Mac esteso Journaled e sia la mappa partizione in GUID Da utility disco selezionate la usb, cliccate su inizializza. dal menù a tendina scegliete la relative impostazioni Immagine Procedura effettua da High Sierra è la stessa della precedente, l'unica attenzione e operazione da aggiungere in primis è cliccare nel menù a tendina in alto sulla sinistra di utility disco e selezionare "mostra tutti i dispositivi" Immagine ===================== METODO 1: "Install_Mac_OS_X.Command" Lo script che trovate allegato in fondo alla guida permette la creazione dell’installer in maniera automatica Include la possibilità di scelta di tre versioni di osx Yosemite El Capitan Sierra Il risultato finale è come quello del metodo "manuale" descritto nella guida, per cui l'installazione avverrà in un solo passaggio, non in due come con il metodo createinstallmedia. Offre inoltre la possibilità di inserire un kernel patchato, utile, per esempio, per chi usa AMD. Rimane invariato il nome dato alla usb in USB, mappa partizione e tipo di formattazione Se la vostra usb non sarà rinominata nel modo corretto, verrete avvisati dal terminale, quindi non dovrete far altro che apportare la relativa modifica e rilanciare nuovamente lo script Esempio =========================== Metodo 2 L'intento è quello di usare la procedura fornitaci direttamente da Apple, "createinstallmedia", introdotta con Mavericks. Tale metodo prevede l’uso del terminale che via via se ne sta perdendo il “valore e l’uso” Inizialmente per i neofiti potrà sembrare problematico ma alla fine non è così. Durante il post installazione alcune operazioni ne richiedono l’ uso. Perciò mi sono chiesto perchè, qualora uno volesse, non far conoscere da subito un po’ questo “strumento”??? Per favorirvi vi ho allegato i comandi già “pronti”, i quali li potrete copiare ed incollare sul terminale. A questo punto aprite il terminale, copiate ed incollate il comando sottostante e premete invio, digitate la vostra password e premete nuovamente invio. Comando per creare USB con Yosemite: sudo /Applications/Install\ OS\ X\ Yosemite.app/Contents/Resources/createinstallmedia --volume /Volumes/USB --applicationpath /Applications/Install\ OS\ X\ Yosemite.app --nointeraction Comando per creare USB con El Capitan sudo /Applications/Install\ OS\ X\ El\ Capitan.app/Contents/Resources/createinstallmedia --volume /Volumes/USB --applicationpath /Applications/Install\ OS\ X\ El\ Capitan.app --nointeraction Comando per creare USB con Sierra sudo /Applications/Install\ macOS\ Sierra.app/Contents/Resources/createinstallmedia --volume /Volumes/USB --applicationpath /Applications/Install\ macOS\ Sierra.app/ --nointeraction Per creare USB con Hight Sierra o Mojave usate --> C_I_M (aggiornato per 10.14) Funziona con il drag & drop sul terminale, in questo caso non vi è necessità che la usb sia nominata in un determinato modo ed essendo basato su create install media ovviamente funziona da 10.9 a 10.14.... BENE…IL PROCESSO DI CREAZIONE E’ INIZIATO… AVREMO CIRCA 20/30 MINUTI DI TEMPO LIBERO A CUI DEDICARSI A CIO’ CHE VOGLIAMO……………………………………….. COLGO L’OCCASIONE PER FARVI NOTARE LA VELOCITA’ E LA SICUREZZA DI QUESTO METODO CONFRONTATE QUESTO CON IL TERZO METODO E NOTERETE CHE CON UN SOLO PASSAGGIO, OSSIA IL COMANDO DATO AL TERMINALE, FACCIAMO IN UNA SINGOLA OPERAZIONE TUTTI I VARI STEP DESCRITTI SULL’ ALTRO METODO. DETTO QUESTO, MOLTO IMPORTANTE E’ SOTTOLINEARE CHE COSI’ FACENDO EVITEREMO ERRORI DI DISTRAZIONE RIGUARDO AI PASSAGGI O FRAINTENDIMENTI. Immagine Potete adesso passare ad installare il bootloader Clover sulla vostra usb. *NOTA*: Avendo usato questo metodo l'installazione si dividerà in due fasi, perciò dopo il primo riavvio e necessario far partire nuovamente l'installer, selezionare lo stesso disco senza formattarlo. Finita questa ulteriore fase , l'installazione sarà terminata ========================= METODO "MANUALE".... (lascio per futura memoria-Compatibile fino a 10.12) ========================== Bootloader **Nota:** Installazione in UEFI dipenderà dalla scheda madre in vostro possesso, quindi se non supporta tale opzione , il bootloader dovrà essere installato in modalità Legacy. Vi invito, qualora non sapeste questa informazione, a recarvi nel sito ufficiale del produttore e controllare le informazioni a riguardo Fatto questo dobbiamo installare Clover sulla usb. A seconda del tipo di Bios o al tipo di installazione che vogliamo fare UEFI o Legacy avremo ovviamente configurazioni diverse in questa fase. Lanciate il pkg. Immagine Cambiate la destinazione di installazione ad USB oppure Install Mac_OS_X (a secondo del tipo di creazione eseguita) Successivamente clicchiamo su "Ad Hoc" Per Installazione UEFI Mettete i flag : Installazione solo per avvio UEFI : installare Clover nella ESP : Driver64UEFI AptioMemory --> (consigliato) -> Link download Può essere solo aggiunto manualmente scaricando dal link sopra e collocandolo nella rispettiva cartella NOTA: in questo caso non selezionare nessun OsxAptioFixDRV durante l'installazione di clover oppure rimuovetelo successivamente. : Driver64UEFI ApfsDriverLoader --> (consigliato) --> sostituisce l'uso del driver apfs.efi : Selezionate l'altri driver come da successiva immagine, *Nota: Altri driver che si possono usare al suo posto sono: informazioni Proseguite con l’installazione. Immagine ** Ricordate che avrete accesso a questa cartella dopo aver montato la partizione EFI** =========================== Per installazione Legacy Immagine =========================== Impostazione per config.plist: Con clover configurator “montate” la partizione EFI della usb. 1) Per fare questo nel menù di sinistra, cliccate su “Mount EFI” 2) individuate la partizione relativa alla vostra usb, a questo punto montiamo la relativa partizione EFI selezionando l’apposito pulsante “Mount Partition” Immagine 3) Successivamente cliccate su “Open Partition”.. recatevi in EFI/Clover ed aprite il config.plist 4) Sezione ACPI: Disabilitate tutti i fix sia del menù 1 che del menù 2 Immagine 5) Sezione BOOT: Sole se si sta installando Yosemite mettete il flag su kext-dev-mode=1 Immagine 6) Sezione RT Variables: Se si sta installando El Capitan oppure Sierra, aggiungere i valori: BooterConfig= 0x28, CsrActiveConfig= 0x67 Immagine 7) Sezione System Parameters: Su inject kext mettete YES Immagine =========================== Nota: Su El Capitan, è stato introdotto SIP (System Integrity Protection) Info: =========================== Recatevi in EFI/Clover/kext/10.x X= alla versione di osx che state installando. Per esempio se installerete Yosemite dovrete recarvi nella cartella 10.10, con El Capitan in 10.11….ecc Se non ci fosse tale cartella, createla e nominatela voi a “modo”. Copiatevi all’interno FakeSmc.kext *Nota se venite già da altre vostre configurazioni, oltre kext sopra citato ,potete mettere gli altri necessari per il vostro hardware Stessa cosa se avete DSDT e/o SSDT potete copiarli in EFI/Clover/Acpi/Patched Immagine  Per High Sierra: Scaricare il driver apfs.efi a fine guida, collocarlo: --> EFI/clover/Driver64UEFI se stiamo usando UEFI --> EFI/Clover/Driver64 se stiamo usando Legacy Per chi volesse continuare ad usare HFS vi rimando a questo post: Come installare High Sierra in HFS direttamente dalla usb Utenti Laptop: Nel 99% è obbligatorio disattivare la grafica discreta Nvidia/Amd per installare questo nuovo osx Quindi aggiungete --> SSDT-Disable_DGPU.aml.zip in EFI/Clover/acpi/Patched della usb -------------------------------------------------------------------- Per Mojave: Scaricare il driver apfs.efi per 10.14 a fine guida, collocarlo: --> EFI/clover/Driver64UEFI se stiamo usando UEFI --> EFI/Clover/Driver64 se stiamo usando Legacy Versione di clover non antecedente a V_4015 Volete usare HFS? E' possibile fare un installazione diretta su altro disco o partizione, nel caso può essere usato anche per effettuare aggiornamenti... nel caso guardate... Mojave in HFS Oppure direttamente da usb Fatto questo avrete la vostra USB bootable per installare OSX. ………Non scordatevi Fakesmc.kext da mettere nella relativa cartella…. senza il quale non farete mai il Boot...... *NOTA: se usato il terminale per la creazione della usb, l'installazione si dividerà in due fasi, perciò dopo il primo riavvio e necessario far partire nuovamente l'installer, selezionare lo stesso disco senza formattarlo. Finita questa ulteriore fase , l'installazione sarà terminata **NOTA** Se avete processori Broadwell,Skylake o Kabylake...usate FakeSmc.kext e relativi sensors che trovate all'interno del secondo pacchetto.. (potete usarlo anche sui precedenti senza problemi, essendo una versione più aggiornata ha ulteriore supporto per le cpu più recenti) Update: Fakesmc e sensors versione 6.26 Post installazione... post #2 Buon Hack…..  Aggiornamento:Install_Mac_OS_X.command.zip (compatibile da 10.10 a 10.12) le info le trovate a questo post Ringrazio @Ciro82 che mi ha aiutato nel preparare questa guida. Pacchetto.zip Pacchetto-2.zip Pacchetto-Fake+Sensors 6.26.1440.zip C_I_M.zip

 1 point
 -
As per someone on a French Hackintosh forum, the HEVC kext remove the need to replace the GVA framework. iTunes DRM works with it. Thanks a bunch...1 point
-
Hello @Monkey303. Welcome to InsanelyMac1 point
-
Thanks for the info. I didn't know about the use element until now. How do you know all the stuff you know? So yeah, referencing an identifier from an external file is exactly the same kinda thing I'm doing here. Though my script does ensure each id is unique as I discovered issues when multiple instances of an id were contained in the same file.1 point
-
Yeah, this could also be easily solved by implementing the use element. The problem is that nanosvg is pretty incomplete, and actually straight up wrong about a lot of stuff... EDIT: Actually this appears to be implemented but unsure if it actually works. EDIT2: Nevermind it's not properly implemented... I should have known better than to assume it was. lol1 point
-
Hello and welcome! I can't find your signature. With the unknown hardware, you are using, nobody here is able to give you proper support. Please be so kind to follow this before next post: https://www.insanelymac.com/forum/topic/336486-video-how-to-add-a-signature/?tab=comments#comment-2647874 and read also carefully the rules: https://www.insanelymac.com/forum/topic/333462-read-insanelymac-forum-rules/ Have fun.1 point
-
It's ok Sir1 point
-
E' identica a quella in mio possesso(presa da Amazon), va molto bene!1 point
-
Sostituisci. Aggiungi i kext (almeno FakeSMC). Altrimenti non parte manco a spinta. CLOVER.zip1 point
-
cancella OsxAptioFix3Drv-64.efi da driver64UEFI e poi i kext dove sono?? no Fakesmc ---> no party ---> no boot.... aggiungi i kext al suo posto1 point
-
Grazie Gengik tutto perfetto!!1 point
-
Hey @ammoune78! Done, and thank you for your contribution1 point
-
DVI-D, HDMI, DisplayPort1 point
-
ma non è un desktop? mi sono perso qualcosa? @sergymac inizia a pensare di usare l'integrata o di cambiare video AMD è supportato solo da serie 7xxx in poi su Mojave1 point
-
non vorrei ricordarmi male, non ho riletto l'intero thread, ma forse gli avevo preparato 2 EFI con 2 setup differenti, uno con WEG e LILU e un'altra con i fake... quindi forse è "colpa" mia1 point
-
Quella Radeon non è supportata.1 point
-
Riprova con questa. CLOVER.zip1 point
-
I implemented <symbol> support, it will be a great help to create themes because of many similar elements. <?xml version="1.0" encoding="utf-8"?> <!-- Generator: Adobe Illustrator 22.1.0, SVG Export Plug-In . SVG Version: 6.00 Build 0) --> <svg version="1.1" id="Layer_1" xmlns="http://www.w3.org/2000/svg" xmlns:xlink="http://www.w3.org/1999/xlink" x="0px" y="0px" viewBox="0 0 128 128" style="enable-background:new 0 0 128 128;" xml:space="preserve"> <style type="text/css"> .st0{fill:#E30313;fill-opacity:0.75;stroke:#F9B233;stroke-width:5;stroke-miterlimit:10;stroke-opacity:0.5;} </style> <symbol id="rombs" viewBox="-44.515 11.475 48.051 48.051"> <path class="st0" d="M-20.49,43.294l-6.348,6.348l6.348,6.348l6.348-6.348L-20.49,43.294z M-28.284,35.5l-6.348,6.348L-40.98,35.5 l6.348-6.348L-28.284,35.5z M0,35.5l-6.348,6.348l-6.348-6.348l6.348-6.348L0,35.5z M-14.142,21.358l-6.348,6.348l-6.348-6.348 l6.348-6.348L-14.142,21.358z"/> </symbol> <use xlink:href="#rombs" width="48.051" height="48.051" x="-44.515" y="11.475" transform="matrix(1 0 0 -1 54.1565 66.8333)" style="overflow:visible;"/> <use xlink:href="#rombs" width="48.051" height="48.051" x="-44.515" y="11.475" transform="matrix(0.6453 0.7639 0.7639 -0.6453 79.8232 84.2069)" style="overflow:visible;"/> <use xlink:href="#rombs" width="48.051" height="48.051" x="-44.515" y="11.475" transform="matrix(1.773 0 0 -0.5535 100.3277 122.8862)" style="overflow:visible;"/> </svg>1 point
-
tutto normale ti basta scrivere il nome esatto di ciò che non vuoi vedere sul config in GUI/Hide Volume1 point
-
Rifai hack_info e ioreg.1 point
-
TINU is also on reddit now:1 point
-
Non ho capito perché ti ostini a usare FakePCIID.kext con una HD 4000. Devo essere all'oscuro di qualcosa... Sostituisci (NON unire le cartelle). CLOVER.zip1 point
-
No problem. Thanks for the continued updates. I'll keep updating the theme as necessary to keep up with Clover changes. I'll also continue to work on Clover SVG Theme Builder to help others create simple themes.1 point
-
This is friday,, i need to shalat in mosque. Will be back after 2 hours. Try this kext first,, and post the result for front mic. AppleALC.kext.zip1 point
-
Take a screenshot at ouput audio in SYstem preference when you plugin jack to Green port and Front jack audio. Don't put jack in same times.1 point
-
1. If you use _DSM method in DSDT then config.plist won't overide it except patch _DSM to XDSM first to override _DSM method of DSDT. But i made simple solutions,, i set _DSM of HDEF in your DSDT. No need to inject properties of HDEF in config.plist again (config.plist won't override it) 2. I prefer DSDT / SSDT ways then config.plist / boot argument 3. HDMI eGPU need to set HDAU device in PEG0 (Depend your Graphics Cards)1 point
-
Spento riacceso ed è partito crash’s MacBook Pro.zip1 point
-
I believe compilation with XCODE 10.1 is the problem. From your debug log, you are compiling Clover with XCODE 10.1 (with toolchain set to XCODE8) on your system... Build with: [Args: -mc --no-usb -D NO_GRUB_DRIVERS_EMBEDDED -t XCODE8 | -D DISABLE_USB_SUPPORT -D NO_GRUB_DRIVERS_EMBEDDED --conf=/Users/pkovacs/src/edk2/Conf -D USE_BIOS_BLOCKIO -D USE_LOW_EBDA -a X64 -b RELEASE -t XCODE8 -n 9 | OS: 10.13.6 | XCODE: 10.1] I already mentioned in this post that other XCODE versions eg 8.2.1, 8.3.3, 9.2, or GCC5.3, generate working boot6 and boot7 for my legacy desktop (system 2 in signature) but not XCODE 10.1 ---> boot hanging on stuck underscore "_" symbol. Also interesting to note that the officially released Clover r4741 was compiled with XCODE 8.3.3 but r4769 (which also fails for your system) with XCODE 10.1. No, still bad boot6,7 if Clover r4760 compiled with XCODE 10.1 (toolchain set to XCODE8, edk2 r27956). I think the problem/bug is intrinsic to XCODE 10.1.1 point
-
There's no latest version other then last one you can find here: https://sourceforge.net/projects/hwsensors3.hwsensors.p/files/. The very very latest is under testing by me and not commited, but soon I'll post it to let you try before doing a commit.1 point
-
Hello guys! Here's how you can add a signature in your profile. Follow the rules. Signatures, Avatars and Nicks Keep your signature/avatar clean and tidy - should you receive a PM from the staff regarding your signature/avatar, please make the requested alterations or it may be removed/shortened appropriately. To keep pages loading fast for everyone, we request that your signatures and avatars contain no animations or high-definition graphics of any kind. Signatures should be no more than 6 lines of text using a regular font. If you can't fit all of your system specs in that you'd like, why not create a small graphic to contain the information?1 point
-
This Kext activated AR9462,AR9463,AR9485 and AR9565 ,also test the configplist ........ Install in S\L\E IO80211Family.kext and put in Clover\Kext\Other ATH9KFixup.kext and lilu.kext ... Restart your PC and test WIFIAR.zip config.plist.zip1 point