Leaderboard


Popular Content
Showing content with the highest reputation on 11/05/2018 in all areas
-
Introducing the AMD OS X FAQ. This is still currently a work in progress but most of the ground work is there. If you've got any suggestions feel free to email me at shaneee@amd-osx.com https://amd-osx.com/faq/5 points
-
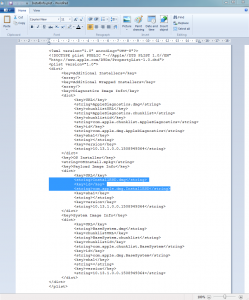
Hint: How to patch Mojave's Combo Update to install on HFs+ If we wanna use macOSUpd10.14.x.pkg to upgrade our not Apfs system (i.e. HFs+ partition) we have to patch distribution file inside .pkg. 1) Expand .pkg pkgutil --expand /Users/username/Desktop/macOSUpd10.14.1.pkg /Users/username/Desktop/macOSUpd10.14.1 2) Edit distribution (we can use TextEdit ) FROM: function FileSystem1(prefix) { if (my.target.filesystem && my.target.filesystem.type == 'hfs') { return true; } return false; TO: function FileSystem1(prefix) { if (my.target.filesystem && my.target.filesystem.type == 'hfs') { return false; } return false; 3) Repack .pkg pkgutil --flatten /Users/username/Desktop/macOSUpd10.14.1 /Users/username/Desktop/macOSUpd10.14.1mod.pkg cheers3 points
-
hi...I have had the same idea see here https://github.com/Gengik84/HFS_ComboUpdate_Unlocker3 points
-
Good news from gengik84 /System/Library/PrivateFrameworks/AppleMediaServices.framework Replace it with 10.14.1, all Apple apps work fine with MBR HFS+ on 10.14.2 18C31g here. I wish the final release will fix the beta bug issue, if it's a bug, not a OOXX.3 points
-
primis backup della attuale efi, magari messa e tenuta anche su una usb a tutela sia per bootare che per reinstallare Essa contiene il 99% di tutta la tua configurazione... mirata sottolineo .. e non fatta a caso come era prima ... per il sistema puo fare un backup con time machine il quale potrai ripristinare al 100%, oppure solo dati o app o impostazioni utente2 points
-
Perfetto ragazzi, tutto ineccepibile e perfettamente funzionante!!!! grazie davvero, siete stati gentilissimi!! E scusate del tempo che vi ho fatto perdere, spero di imparare al meglio andando avanti!! Ora vorrei installare pure windows, per avere una macchina completa da tenere quì a casa e poterci fare un pochino tutto...mi informerò, anche perchè questo thread non è di certo il luogo adatto!! Ultimissima cosa, poi mi congedo...per avere un "disaster backup" dell'intero sistema così com'è ora, da poter recuperare in caso di casini vari, che mi consigliate? Grazie di nuovo a tutti!!!!2 points
-
Eccomi ragazzi...allora, con il cavo DVI la HD530 funziona a dovere!!!!! Ho reinstallato Mojave e ora su info mi da "Intel HD Graphics 530 1536 MB" Ora ho installato Clover come è descritto nella guida di gengik, ma su SSD, ed ho sostituito la cartella clover con quella di iCanaro. Tutto ok... Ora però chiedo a voi, per non fare casini. Non mi funziona la wifi...ho una pci express Tp-link...che kext devo installare? la volta scorsa ho fatto con [url="http://www.insanelymac.com/forum/topic/279450-why-insanelymac-does-not-support-tonymacx86/"]#####[/url], ma mi pare di aver capito che meglio evitare, no?2 points
-
Scusate x l'errore2 points
-
[mention=1069282]vandroiy2012[/mention] I make new resource for ALC255 for Asus X441UA-WX096D. None of layoutid work at currently AppleALC resource github. All configure platform use different NodeID for output device (internal speaker). I have tried it from layoutid 3, 13, 17, 18, 27, 28, 30 and 99 because all platform xml use different node id for internal speaker and different hda config too. I make new configuration with layoutID 21. File attached. But there is problem, about internal and external mic. I am pretty sure set correctly for input node, mixer and pin complex. But still not work, maybe special treatment for AMP-In values. But many Asus X441UA or maybe another device with same output node and hda config value can't use AppleALC.kext for now. It's still good to use Internal speaker and headphone than none. Maybe at future i will check and upload new revision for internal / external mic. I attach codec dump and new AppleALC.kext (include new ALC255 configuration, recompiled with lilu 1.2.8). Please check and add to repository, sorry for bad english New Resource ALC255 - ID = 21.zip codec_dump.txt AppleALC.kext.zip2 points
-
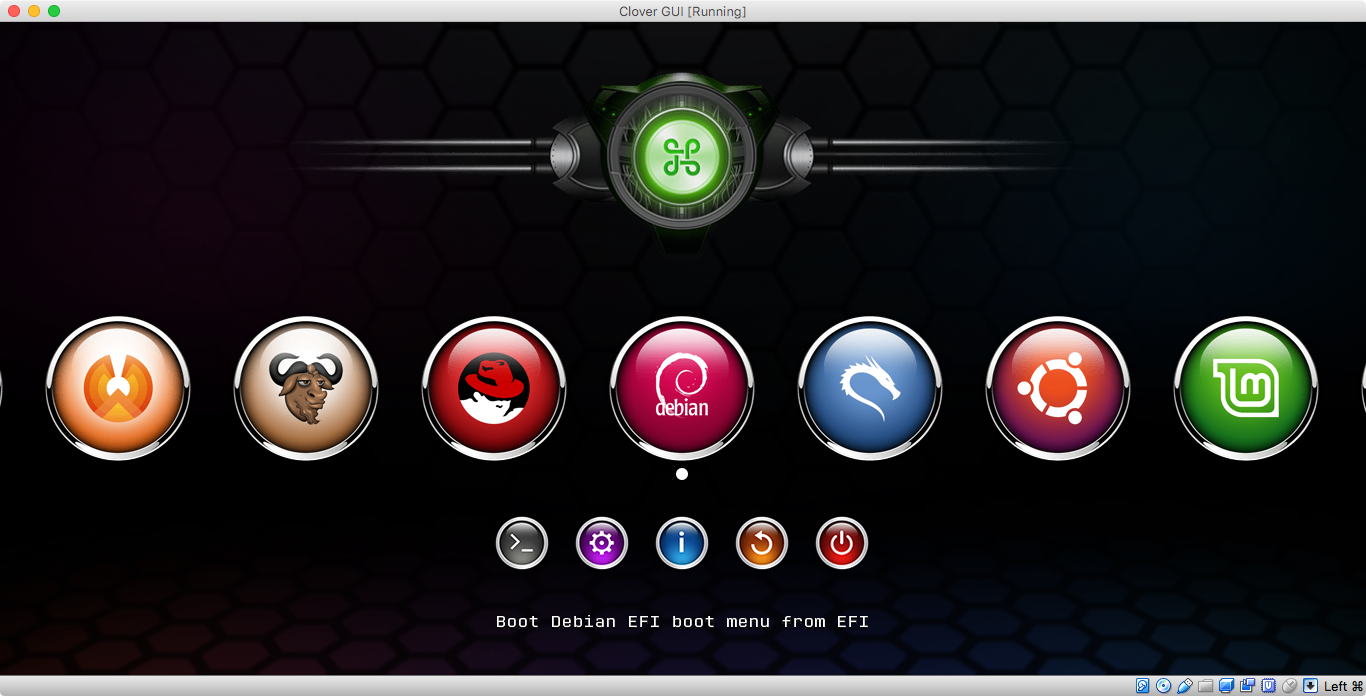
<clover:theme SelectionOnTop="0" BadgeOffsetX="0xFFFF" BadgeOffsetY="0xFFFF" NonSelectedGrey="0" CharWidth="16" BackgroundDark="1" BackgroundSharp="0x80" Badges="none" BackgroundScale="scale" SelectionColor="0x80808080" /> Possible values are Badges="swap inline none" in any combination.2 points
-
Good job with the continued changes and improvements with SVG support. And I see the Clovy theme is becoming more polished and including more icons. I'll play and learn with this theme while it's being developed. @Slice Is there anyway yet to instruct SVG theme to use <key>Theme</key> <dict> <key>Badges</key> <dict> <key>Swap</key> <true/> </dict> </dict>2 points
-
 Good news from gengik84 /System/Library/PrivateFrameworks/AppleMediaServices.framework Replace it with 10.14.1, all Apple apps work fine with MBR HFS+ on 10.14.2 18C31g. I wish the final release will fix the beta bug issue, if it's a bug, not a OOXX.2 points
 -
The MBR-Automatic-Method can install over 10.14.0, but MBR-Manual-Method can't.2 points
-
Thanks, no problem to fix.2 points
-
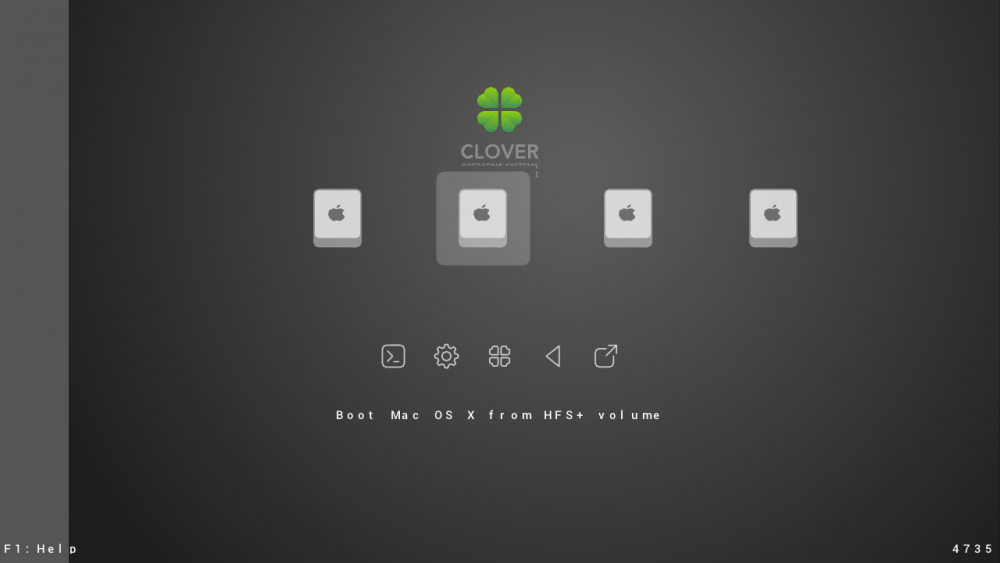
Thanks @Slice for commits 4735. In addition to the remarks of @chris1111 and @Badruzeus: There is always a gray bar on the left side of the screen. First picture: repo. Second image: test on my system

 2 points
 -
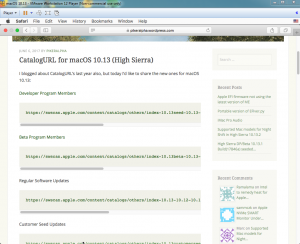
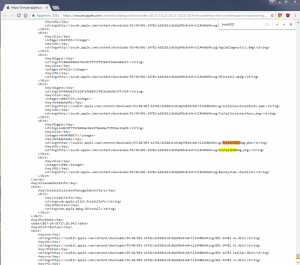
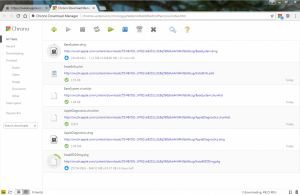
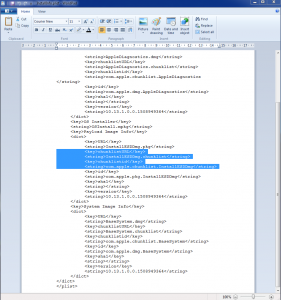
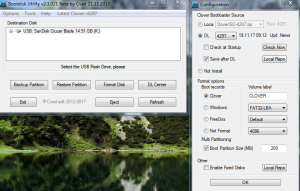
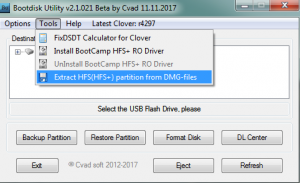
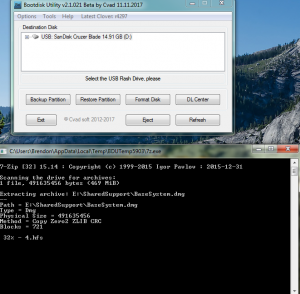
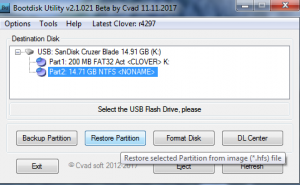
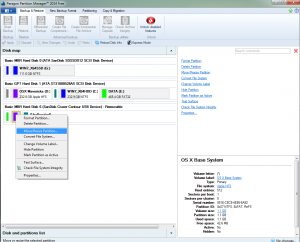
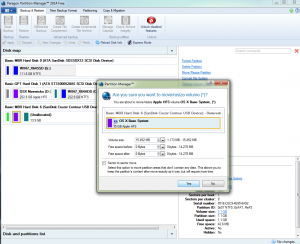
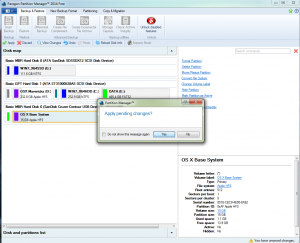
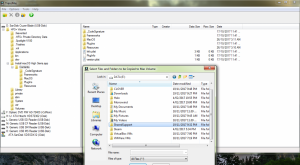
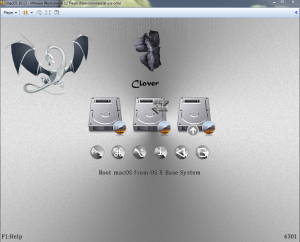
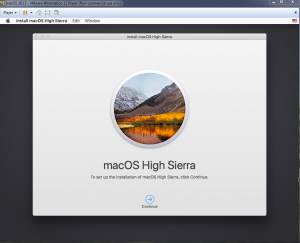
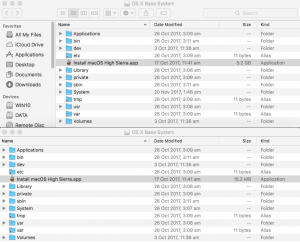
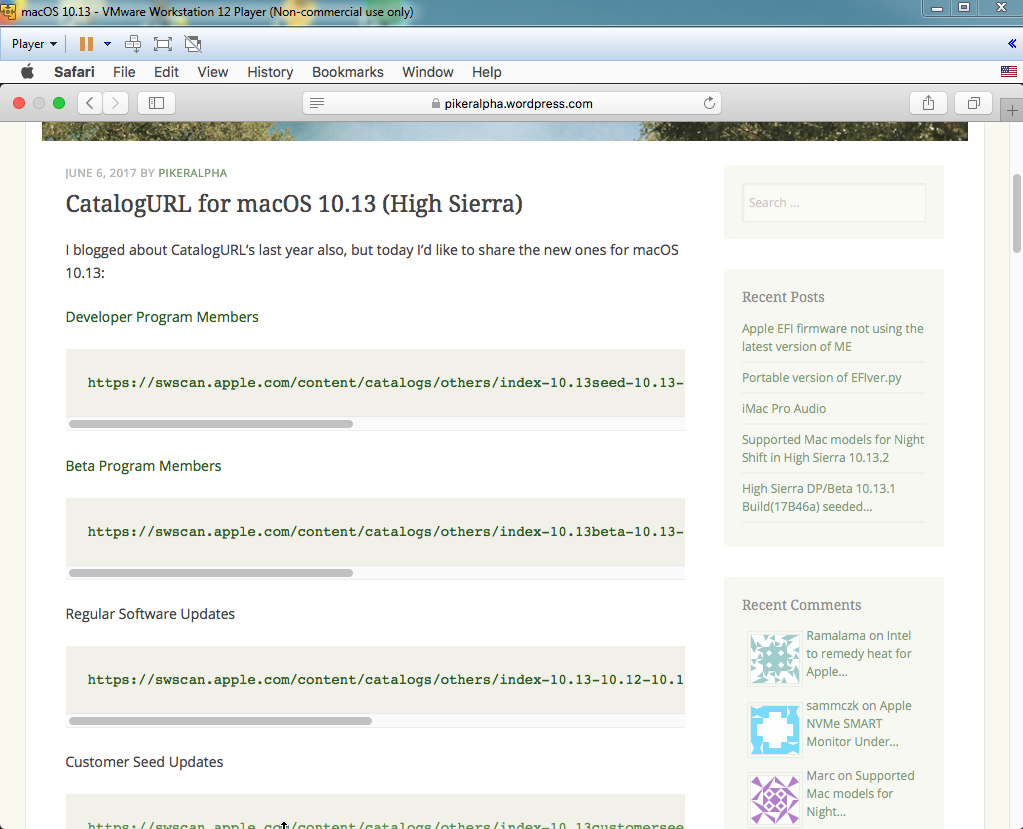
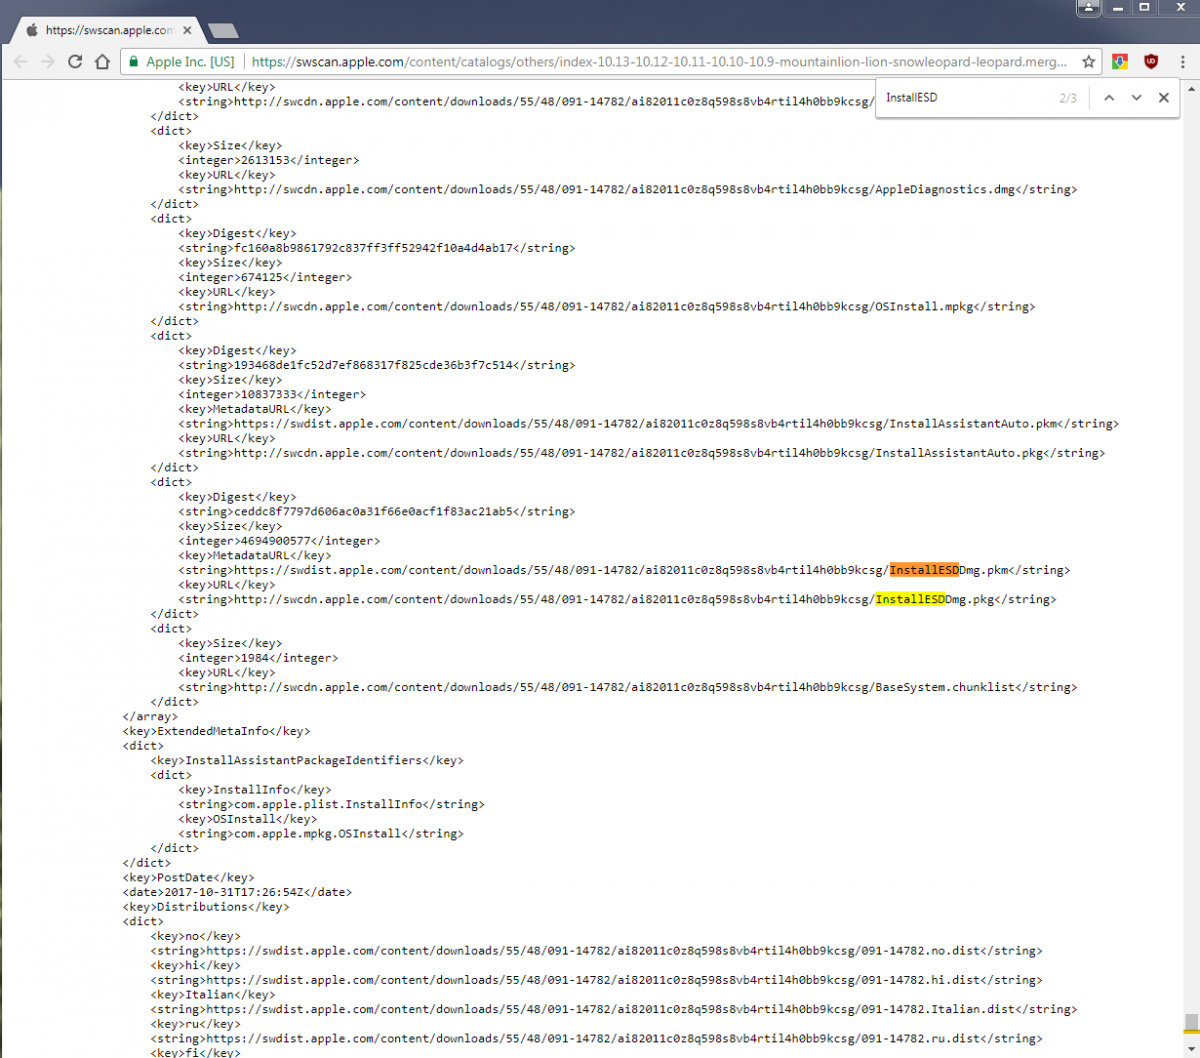
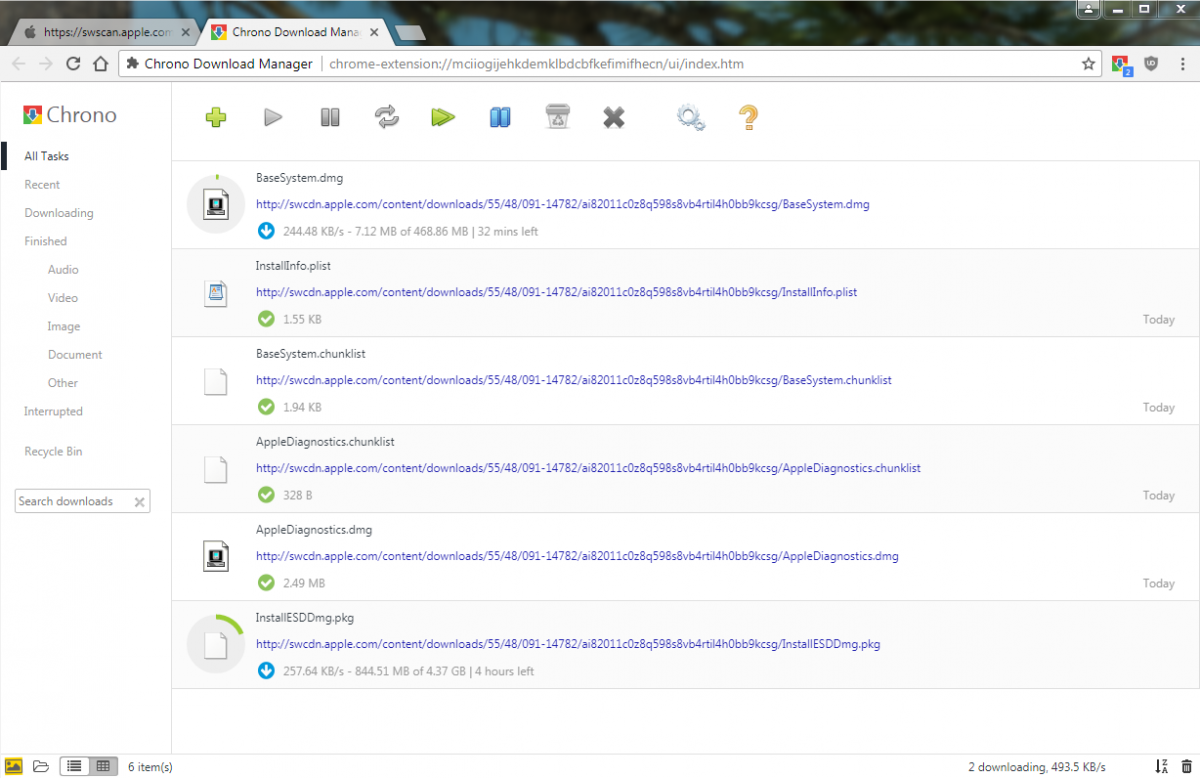
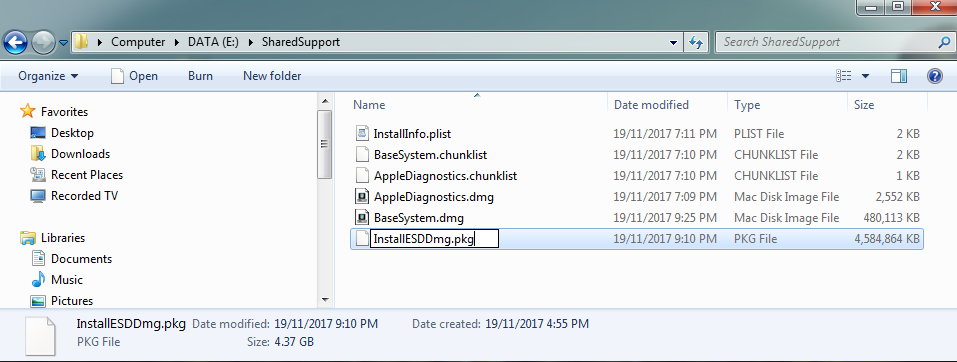
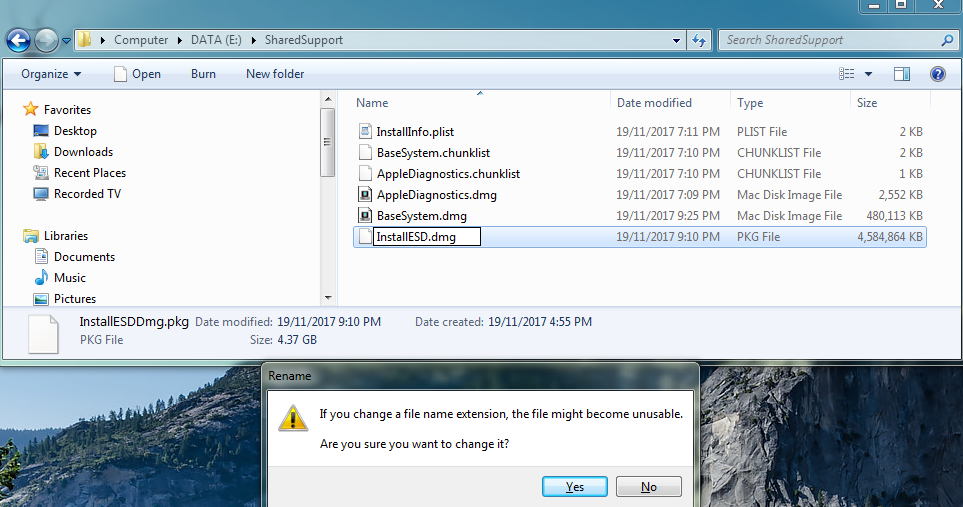
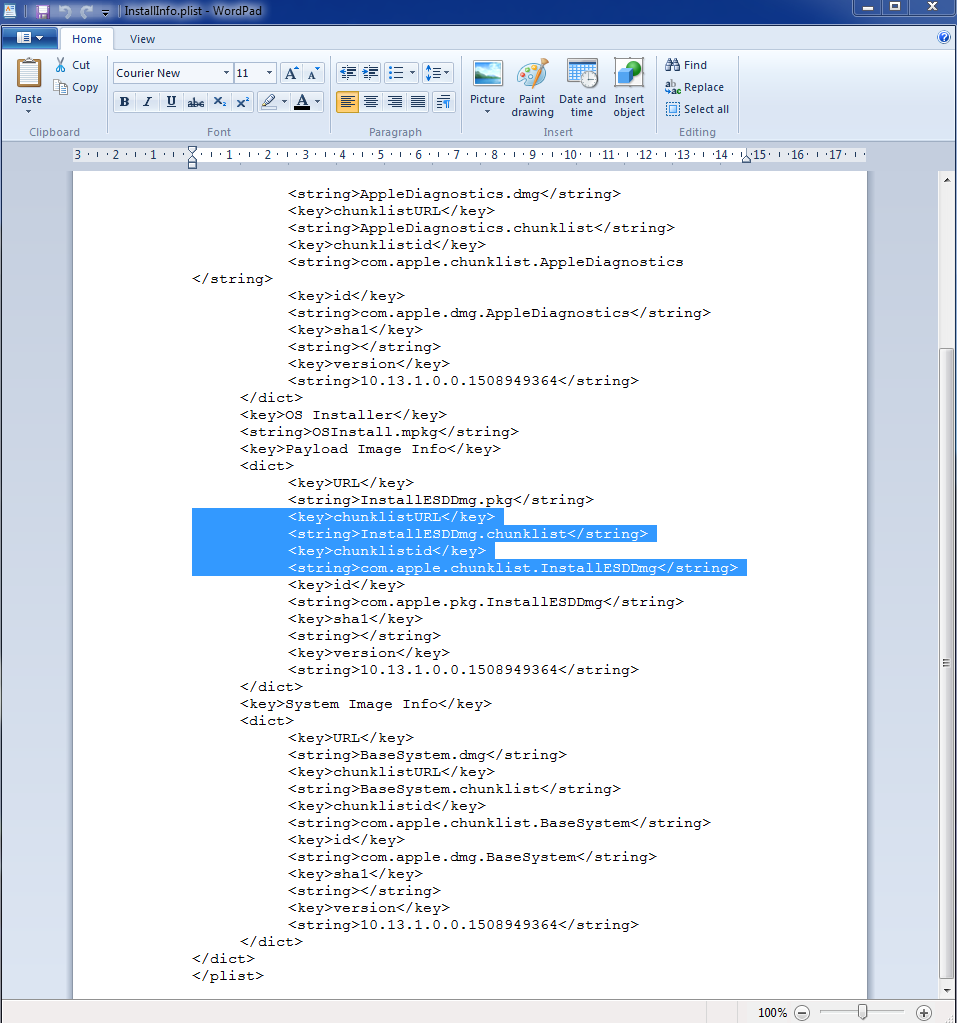
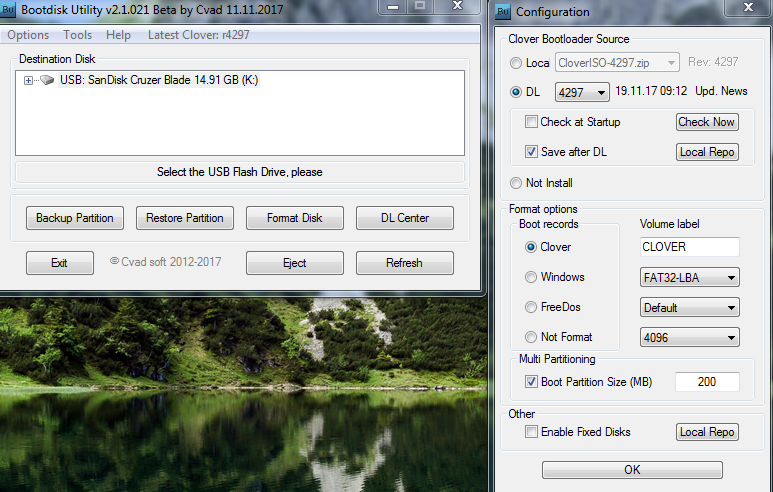
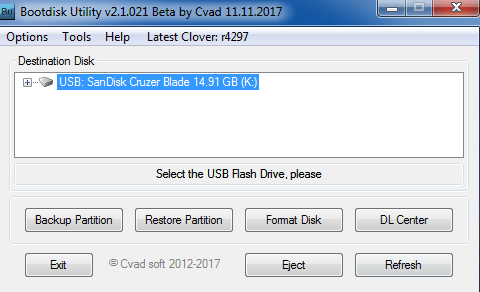
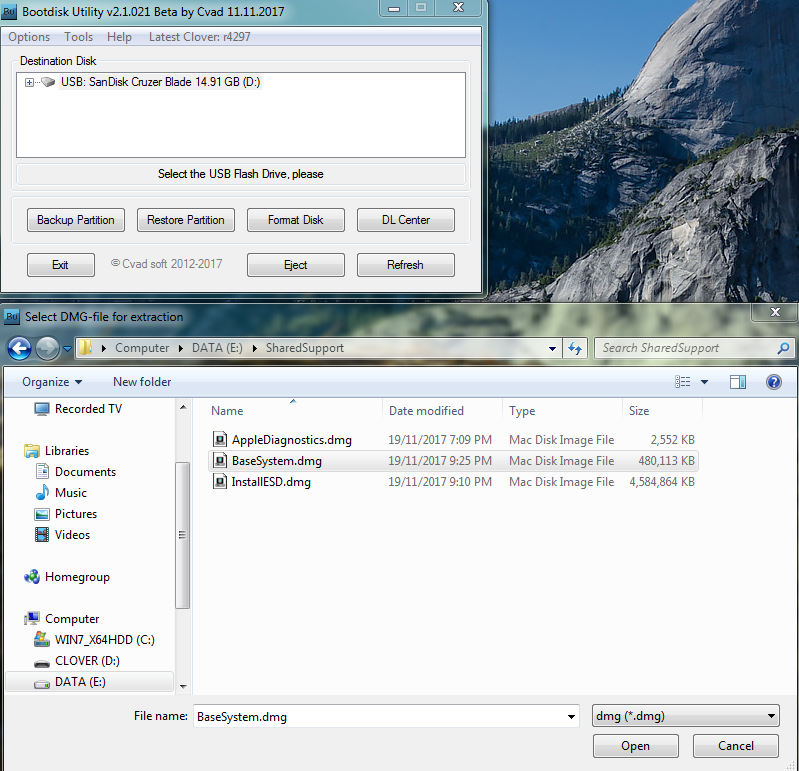
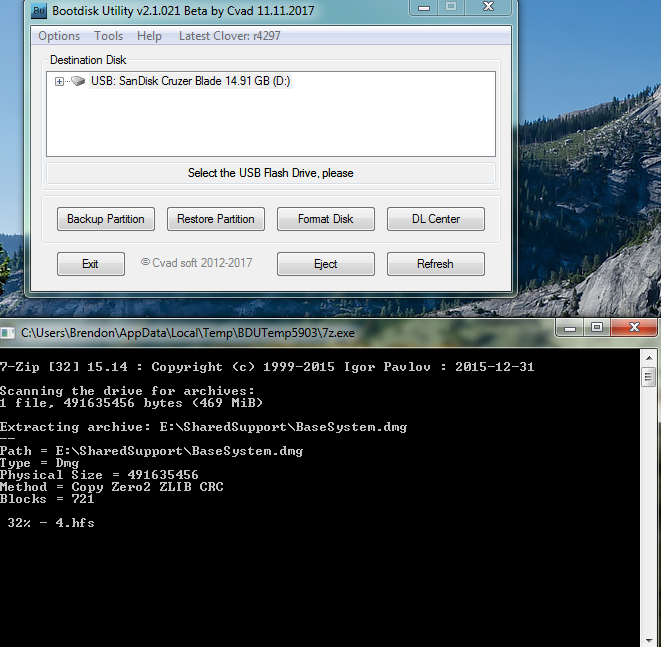
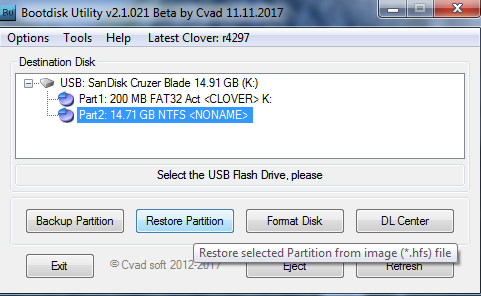
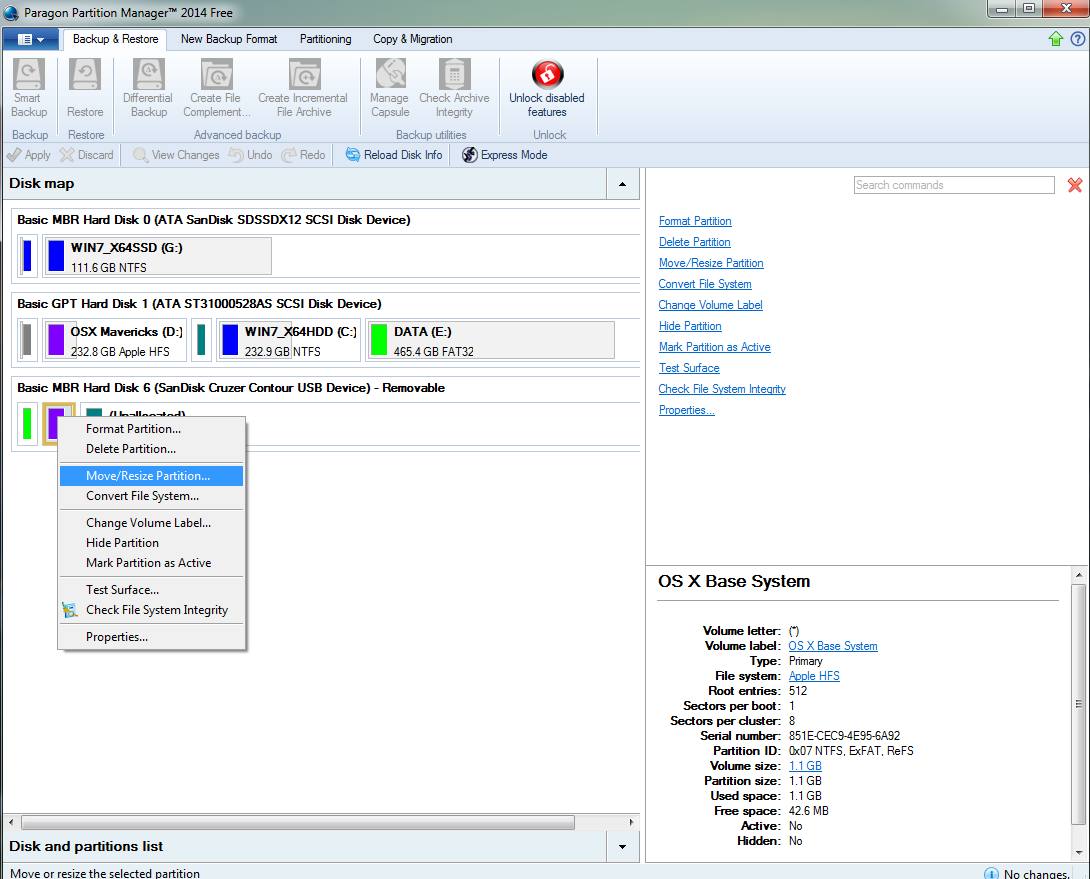
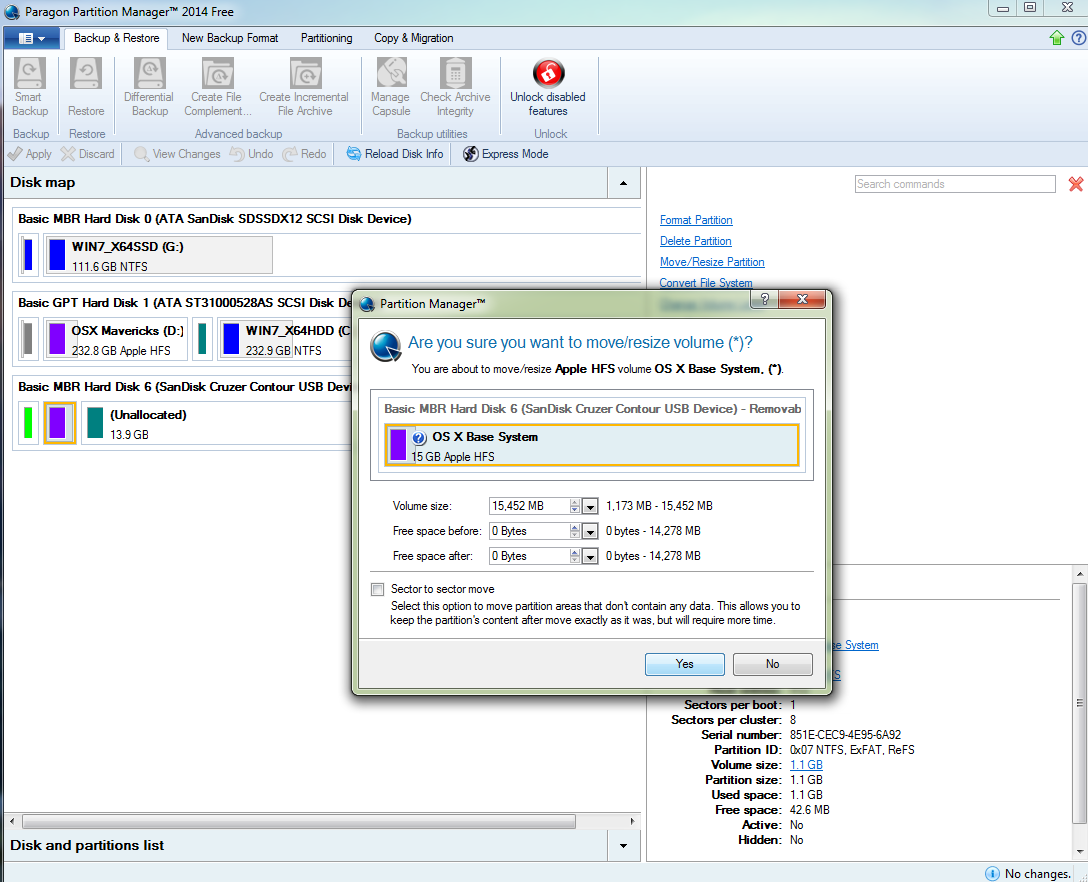
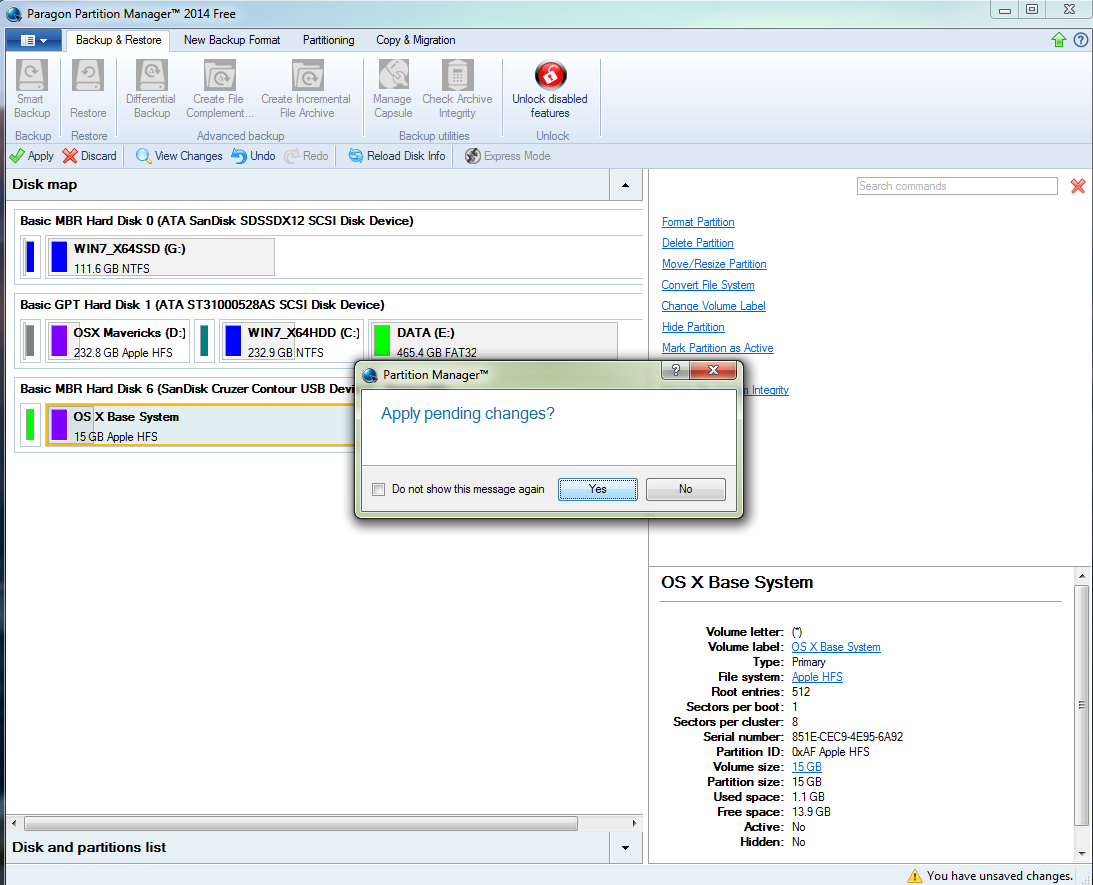
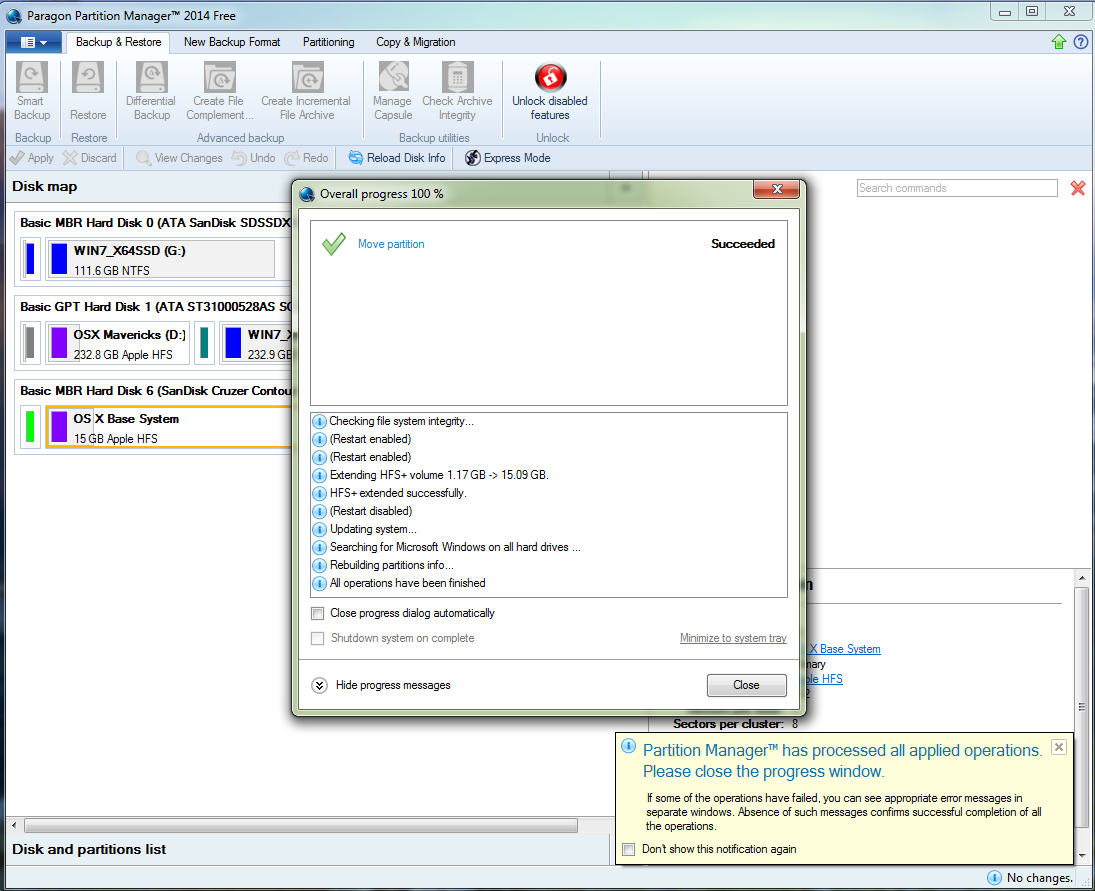
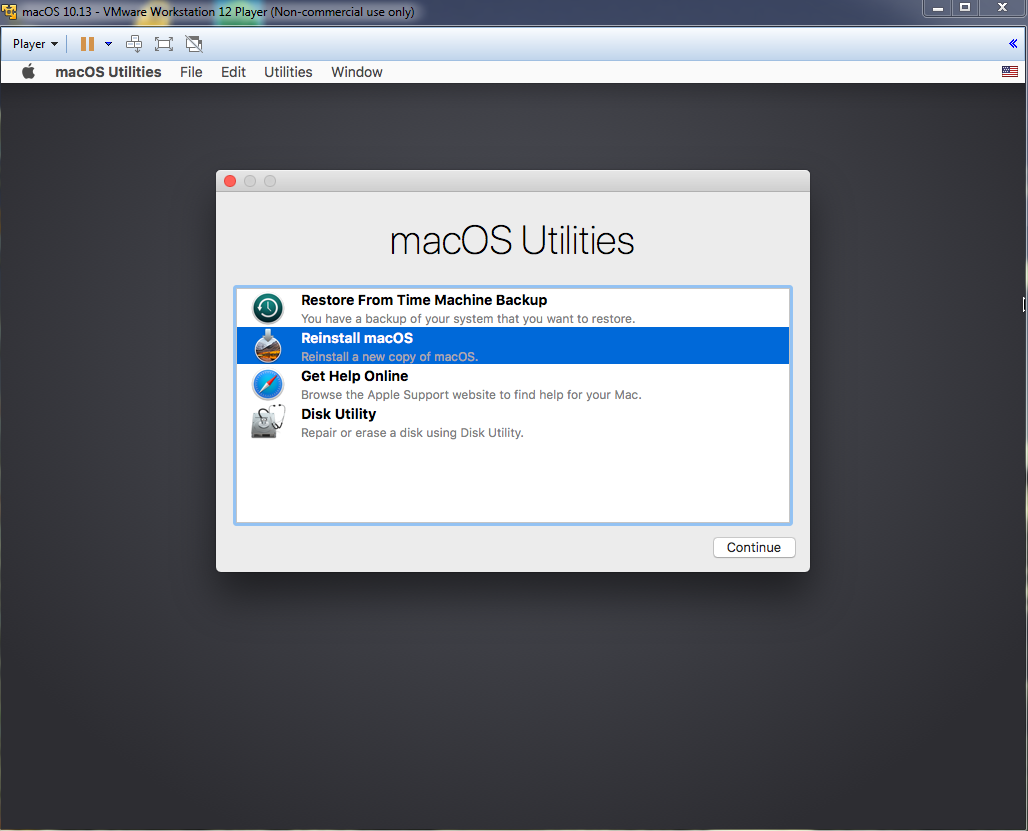
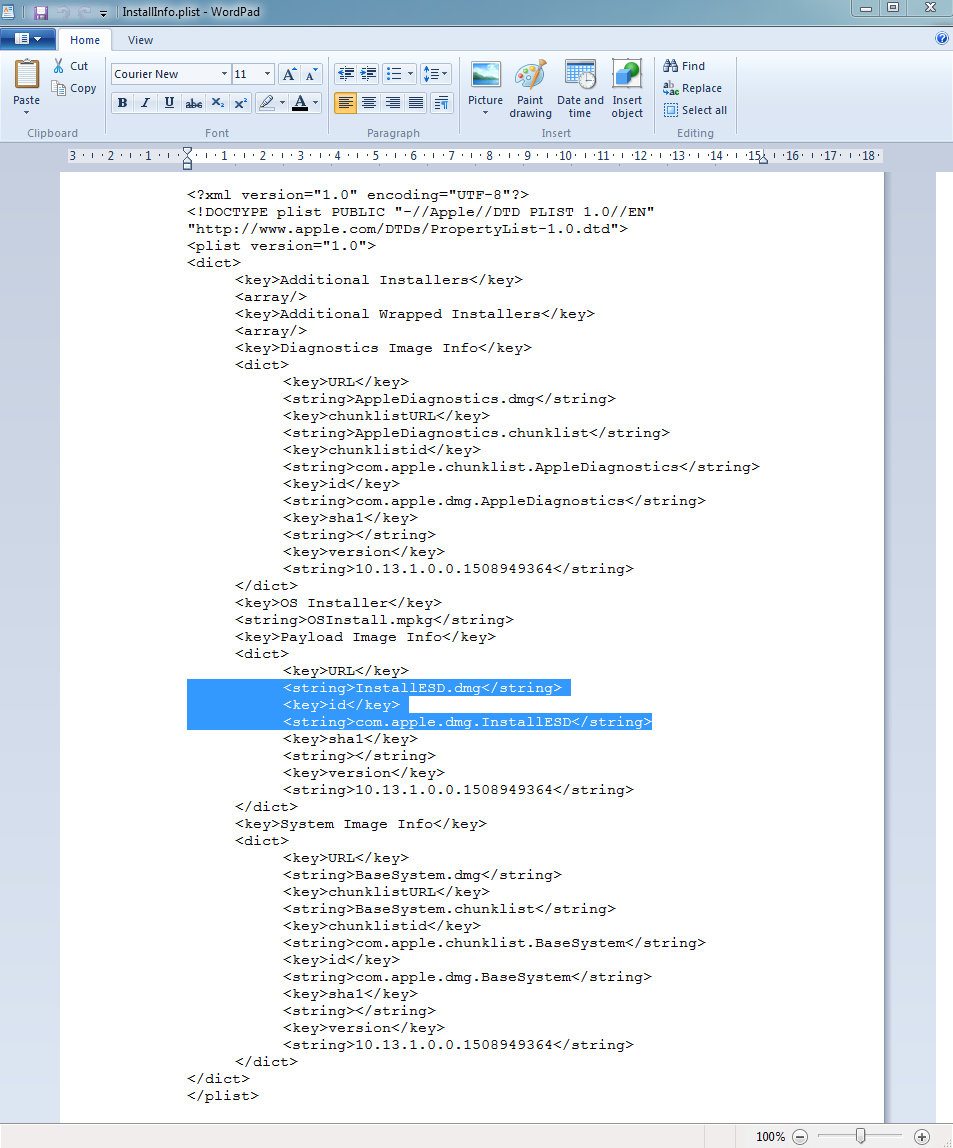
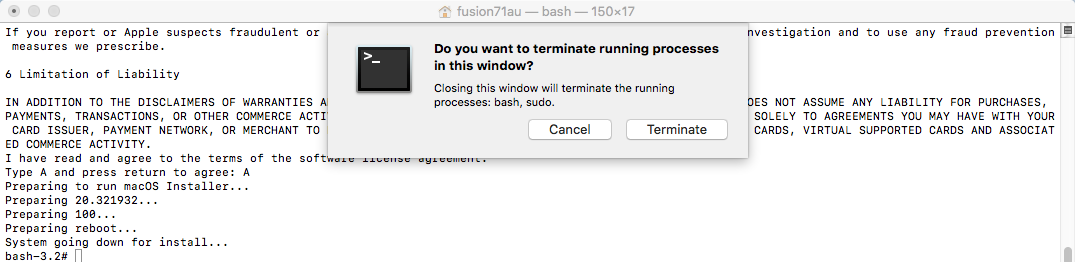
Making a High Sierra USB Installer Entirely From Scratch in Windows This is a proof of concept tutorial, to show it's possible to create a vanilla High Sierra installer, entirely from scratch, in Windows (even without App Store downloaded "Install macOS High Sierra.app" from a real Mac ). @PikeRAlpha's link to Apple's Software Catalog provides us with all the URLs necessary to download the needed files directly from Apple instead of some dubious source from the internet... Pre-Requisites 8GB or larger USB drive. Edit: Recommend 16GB or larger for macOS Catalina 10.16 Boot Disk Utility v2.1.2017rev021b from @CVAD TransMac (free 15 day trial) Paragon Hard Disk Manager Free Download Installer Files Directly from Apple 1) Browse Apple's Regular Software Catalog and find the URLs to download the following 6 installer files... BaseSystem.dmg BaseSystem.chunklist InstallInfo.plist InstallESDDmg.pkg AppleDiagnostics.dmg AppleDiagnostics.chunklist (Hint - search page for "InstallESD" to find its URL and others nearby) to a folder named "SharedSupport" on your Windows NTFS drive. A browser download manager (eg Chrono for Chrome, dTA for FireFox) is handy since InstallESD is >4GB ---> allows you to pause/resume interrupted download... 2) Rename InstallESDDmg.pkg to InstallESD.dmg 3) Edit InstallInfo.plist with WordPad/text editor to remove the chunklistURL and chunklistid keys for InstallESD, and renaming it from InstallESDDmg.pkg to InstallESD.dmg (example of edited file attached to this post)... Note: You can verify the SHA1 checksum of your InstallESD.dmg and BaseSystem.dmg with the correct ones at this website. Boot Disk Utility to format the Installer USB and Restore OS X Base System HFS partition 1. Format USB with BDU & latest Clover ---> creates boot files in CLOVER partition + second FAT partition 2. Extract 4.hfs from \SharedSupport\BaseSystem.dmg with BDU --> save to it's local folder 3. Restore 4.hfs to USB second partition with BDU ---> 2nd partition becomes bootable "OS X Base System" Paragon Hard Disk Manager to extend HFS Partition to its Full Extent Open Paragon Partition Manager Free and resize the second partition of the USB drive to the full size allowed. Don't forget to apply the changes at the end... Transmac to Copy "SharedSupport" folder to OS X Base System 1. Open the TransMac program and navigate to the HFS+ Volume/Install macOS High Sierra.app/Contents folder. Right click anywhere in the empty space on the RHS pane and select "Copy Here"... 2. In the next stage, select the "SharedSupport" folder we created above as the "Files and Folders to be copied to the Mac Volume"... Clover Settings Clover configuration is required now. The default config.plist (in the Clover FAT32 partition of the USB) maybe sufficient to boot your machine if you’re lucky. If not, the hackintosh-vanilla-desktop-guide has some good explanations on the various settings available and also offers sample configuration files based on CPU type. Also, look at the Clover Wiki, Clover Instructions and Clover Configuration Thread for pointers and edit /EFI/Clover/config.plist accordingly with Wordpad or Notepad. The location of the important configuration files for Clover are summarized below config.plist--->EFI/CLOVER folder DSDT.aml with or without SSDT.aml--->EFI/CLOVER/ACPI/patched (don't need one if your DSDT is auto patched by Clover in config.plist) Kexts eg FakeSMC, NullCPUPowerManagement --->EFI/CLOVER/kexts/<osx version> or /Other. NB BootDiskUtility by default already has FakeSMC.kext installed here. You may need to add VoodooPS2Controller for your laptop keyboard/trackpad to work. If UEFI booting, you will most likely need one of the OsxAptioFixDrv-64 drivers copied from /EFI/CLOVER/drivers-off/drivers64UEFI to /EFI/CLOVER/drivers64UEFI. If you want to use the installer to run High Sierra in Windows on VMware, you can follow my guide to set up the Virtual Machine and replace Clover's default config with EFI_Clover for VMware (which is compatible to run in VMware). In the screenshots below, I have attached the USB Installer (in this case PhysicalDrive7) to my macOS Virtual Machine. Reboot the system to the USB installer to install High Sierra ... What happens if we don't have access to TransMac or Paragon Hard Disk Manager? Not a problem, as long as we get "OS X Base System" bootable, we can launch terminal from the Utilities Menu to copy the SharedSupport folder over to the Installer app. In essence, we will build the full installer app = 5GB+ on the target HD eg "Macintosh HD", by copying both the "small" installer app = 15MB (on "OS X Base System") and the SharedSupport folder from the NTFS volume (mounted in this example on /Volumes/DATA)... -bash-3.2# cd / -bash-3.2# cp -R Install\ macOS\ High\ Sierra.app /Volumes/Macintosh\ HD/ -bash-3.2# cp -R /Volumes/DATA/SharedSupport /Volumes/Macintosh\ HD/Install\ macOS\ High\ Sierra.app/Contents/ ...then start installation with the startosinstall utility... -bash-3.2# /Volumes/Macintosh\ HD/Install\ macOS\ High\ Sierra.app/Contents/Resources/startosinstall --volume /Volumes/Macintosh\ HD --converttoapfs NO --applicationpath /Volumes/Macintosh\ HD/Install\ macOS\ High\ Sierra.app The above steps can be automated with the attached "startosinstall.command" script, which will assemble "Install macOS High Sierra.app" on "Macintosh HD" and launch the startosinstall utility targeting the "Macintosh HD" volume. Copy/download to "Macintosh HD", then run in terminal (after attaching DATA USB with /Shared Support folder)... cd "/Volumes/Macintosh HD" chmod +x startosinstall.command ./startosinstall.command Updated Download Links for macOS Mojave 10.14.6_18G103 Browse Apple's Regular Software Catalog and find the URLs to download the following 6 installer files... BaseSystem.dmg BaseSystem.chunklist InstallInfo.plist InstallESDDmg.pkg AppleDiagnostics.dmg AppleDiagnostics.chunklist Note: In Mojave, Apple has removed the --converttoapfs NO and --applicationpath arguments from the startosinstall utility.... eg to use startosinstall for the above section "What happens if we don't have access to TransMac or Paragon Hard Disk Manager?", the syntax is now -bash-3.2# /Volumes/Macintosh\ HD/Install\ macOS\ Mojave.app/Contents/Resources/startosinstall --volume /Volumes/Macintosh\ HD This basically means that for Mojave, the default installation will always convert the target volume to the apfs file system. Updated Download Links for macOS Catalina 10.15.6_19G73 Browse Apple's Regular Software Catalog and find the URLs to download the following 6 installer files... BaseSystem.dmg BaseSystem.chunklist InstallInfo.plist InstallESDDmg.pkg AppleDiagnostics.dmg AppleDiagnostics.chunklist startosinstall.command.zip InstallInfo.plist_edited_10.13.6.zip InstallInfo.plist_edited_10.14.6.zip InstallInfo.plist_edited_10.15.6.zip


 1 point
 -
AMD Mojave Kernel Development and Testing This thread is only for the purpose of development and testing the kernel and it's source for AMD on Mojave. Any support questions regarding installation or post install will be removed. Installation support forum - https://www.insanelymac.com/forum/719-amd/ Post Installation support forum - https://www.insanelymac.com/forum/720-amd/ When reporting tests with a kernel uploaded please provide the following, Output from Terminal of " sysctl -a " when possible. CPU and any OC settings. Graphics card including Manufacturer name. If you are booting an install USB with a test kernel, please say how you made the installer. Thanks, Shaneee1 point
-
Uploaded wrong picture by mistake at previous message Here is the latest one Thanks!
 1 point
 -
devi mettere il nome esatto se nella gui di clover leggi Preboot scrivi questo sul config.. etc etc per il tema diciamo di default, nella parte GUI/theme scrivi embedded esempio
 1 point
 -
ToledaARPT... in efi poi il kext come l'hai installato in S/L/E? per installarlo usa https://www.insanelymac.com/applications/core/interface/file/attachment.php?id=187043 ti allego l'altro toledaARPT.kext.zip1 point
-
@Rodion2010, try this: HWMonitorSMC2.app_Rodion_CPU_2.zip, I think I got it.1 point
-
@Baio77 quella scheda è AR9287 credo che fosse questo che volevi sapere? @mr.penot oltre a reinstallare il kext di 10.13 ti serve un ulteriore kext...esempio ToledaARPT da mettere in EFI1 point
-
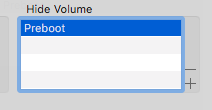
https://www.macos86.it/viewtopic.php?p=9745#p9745 x le kext Hide Volume inserisci il nome della voce da NON visualizzare deve essere come lo vedi scritto rispettando spazi e caratteri esempio Preboot
 1 point
 -
Hai assolutamente ragione!! Faccio una prova, dato che non mi costa nulla...mal che vada son già pronto a prendere un Acer SA240Ybmid sull'amazzone...1 point
-
@arsradu It worked I changed to MacPro6,1 in SMBIOS and it's working the preview. Hurray. Thank you so much.1 point
-
Yeeees! We did it! Thank you crazybirdy, gengik84 and everybody else involved! I rolled back everything again, took a deep breath and then ran Q7 updater script. I then shut down the machine, booted up in single user (trivia: In my first attempt I forgot to disable SIP before updating, so I had to do everything twice. Ouch!), refreshed kextcaches and after a fairly quick reboot it's finally up and running: Apple apps work. Thank you very much for your help, it is greatly appreciated. Now let's test how stable it is!1 point
-
Use this,,, your audio will work again. Just use latest Lilu.kext and AppleALC.kext I correct your config.plist and DSDT.aml. Just give it a try. And put all 3rd party kext at EFI/CLOVER/Kexts/Other to avoid duplicate using kext and make easy to tracking the problem config.plist DSDT.aml1 point
-
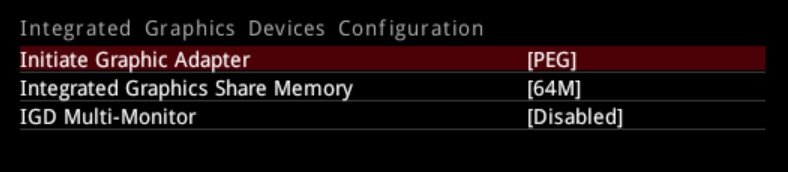
I can't find iGPU in BIOS. In Graphics it only allows me to choose between IGD or PEG Below I can specify shared memory and IGD Multi-Monitor. Similar to the screenshot.
 1 point
 -
Thanks @Slice, with r4737.. banner animation is working again, but weird it is not on 1280p DisplayWeight (which on r4728 or below revs were working). I by mistake pressing F9 on Clover GUI then got it . Is there any banner weight size limitation? I use 846px for Gothic banner weight, too wide?
 1 point
 -
Well, you've got multiple options. And your setup is actually very similar to mine. So I guess I have some experience with that. Let's start with: which SMBIOS are you currently using? If you went for iMac14,2 for example or even iMac18,3 make sure the iGPU is enabled in BIOS (you can easily enable it by going under dual-monitor and enabling that option). Add 64MB for the iGPU and that's all. Make sure you use WhateverGreen.kext so your computer doesn't freeze on certain websites. Alternatively, you can simply use a MacPro5 or MacPro6,1 SMBIOS and you won't have to worry about the iGPU anymore, since those don't have iGPUs in the first place. So, if you're going the SMBIOS route, make sure you either enable the iGPU in BIOS and use WEG, or use an SMBIOS like the ones for Mac Pro or iMac Pro which don't require you to enable the iGPU. I actually tried the NoVPAJpeg kext myself and just like you, it didn't do anything for me. Maybe I missed something, maybe there are other reasons why it didn't work. I didn't have the time to investigate that. But personally, I already have at least 2 other methods to get this to work. And I already described them for you above.1 point
-
Attento che a ogni aggiornamento di sicurezza ti conviente prima disinstallare i web driver. Mojave non compare tra gli aggiornamenti.1 point
-
@Slice I just realized that not all Banner animations are stop working; I mean.. on Bitmap themes. My Clovernity theme with 6 frames is working fine (320x160px for png), but Gothic theme with 14 frames is not (846x192px). I also have a question; do you wanna change Transparency level once more time? The current rev is good for transparency, with light theme I no longer see black hair line surrounding it' s transparent layer w/o ColorMatte. So, I need to redesign my prev. themes which have icons transparency to adapt this change. Thanks.1 point
-
Two new Clover themes are available on the repo: 1. Emerald 2. Oceanix1 point
-
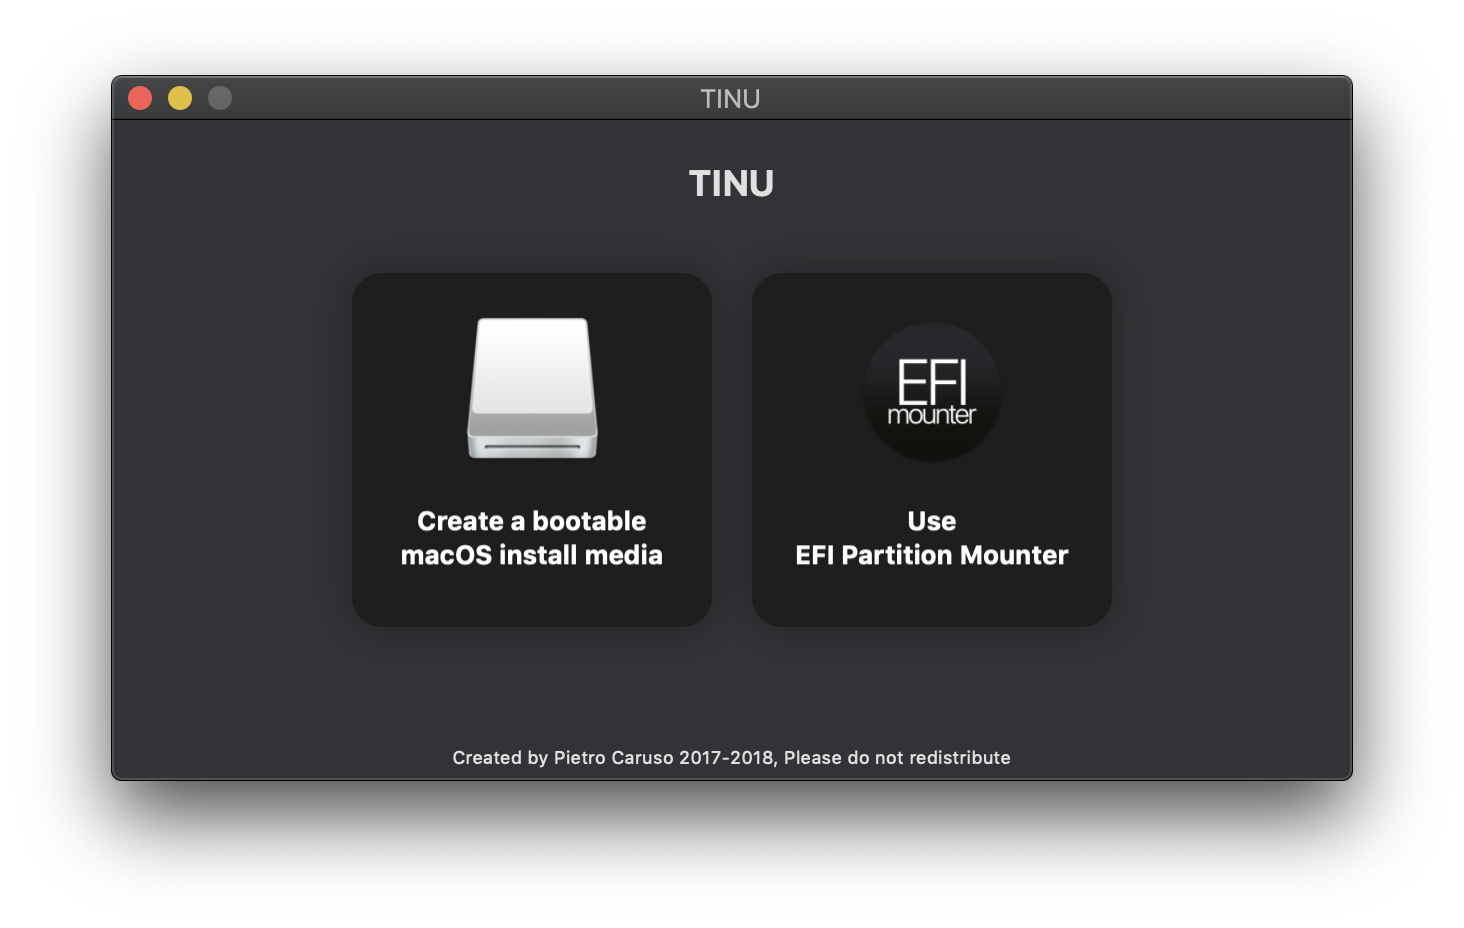
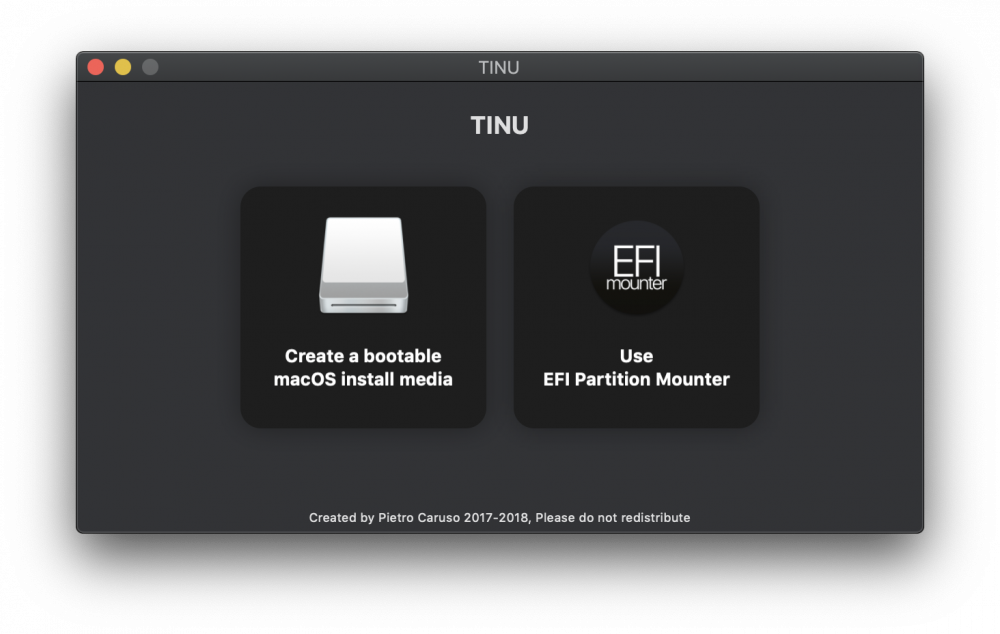
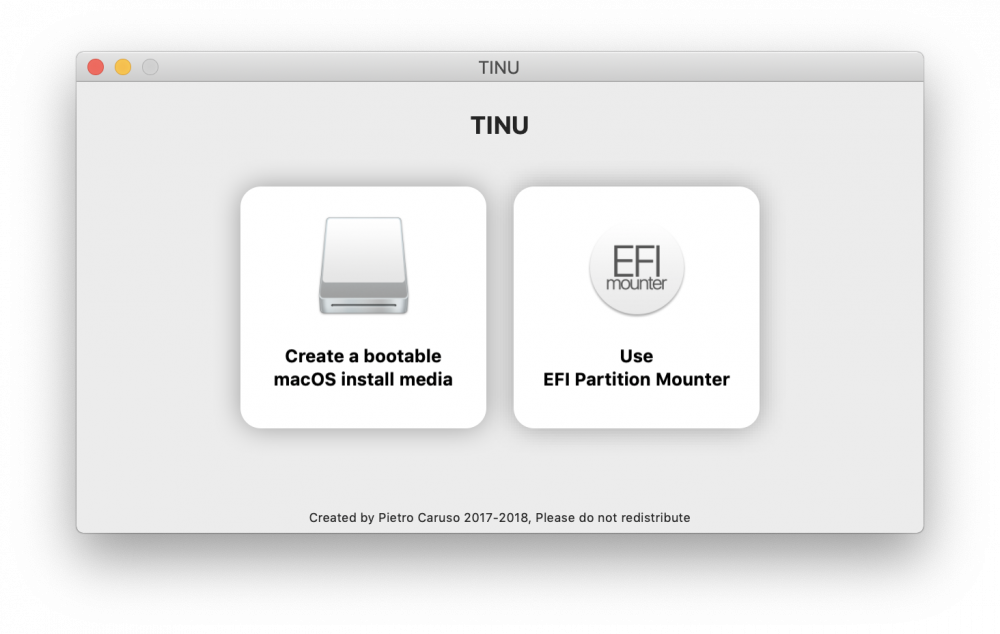
Wish Pike was still around, he would have already had something for us to play with. Will start poking around to see what I can dig up before this week. By the way Pietro, your TINU app has a lot of promise. I used it to create an installer, I will try using it this week and see how well it works. Thanks for the contribution and all the hard work. Nice video with Paul, can't wait for the next one. You should be able to get HD630 running without the MacMini SMBios. What have you tried?1 point
-
update to 10.14.1.18B75 via installScript_1014, and boot -s with following commands. All apple app work fine. mount -uw / kextcache -i / reboot credit to gengik841 point
-
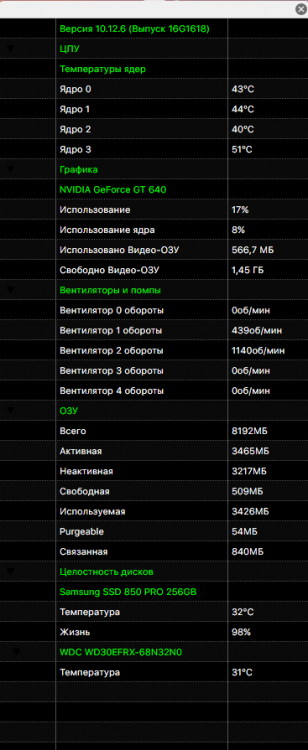
GHz = ГГц GB = ГБ mWh = мВт⋅ч J = Дж °C = °C1 point
-
Alessandro Volta = Алессандро Вольта1 point
-
now it works except CPU temperature
 1 point
 -
Works. It is necessary will add the translation on Russian, dimensionalities. MHz = МГц W = Вт V = В rpm = об/мин MB = МБ mV = мВ mA = мА1 point
-
I I copy your new EFI but I change ncpi=0X2000 (in the new it was uncheck and don't work) I reinstalled AppleHDA.kext under /System/Library/Extensions using Kext Utility (thx all). (I primarily patched the AppleHDA.kext by implementing the realtekALC approach. I´am a fan of your guide ) Thunderbolt in my BIOS settings is as outlined in your guide but I didn't install any driver from Windows. I don't have HD to complete the operation and now I don't have Windows HD. (Waiting for NVMe SSD) My USB dock only work with the USB port of the Thunderbolt Card. very funny or For my use it´s ok, but I think it could be help for those having same problems with USB Dock and needs of it. I change info en GoogleDrive. https://drive.google.com/drive/folders/1FMvukFPvyQNf473EnwwSLzcO2pb7Jpbr?usp=sharing I´ll keep you up to date with any change. It sometimes difficult to understand where are the problems when you don't know anything of programming and the use of programs as adobe or resolve with their own bugs. Gracias por todo1 point
-
Hola a todos, actualmente tengo instalado High Sierra.1 point
-
latest commits not resolved transparency on icons animation that's broken after 4728 because 4728 works good1 point
-
Hi.. i don't have any issue with hfs on 10.14.2 (I updated from release) For go back to 10.14.1 you can use "combo update" by Apple after unlocked it You have any log about your issue?1 point
-
Congratulations Slice and Clovy. Thank you for bringing the beginnings of an SVG user interface to Clover.1 point
-
Update for "Mojave" theme v1.2: Now, it uses (fake) Dynamic background by default
 1 point
 -
Finally I am back to work with this app, I have implemented the new system for authentication, which needs some extra testing, and I have also implemented a new initial screen and I am also working on optimizing the maojave dark mode support
 1 point
 -
Hi, Here it is (attached) for anyone who needs it for patching or restoring! Taken from macOS 10.14 Beta 1 18A293u Regards, Mohamed AppleHDA_282.5.kext.zip1 point
-
 Thanks. It worked. I don't know why I was not able to see the Create New VM for Apple . but I must be frank that I used the unlocker 1.3 on VMware Workstation 11 before using unlocker 2.0 when I first installed VMware Workstation 11. I also noticed a faster booting time with Mac OS X Yosemite.1 point
 -
Work in progress – a painful slow progress even... Introduction I started this new topic here because I think that most of us are ready for the next step. I mean our hacks are working, mostly thanks to devoted hackers / developers thank you very much, but the Chameleon boot process is still taking ages. Way too long for my taste. Let's change that shall we. And there are of course a number of things that I tried already, but I cannot possibly be the only person who tried to speed up the boot process now can I. So. Are you also interested in speeding up your boot process, then please join me and start sharing ideas and information, so that everyone here can benefit from our work. This is of course just an initial announcement, but good things are about to happen.... that is when enough people share the same passion and need for speed. What are your plans Chief? First. This all is still A WORK IN PROGRESS – pardon the shouting – and it will take me some time before everything I want to talk about is either added here or linked to. And certain parts of my text will be rewritten, replaced with better text. At least two subjects here already will eventually be moved over to a new thread. So that we can link to it. Now. There are several different areas where we can improve things – at least that's how I see things. Some are easy. Others more complicated. Most of my work here however will be limited to the boot process in general. I'll also mention / link to previously explored subjects like DSDT patching, but hardware hacking like BIOS modifications may only appear in the form of links here. And let's be perfectly clear about one thing; flashing a modified BIOS may end in misery. Also. You are doing everything on your own risk! Don't feel comfortable? Then please don't even start. Still here? Fine. Let us start with a relatively easy process. Gathering data. And for this we'll be looking at the boot process first. Boot process I don't intent to explain every single little detail here because there are plenty other places on the web doing a great job already. Google or Bing should help you get there. However. There are a few areas we should name: 1) BIOS Post – The time it takes to go through the BIOS initialization, this includes ACPI and USB initialization. - Disabling ACPI for all but the boot drive shortens the time it takes to go through this process. 2) Text Spinner Duration – The time it takes to load boot2. - With the in-BIOS version of Revolution this process is eliminated. 3) Post Screen Blanking – The time it takes before the screen turns gray. - I have modified some of the Chameleon function to perform this step a little quicker. 4) Screen Blanking Duration – The duration of the gray screen. - The time it takes to load either Extensions.mkext or the kexts one after the other (need to check with a reduced copy of Extensions.mkext again). 5) Post Spinner Initialization – The time it takes before the spinner starts revving. - Undetermined (Kernel load time?). 6) Spinner Duration – also known as the Kernel load time. - Undetermined (kernel initialization time?). SSD Drive(s) Having one or more SSD drives helps a great deal, and this task can be done by everyone. And this is by far the best way to boost your boot process. Just have a look at the size of the kernel file, which is one of the big files that needs to be loaded at boot time. No surprises here, but even with a fast SSD drive there are things to speed up the process. Let's have a closer look. pro et contra: Still too expensive compared to regular hard drives, but this is a huge win. A must have! Removing Unused Kexts I presume that most people here already tried this. And some seem to think that is pointless. Probably because Extensions.mkext is not that big after all. Let's look at it. Ah only 8.9MB here. Now try this on a simple USB stick and it will do wonders. It took five revs off here. And not surprisingly, because there was like 40% less to load. Only 5.4MB now. Seems like this actually does something. Even on your ultra fast hard disk. But this might not be what you are looking for. Probably not. And I could remove a few more, but I have only 111 kexts left now in: /Systm/Library/Extensions/ pro et contra: Too much work for only a little gain. Has to be done carefully, and after each upgrade or installation. A must have for CD/USB boot only! DSDT Patching / Stripping The DSDT (Differentiated System Description Table) is one of the other files that are loaded at boot time. And this work is actually done twice (sort of) because it is part of the ACPI in the BIOS. So why do we load it? Simple. It was not written for OS X and thus we have to patch it. My P5K PRO BIOS reserved 35,633 byte for the DSDT. There are also four other tables called SSDT (Secondary System Description Table) in my P5K PRO BIOS, which are much smaller, but these are totally meaningless to OS X. A waste of time to load them. That's why I removed them. You can read more about this task here and here. pro et contra: Been there already. A big plus and a must do! DSDT Loading It should be clear by now that reducing the file size of your DSDT is a good thing. Not only will it load faster, but it will also take less time to do its thing. And the change is pretty obvious when you start with a large file and then use say one of only 2480 bytes. That's how small my DSDT is and I don't even have to load it anymore. Nope. And here is where Revolution comes into place. It not only includes a patched and rather common DSDT but it also enables you to load and/or incorporate a custom SSDT with all your patches. Incorporating DSDT (move to new thread) To be added... pro et contra: This is an absolute must do for the die hard hacker! static uint32_t DSDT_Table[] = { // DSDT in little-endian format 0x54445344, 0x000009B0, 0x30419401, 0x00363139, 0x31393041, 0x32333036, 0x00000032, 0x4C544E49, 0x20080926, 0x5F154E10, 0x085F5250, 0x5F445350, 0x0A050C12, 0x0A000005, 0x50434EFC, 0x53500855, 0x3C125F53, 0x060D1204, 0x100A0000, 0x5350100A, 0x12003154, 0x0000060D, 0x100A100A, 0x32545350, 0x060E1201, 0x100A0000, 0x5350100A, 0x020A3354, 0x00060E12, 0x0A100A00, 0x54535010, 0x08030A34, 0x5F545343, 0x04054E12, 0x1C12030A, 0x0A141104, 0x000C8211, 0x0002017F, 0x00000000, 0x00000000, 0x01010079, 0x12041C0B, 0x1411041D, 0x0C82110A, 0x00080100, 0x00081400, 0x00000000, 0x0A007900, 0xF40B0102, 0x041D1201, 0x110A1411, 0x01000C82, 0x15000008, 0x00000008, 0x79000000, 0x0A030A00, 0x5BFA0A55, 0x50432683, 0x10013155, 0x06000008, 0x53535006, 0x53505F5F, 0x53500653, 0x505F5F44, 0x43064453, 0x5F5F5453, 0x5B545343, 0x50432683, 0x10023255, 0x06000008, 0x53535006, 0x53505F5F, 0x53500653, 0x505F5F44, 0x43064453, 0x5F5F5453, 0x5B545343, 0x50432683, 0x10033355, 0x06000008, 0x53535006, 0x53505F5F, 0x53500653, 0x505F5F44, 0x43064453, 0x5F5F5453, 0x5B545343, 0x50432683, 0x10043455, 0x06000008, 0x53535006, 0x53505F5F, 0x53500653, 0x505F5F44, 0x43064453, 0x5F5F5453, 0x5B545343, 0x4F494280, 0x900C0053, 0x01CFF8E0, 0x420B815B, 0x01534F49, 0x42535341, 0x764E1008, 0x5F42535F, 0x554C825B, 0x30494350, 0x44415F08, 0x5F080052, 0x00444955, 0x42425F08, 0x5F08004E, 0x0C444943, 0x030AD041, 0x49485F08, 0xD0410C44, 0x5F08080A, 0x0A443353, 0x505F0802, 0x40125452, 0x0B12120E, 0xFFFF0C04, 0x00000001, 0x0B12100A, 0xFFFF0C04, 0x00010001, 0x0C12110A, 0xFFFF0C04, 0x020A0001, 0x12120A00, 0xFF0C040C, 0x0A0001FF, 0x130A0003, 0x0C040B12, 0x001FFFFF, 0x120A0000, 0x0C040B12, 0x001FFFFF, 0x160A0001, 0x0C040C12, 0x001FFFFF, 0x0A00020A, 0x040B1212, 0x1DFFFF0C, 0x0A000000, 0x040C1217, 0x1AFFFF0C, 0x00020A00, 0x0B12120A, 0xFFFF0C04, 0x0000001B, 0x0B12160A, 0xFFFF0C04, 0x0001001D, 0x0C12130A, 0xFFFF0C04, 0x020A001D, 0x12120A00, 0xFF0C040B, 0x00001AFF, 0x12100A00, 0xFF0C040B, 0x01001AFF, 0x12150A00, 0xFF0C040B, 0x000002FF, 0x12100A00, 0xFF0C040B, 0x010002FF, 0x12110A00, 0xFF0C040B, 0x00001CFF, 0x12110A00, 0xFF0C040B, 0x01001CFF, 0x08100A00, 0x30315241, 0x12042C12, 0xFF0B0409, 0x0A0000FF, 0x04091210, 0x01FFFF0B, 0x12110A00, 0xFF0B040A, 0x00020AFF, 0x0A12120A, 0xFFFF0B04, 0x0A00030A, 0x52410813, 0x2C123131, 0x04091204, 0x00FFFF0B, 0x12110A00, 0xFF0B0409, 0x0A0001FF, 0x040A1212, 0x0AFFFF0B, 0x130A0002, 0x0B040A12, 0x030AFFFF, 0x08100A00, 0x33315241, 0x12042C12, 0xFF0B0409, 0x0A0000FF, 0x04091213, 0x01FFFF0B, 0x12100A00, 0xFF0B040A, 0x00020AFF, 0x0A12110A, 0xFFFF0B04, 0x0A00030A, 0x57500812, 0x06123439, 0x0A090A02, 0x16825B04, 0x4845434D, 0x49485F08, 0x10060C44, 0x5F080600, 0x0A415453, 0x21825B0B, 0x32503050, 0x44415F08, 0x00000C52, 0x41060001, 0x5F303152, 0x06545250, 0x34395750, 0x5752505F, 0x0945825B, 0x42494350, 0x44415F08, 0x00000C52, 0x5F08001E, 0x12545250, 0x12090743, 0xFF0C040B, 0x000001FF, 0x12110A00, 0xFF0C040B, 0x010001FF, 0x12120A00, 0xFF0C040C, 0x0A0001FF, 0x130A0002, 0x0C040C12, 0x0001FFFF, 0x0A00030A, 0x040B1210, 0x02FFFF0C, 0x0A000000, 0x040B1212, 0x02FFFF0C, 0x0A000100, 0x040C1213, 0x02FFFF0C, 0x00020A00, 0x0C12100A, 0xFFFF0C04, 0x030A0002, 0x12110A00, 0xFF0C040B, 0x000003FF, 0x08100A00, 0x5752505F, 0x0A020612, 0x5B040A0B, 0x4C094082, 0x08424350, 0x5244415F, 0x1F00000C, 0x33825B00, 0x54455048, 0x49485F08, 0xD0410C44, 0x5F080301, 0x0A415453, 0x435F080F, 0x17115352, 0x0122140A, 0x01002200, 0x00000986, 0xFED00000, 0x00000400, 0x825B0079, 0x43545222, 0x485F085F, 0x410C4449, 0x08000BD0, 0x5352435F, 0x0A0A0D11, 0x00700147, 0x02010070, 0x825B0079, 0x4D495425, 0x485F0852, 0x410C4449, 0x080001D0, 0x5352435F, 0x0D0A1011, 0x00400147, 0x04010040, 0x79000122, 0x0F825B00, 0x41544153, 0x44415F08, 0x00020C52, 0x825B001F, 0x4348451B, 0x415F0849, 0x070C5244, 0x08001D00, 0x5752505F, 0x0A020612, 0x5B040A0D, 0x48551B82, 0x5F084943, 0x0C524441, 0x001A0007, 0x52505F08, 0x02061257, 0x040A0D0A, 0x5021825B, 0x08345030, 0x5244415F, 0x1C00000C, 0x52410600, 0x505F3031, 0x50065452, 0x5F343957, 0x5B575250, 0x30502182, 0x5F083550, 0x0C524441, 0x001C0001, 0x31524106, 0x52505F31, 0x57500654, 0x505F3439, 0x825B5752, 0x50305021, 0x415F0836, 0x020C5244, 0x06001C00, 0x33315241, 0x5452505F, 0x39575006, 0x52505F34, 0x21825B57, 0x37503050, 0x44415F08, 0x00030C52, 0x4106001C, 0x5F333152, 0x06545250, 0x34395750, 0x5752505F, 0x5021825B, 0x08385030, 0x5244415F, 0x1C00040C, 0x52410600, 0x505F3031, 0x50065452, 0x5F343957, 0x5B575250, 0x50054782, 0x08395030, 0x5244415F, 0x1C00050C, 0x52410600, 0x505F3131, 0x50065452, 0x5F343957, 0x5B575250, 0x54535080, 0x8C0A0253, 0x815B040A, 0x5453500F, 0x10000153, 0x53454D50, 0x5B0F0001, 0x414C1782, 0x5F08304E, 0x00524441, 0x52505F08, 0x02061257, 0x030A090A, 0x483A825B, 0x08464544, 0x5244415F, 0x1B00000C, 0x505F0800, 0x06125752, 0x0A0D0A02, 0x48805B04, 0x02534344, 0x040A540A, 0x4812815B, 0x03534344, 0x5F5F5350, 0x500D0002, 0x0153454D, 0x551B825B, 0x08314348, 0x5244415F, 0x1D00000C, 0x505F0800, 0x06125752, 0x0A030A02, 0x1B825B04, 0x32434855, 0x44415F08, 0x00010C52, 0x5F08001D, 0x12575250, 0x040A0206, 0x825B040A, 0x4348551B, 0x415F0833, 0x020C5244, 0x08001D00, 0x5752505F, 0x0A020612, 0x5B040A0C, 0x48551B82, 0x5F083443, 0x0C524441, 0x001A0000, 0x52505F08, 0x02061257, 0x040A0E0A, 0x551B825B, 0x08354348, 0x5244415F, 0x1A00010C, 0x505F0800, 0x06125752, 0x0A050A02, 0x1B825B04, 0x36434855, 0x44415F08, 0x00020C52, 0x5F08001A, 0x12575250, 0x200A0206, 0x4A10040A, 0x475F5C1E, 0x42144550, 0x304C5F09, 0x5C860039, 0x535F032F, 0x43505F42, 0x30503049, 0x020A3250, 0x032F5C86, 0x5F42535F, 0x30494350, 0x35503050, 0x5C86020A, 0x535F032F, 0x43505F42, 0x30503049, 0x020A3650, 0x032F5C86, 0x5F42535F, 0x30494350, 0x37503050, 0x5C86020A, 0x535F032F, 0x43505F42, 0x30503049, 0x020A3850, 0x032F5C86, 0x5F42535F, 0x30494350, 0x39503050, 0x5C86020A, 0x535F032F, 0x43505F42, 0x30503049, 0x020A3450, 0x5F2E5C86, 0x505F4253, 0x0A425257, 0x5F251402, 0x0042304C, 0x032F5C86, 0x5F42535F, 0x30494350, 0x42494350, 0x5C86020A, 0x42535F2E, 0x5257505F, 0x14020A42, 0x4C5F0445, 0x86004430, 0x5F032F5C, 0x505F4253, 0x45304943, 0x0A494348, 0x2E5C8602, 0x5F42535F, 0x42525750, 0x5C86020A, 0x535F032F, 0x43505F42, 0x48553049, 0x020A4943, 0x5F2E5C86, 0x505F4253, 0x0A425257, 0x5F251402, 0x0033304C, 0x032F5C86, 0x5F42535F, 0x30494350, 0x31434855, 0x5C86020A, 0x42535F2E, 0x5257505F, 0x14020A42, 0x304C5F25, 0x5C860034, 0x535F032F, 0x43505F42, 0x48553049, 0x020A3243, 0x5F2E5C86, 0x505F4253, 0x0A425257, 0x5F251402, 0x0043304C, 0x032F5C86, 0x5F42535F, 0x30494350, 0x33434855, 0x5C86020A, 0x42535F2E, 0x5257505F, 0x14020A42, 0x304C5F25, 0x5C860045, 0x535F032F, 0x43505F42, 0x48553049, 0x020A3443, 0x5F2E5C86, 0x505F4253, 0x0A425257, 0x5F251402, 0x0035304C, 0x032F5C86, 0x5F42535F, 0x30494350, 0x35434855, 0x5C86020A, 0x42535F2E, 0x5257505F, 0x14020A42, 0x324C5F25, 0x5C860030, 0x535F032F, 0x43505F42, 0x48553049, 0x020A3643, 0x5F2E5C86, 0x505F4253, 0x0A425257, 0x1D825B02, 0x42525750, 0x49435F08, 0xD0410C44, 0x5F080C0C, 0x0A444955, 0x535F08AA, 0x0B0A4154, 0x4D53805B, 0x0B014549, 0x050A0830, 0x5316815B, 0x0145494D, 0x53500400, 0x00014531, 0x5004001B, 0x01533153, 0x505F1F14, 0xA0015354, 0x68939218, 0x0170050A, 0x53315350, 0x53500170, 0x68704531, 0x42535341, 0x575F0C14, 0xA4014B41, 0x00020412, 0x535F0800, 0x06125F30, 0x00000004, 0x535F0800, 0x06125F31, 0x00000104, 0x535F0800, 0x07125F33, 0x00050A04, 0x5F080000, 0x125F3453, 0x060A0407, 0x08000000, 0x5F35535F, 0x0A040712, 0x00000007, 0x434D1114, 0xA0025044, 0x0068930A, 0x01031170, 0xA3A36903 }; Incorporating SSDT Table (move to new thread) The next thing I did was a rather new approach, sort of, but this enabled me to patch a much smaller file. Mine now is only 951 bytes, and it includes everything I need for my board: Easy P-States, Sata, HDEF, Graphics card, PATA, FireWire and two of my very own methods being MCDP and MCID. And here is it: DefinitionBlock ("ssdt.aml", "SSDT", 1, "MC", "POWERM", 0x00000001) { External (_SB.PCI0.SATA, DeviceObj) External (_SB.PCI0.HDEF, DeviceObj) External (_SB.PCI0.P0P2, DeviceObj) // External (_SB.PCI0.P0P8, DeviceObj) External (_SB.PCI0.PCIB, DeviceObj) Scope (_PR) { Name (NCPU, 0x04) // Number of processor cores. Name (PST1, 0x4720) // Easy P-State values. Name (PST2, 0x071E) Name (PST3, 0x461C) Name (PST4, 0x0616) } Scope (_SB.PCI0.SATA) { Method (_DSM, 4, NotSerialized) { Return (MCID (Arg2, 0x26818086)) // MacPro3,1 – Both device-id and vendor-id specified! } } Scope (_SB.PCI0.HDEF) { Method (_DSM, 4, NotSerialized) { Store (Package (0x04) { "layout-id", Buffer (0x04) { 0x73, 0x03, 0x00, 0x00 }, "PinConfigurations", Buffer (Zero) {} }, Local0) Return (MCDP (Arg2, RefOf (Local0))) } } Scope (_SB.PCI0.P0P2) // PCI Express Root Port { // 427 bytes. Device (PXS1) // Newly added device. { Name (_ADR, Zero) Name (_SUN, One) Method (_DSM, 4, NotSerialized) { Store (Package (0x18) { "@0,compatible", Buffer (0x0B) { "NVDA,NVMac" }, "@0,device_type", Buffer (0x08) { "display" }, "@0,name", Buffer (0x0F) { "NVDA,Display-A" }, "@1,compatible", Buffer (0x0B) { "NVDA,NVMac" }, "@1,device_type", Buffer (0x08) { "display" }, "@1,name", Buffer (0x0F) { "NVDA,Display-B" }, "NVCAP", Buffer (0x18) { 0x04, 0x00, 0x00, 0x00, 0x00, 0x00, 0x0B, 0x00, 0x04, 0x00, 0x00, 0x00, 0x00, 0x00, 0x00, 0x07, 0x00, 0x00, 0x00, 0x00 }, "NVPM", Buffer (0x1C) { 0x01, 0x00, 0x00, 0x00, 0x00, 0x00, 0x00, 0x00, 0x00, 0x00, 0x00, 0x00, 0x00, 0x00, 0x00, 0x00, 0x00, 0x00, 0x00, 0x00, 0x00, 0x00, 0x00, 0x00, 0x00, 0x00, 0x00, 0x00 }, "VRAM,totalsize", Buffer (0x04) { 0x00, 0x00, 0x00, 0x20 }, "device_type", Buffer (0x0D) { "NVDA,Parent" }, "model", Buffer (0x17) { "nVidia GeForce 9600 GT" }, "rom-revision", Buffer (0x2B) { "nVidia GeForce 9600 GT OpenGL Engine" } }, Local0) Return (MCDP (Arg2, RefOf (Local0))) } } } /* Comment this out when you have/add PATA hardware! Scope (_SB.PCI0.P0P8) { Device (PATA) { Name (_ADR, Zero) Device (PRID) { Name (_ADR, Zero) } Device (SECD) { Name (_ADR, One) } Method (_DSM, 4, NotSerialized) { Return (MCID (Arg2, 0x269e)) } } } */ Scope (_GPE) { Method (_L18, 0, NotSerialized) // FireWire support. { Notify (\_SB.PCI0.PCIB.FRWR, Zero) } } Scope (_SB.PCI0.PCIB) { Device (FRWR) { Name (_ADR, 0x00030000) Name (_GPE, 0x18) Method (_DSM, 4, NotSerialized) { Store (Package (0x02) { "fwhub", Buffer (0x04) { 0x00, 0x00, 0x00, 0x00 } }, Local0) Return (MCDP (Arg2, RefOf (Local0))) } } } // 18 Bytes. Method (MCDP, 2, NotSerialized) // New Method V1.3 – By Master Chief. { If (LEqual (Arg0, Zero)) // Function index: 0 { Return (Buffer (One) { 0x03 }) } Return (DeRefOf (Arg1)) // Modified return value! } Name (IDB0, Buffer (0x04) { 0x00, 0x00, 0x00, 0x00 }) // New Method V1.4 – By Master Chief. Name (IDB1, Buffer (0x04) { 0x00, 0x00, 0x00, 0x00 }) Method (MCID, 2, NotSerialized) { If (Arg1) // Either a device-id like 0x2693 or a 32-bit combo like 0x269e8086 with both a device-id and a vendor-id. { Store (And (Arg1, 0xFF), Index (IDB0, Zero)) // 0x9e => BUF0 is now 0x9e 0x00 0x00 0x00 Store (ShiftRight (And (Arg1, 0xFF00), 0x08), Index (IDB0, One)) // 0x2600 => 0x26 => BUF0 is now 0x9e 0x26 0x00 0x00 If (LEqual (And (Arg1, 0xFFFF0000), Zero)) { Store (Package (0x02) { "device-id", IDB0 // 0x9e 0x26 0x00 0x00 }, Local0) } Else { // BUF0 is now 0x86 0x80 0x00 0x00 ShiftRight (Arg1, 0x10, Arg1) // 0x269e0000 => 0x269e Store (And (Arg1, 0xFF), Index (IDB1, Zero)) // 0x9e => BUF1 is now 0x9e 0x00 0x00 0x00 Store (ShiftRight (And (Arg1, 0xFF00), 0x08), Index (IDB1, One)) // 0x2600 => 0x26 => BUF1 is now 0x9e 0x26 0x00 0x00 Store (Package (0x04) { "vendor-id", IDB0, // 0x86 0x80 0x00 0x00 "device-id", IDB1 // 0x9e 0x26 0x00 0x00 }, Local0) } Return (MCDP (Arg2, RefOf (Local0))) } Return (Zero) } } And this in converted AML formad looks like this: static uint32_t SSDT_Table[] = { // SSDT in little-endian format 0x54445353, 0x000003B7, 0x434D7601, 0x00000000, 0x45574F50, 0x00004D52, 0x00000001, 0x4C544E49, 0x20080926, 0x505F2C10, 0x4E085F52, 0x0A555043, 0x53500804, 0x200B3154, 0x53500847, 0x1E0B3254, 0x53500807, 0x1C0B3354, 0x53500846, 0x160B3454, 0x2F211006, 0x42535F03, 0x4943505F, 0x54415330, 0x5F111441, 0x044D5344, 0x49434DA4, 0x860C6A44, 0x10268180, 0x032F044D, 0x5F42535F, 0x30494350, 0x46454448, 0x445F3C14, 0x70044D53, 0x0D042B12, 0x6F79616C, 0x692D7475, 0x07110064, 0x0373040A, 0x500D0000, 0x6F436E69, 0x6769666E, 0x74617275, 0x736E6F69, 0x00021100, 0x434DA460, 0x716A434D, 0x1B491060, 0x535F032F, 0x43505F42, 0x30503049, 0x825B3250, 0x58501A47, 0x5F083153, 0x00524441, 0x55535F08, 0x4414014E, 0x53445F19, 0x1270044D, 0x0D181842, 0x632C3040, 0x61706D6F, 0x6C626974, 0x0E110065, 0x564E0B0A, 0x4E2C4144, 0x63614D56, 0x30400D00, 0x7665642C, 0x5F656369, 0x65707974, 0x0A0B1100, 0x73696408, 0x79616C70, 0x30400D00, 0x6D616E2C, 0x12110065, 0x564E0F0A, 0x442C4144, 0x6C707369, 0x412D7961, 0x31400D00, 0x6D6F632C, 0x69746170, 0x00656C62, 0x0B0A0E11, 0x4144564E, 0x4D564E2C, 0x0D006361, 0x642C3140, 0x63697665, 0x79745F65, 0x11006570, 0x64080A0B, 0x6C707369, 0x0D007961, 0x6E2C3140, 0x00656D61, 0x0F0A1211, 0x4144564E, 0x7369442C, 0x79616C70, 0x0D00422D, 0x4143564E, 0x17110050, 0x0004180A, 0x00000000, 0x0004000B, 0x00000000, 0x00000700, 0x4E0D0000, 0x004D5056, 0x1C0A1F11, 0x00000001, 0x00000000, 0x00000000, 0x00000000, 0x00000000, 0x00000000, 0x00000000, 0x4152560D, 0x6F742C4D, 0x736C6174, 0x00657A69, 0x040A0711, 0x20000000, 0x7665640D, 0x5F656369, 0x65707974, 0x0A0F1100, 0x44564E0D, 0x61502C41, 0x746E6572, 0x6F6D0D00, 0x006C6564, 0x170A1A11, 0x6469566E, 0x47206169, 0x726F4665, 0x39206563, 0x20303036, 0x0D005447, 0x2D6D6F72, 0x69766572, 0x6E6F6973, 0x0A281100, 0x69566E2B, 0x20616964, 0x6F466547, 0x20656372, 0x30303639, 0x20544720, 0x6E65704F, 0x45204C47, 0x6E69676E, 0xA4600065, 0x434D434D, 0x1060716A, 0x50475F21, 0x5F1B1445, 0x0038314C, 0x042F5C86, 0x5F42535F, 0x30494350, 0x42494350, 0x52575246, 0x044B1000, 0x535F032F, 0x43505F42, 0x43503049, 0x825B4249, 0x57524639, 0x415F0852, 0x000C5244, 0x08000300, 0x4550475F, 0x2214180A, 0x4D53445F, 0x11127004, 0x77660D02, 0x00627568, 0x040A0711, 0x00000000, 0x434DA460, 0x716A434D, 0x4D131460, 0x02434D43, 0x689309A0, 0x0311A400, 0x83A40301, 0x44490869, 0x07113042, 0x0000040A, 0x49080000, 0x11314244, 0x00040A07, 0x14000000, 0x434D094F, 0xA0024449, 0x70690945, 0xFF0A697B, 0x44498800, 0x00003042, 0x697B7A70, 0x00FF000B, 0x8800080A, 0x30424449, 0x1FA00001, 0x0C697B93, 0xFFFF0000, 0x12700000, 0x640D0211, 0x63697665, 0x64692D65, 0x42444900, 0x49A16030, 0x0A697A04, 0x7B706910, 0x00FF0A69, 0x42444988, 0x70000031, 0x0B697B7A, 0x0A00FF00, 0x49880008, 0x01314244, 0x20127000, 0x65760D04, 0x726F646E, 0x0064692D, 0x30424449, 0x7665640D, 0x2D656369, 0x49006469, 0x60314244, 0x5044434D, 0xA4607168, 0xA300A460 }; And this gets injected from within the boot loader. More about this at a later stage. pro et contra: The next step and a must do for die hard hackers! Gathering Data To be added... Text Spinner I assume that most people know what I mean with the text spinner. It's nothing more than a few simple characters popping up in the top left corner of your screen. And just before the Apple boot logo appears. And the used characters are defined like this: static char indicator[] = {'-', '\\', '|', '/', '-', '\\', '|', '/', '\0'}; And one of the first things I did was to remove all of the text spinner (code) but then I realized something. Without this it is much harder, if not impossible to tell what is going on. How long it takes. I basically removed an easy way of measuring the time it takes (a certain process we are interested in). And that is why I replaced it with the following: static char indicator[] = {'A', 'B', 'C', 'D', 'E', 'F', 'G', 'H', '\0'}; There's another small modification required. This to make it a little easier for us to spot the characters: static char string[2] = {'\0', '\0'}; Nothing really mind blowing you say, but this showed me that I was wrong. Yes sir. I did not see three, but five (or even six) characters. That's how easy it is to be wrong. Hiding the text spinner was easy, yes, but it doesn't really speed up the boot process. Eliminate the time it takes to get past this stage will. A quiet boot process will also still be part of the deal, but at a later stage. We first need to collect data about the time certain functions take. We need this before we can change/improve anything. Annoying, but also very true. Boot Logo On my P5K PRO with stock speed (2.5GHz) I see three five or six of the previously mentioned text characters, but your mileage may vary. I know that booting from my USB stick takes a lot more time, and there the text spinner is a lot longer in action. Next is this ugly Apple boot logo. This normally only takes very little time to show up. Even on my old NVIDIA 9600GT. Then (after a lot of HD action) I get to see a graphical throbber. And I don't start counting before it reaches the top for the first time. That would be one rev. Now. Let's assume that it stops after five revolutions (spins) and on the second marker. That would be: 5.10 And each next line will add another five (5). This way we all how to I do things. Easy huh? The boot logo in my boot loader is still the same as the original, but it appears a bit earlier in the boot process. This way it seems to take longer before the spinner shows up and start spinning, but I hope to change this process a.s.a.p. To speed it up even further that is. Log files Your log files (kernel.log and system.log) are another way of getting data. The boot process there usually starts with npvhash=4095 and it may end with your network adapter or audio. This depends in what you have installed. Just have a look at it. And now that we are looking at kernel.log... check the lines with: AppleIntelCPUPowerManagement: initialization complete and DSMOS has arrived which will quickly become important. More about this at a later stage. A First Test The last thing for today is a test. Simply disable your audio and network device in the BIOS and boot twice, to see what that saves you. And yes, you need it. I know, but we are going to change things remember? Now. I see five (5) revs of the graphical throbber (below the Apple boot logo) with audio and network disabled. Which is four (4) revs less. And this without doing anything else. Just the factory 2.5GHz clock speed. No SSD or any crazy stuff. And yes we have to know what is taking so long... before we can start fixing things. This might actually trigger some attention of other developers. Which of course never hurts. Note: The times given here are without Revolution in the BIOS activated! This was update one. I'll be back with more next time. Verifying HPET compatibility There's one thing you must do before you flash your BIOS with a patched DSDT and that is to verify that it works. For this step you need a working/patched DSDT. And one that enables you to remove both hpet.c and hpet.h from Chameleon's libsaio folder. Below you'll find a part of the Makefile we are going to change: #SAIO_OBJS = table.o asm.o bios.o biosfn.o \ disk.o sys.o cache.o bootstruct.o \ stringTable.o load.o pci.o memory.o misc.o \ [color="#008000"]ufs.o ufs_byteorder.o[/color] \ vbe.o [color="#008000"]nbp.o[/color] hfs.o hfs_compare.o \ xml.o [color="#008000"]ntfs.o msdos.o[/color] md5c.o device_tree.o \ freq_detect.o platform.o [color="#FF8C00"]dsdt_patcher.o[/color] \ smbios_patcher.o fake_efi.o [color="#008000"]ext2fs.o[/color] \ [color="#FF0000"]hpet.o[/color] spd.o [color="#008000"]usb.o pci_setup.o[/color] \ [color="#008000"]device_inject.o nvidia.o ati.o[/color] Remove the red part and save the file. Now fix the caller force_enable_hpet() in pci_setup.c Simply comment it out and do the usual: make clean and make > logfile.txt combo. Now copy sym/i386/boot to / and reboot (crossing your fingers). Does it boot? No HPET error? Great. If not you have work to do (patch your DSDT's HPET device). You should now be ready for the next step; assuming that all went well of course. But please. Do not continue with the next step until this works for you! Notes: I removed all green items for my boot loader aka Revolution. I also renamed dsdt_patcher in the Makefile to acpi_patcher but the actual code is new. And I had to change almost every single file of Chameleon, but the fun part is that Revolution (the Hard Disk version that is) is now only 67360 bytes! And everything I need works out of the box. Even without smbios.plist or no /Extra/ at all. Preparing for dsdt_patcher removal The DSDT patcher in Chameleon is great when you need to patch something, but our goal is to speed up the boot process. And to first load a table from BIOS to have it replaced with a different one from disk, isn't really helping us with this process. That is why I removed it. And completely. Here is what I did. I first replaced function setupAcpi() in Chameleon with the following lines: uint64_t acpi20_p = (uint32_t)getACPIBaseAddress(); addConfigurationTable(&gEfiAcpi20TableGuid, &acpi20_p, "ACPI_20"); Note: This only works with a ACPI 2.0 compliant BIOS People with a ACPI 1.0 BIOS either need a new or patched BIOS first (no help here). The first line isn't even required. Not if you know the address that is; you can get the address from your ACPI dump. Just look for something like (example): ACPI: RSDP 000FBC10, 0024 (r2 ACPIAM) Which happens to be the address I am using. Don't have your system ACPI dump handy? Then add this helper function: static struct acpi_2_rsdp* getACPIBaseAddress() { void *baseAddress = (void*)ACPI_RANGE_START; for (; baseAddress <= (void*)ACPI_RANGE_END; baseAddress += 16) { if (*(uint64_t *)baseAddress == ACPI_SIGNATURE_UINT64_LE) { uint8_t csum = checksum8 (baseAddress, 20); if (csum == 0) { uint8_t revision = ((struct acpi_2_rsdp*)baseAddress)->Revision; if (revision > 0 && checksum8(baseAddress, sizeof(struct acpi_2_rsdp)) == 0) return baseAddress; } } } return NULL; } Add the above code to fake_efi.c and let it run once (print the address). That should do the trick. Oh and don't forget to remove it afterwards (or comment it out) to keep the file size as small as possible (we need this for Revolution). What is Revolution? Revolution is a new experimental boot loader aimed at improving our boot time. Revolution is based on the source code of Chameleon v2.0 RC 4 (which is a fork of Apple's boot-132 source code) but Revolution should not be seen as a fork, but as another (unofficial) "branch" of Chameleon. And the number one issue I have with Chameleon is the fact that one cannot compile an "official" Chameleon version without a GUI. Which is too bad, but also why I got into 'Chameleon' hacking in the first place. You can find the source code of Revolution in one of my posts here. Please note that since Revolution is my experimental, and still unofficial branch, of Chameleon, which is why I only include the files I work with / modify (as in I do not include all files). The reason for this is simply that I want to concentrate on boot2 first. This to prevent possible boot issues. Warning Flashing a BIOS is relatively easy. Unlike BIOS patching. Don't even start when you don't know what you are doing! The risk involved should not to be taken lightly. This can basically wreck a good working motherboard. Please think twice before you do this. You are warned! Happy Hacking!1 point


.thumb.png.a43579d9e280a5c4c80807bf93412ae7.png)