Leaderboard


Popular Content
Showing content with the highest reputation on 11/03/2018 in all areas
-
Rev 4729 Vector theme became usable. I will write instructions asap. At this moment you can see first theme created by Clovy. Designed as Real works as OK, not the same. There are still bugs and absent features. Anyway it somehow works!
 6 points
 -
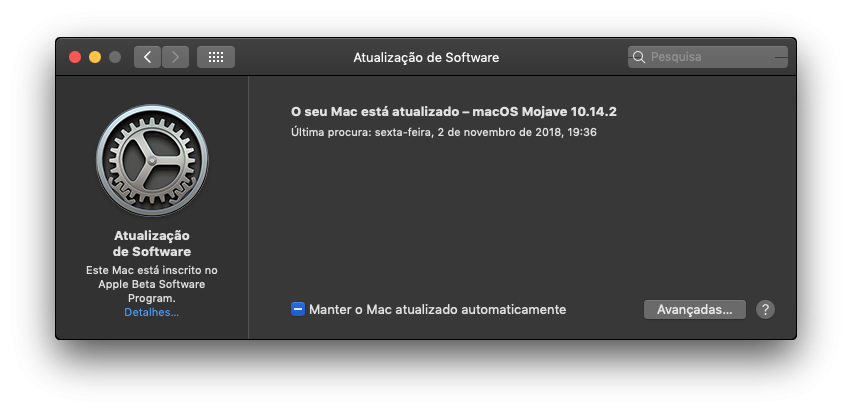
Update para o 10.14.2 beta (18C31g). Tudo decorreu de forma suave e normal como tem sido costume... Ok vá, grato ao mestre MaLd0n, que em tempos fez-me uma boa DSDT
 3 points
 -
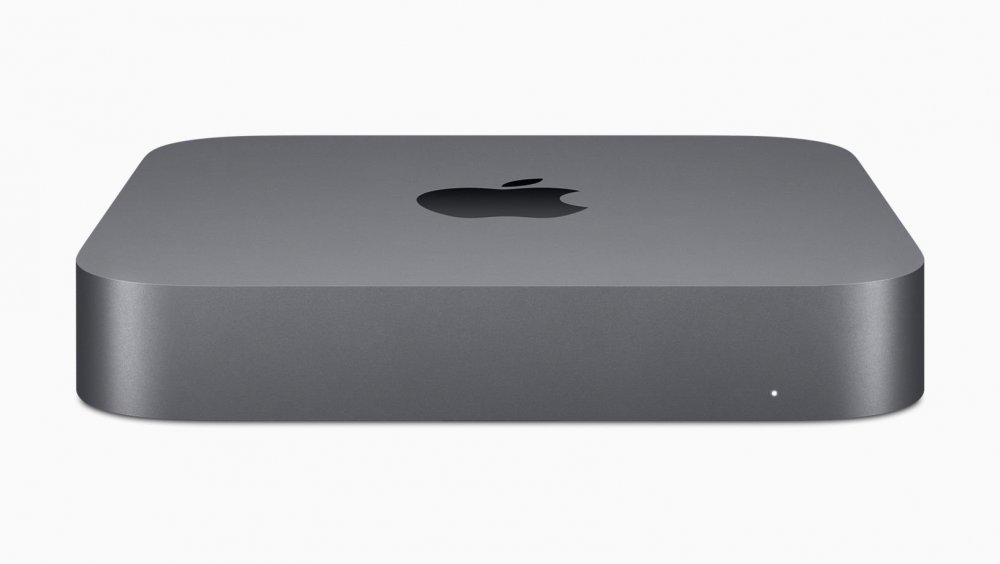
So apple has presented a new and updated mac mini a few days ago, and the great news seems to be the use of desktop processors in it, in fact, all the specs seems to match a typical desktop socket 1151 v2 coffeelake system without a dedicated gpu, so i am wondering if the smbios of this machine could be our new smbios of preference for coffeelake desktop machines. So i have created this new topic to discuss about it. Of course we will have to wait to do tests using the first public version of mac os which integrates this smbios, because when every new mac is released it's smbios is available initialy just in a purpose made mac os build and then it's added for all the os builds in the following releases. So what do you think about the possibility of using this new smbios for desktop coffeelake machines instead of the imac 18.3/18.2 ones? https://www.apple.com/mac-mini/specs/
 2 points
 -
Are you guys talking behind my back? Yes my R9 280X is showing metal support.2 points
-
Congratulations Slice and Clovy. Thank you for bringing the beginnings of an SVG user interface to Clover.2 points
-
lol They removed it again from the catalog url but still downloadable from servers. It looks like they want to make a gift for us??? Just saying. EDIT: It is in the catalog... again2 points
-
Let reports to be. I want to know bugs.2 points
-
r4729 little problem
 2 points
 -
Im watching the youtube right now, great job!2 points
-
Yes, he really liked this tool, and we are going to continue doing stuff together. for all the curious folks out there, here is a link to the video: https://youtu.be/GJnI1RwM1xs2 points
-
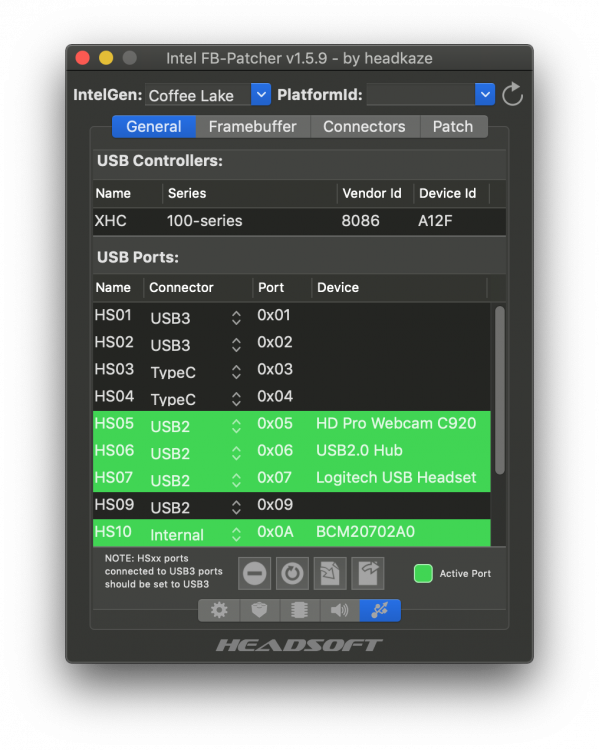
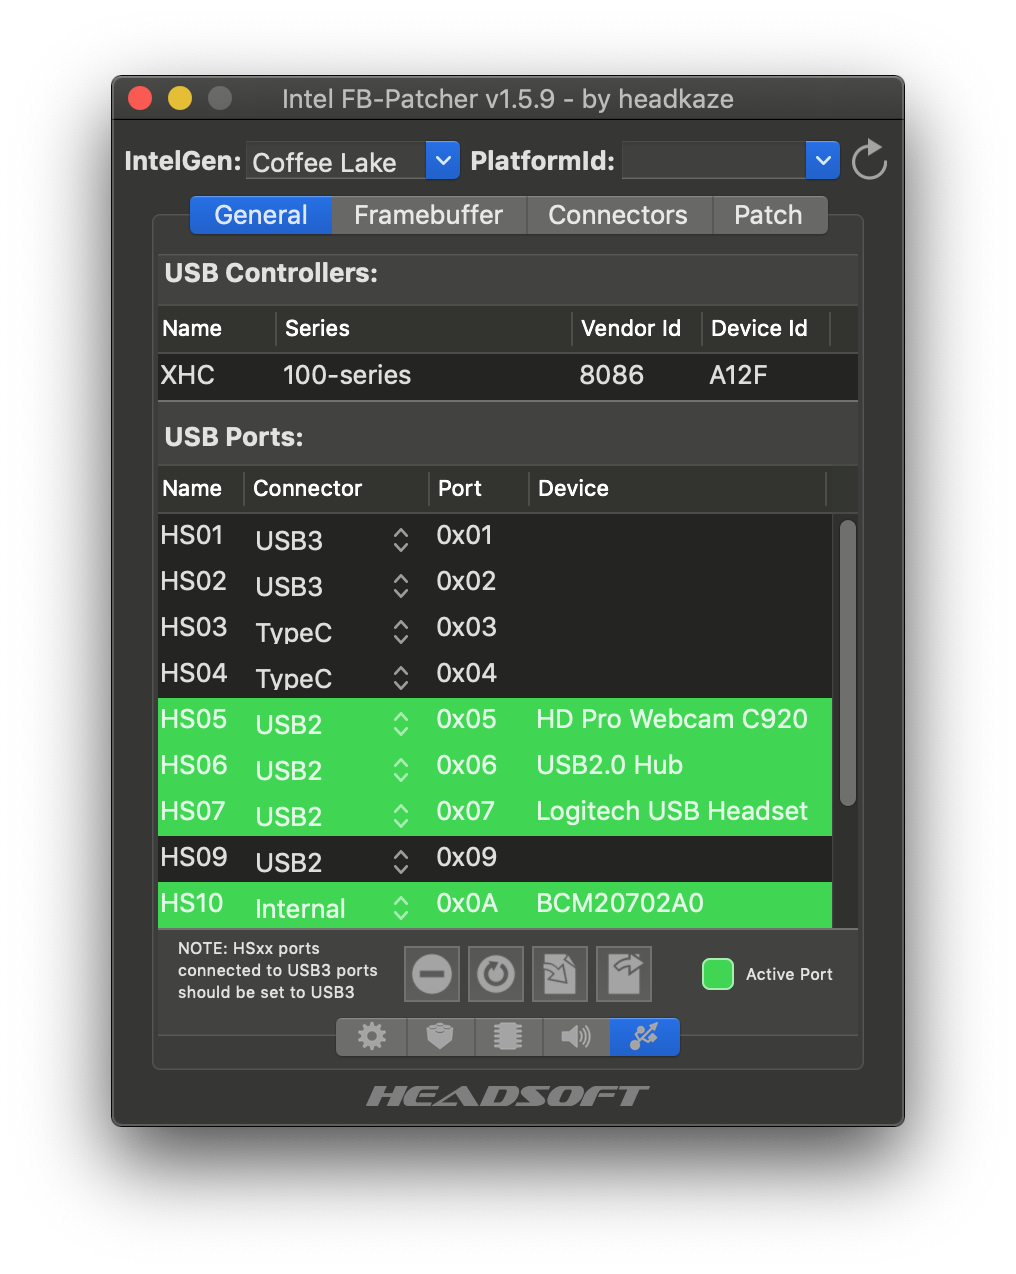
Intel FB-Patcher 1.5.9 Released - Now shows USB Controllers
 2 points
 -
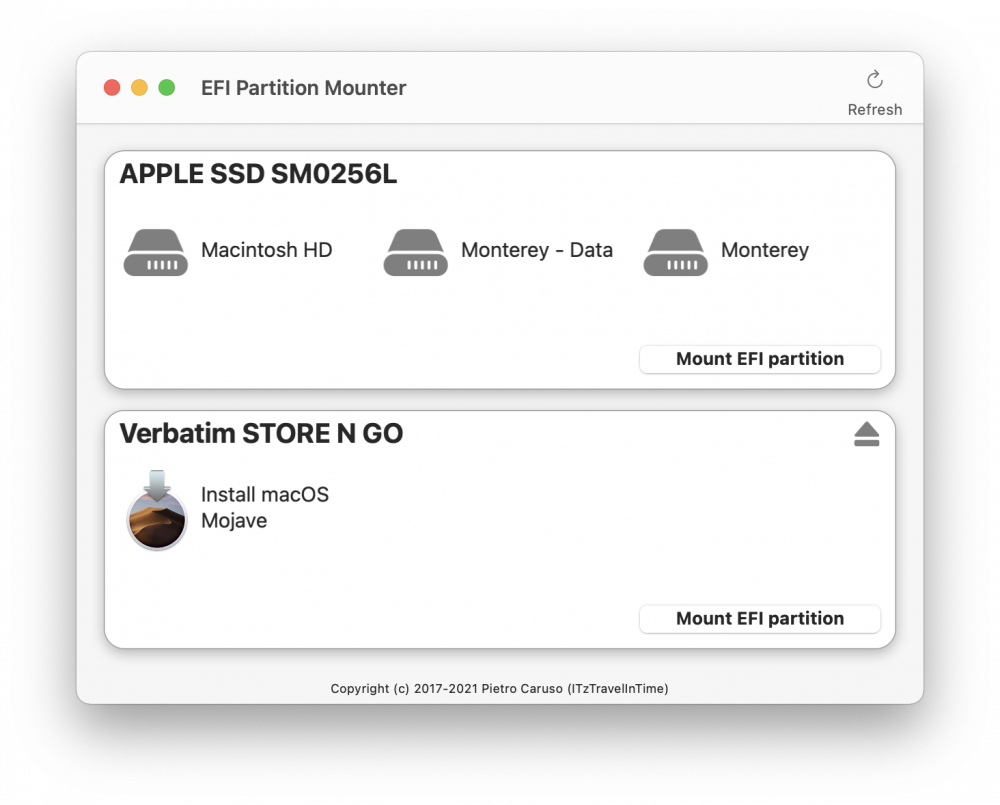
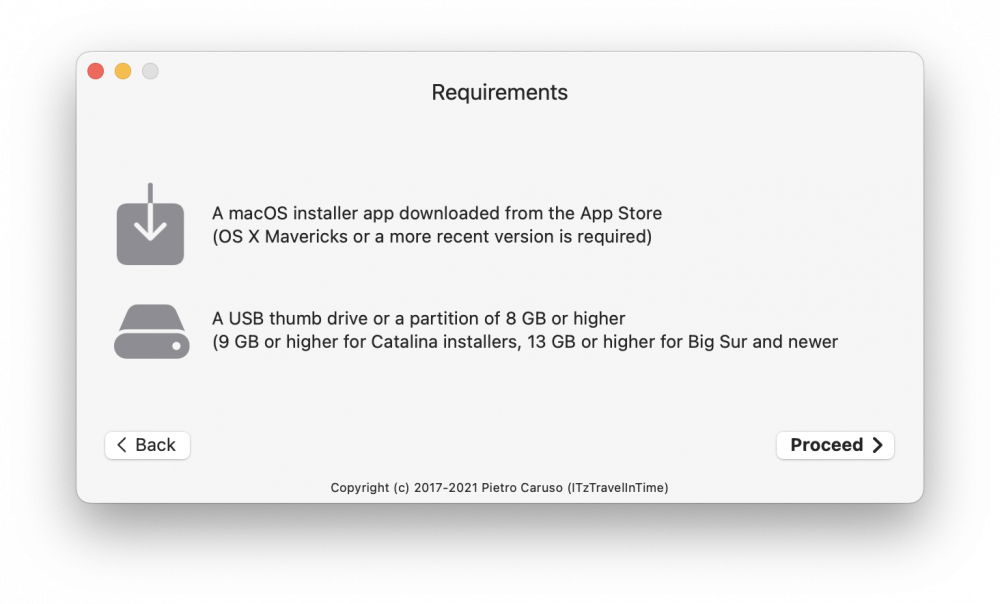
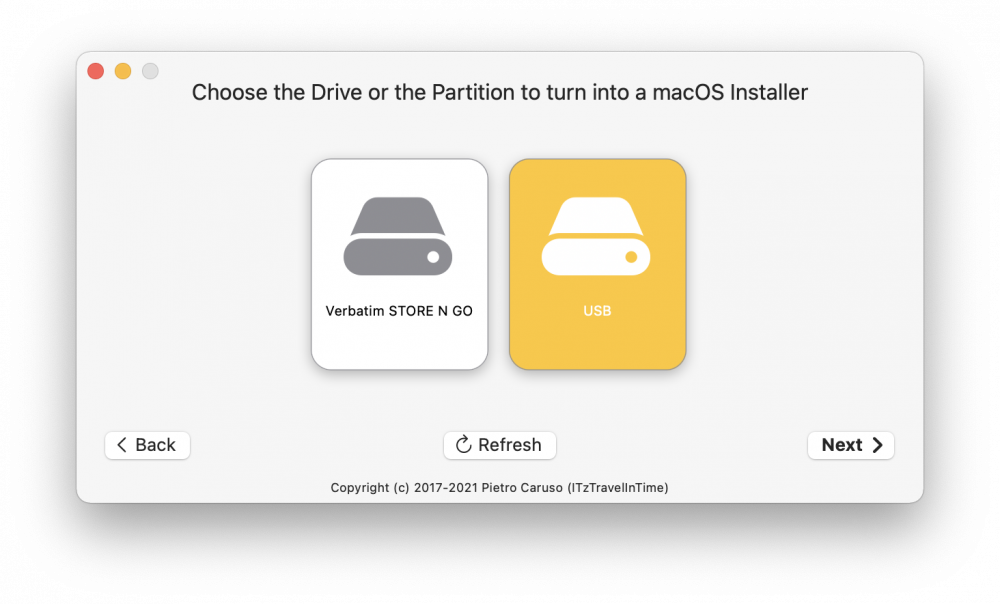
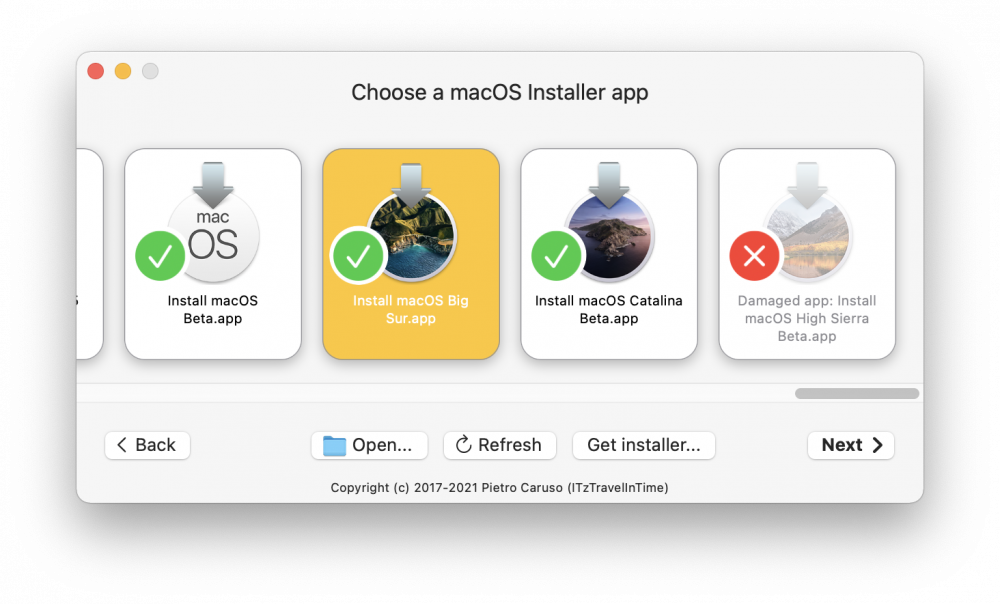
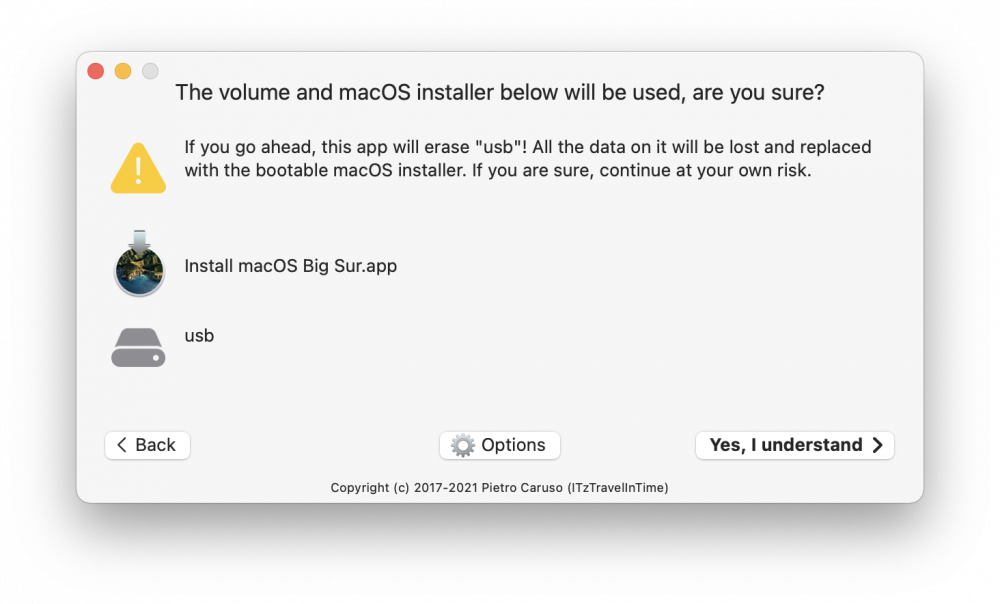
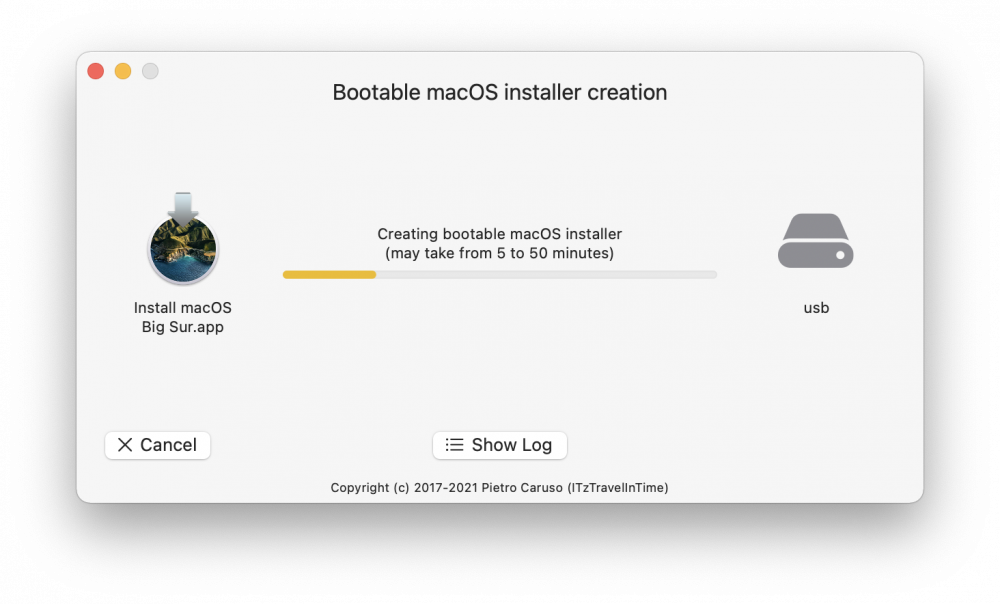
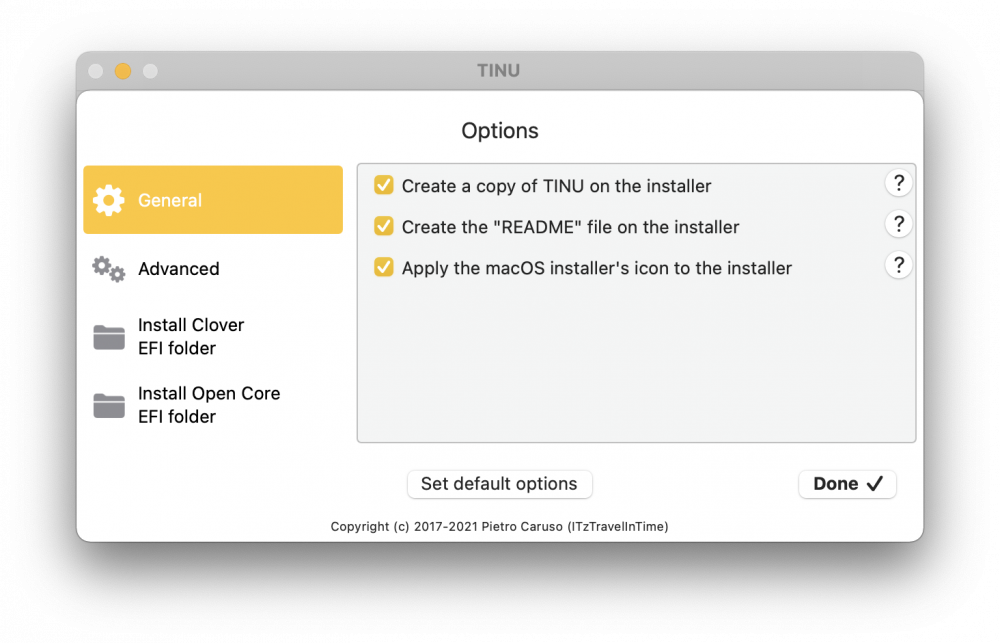
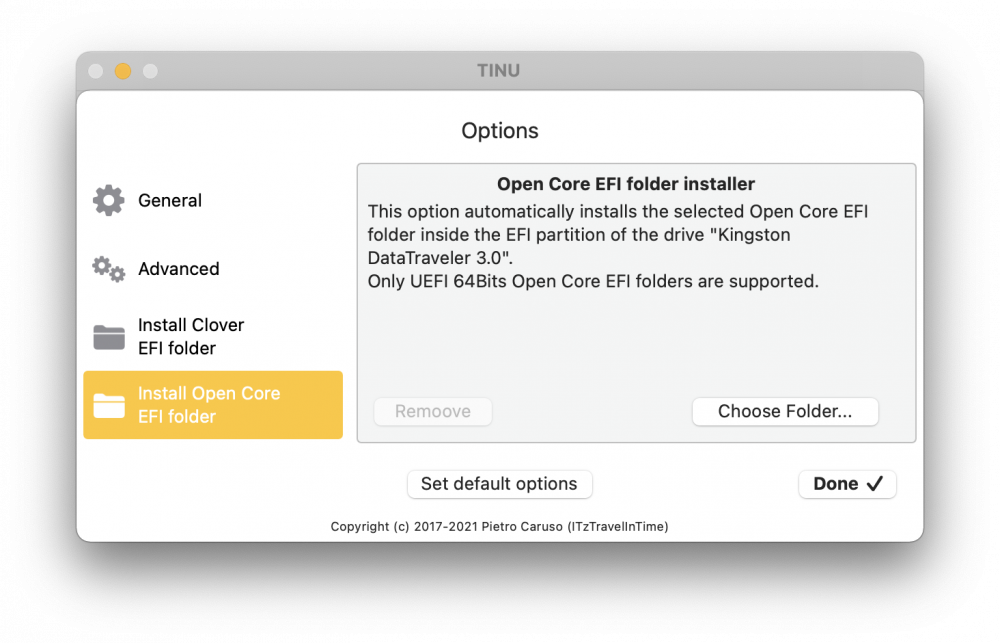
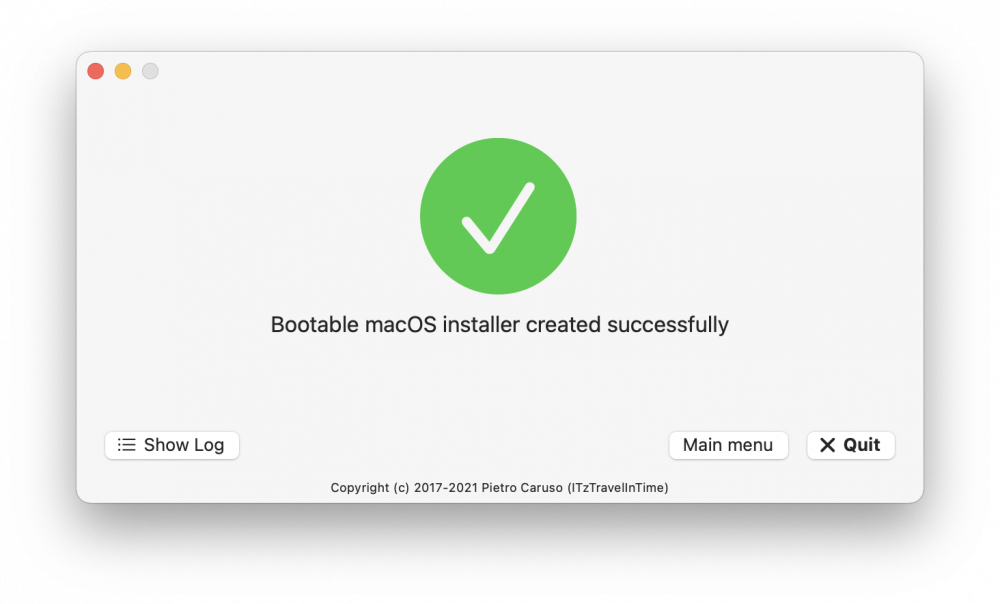
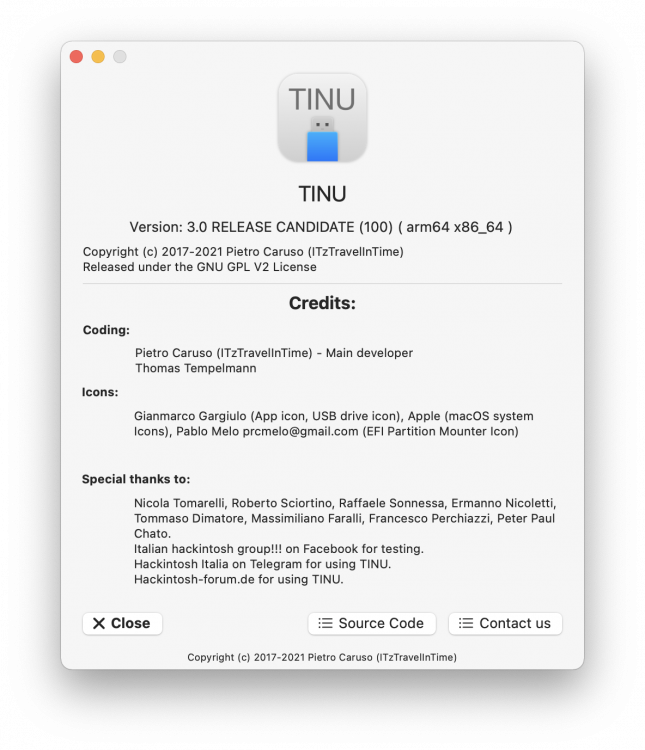
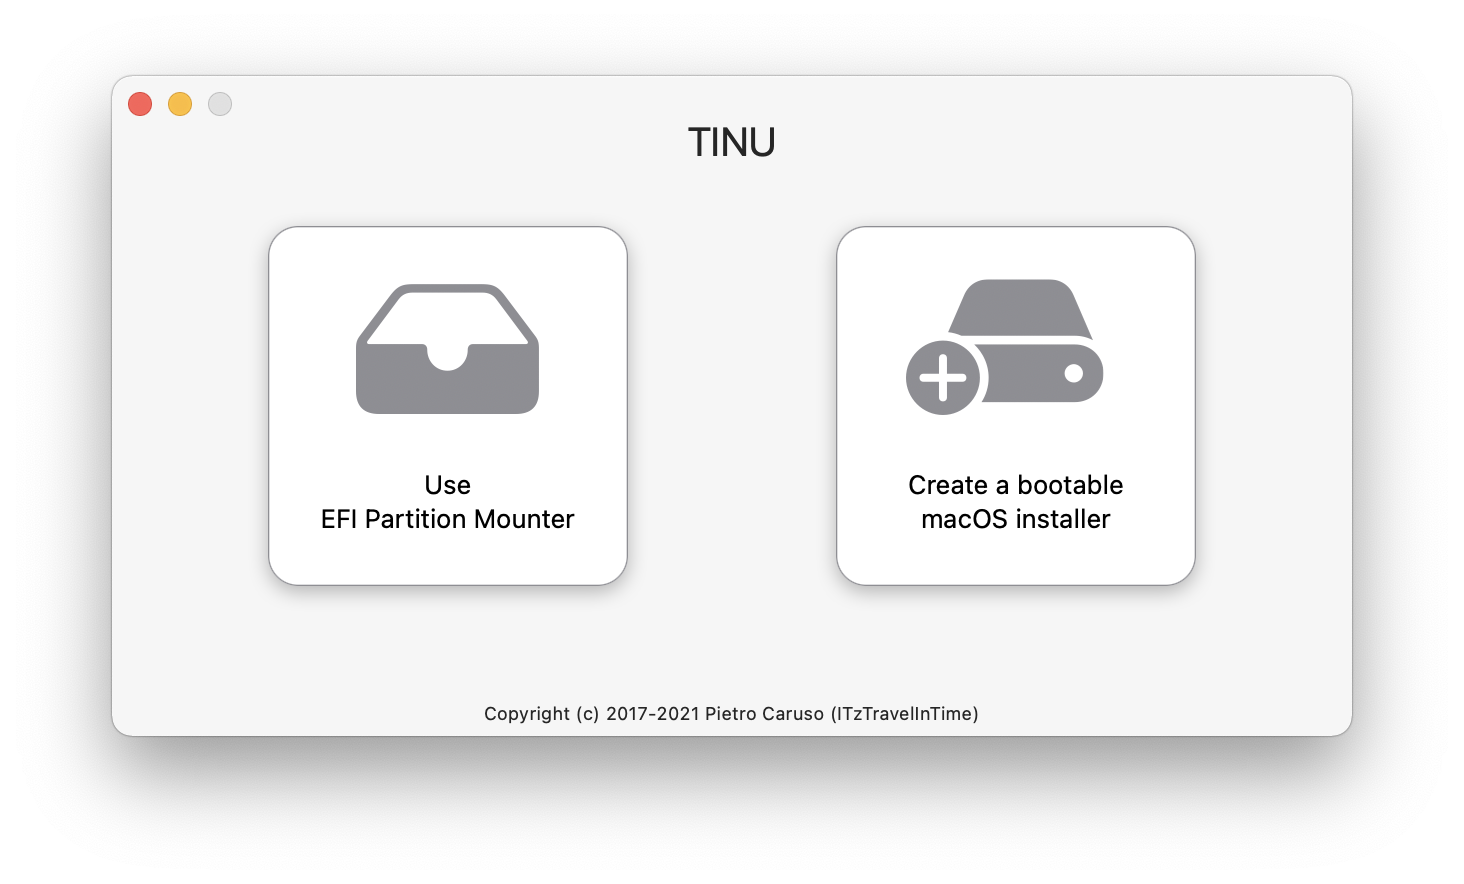
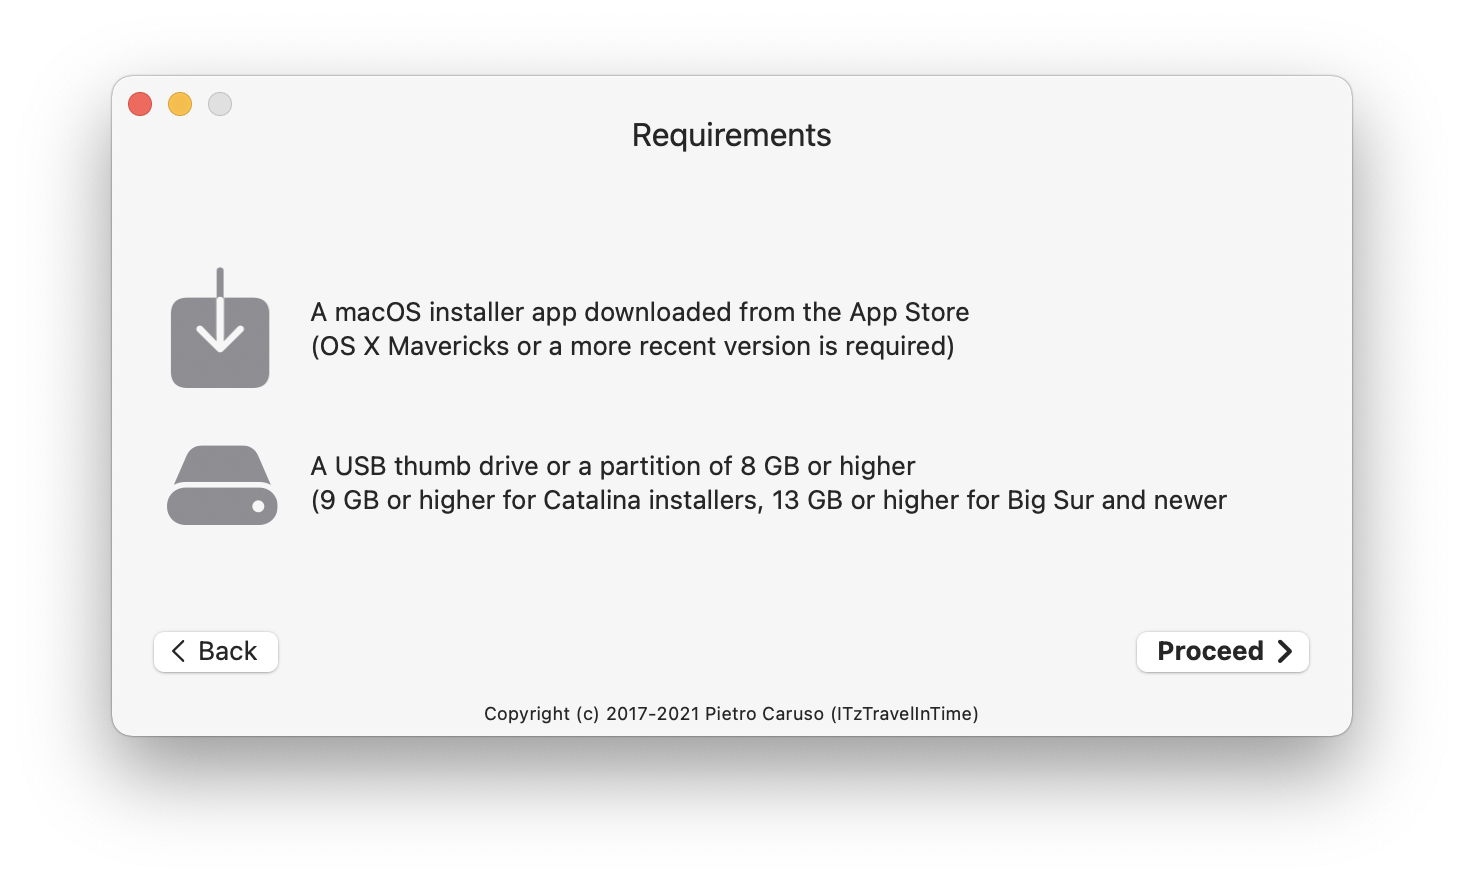
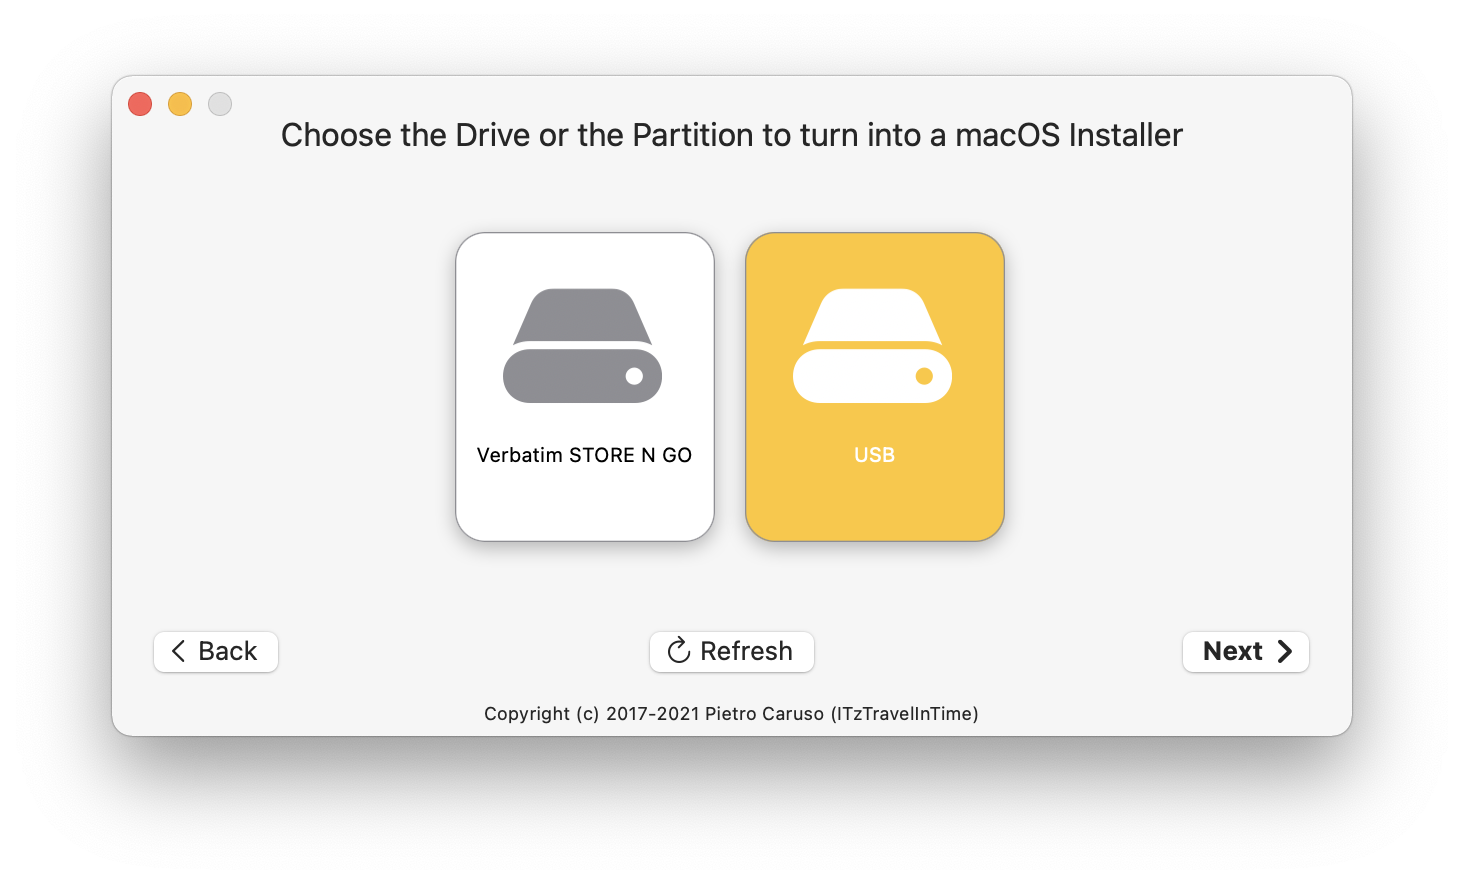
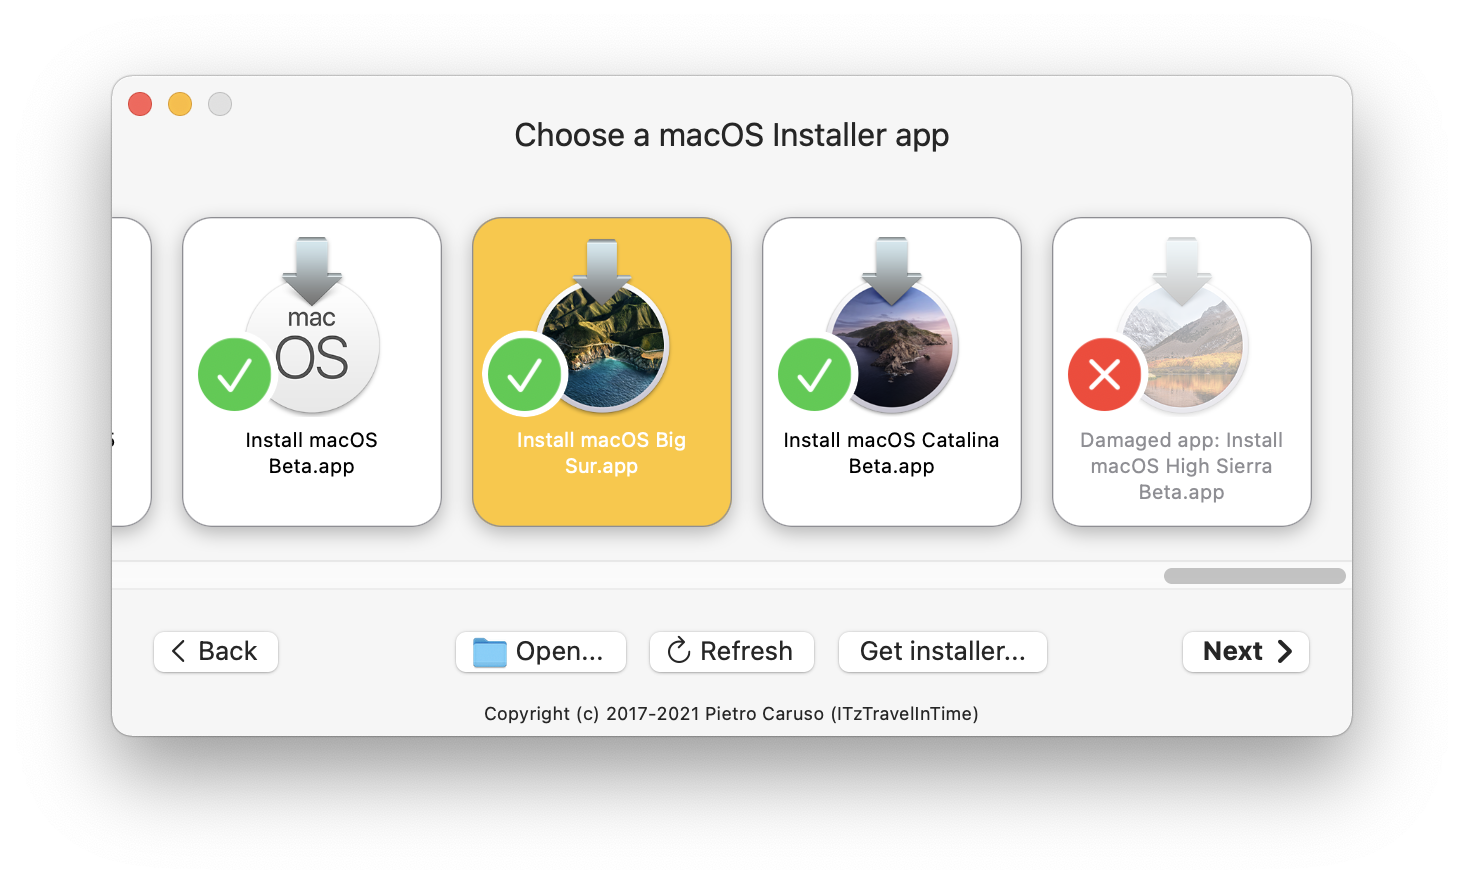
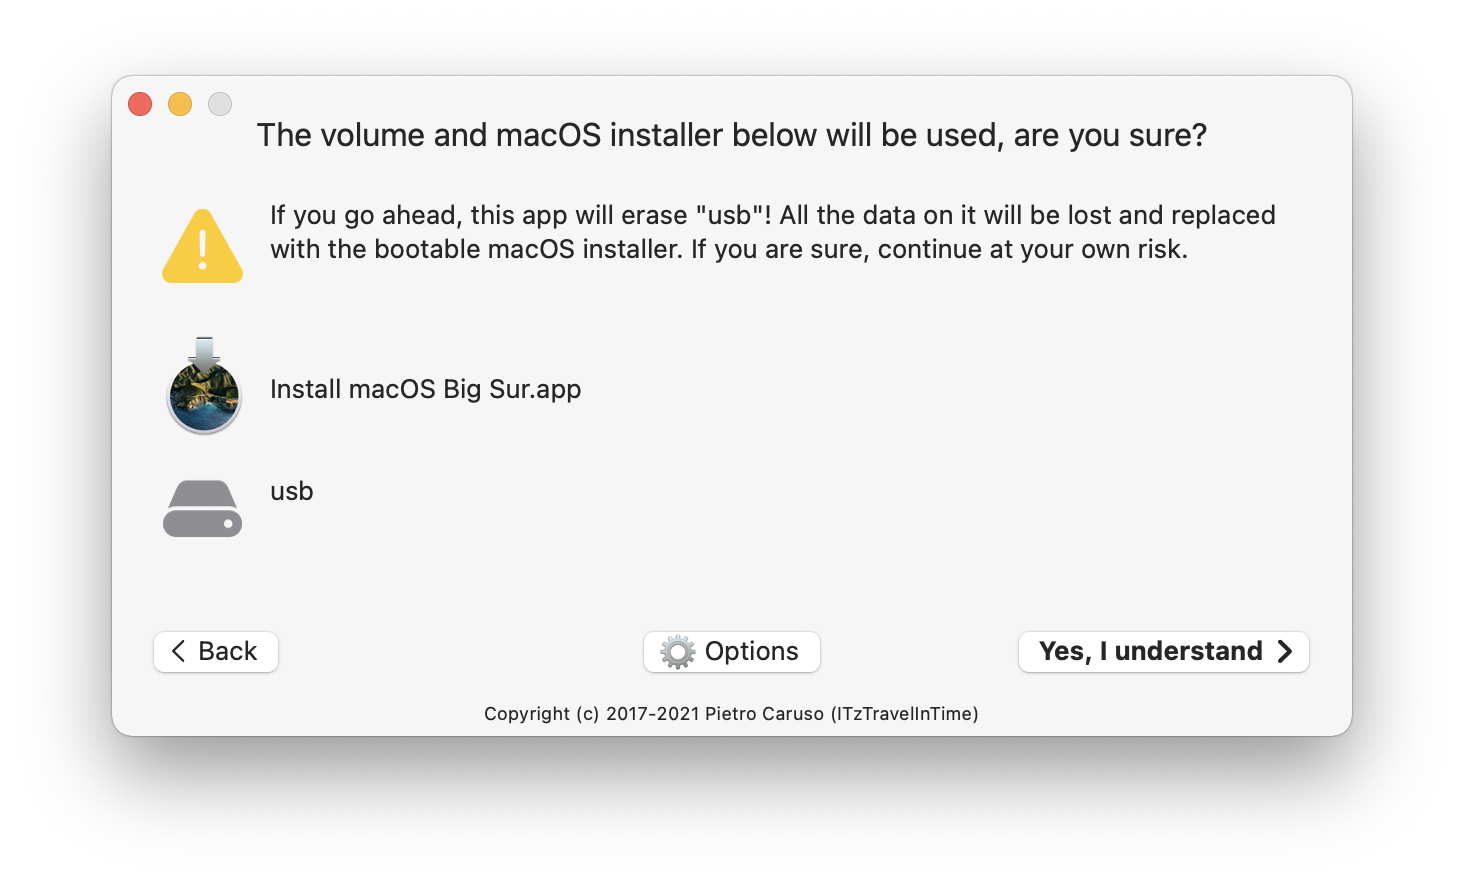
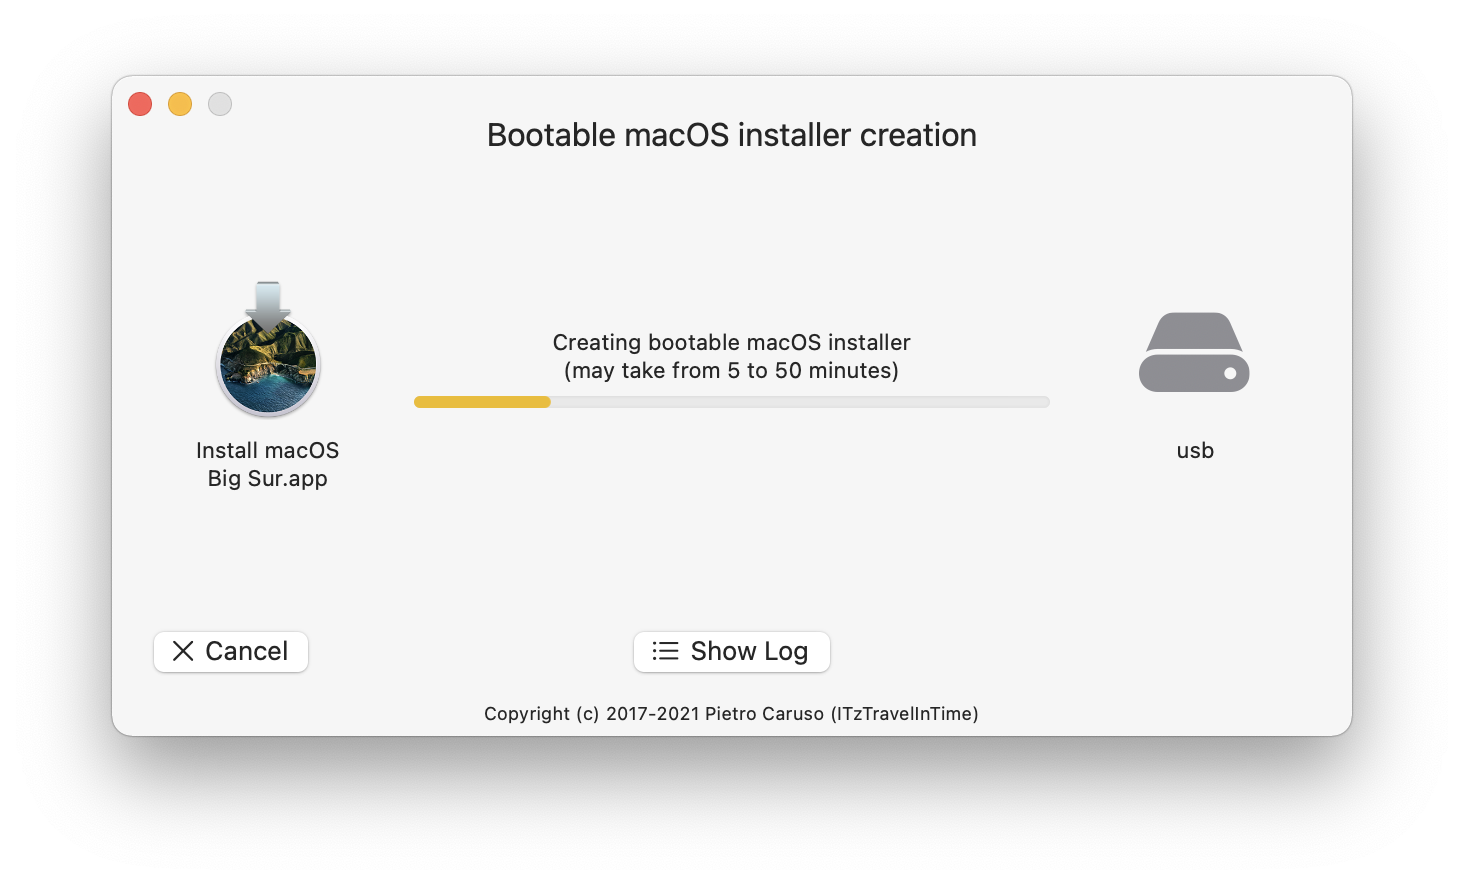
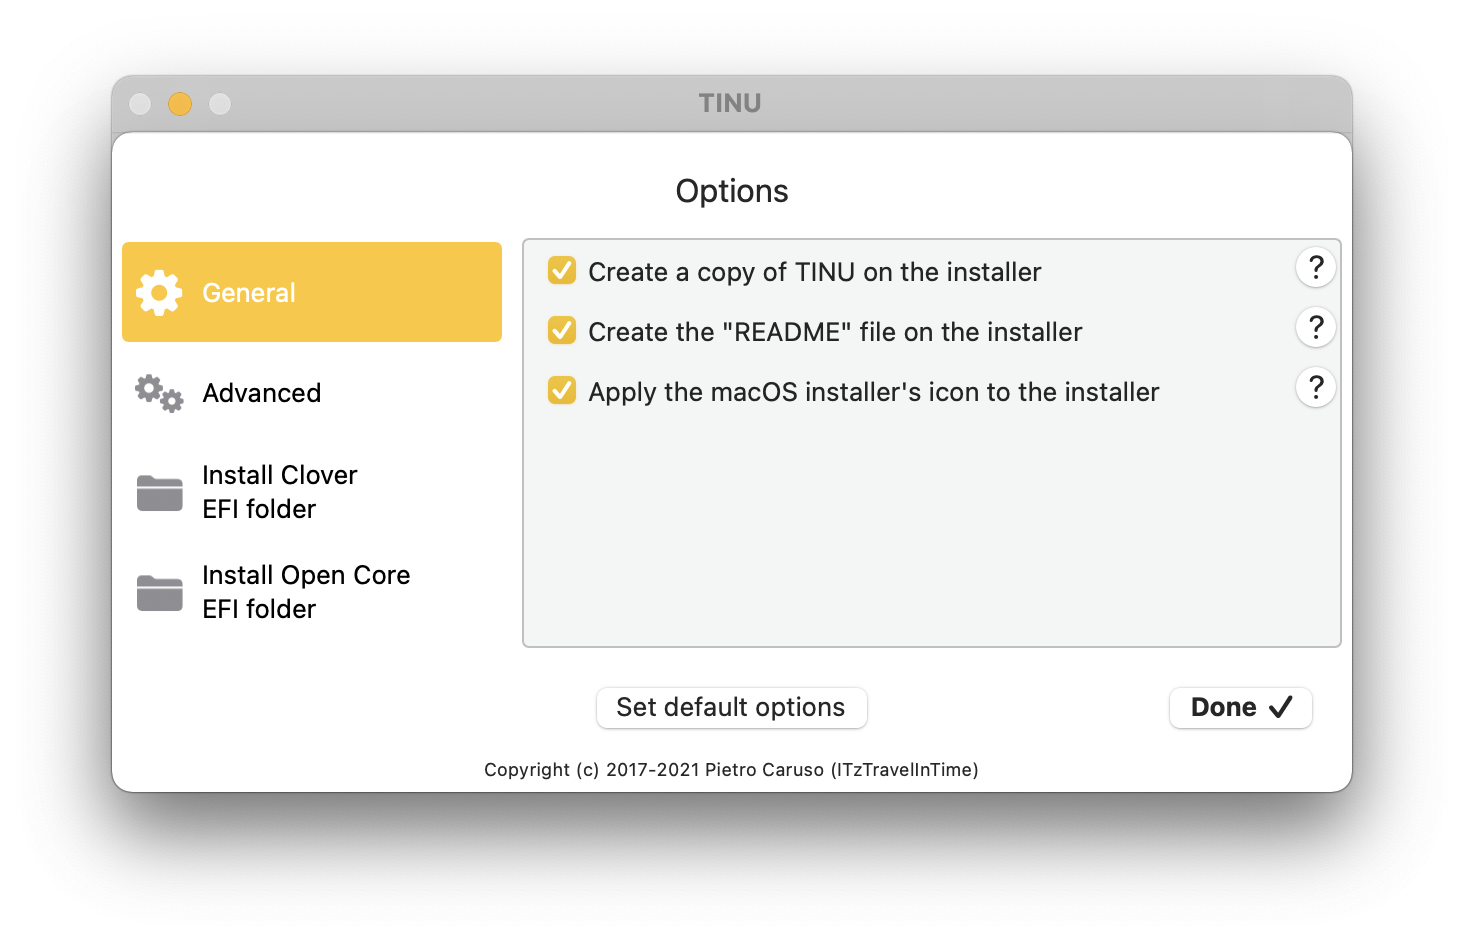
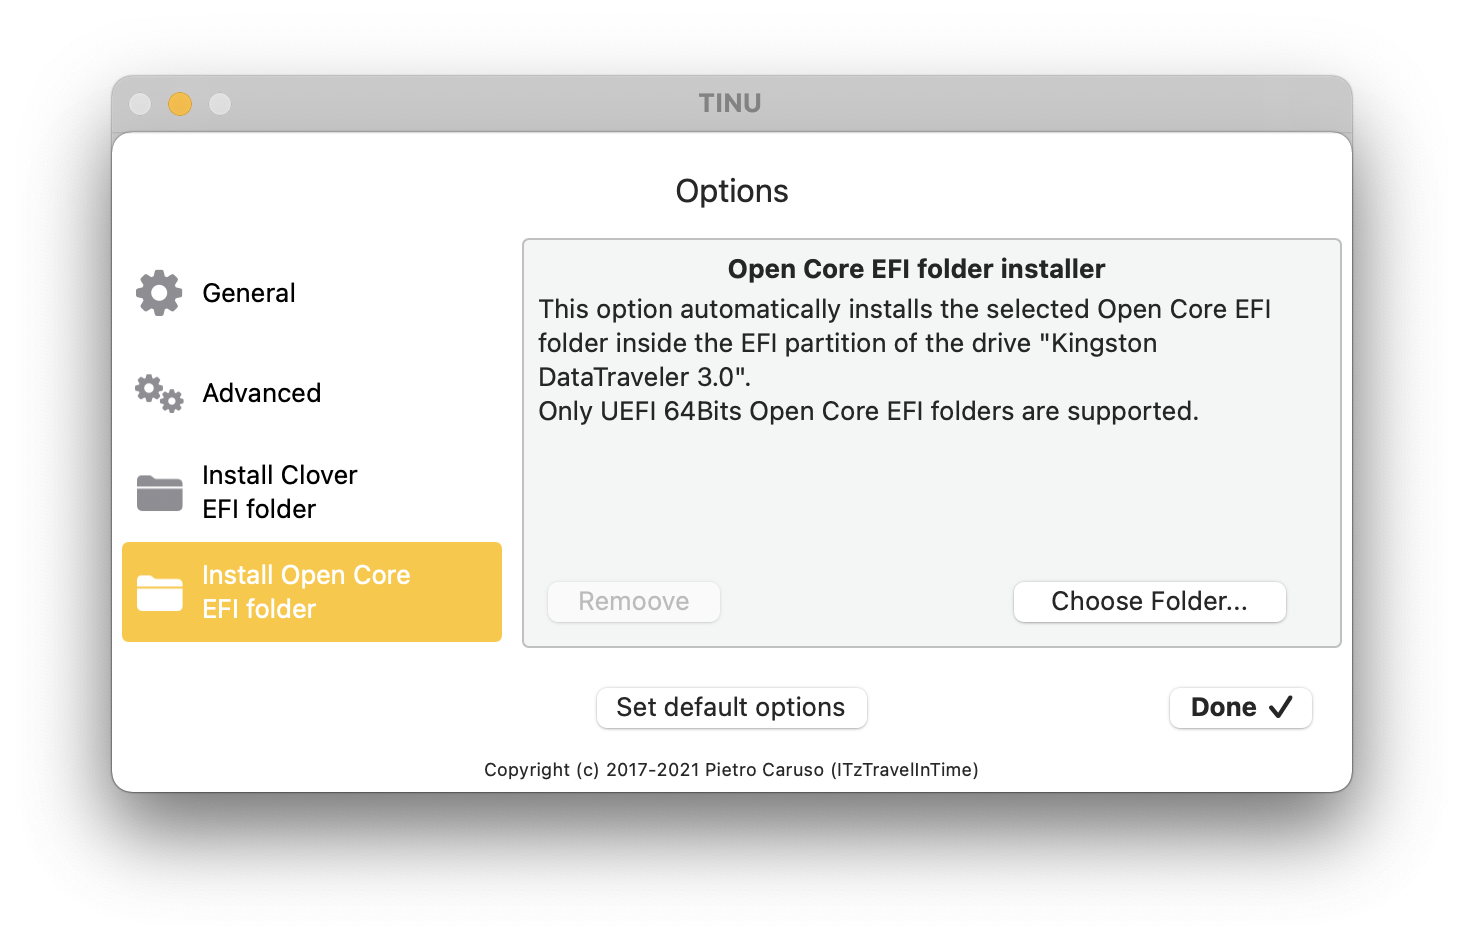
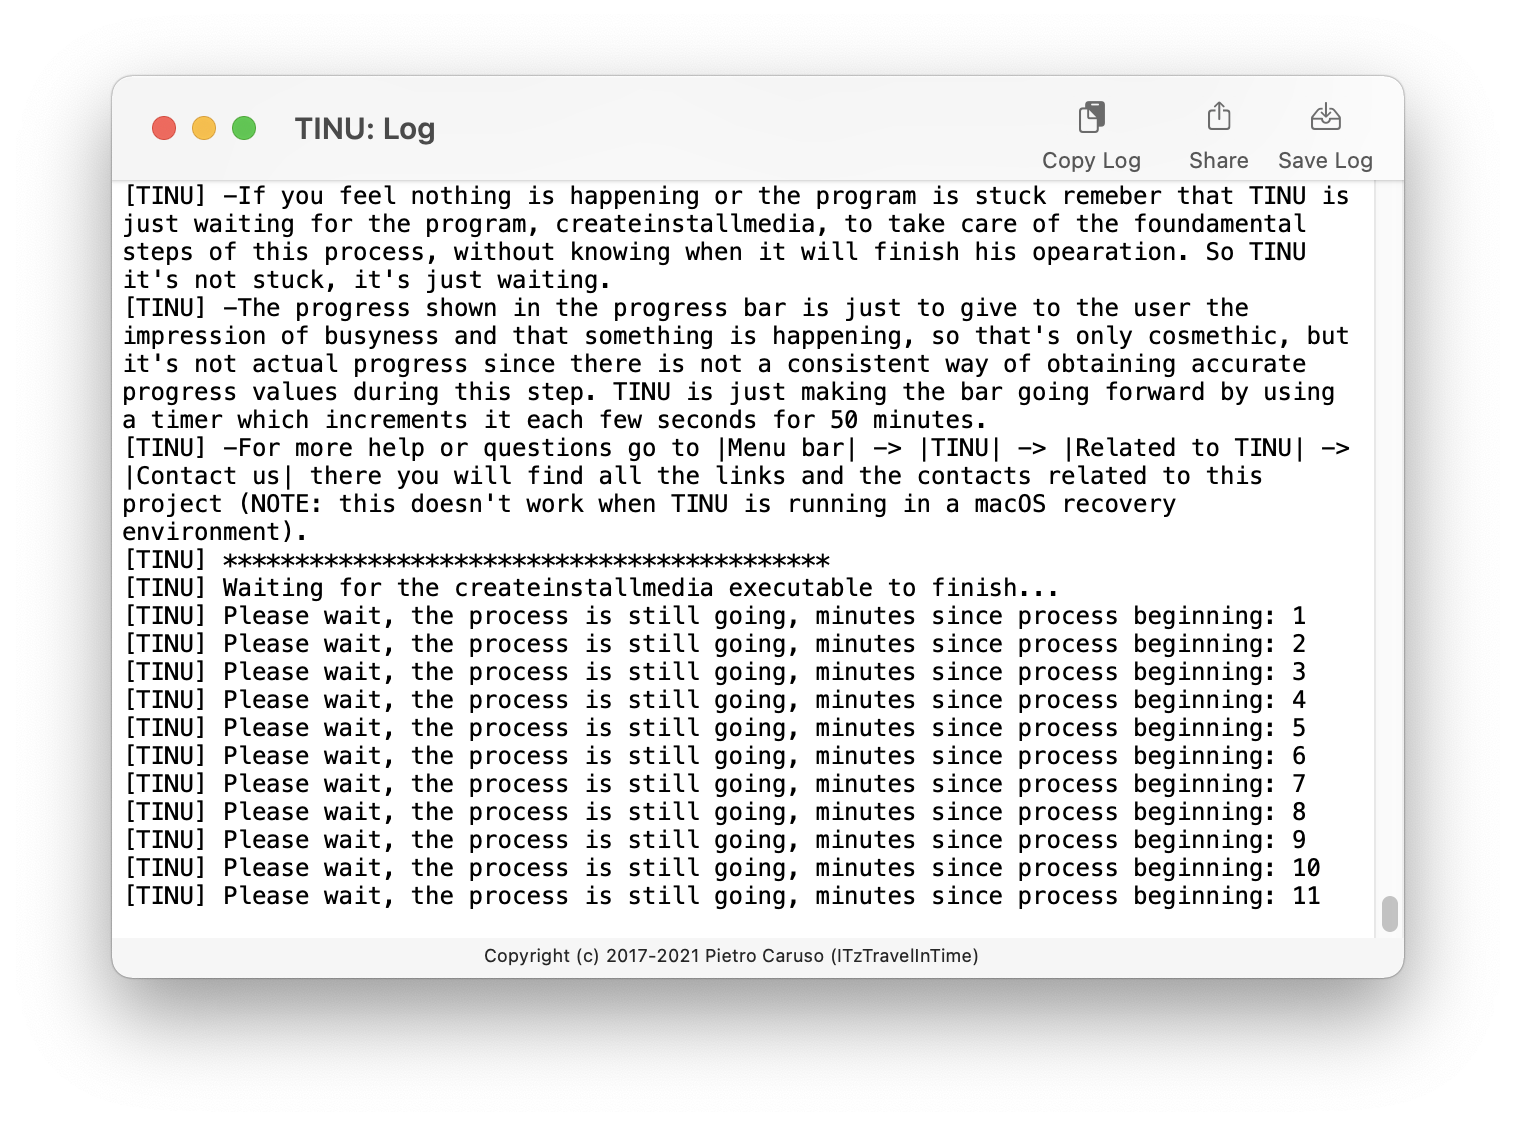
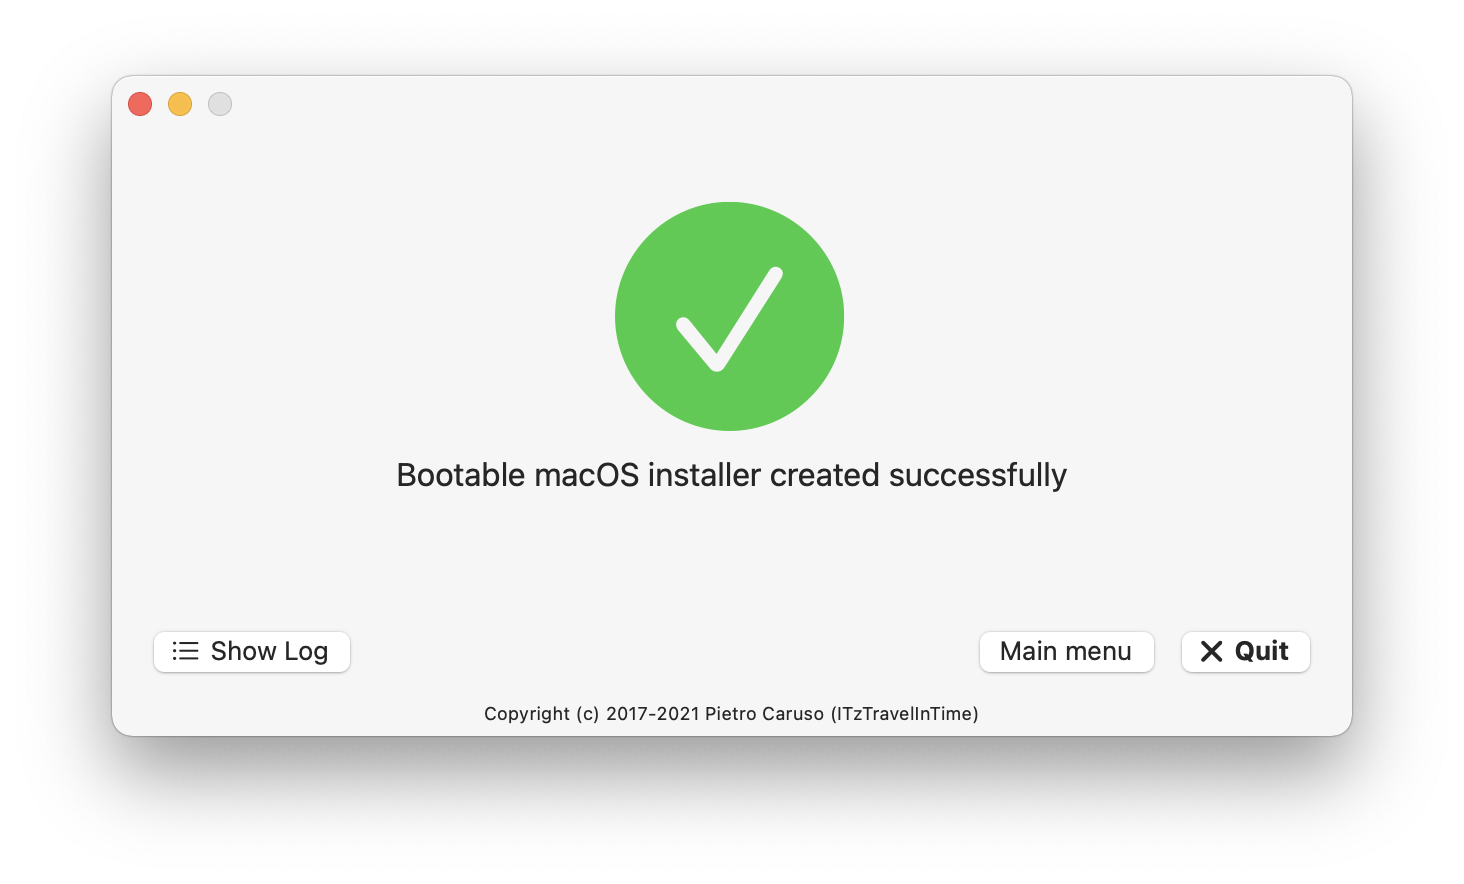
Hi guys, this thread is to show you a new and open source app, created by me, that I called TINU: The name means: TINU Is Not #####, the U refers to a popular software that is used to create macOS hackintosh installers (that for good reasons is banned on this forum), but the aim of the name is to explain that this app is a totally different thing from that software and works in a totally different way. This software is intended to be used to create a bootable macOS installer for computers capable of running Apple's macOS, this app, amoung other things is also a GUI for the createinstallmedia executable that could be found in any macOS installer app from Mavericks up to the latest versions. Allows you to create easily a macOS install media without messing around with command line stuff and without using disk utility, and also detects and prevents the most common errors with the creation of bootable vanilla macOS installers. # Features: - No need for guides or instructions! Just follow the very simple on-screen indications to very easily start the bootable macOS installer creation process. - Fully open: You can see how this programs works and you can freely contribute to it! (See the `Repository rules` and the `Note that` sections of this page) - Support for multiple languages (currently just italian and english, but more will be added with future updates once the system which allows it gets improoved) - Can work with every macOS installer app that has the `createinstallmedia` executable inside its internal resources folder (including also beta and newly released installers). - 100% clean using the official apple's method: The bootable macOS installers created with this tool are made using the official apple's `createinstallmedia` method, just as if you created them using the command line, this ensures the best and the cleanest results avoiding all the problems that modded installers have. - Does not require any special preparations. Just open the program, make sure you have a big enought USB drive plugged in (see the `Requirements` section) and have a macOS installer app on your disk. - No need to use Disk Utility first. TINU can format your drive or partition for you, if it's necessary. - Integrated downloads from Apple for lots of macOS/OS X installer apps (to access them open the app, go to the menu bar, and then `Tools->Download a macOS installer`). - Integrated EFI partition mounter tool. - Automatic Clover and OpenCore EFI folder installer. - Tested to work on all the latest macOS releases. - Makes use of the latest Swift 5 language and the latest Xcode releases. (To suggest a new feature please contact us) # Requirements: - A computer that runs Mac OS X Yosemite or a more recent version (Mac OS X El Capitan is required to use TINU inside a macOS Recovery/Installer OS). - A drive or a free partition of least 8 GB (9+ for Catalina, 12+ for Big Sur and newer versions) that you want to turn into a macOS/Mac OS X installer (NOTE: partitions are usable only if they belong to a drive which uses the GUID partition format). - A copy of a macOS/Mac OS X installer app (Maveriks or newer versions are supported), it's reccommended to have the app placed into the /Applications folder or in the root of a volume connected to your computer (excepted the drive/volume you want to turn into your macOS install media). # Download: - You can download the pre-made executable of the app here: https://github.com/ITzTravelInTime/TINU/releases # Building/Compiling requirements: - To compile a copy this app using the source code provvided in this repo, Xcode 12.x or newer is required and so a machine running at least Catalina is needed. # Frequently asked questions https://github.com/ITzTravelInTime/TINU/wiki/FAQs # Useful links and contacts: Thread (english) on insanelymac.com: - http://www.insanelymac.com/forum/topic/326959-tinu-the-macos-installer-creator-app-mac-app/ Thread (italian) on insanelymac.com: - https://www.insanelymac.com/forum/topic/333261-tinu-app-per-creare-chiavette-di-installazione-di-macos-thread-in-italiano/ Thread (english-german) on hackintosh-forum.de: - https://www.hackintosh-forum.de/index.php/Thread/33630-TINU/ Contact the project creator (ITzTravelInTime aka Pietro): - Reddit profile: https://www.reddit.com/user/ITzTravelInTime - email: piecaruso97@gmail.com # Swift packages used: - https://github.com/ITzTravelInTime/Command - https://github.com/ITzTravelInTime/CommandSudo - https://github.com/ITzTravelInTime/SwiftCPUDetect - https://github.com/ITzTravelInTime/SwiftLoggedPrint - https://github.com/ITzTravelInTime/TINUNotifications - https://github.com/ITzTravelInTime/TINURecovery # Note that: - We (the project creator and othe people involved with active developmment) assume no responsibility for any use of this app and this source code, use them at your own risk! - We (the project creator and othe people involved with active developmment) do not guarantee support to you, this is only an open source project done in our free time, not a product released by a company! - This project is born only for educational and demonstrative purposes, it's not intended to be used for commercial purposes. - This is a no-profit project, born only to let people to create macOS install medias in a more simple way and also to let them learn how to create this kind of apps. - Changes to the provvided source code are documented using git, so for any info about any changes made please see the commit history here on the repo. # Credits: - Apple for macOS, system icons and installer apps (and their createinstallmedia executable). - Special tahnks to: Francesco Perchiazzi, Nicola Tomarelli, Roberto Sciortino, Raffaele Sonnessa, Ermanno Nicoletti, Tommaso Dimatore, Michele Vitiello Bonaventura, Massimiliano Faralli, Davide Dessì, Giorgio Dall'Aglio, Peter Paul Chato, Antonio De Masi, the Facebook group ["Italian Hackintosh group!!"](https://www.facebook.com/groups/Italia.hackintosh/?fref=ts), the Telegram group ["Hackintosh Italia"](https://t.me/Hackinto{censored}alia) and the commiunity from hackintosh-forum.de . - Gianmarco Gargiulo for the current app icon and usb drive image. - Thomas Tempelmann for help with the UI, grammar and the code. - Pietro Caruso (ITzTravelInTime) project creator, maintainer and main developer. # Legal info: TINU, the open tool to create bootable macOS installers. Copyright (C) 2017-2021 Pietro Caruso (ITzTravelInTime) This program is free software; you can redistribute it and/or modify it under the terms of the GNU General Public License as published by the Free Software Foundation; either version 2 of the License, or (at your option) any later version. This program is distributed in the hope that it will be useful, but WITHOUT ANY WARRANTY; without even the implied warranty of MERCHANTABILITY or FITNESS FOR A PARTICULAR PURPOSE. See the GNU General Public License for more details. You should have received a copy of the GNU General Public License along with this program; if not, write to the Free Software Foundation, Inc., 51 Franklin Street, Fifth Floor, Boston, MA 02110-1301 USA. Here are also some screenshots inside this spoiler tab


 1 point
 -
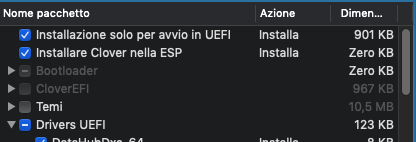
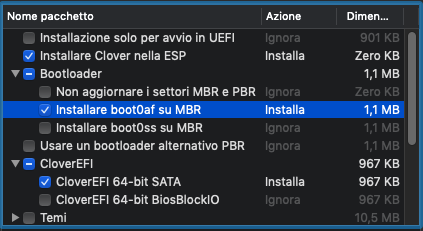
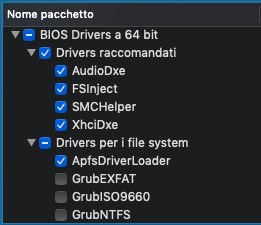
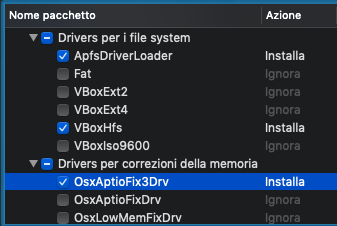
Ciro82==>>Thanks Uno dei tre Requisiti: Hack funzionante Mac vero Macchina virtuale Impostazioni Bios per il boot: Cercate una voce del tipo “Sata Mode”e settatela in AHCI Secure Boot: disabilitare o altri sistemi operativi CSM: UEFI o LEGACY, oppure a secondo del tipo di installazione VT-x / VT-d disable *Nota: Secure boot e csm valido solo per bios UEFI Materiale Occorrente "OS X (Versione App.Store)” USB 8GB *nota: nel caso di usb superiori dovrà essere partizionata, in modo da avere una partizione su cui "lavoreremo,di questa dimensione ShowAllfiles kext Wizard Bootloader Clover_2.3k_r xxx: http: //sourceforge.n.../cloverefiboot/ Clover Configurator: http: //mackie100proj...a.org/download/ FakeSmc.kext: https://github.com/kozlek/HWSensors/releases In allegato,a fondo pagina troverete un "pacchetto" contenente : ShowAllfiles, Kext Wizard, FakeSmc.kext: App alternative: ESP Mounter Pro: per montare la partizione EFI Vi illustrerò tre metodi per creare la usb, ma sono ben distinti… quindi usatene soltanto uno Metodo 1: “Install Mac_OS_X.command” Metodo 2: “Create Install Media di Apple” Metodo 3: Metodo Manuale Alla fine delle preparazione dell’installer, tutti i metodi necessitano l’installazione del Bootloader Clover sulla a vostra USB. “CONDIZIONI OBBLIGATORIE” PUNTO 1: che la vostra usb sia stata preventivamente nominata USB (caratteri maiuscoli) Tabella di partizione GUID e la formattazione in Mac esteso Journaled. PUNTO 2: che l’installer di OSX si trovi in Applicazioni Utility Disco Selezionate la pendrive, andate su “partizione”, selezionate “1 partizione”, impostate Mac OS esteso journaled e date il nome USB, poi in basso cliccate su opzioni e scegliete Tabella partizione (GUID), poi “applica”. Immagine Riporto nuovamente l’operazione sopra citata adoperando dal nuovo Utility Disco introdotto su El Capitan. Rimane ovviamente invariato nome della usb in ==>> USB (maiuscolo), la formattazione in Mac esteso Journaled e sia la mappa partizione in GUID Da utility disco selezionate la usb, cliccate su inizializza. dal menù a tendina scegliete la relative impostazioni Immagine Procedura effettua da High Sierra è la stessa della precedente, l'unica attenzione e operazione da aggiungere in primis è cliccare nel menù a tendina in alto sulla sinistra di utility disco e selezionare "mostra tutti i dispositivi" Immagine ===================== METODO 1: "Install_Mac_OS_X.Command" Lo script che trovate allegato in fondo alla guida permette la creazione dell’installer in maniera automatica Include la possibilità di scelta di tre versioni di osx Yosemite El Capitan Sierra Il risultato finale è come quello del metodo "manuale" descritto nella guida, per cui l'installazione avverrà in un solo passaggio, non in due come con il metodo createinstallmedia. Offre inoltre la possibilità di inserire un kernel patchato, utile, per esempio, per chi usa AMD. Rimane invariato il nome dato alla usb in USB, mappa partizione e tipo di formattazione Se la vostra usb non sarà rinominata nel modo corretto, verrete avvisati dal terminale, quindi non dovrete far altro che apportare la relativa modifica e rilanciare nuovamente lo script Esempio =========================== Metodo 2 L'intento è quello di usare la procedura fornitaci direttamente da Apple, "createinstallmedia", introdotta con Mavericks. Tale metodo prevede l’uso del terminale che via via se ne sta perdendo il “valore e l’uso” Inizialmente per i neofiti potrà sembrare problematico ma alla fine non è così. Durante il post installazione alcune operazioni ne richiedono l’ uso. Perciò mi sono chiesto perchè, qualora uno volesse, non far conoscere da subito un po’ questo “strumento”??? Per favorirvi vi ho allegato i comandi già “pronti”, i quali li potrete copiare ed incollare sul terminale. A questo punto aprite il terminale, copiate ed incollate il comando sottostante e premete invio, digitate la vostra password e premete nuovamente invio. Comando per creare USB con Yosemite: sudo /Applications/Install\ OS\ X\ Yosemite.app/Contents/Resources/createinstallmedia --volume /Volumes/USB --applicationpath /Applications/Install\ OS\ X\ Yosemite.app --nointeraction Comando per creare USB con El Capitan sudo /Applications/Install\ OS\ X\ El\ Capitan.app/Contents/Resources/createinstallmedia --volume /Volumes/USB --applicationpath /Applications/Install\ OS\ X\ El\ Capitan.app --nointeraction Comando per creare USB con Sierra sudo /Applications/Install\ macOS\ Sierra.app/Contents/Resources/createinstallmedia --volume /Volumes/USB --applicationpath /Applications/Install\ macOS\ Sierra.app/ --nointeraction Per creare USB con Hight Sierra o Mojave usate --> C_I_M (aggiornato per 10.14) Funziona con il drag & drop sul terminale, in questo caso non vi è necessità che la usb sia nominata in un determinato modo ed essendo basato su create install media ovviamente funziona da 10.9 a 10.14.... BENE…IL PROCESSO DI CREAZIONE E’ INIZIATO… AVREMO CIRCA 20/30 MINUTI DI TEMPO LIBERO A CUI DEDICARSI A CIO’ CHE VOGLIAMO……………………………………….. COLGO L’OCCASIONE PER FARVI NOTARE LA VELOCITA’ E LA SICUREZZA DI QUESTO METODO CONFRONTATE QUESTO CON IL TERZO METODO E NOTERETE CHE CON UN SOLO PASSAGGIO, OSSIA IL COMANDO DATO AL TERMINALE, FACCIAMO IN UNA SINGOLA OPERAZIONE TUTTI I VARI STEP DESCRITTI SULL’ ALTRO METODO. DETTO QUESTO, MOLTO IMPORTANTE E’ SOTTOLINEARE CHE COSI’ FACENDO EVITEREMO ERRORI DI DISTRAZIONE RIGUARDO AI PASSAGGI O FRAINTENDIMENTI. Immagine Potete adesso passare ad installare il bootloader Clover sulla vostra usb. *NOTA*: Avendo usato questo metodo l'installazione si dividerà in due fasi, perciò dopo il primo riavvio e necessario far partire nuovamente l'installer, selezionare lo stesso disco senza formattarlo. Finita questa ulteriore fase , l'installazione sarà terminata ========================= METODO "MANUALE".... (lascio per futura memoria-Compatibile fino a 10.12) ========================== Bootloader **Nota:** Installazione in UEFI dipenderà dalla scheda madre in vostro possesso, quindi se non supporta tale opzione , il bootloader dovrà essere installato in modalità Legacy. Vi invito, qualora non sapeste questa informazione, a recarvi nel sito ufficiale del produttore e controllare le informazioni a riguardo Fatto questo dobbiamo installare Clover sulla usb. A seconda del tipo di Bios o al tipo di installazione che vogliamo fare UEFI o Legacy avremo ovviamente configurazioni diverse in questa fase. Lanciate il pkg. Immagine Cambiate la destinazione di installazione ad USB oppure Install Mac_OS_X (a secondo del tipo di creazione eseguita) Successivamente clicchiamo su "Ad Hoc" Per Installazione UEFI Mettete i flag : Installazione solo per avvio UEFI : installare Clover nella ESP : Driver64UEFI AptioMemory --> (consigliato) -> Link download Può essere solo aggiunto manualmente scaricando dal link sopra e collocandolo nella rispettiva cartella NOTA: in questo caso non selezionare nessun OsxAptioFixDRV durante l'installazione di clover oppure rimuovetelo successivamente. : Driver64UEFI ApfsDriverLoader --> (consigliato) --> sostituisce l'uso del driver apfs.efi : Selezionate l'altri driver come da successiva immagine, *Nota: Altri driver che si possono usare al suo posto sono: informazioni Proseguite con l’installazione. Immagine ** Ricordate che avrete accesso a questa cartella dopo aver montato la partizione EFI** =========================== Per installazione Legacy Immagine =========================== Impostazione per config.plist: Con clover configurator “montate” la partizione EFI della usb. 1) Per fare questo nel menù di sinistra, cliccate su “Mount EFI” 2) individuate la partizione relativa alla vostra usb, a questo punto montiamo la relativa partizione EFI selezionando l’apposito pulsante “Mount Partition” Immagine 3) Successivamente cliccate su “Open Partition”.. recatevi in EFI/Clover ed aprite il config.plist 4) Sezione ACPI: Disabilitate tutti i fix sia del menù 1 che del menù 2 Immagine 5) Sezione BOOT: Sole se si sta installando Yosemite mettete il flag su kext-dev-mode=1 Immagine 6) Sezione RT Variables: Se si sta installando El Capitan oppure Sierra, aggiungere i valori: BooterConfig= 0x28, CsrActiveConfig= 0x67 Immagine 7) Sezione System Parameters: Su inject kext mettete YES Immagine =========================== Nota: Su El Capitan, è stato introdotto SIP (System Integrity Protection) Info: =========================== Recatevi in EFI/Clover/kext/10.x X= alla versione di osx che state installando. Per esempio se installerete Yosemite dovrete recarvi nella cartella 10.10, con El Capitan in 10.11….ecc Se non ci fosse tale cartella, createla e nominatela voi a “modo”. Copiatevi all’interno FakeSmc.kext *Nota se venite già da altre vostre configurazioni, oltre kext sopra citato ,potete mettere gli altri necessari per il vostro hardware Stessa cosa se avete DSDT e/o SSDT potete copiarli in EFI/Clover/Acpi/Patched Immagine  Per High Sierra: Scaricare il driver apfs.efi a fine guida, collocarlo: --> EFI/clover/Driver64UEFI se stiamo usando UEFI --> EFI/Clover/Driver64 se stiamo usando Legacy Per chi volesse continuare ad usare HFS vi rimando a questo post: Come installare High Sierra in HFS direttamente dalla usb Utenti Laptop: Nel 99% è obbligatorio disattivare la grafica discreta Nvidia/Amd per installare questo nuovo osx Quindi aggiungete --> SSDT-Disable_DGPU.aml.zip in EFI/Clover/acpi/Patched della usb -------------------------------------------------------------------- Per Mojave: Scaricare il driver apfs.efi per 10.14 a fine guida, collocarlo: --> EFI/clover/Driver64UEFI se stiamo usando UEFI --> EFI/Clover/Driver64 se stiamo usando Legacy Versione di clover non antecedente a V_4015 Volete usare HFS? E' possibile fare un installazione diretta su altro disco o partizione, nel caso può essere usato anche per effettuare aggiornamenti... nel caso guardate... Mojave in HFS Oppure direttamente da usb Fatto questo avrete la vostra USB bootable per installare OSX. ………Non scordatevi Fakesmc.kext da mettere nella relativa cartella…. senza il quale non farete mai il Boot...... *NOTA: se usato il terminale per la creazione della usb, l'installazione si dividerà in due fasi, perciò dopo il primo riavvio e necessario far partire nuovamente l'installer, selezionare lo stesso disco senza formattarlo. Finita questa ulteriore fase , l'installazione sarà terminata **NOTA** Se avete processori Broadwell,Skylake o Kabylake...usate FakeSmc.kext e relativi sensors che trovate all'interno del secondo pacchetto.. (potete usarlo anche sui precedenti senza problemi, essendo una versione più aggiornata ha ulteriore supporto per le cpu più recenti) Update: Fakesmc e sensors versione 6.26 Post installazione... post #2 Buon Hack…..  Aggiornamento:Install_Mac_OS_X.command.zip (compatibile da 10.10 a 10.12) le info le trovate a questo post Ringrazio @Ciro82 che mi ha aiutato nel preparare questa guida. Pacchetto.zip Pacchetto-2.zip Pacchetto-Fake+Sensors 6.26.1440.zip C_I_M.zip

 1 point
 -
Hello! Which kexts are you using for Bluetooth? Have fun.1 point
-
OK. Grazie di tutto. domani, aggiorno al firma, come scheda grafica cosa scrivo, solo Intel oppure ha un modello specifico? Mobo: Gigabyte GA-B250M-D3H CPU: Intel® Core™ i7-6700 - LGA1151 Ram: 16 GB ram DDR4 2400MHZ Kingston Graphics: NVIDIA GEFORCE GT710 1GB SDDR3 64bit VGA HDMI DVI1 point
-
Be basta segui la Guida in firma , in stile apple , con OS scaricato da App.Store , bootloader Clover ufficiale , senza aggiunta di Tools che piantano Kext a DX e SX dell'OS , cosi facendo nella tua Cartella Clover avrai raccolte le impostazioni servono al tuo HW x funzionare in OSX1 point
-
Ok, quindi dite che l'unica soluzione è reinstallare tutto? Se è così ci aggiorniamo a domani, ora non riesco di sicuro... Per ora grazie a tutti per l'impegno nel risolvere il mio problema...gentilissimi davvero!!!!1 point
-
come immaginavo, hai commesso l'errore che poi commettono in tanti, hai installato una fracassata di roba a destra e a manca, appleHDA patchato ne ora leggo che dice il boss clover l'ha già allegato su, ma attento, la visione ti potrebbe causare un coccolone neeee
 1 point
 -
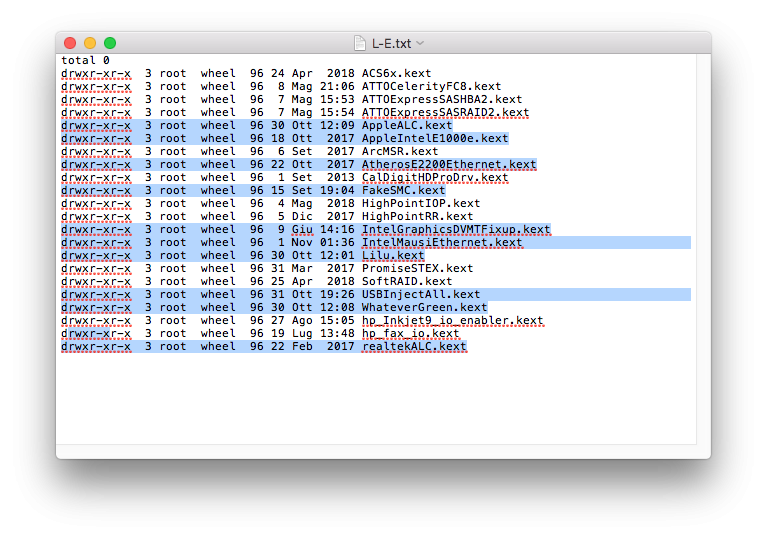
hai un "vagone" di kext in L/E... duplicati..altri inutili per il tuo hardware etc questo è il frutto di "quei" tools segui la mia guida in firma, crea la usb e fai un installazione pulita Appena creata la usb, sostituisci nella efi la cartella di @iCanaro1 point
-
di fatto apfs è basato sul firmware che in hack non abbiamo oltre a questo su 10.13 non era gran che, migliorato poi su 10.14 tieni presente che la conversione sarà automatica su ssd1 point
-
Grazie per la Dritta, il pc in calce (Gigabyte GA-B250M-D3H) montava questa scheda (GT710), l'ho tolta e messa in questo, e quello l'ho fantto funzionare con la sua Intel (nota dolente l'audio HDMI non funziona, uso le casse, sino a una soluzione) Ti invio il nuovo clover, puoi vedere se c'è qualcosa da correggere, Funziona tutto! Grazie di tutto. CLOVER P8H61-MX - Nvida GT710.zip1 point
-
Nel caso fosse passato al lato oscuro, vediamo di riportarlo alla luce1 point
-
La cosa più importante da ricordarsi è che qui non vi è alcun supporto a chi ha usato tali tools Come da regolamento.1 point
-
Yes, already reported here and also here. Seems a bug, give the devs enough time to fix it.. or rollback to prev. Clover rev.1 point
-
I have the same problem.1 point
-
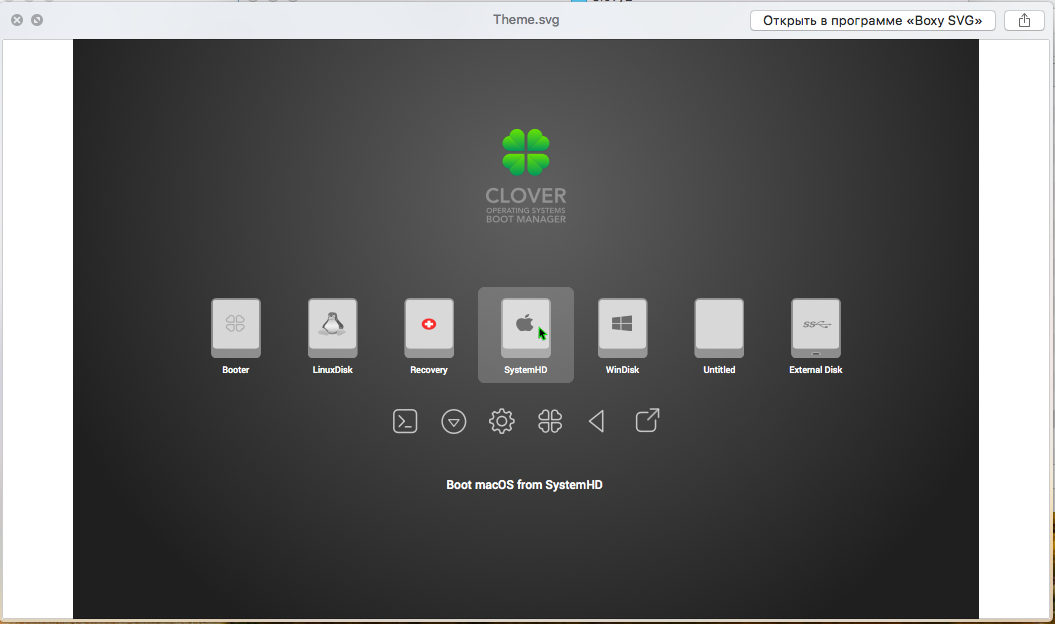
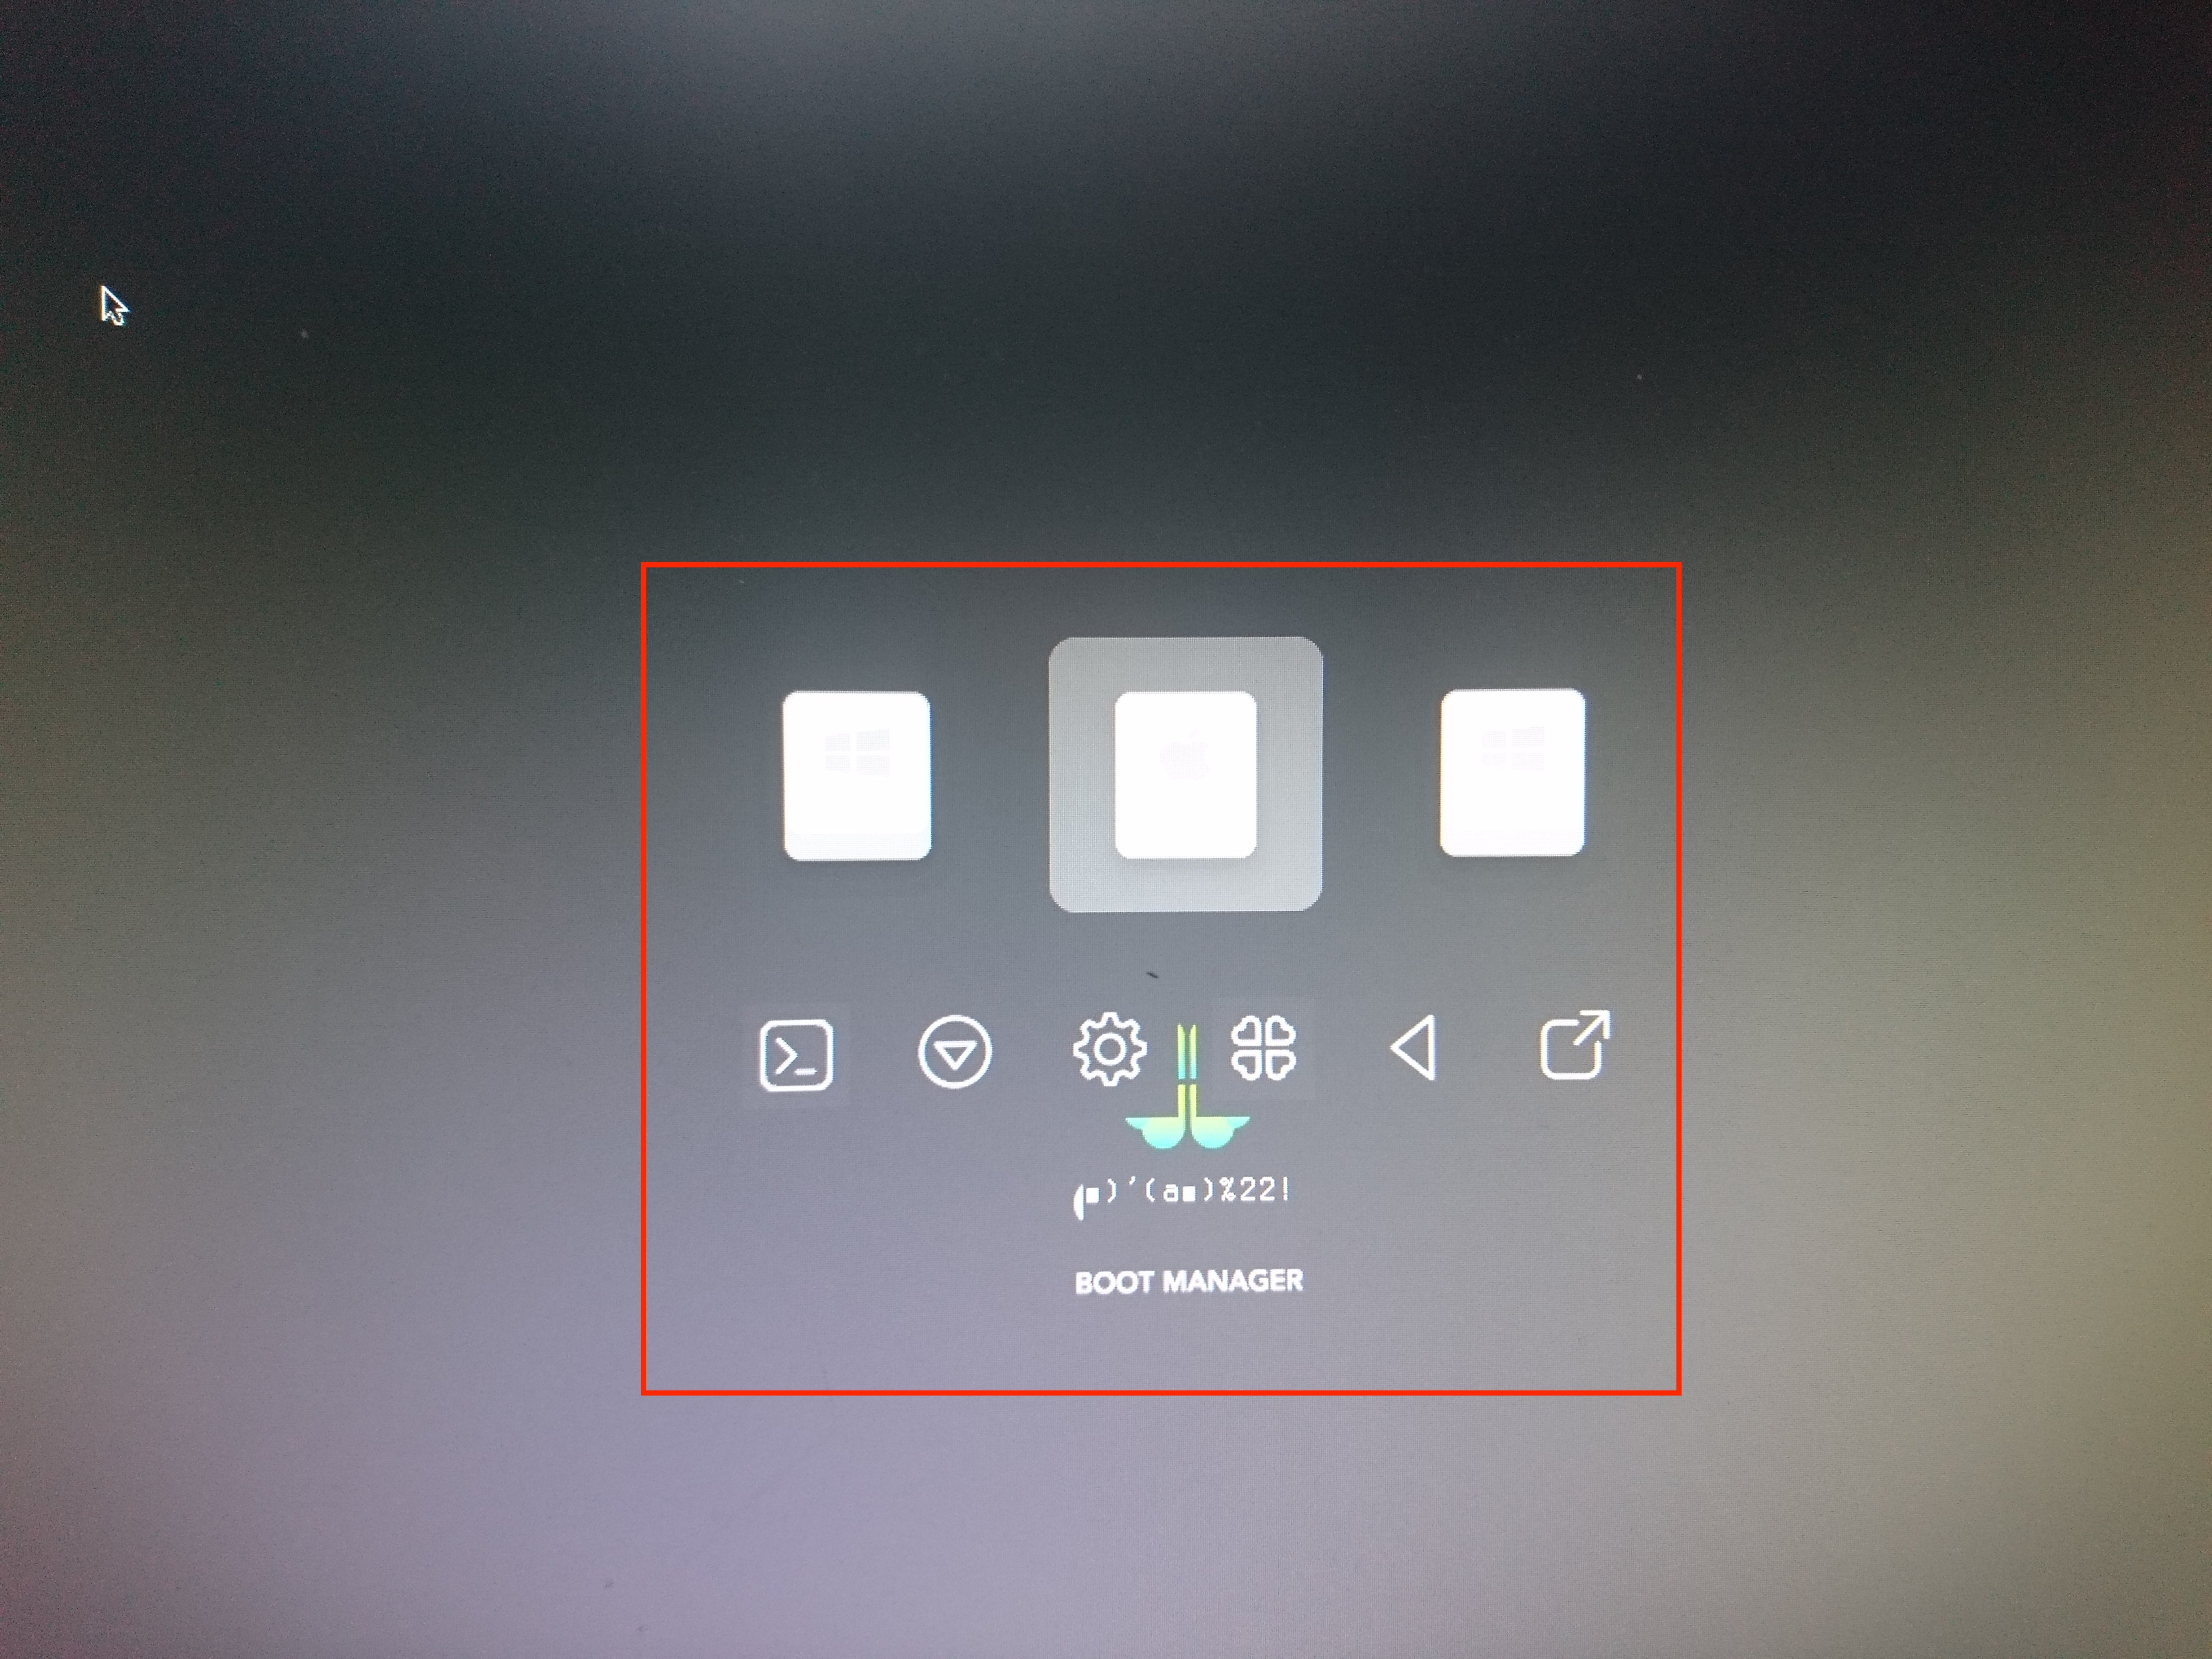
After upgrade to r4729, i got garbled text on the clover GUI. Is it a bug or what parameters need to be modified in config.plist?
 1 point
 -
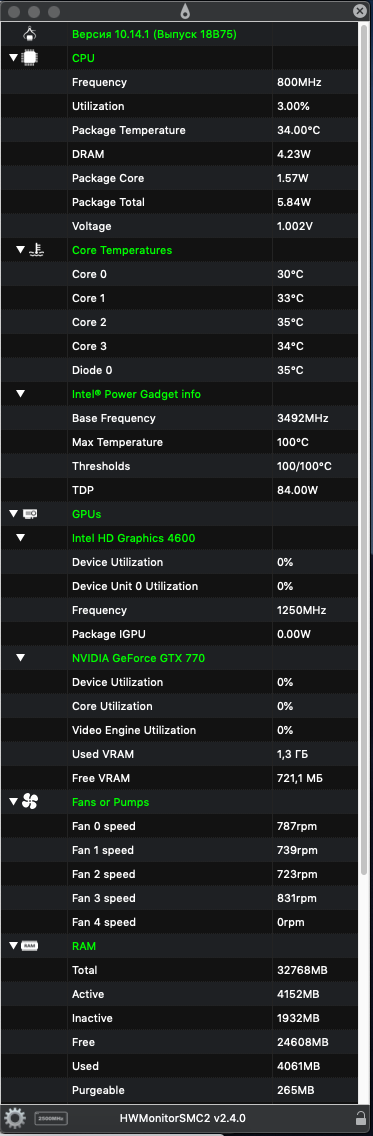
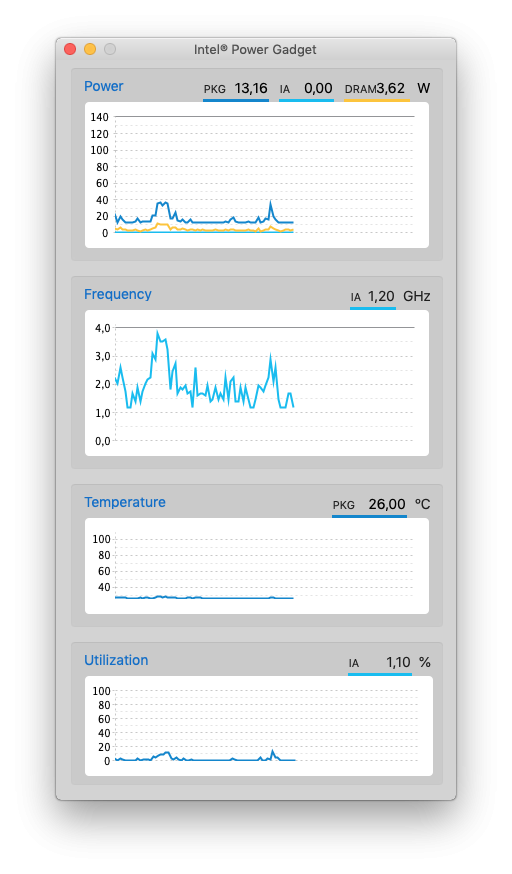
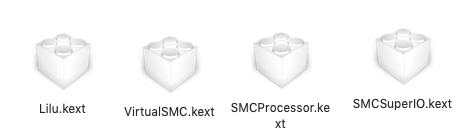
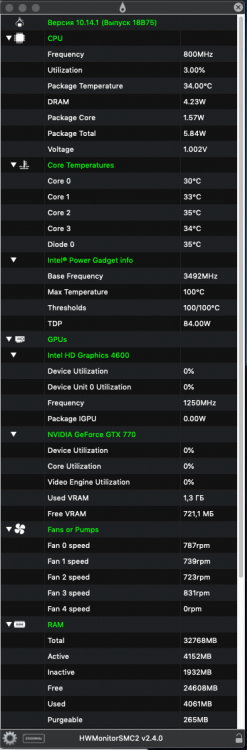
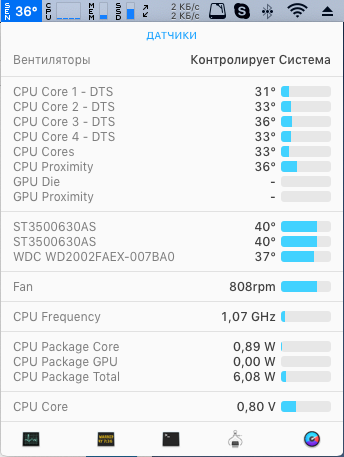
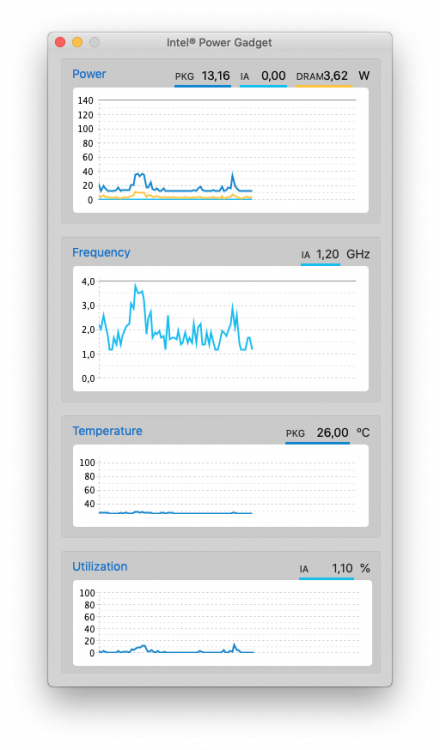
You will need these the kexts for you desktop. Use HWMonitorSMC2 or iStat Menus. Install Intel® Power Gadget too.
 1 point
 -
eh eh dentro questa efi manca solo il caffe1 point
-
ciao boss...purtroppo non essendo capace a controllarlo l'ho buttato come tentativo...1 point
-
https://olarila.com/forum/viewtopic.php?p=65287#p652871 point
-
Hi Another issue here with commit r4729: strange fonts in Clover GUI, menu etc makes Clover unusable. Sorry for my bad english. EDIT: same issue with commit r4731. Can we continue to use PNG / Icns instead of SVG themes, Please
 1 point
 -
intanto metti un FakeSMC aggiornato https://bitbucket.org/RehabMan/os-x-fakesmc-kozlek/downloads/ Procurati già LILU, WEG e appleALC https://github.com/acidanthera il config è tutto sballato e da creare correttamente... ora devo andare a pranzo, se non arriva qualcuno prima, poi te lo sistemo.. parliamo dell'hardware in firma con 8700K giusto thanks foskvs1 point
-
Sostituisci il config.plist con questo e riprova. config.plist.zip1 point
-
Yes, but i remember that he got video acceleration on mojave and i told him that this card is supported for metal, maybe is just a missplacement of the system informations app.1 point
-
si OK bene, ma rispondi alla domanda di @foskvs il DSDT da dove arriva? è stato creato per il tuo hack con il BIOS attuale o è stato pescato da altra EFI? se è la seconda, allora lo devi togliere.1 point
-
grazie mille in download...1 point
-
If Apple will switch to ARM, we will switch too... T2 security ?? We will find a solution ... FakeT2 sent from my iPhone1 point
-
l'applicazione Apple Store è per dispositivi IOS ed il mio Ipad non la supporta in quanto vecchio e fermo alla versione IOS 9. Quindi non riesco a scaricare. Tenete presente che sto cercando di scaricare dal PC in firma.1 point
-
Ok Sostituisci questi file , controlla se avvia , quindi assicurati di poter arrivare al desktop se cosi NON fosse . Ho tolto DSDT da ACPI\Patch e sistemato il configplist , aggiornato Kext , nel caso dovrai ripetere le prove dei layout audio con le mie impostazioni , ANZI se arrivi al desktop con le mie impostazioni BUTTA quelle vecchie xche davvero NON vanno bene affatto , se avvia posta Ioregistryexplorer ed Hack Info trovi tutto nella mia firma Archivio.zip EDIT: Dimmi se l'OS è su HDD\SSD , se hai installato APFS o HFS e cosa ci fanno le Kext non hanno il pallino verde nelle cartella Kext\Other ti ho passato io EDIT2: Se puoi correggere il Titolo del Topic , con il Modello preciso del tuo Notebook , magari in futuro può essere d'aiuto a chi ha PC simili , visto questa è UNA POST installazione1 point
-
enjoy tomorrow i'll post one step by step about it1 point
-
Chato, I’ve been subscribed for a while. Nice!1 point
-
New WebDriver-387.10.10.10.40.108 (build 17G3025)1 point
-
Another update for my table. Changes: - Optimized Layout - Added SoC clock configuration - Added some more markup of the PPT including fields for optional manual editing - Added a short guide for using the generated data and a warning for the noobs ( ) - Preset settings optimized for cards that suffer from coil whine, reduces coil whine to near zero for me while retaining great performance and low heat vega64-mac-pp_table-gen-V1.5.xlsx1 point
-
Latest build: HWSensors-3_r177.dmg.zip1 point
-
Finally some updates about TINU, after a lot of work under the hood work, because of the bugs i found and also because of the design changements, i am close to the release of the 2.1 version and the open beta testing for tinu 3, so i am currently chegking everything and sending the software to some closed beta testers, and also i have done a collboration video about tinu on the youtube channel of Peter Paul Chato which will go online soon ( i will link it here ). So don't worry, this project is still going on.1 point
-
NVIDIA Web Driver 378.05.05.25f11: https://images.nvidia.com/mac/pkg/378/WebDriver-378.05.05.25f11.pkg1 point
-
That might be quick and easy for you. But it's definitely not a solution for everyone. What's your SMBIOS? Some of them (such as MacPro5, MacPro6, iMacPro) do work without an iGPU. But whether or not it's enabled in BIOS, should not affect anything, since in many cases, the iGPU is not even recognised. :)) Still, I'm curious to know what's your current SMBIOS.1 point
-
Suave suavecito aqui since yesterday...
 1 point
 -
You can use Ozmosis inside VM using the "refind" method... Just create a "refind" iso1 point
-
I keep all the SDKs, since 10.6: NUC6i7KYK:~ rehabman$ ls -l /Applications/Xcode.app/Contents/Developer/Platforms/MacOSX.platform/Developer/SDKs/ total 64 drwxr-xr-x 5 root wheel 170 Dec 31 1969 MacOSX.sdk lrwxr-xr-x 1 root wheel 40 Dec 4 13:52 MacOSX10.10.sdk -> /Applications/LegacySDKs/MacOSX10.10.sdk lrwxr-xr-x 1 root wheel 40 Dec 4 13:52 MacOSX10.11.sdk -> /Applications/LegacySDKs/MacOSX10.11.sdk lrwxr-xr-x 1 root wheel 40 Dec 4 13:52 MacOSX10.12.sdk -> /Applications/LegacySDKs/MacOSX10.12.sdk lrwxr-xr-x 1 root wheel 10 Dec 4 13:48 MacOSX10.13.sdk -> MacOSX.sdk lrwxr-xr-x 1 root wheel 39 Dec 4 13:52 MacOSX10.6.sdk -> /Applications/LegacySDKs/MacOSX10.6.sdk lrwxr-xr-x 1 root wheel 39 Dec 4 13:52 MacOSX10.7.sdk -> /Applications/LegacySDKs/MacOSX10.7.sdk lrwxr-xr-x 1 root wheel 39 Dec 4 13:52 MacOSX10.8.sdk -> /Applications/LegacySDKs/MacOSX10.8.sdk lrwxr-xr-x 1 root wheel 39 Dec 4 13:52 MacOSX10.9.sdk -> /Applications/LegacySDKs/MacOSX10.9.sdk setup with this script: NUC6i7KYK:~ rehabman$ cat legacysdks.sh #!/bin/bash osxplatform=/Applications/Xcode.app/Contents/Developer/Platforms/MacOSX.platform sdkrepo=$osxplatform/Developer/SDKs/ infoplist=$osxplatform/Info.plist for sdk in /Applications/LegacySDKs/*.sdk; do sudo ln -s $sdk $sdkrepo`basename $sdk` done ls -l $sdkrepo sudo /usr/libexec/PlistBuddy -c "Set :MinimumSDKVersion 10.6" $infoplist1 point


.thumb.png.a43579d9e280a5c4c80807bf93412ae7.png)