Leaderboard


Popular Content
Showing content with the highest reputation on 11/01/2018 in Posts
-
5 points
-
here. https://www119.zippyshare.com/v/3JGIU4e2/file.html I've heard that this driver works for the security update 2018-002 of High Sierra2 points
-
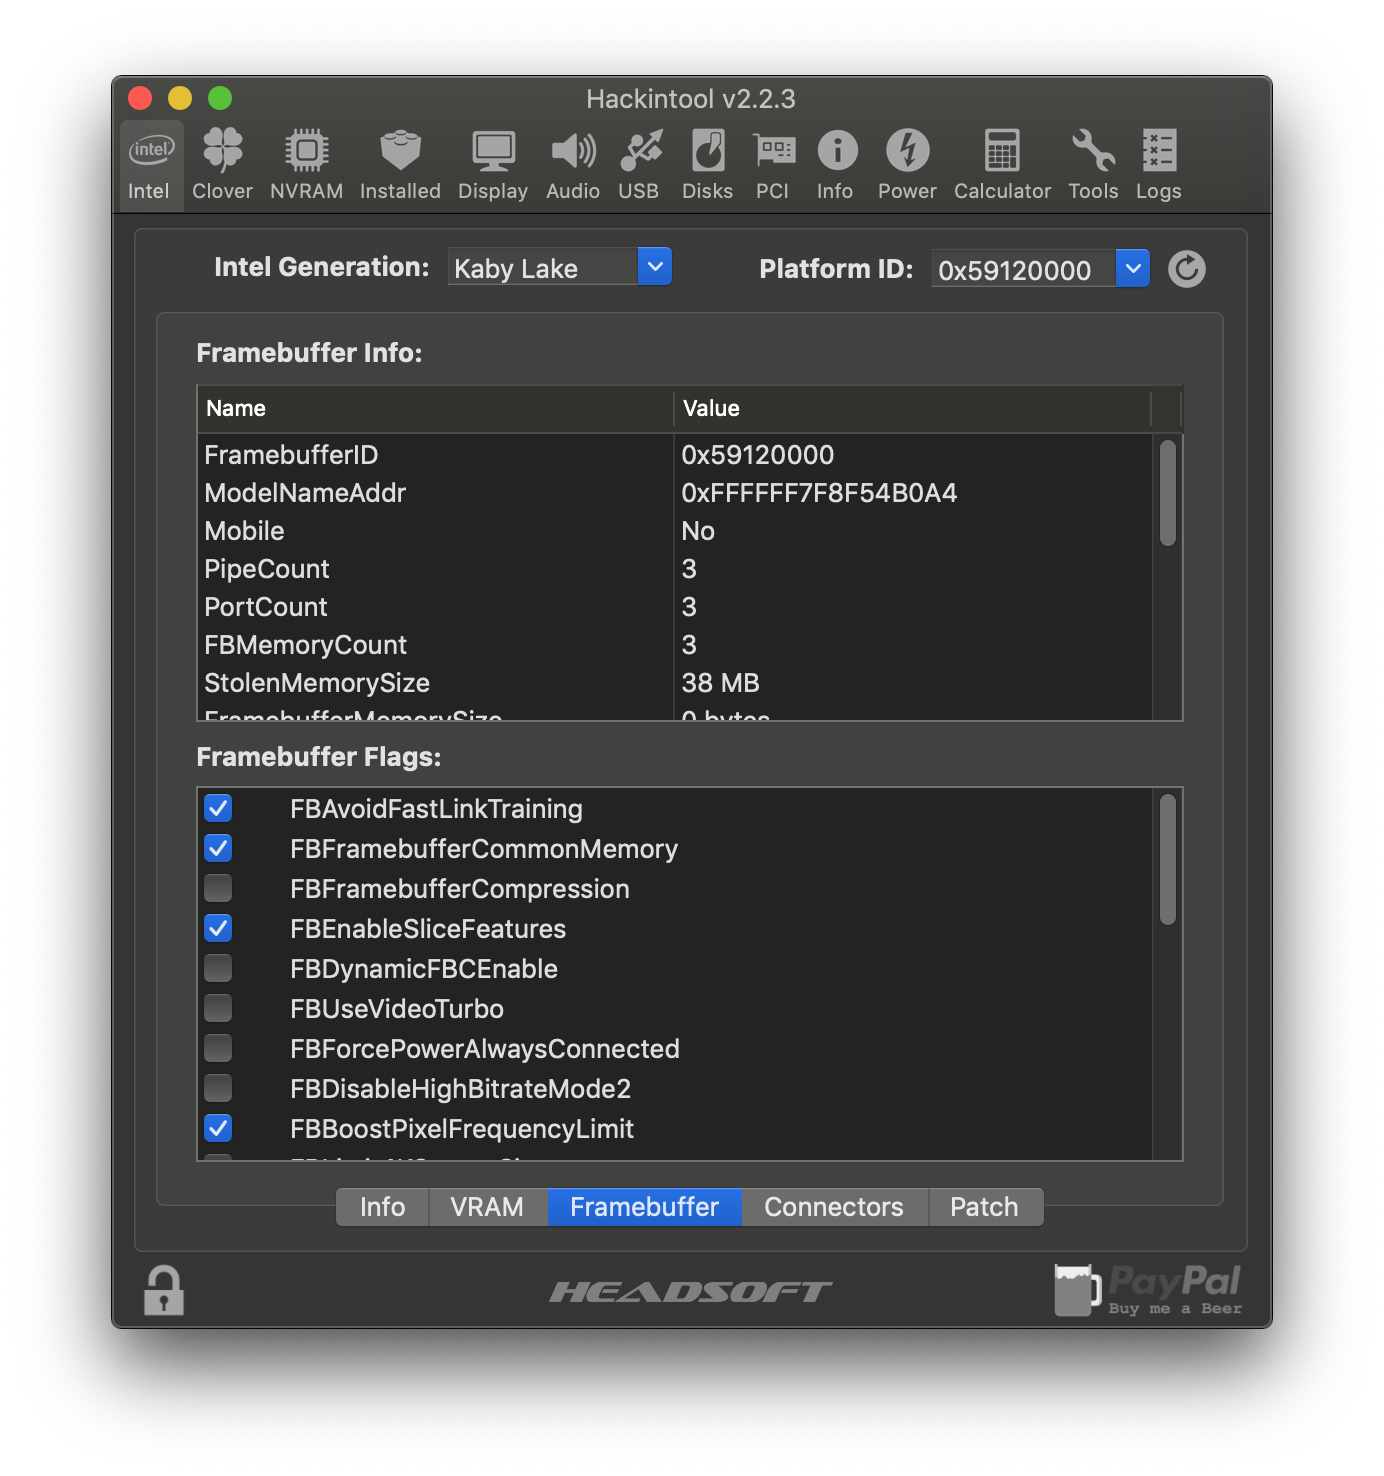
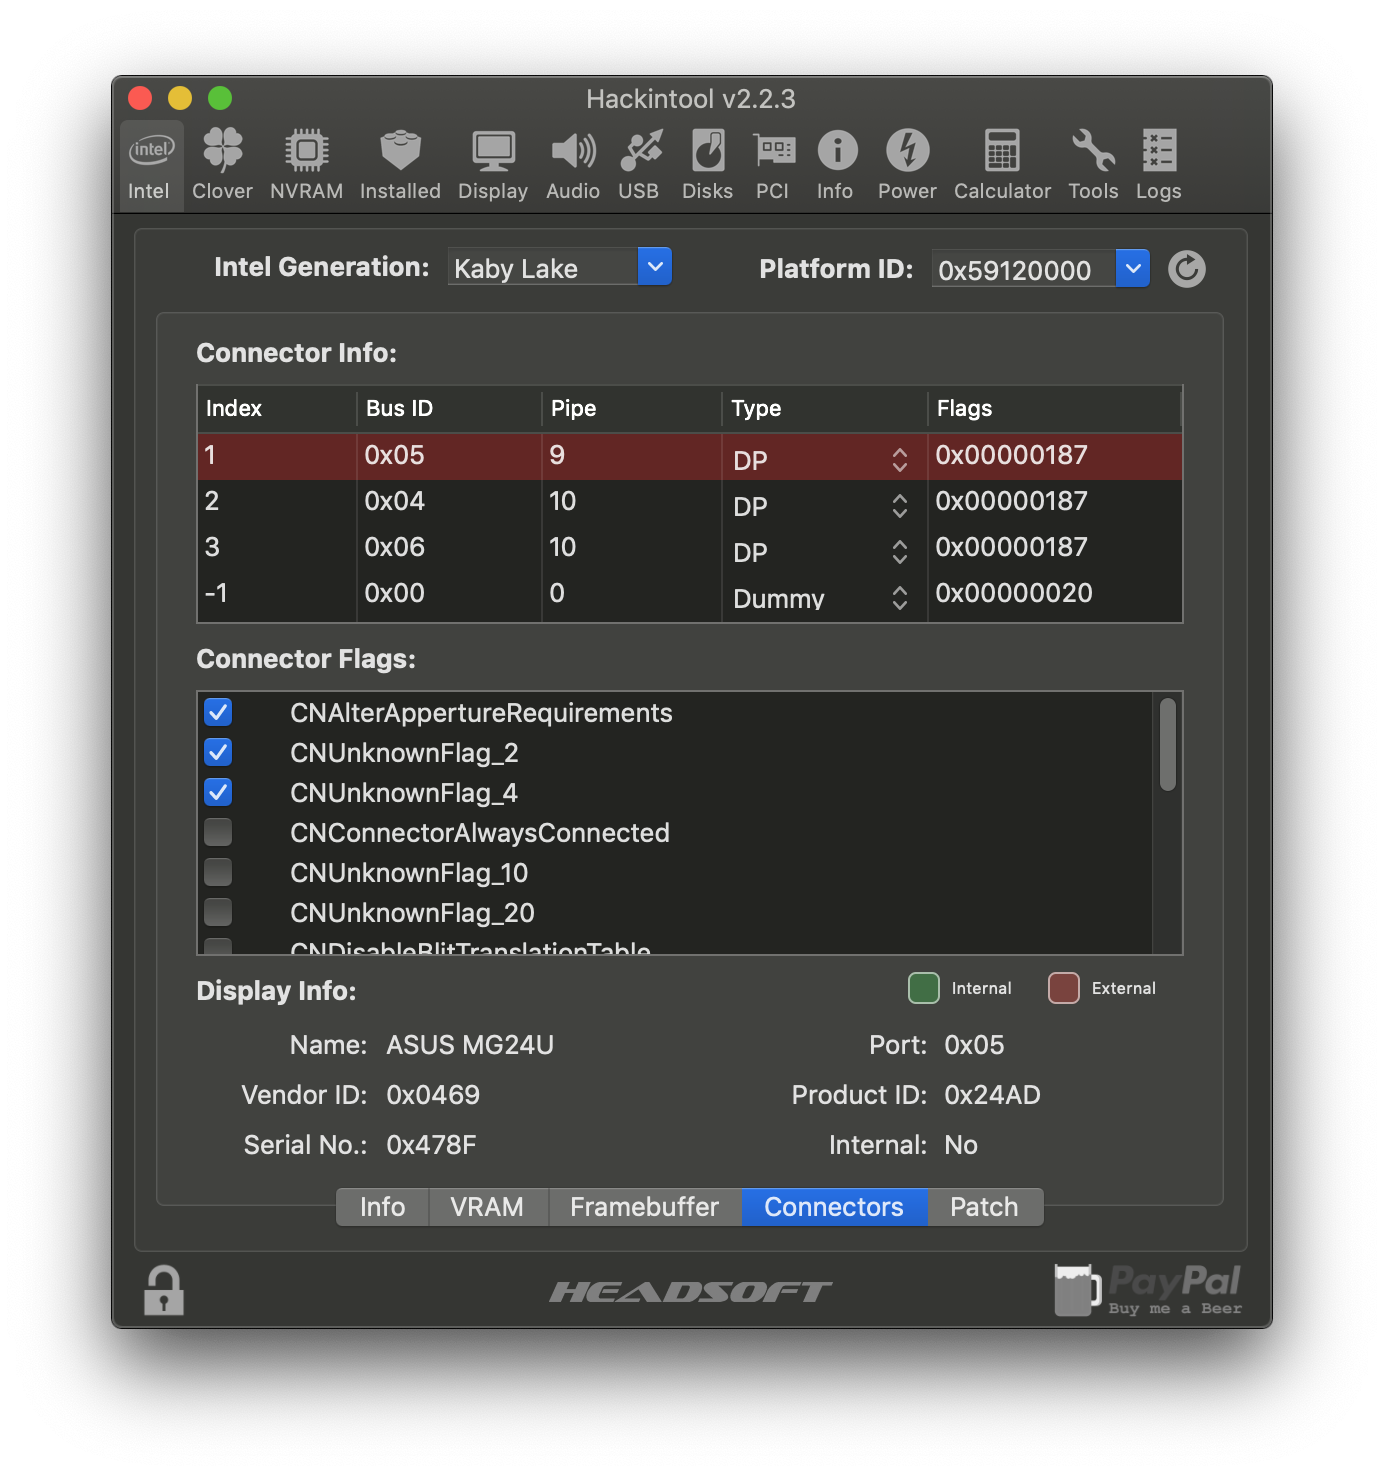
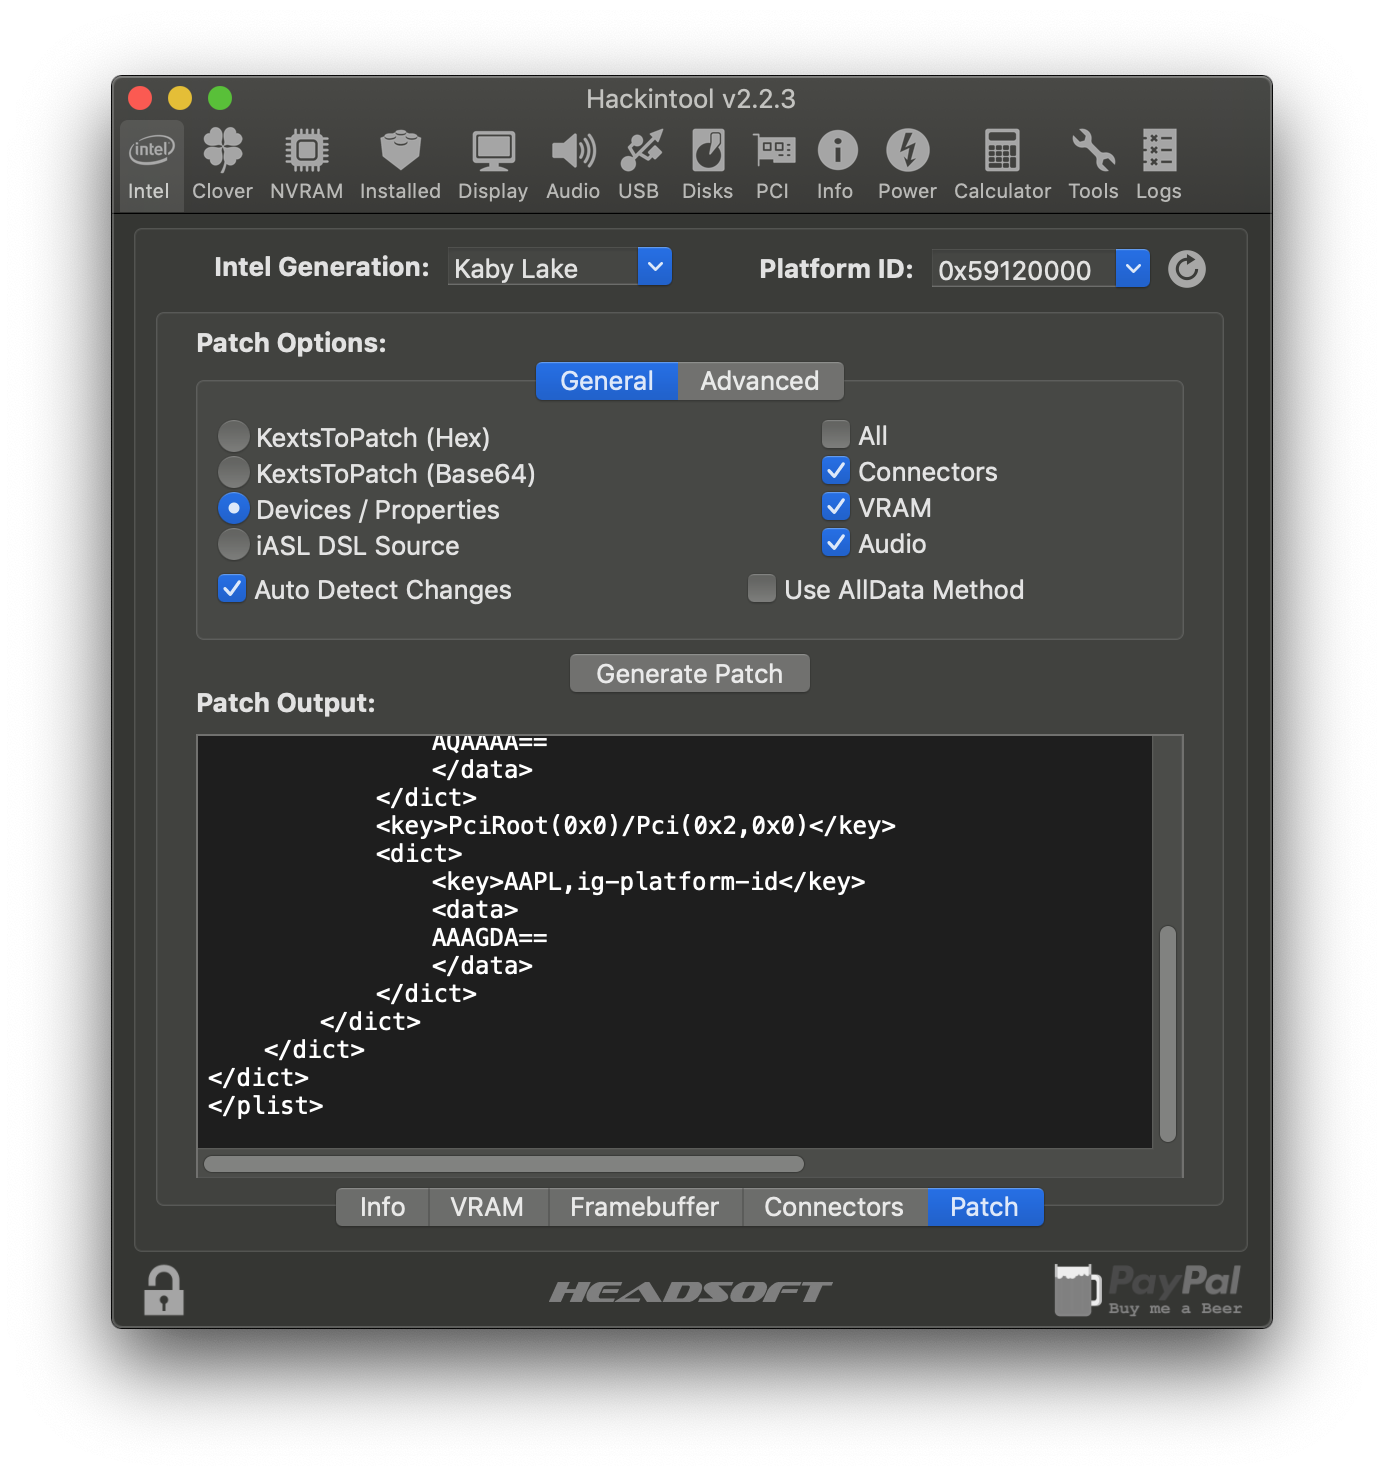
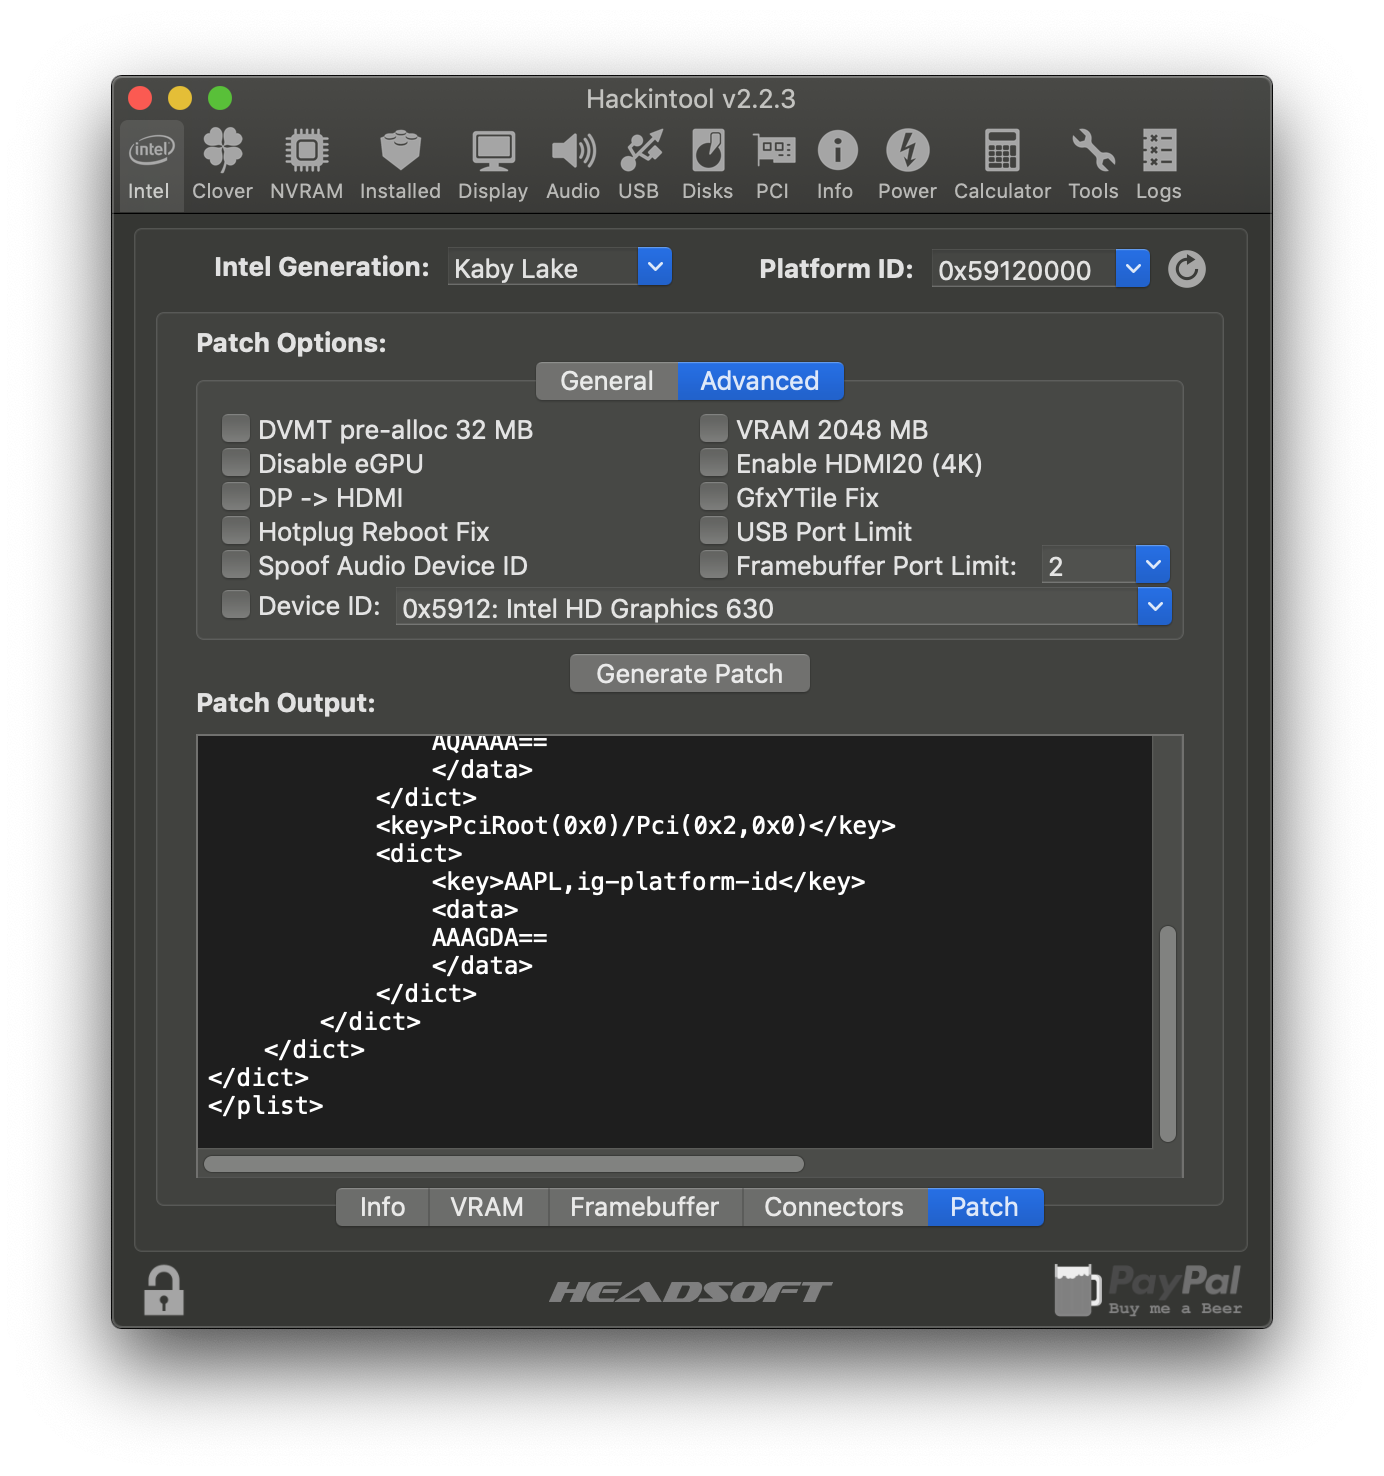
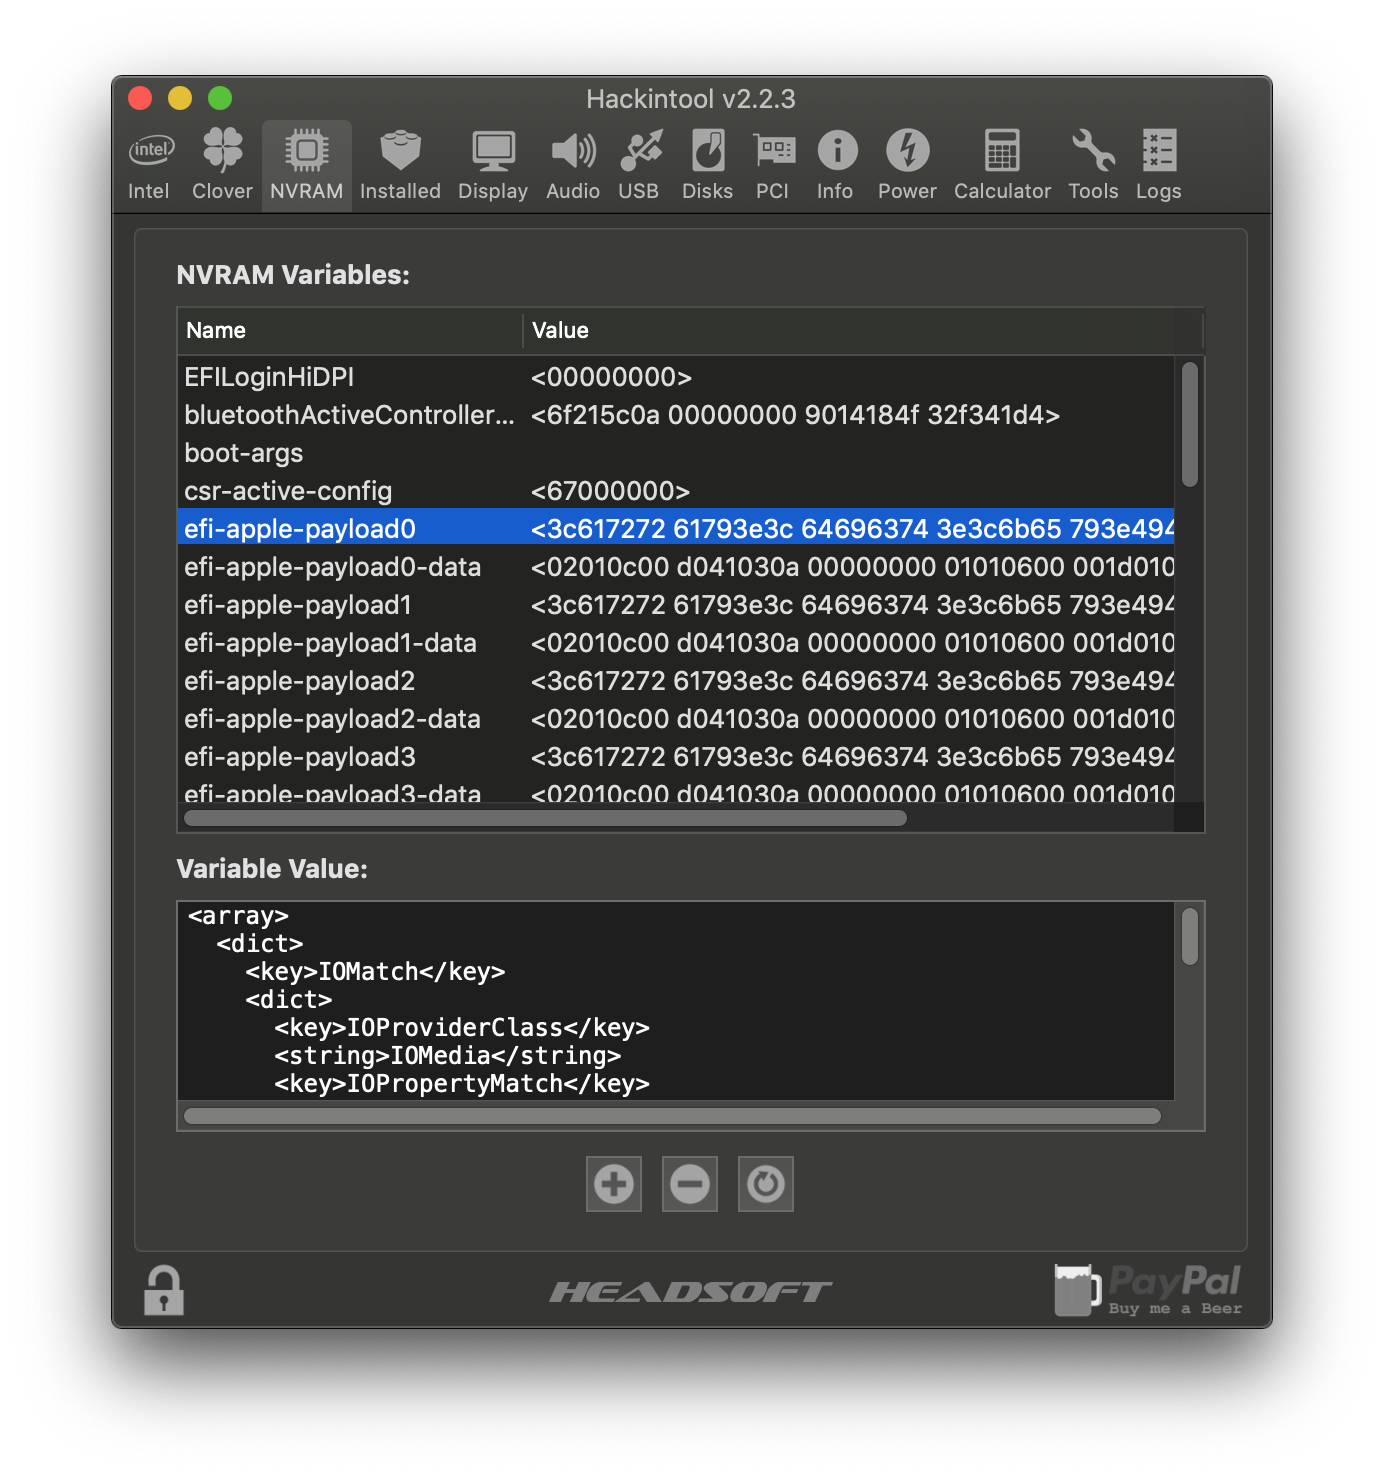
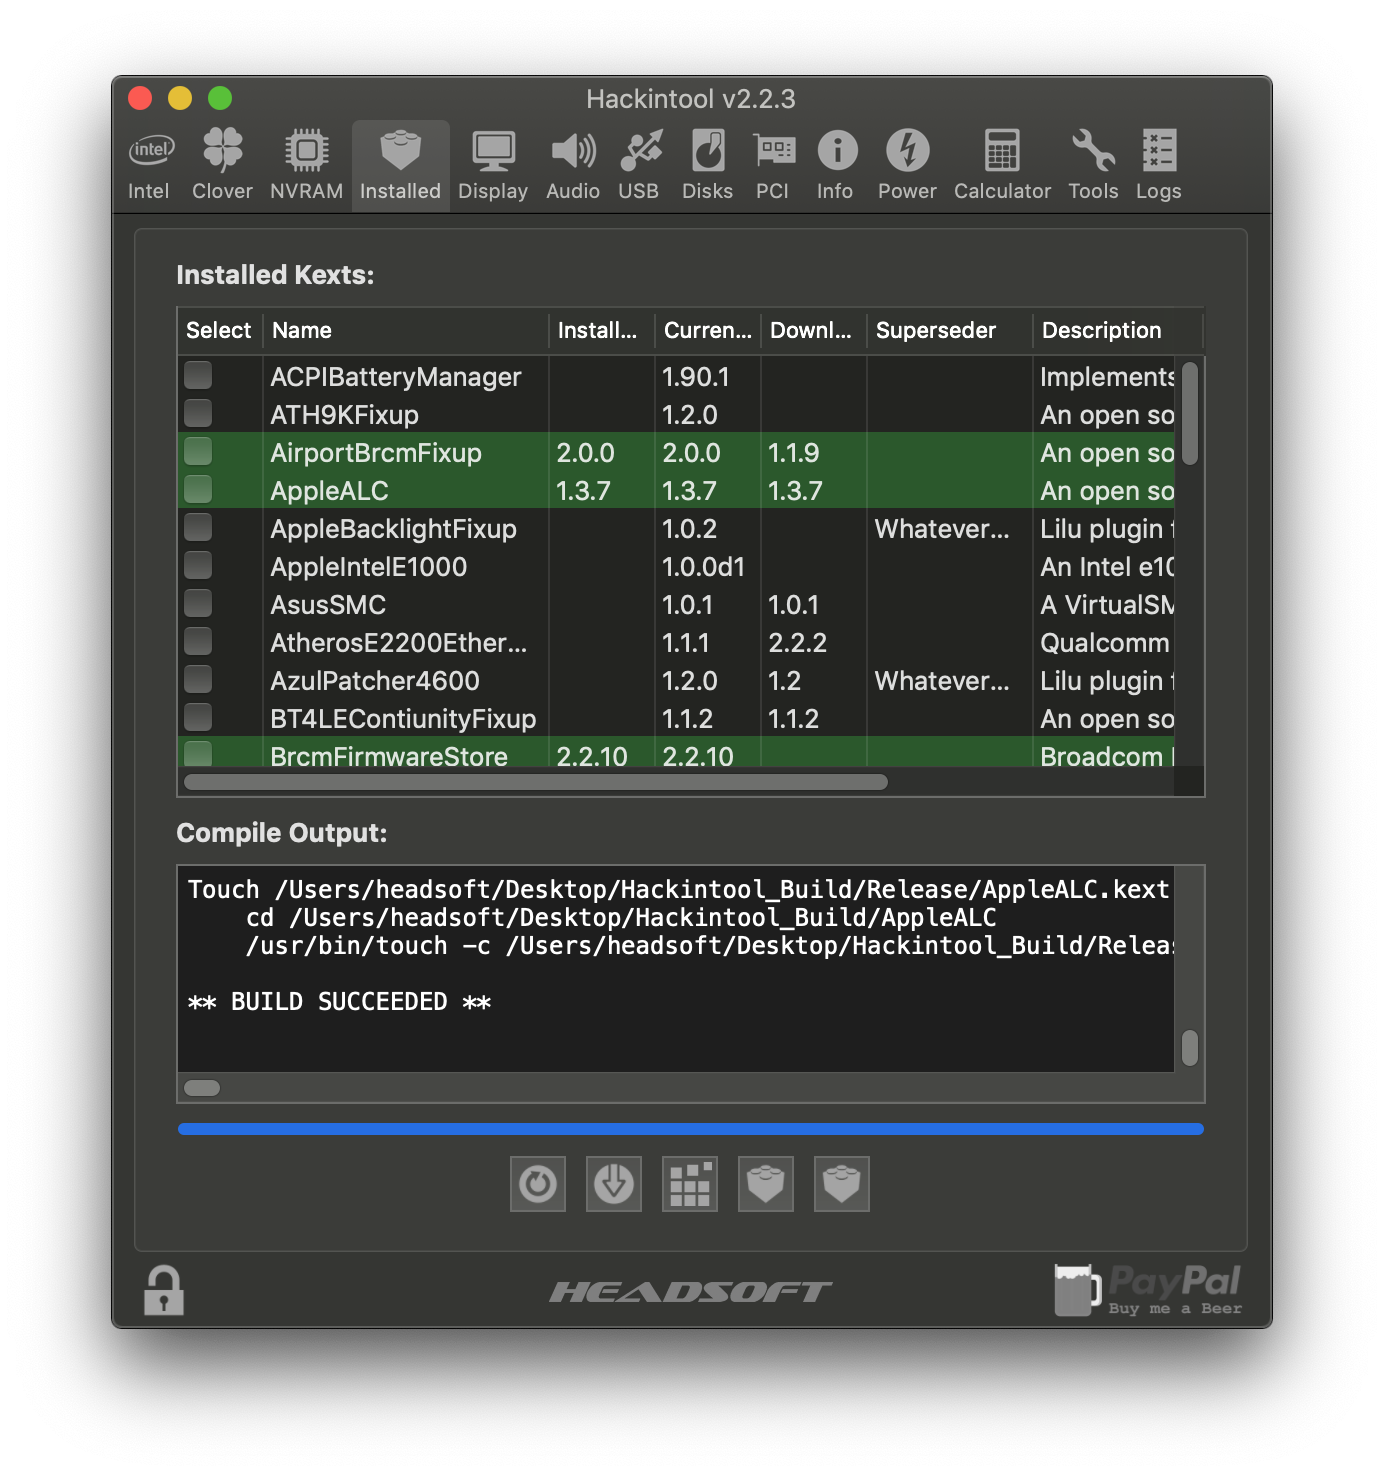
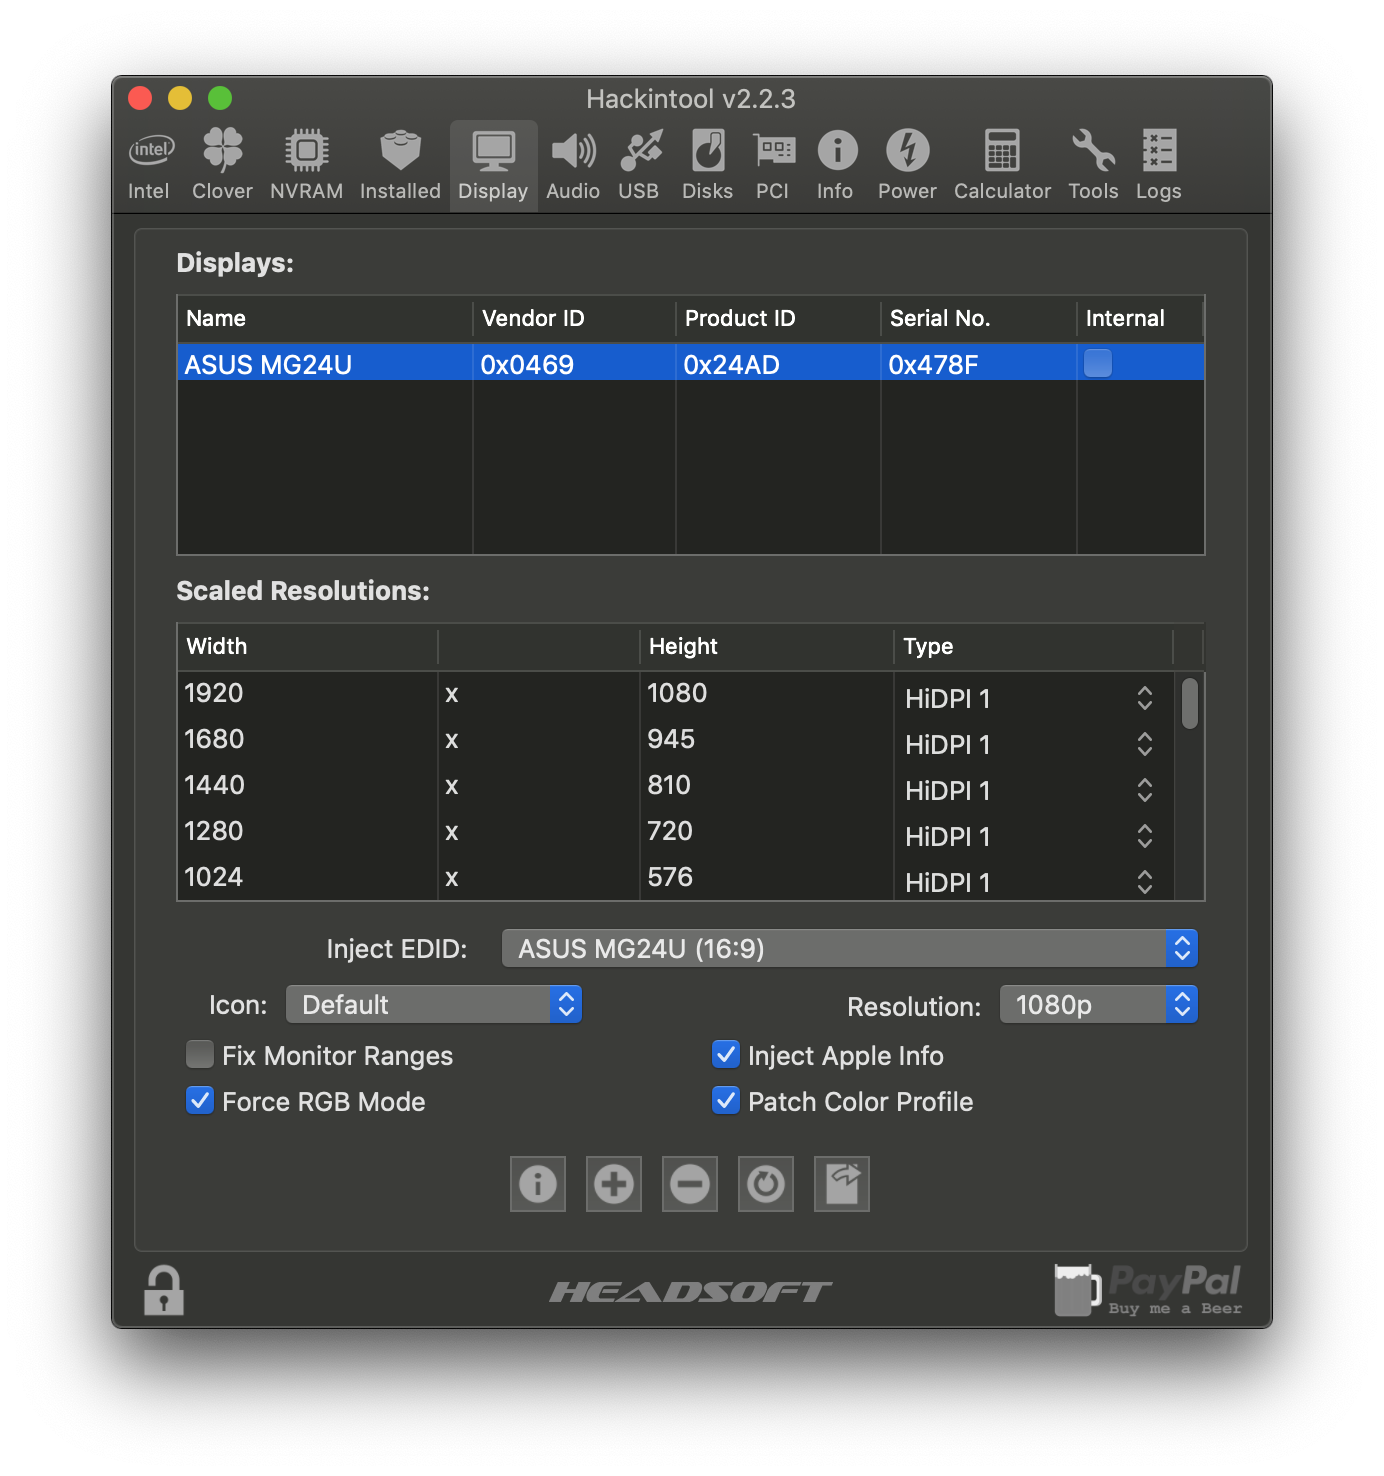
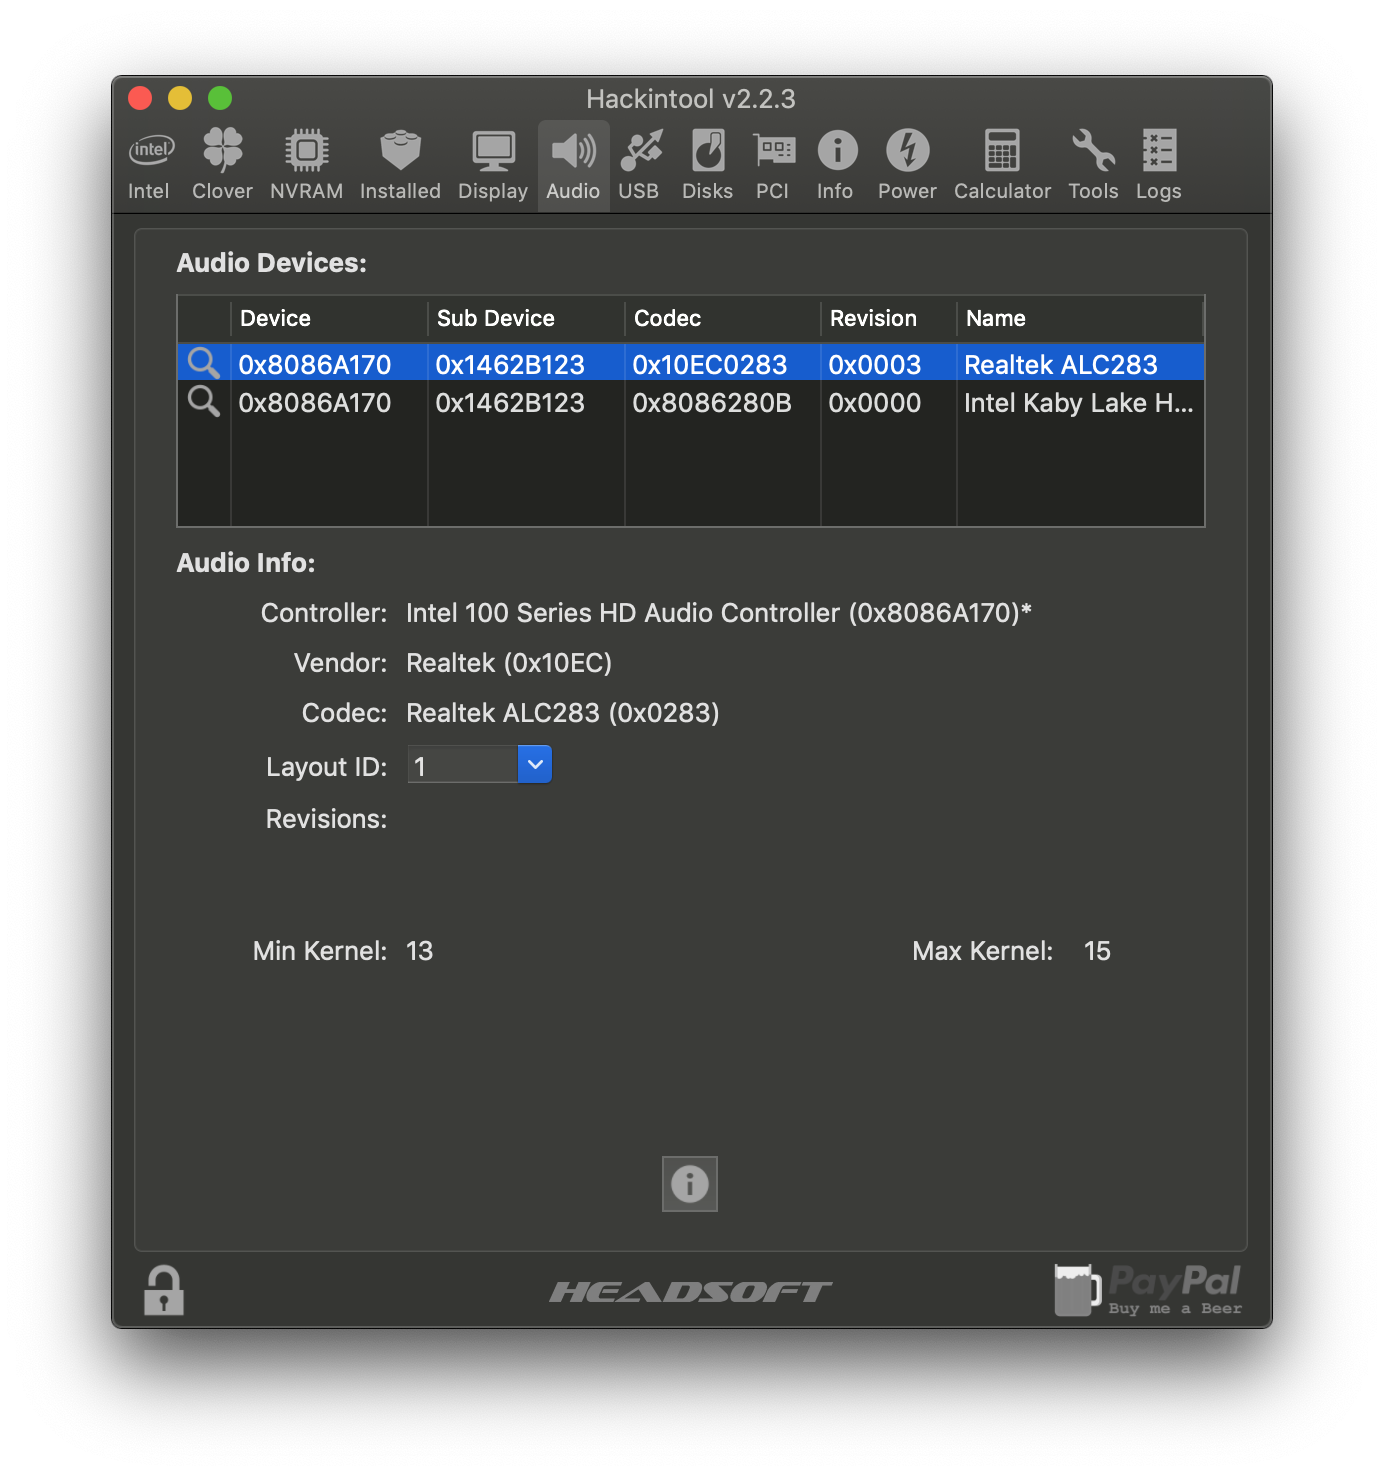
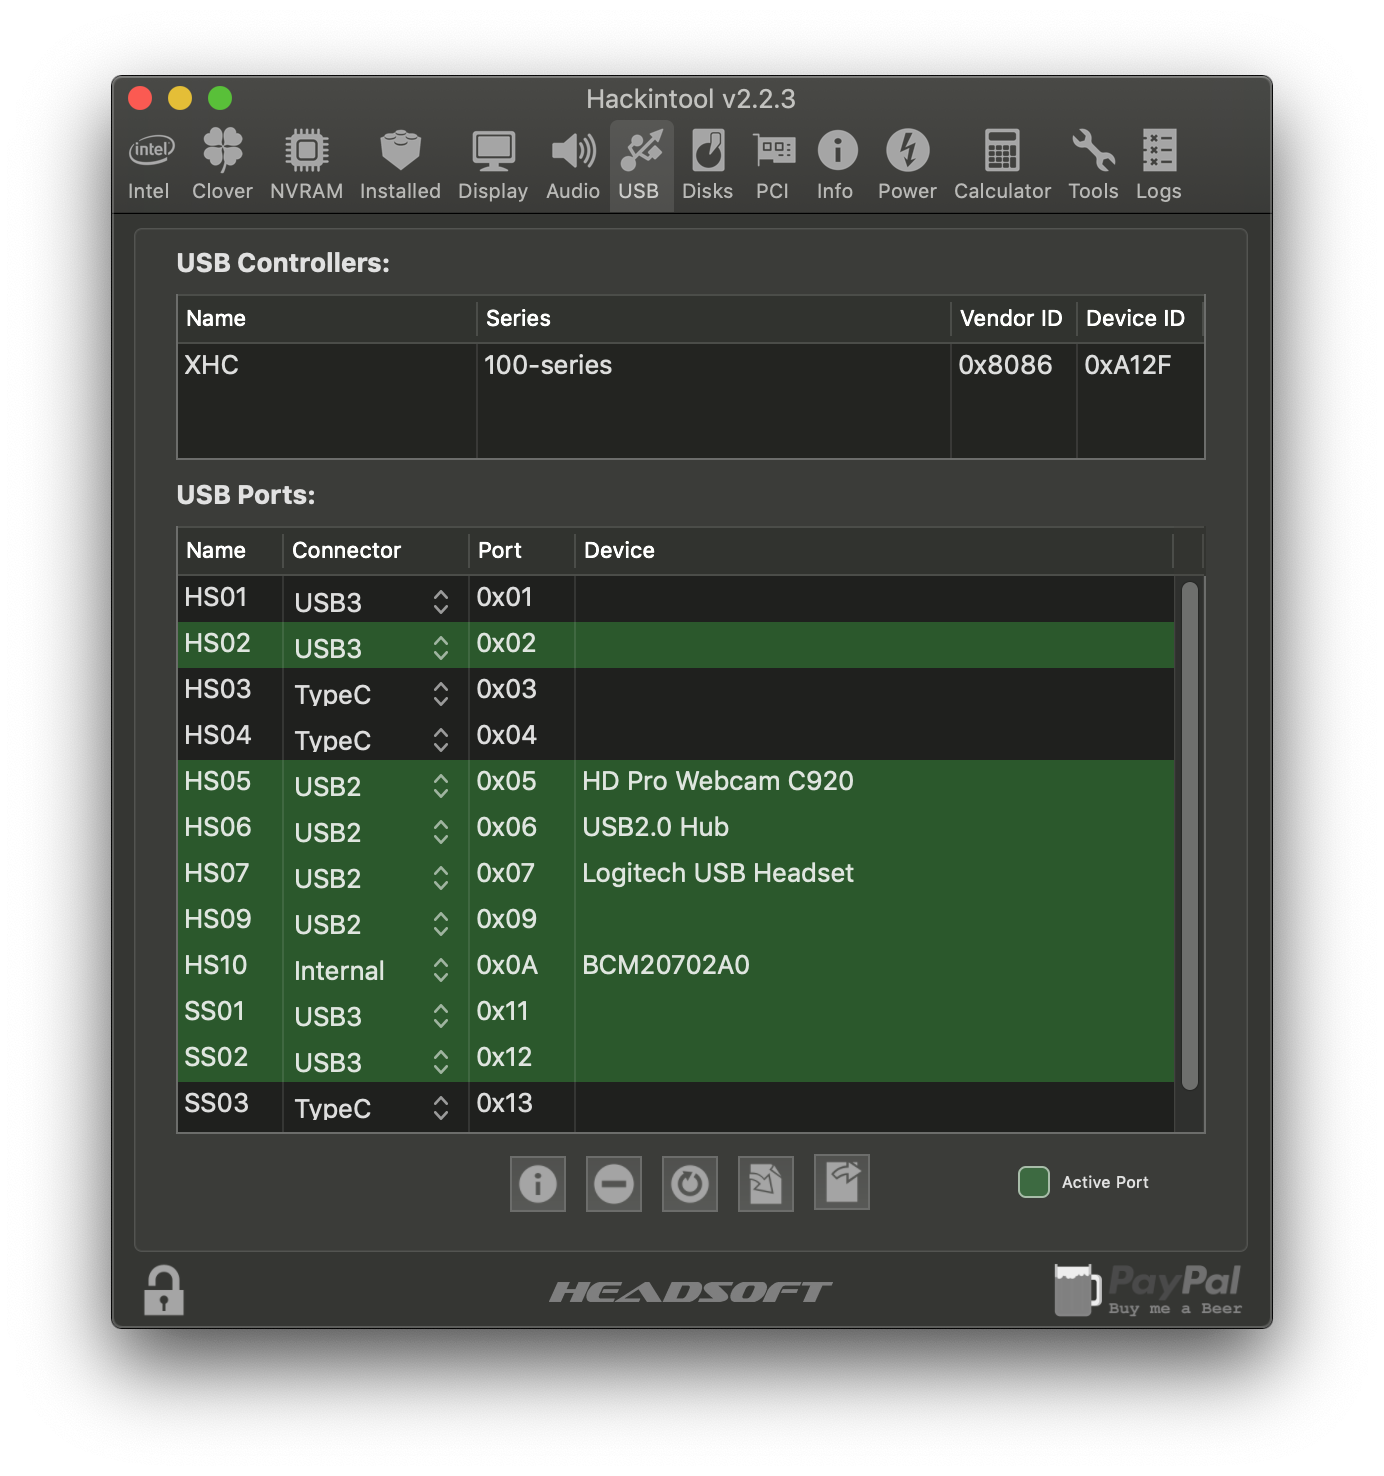
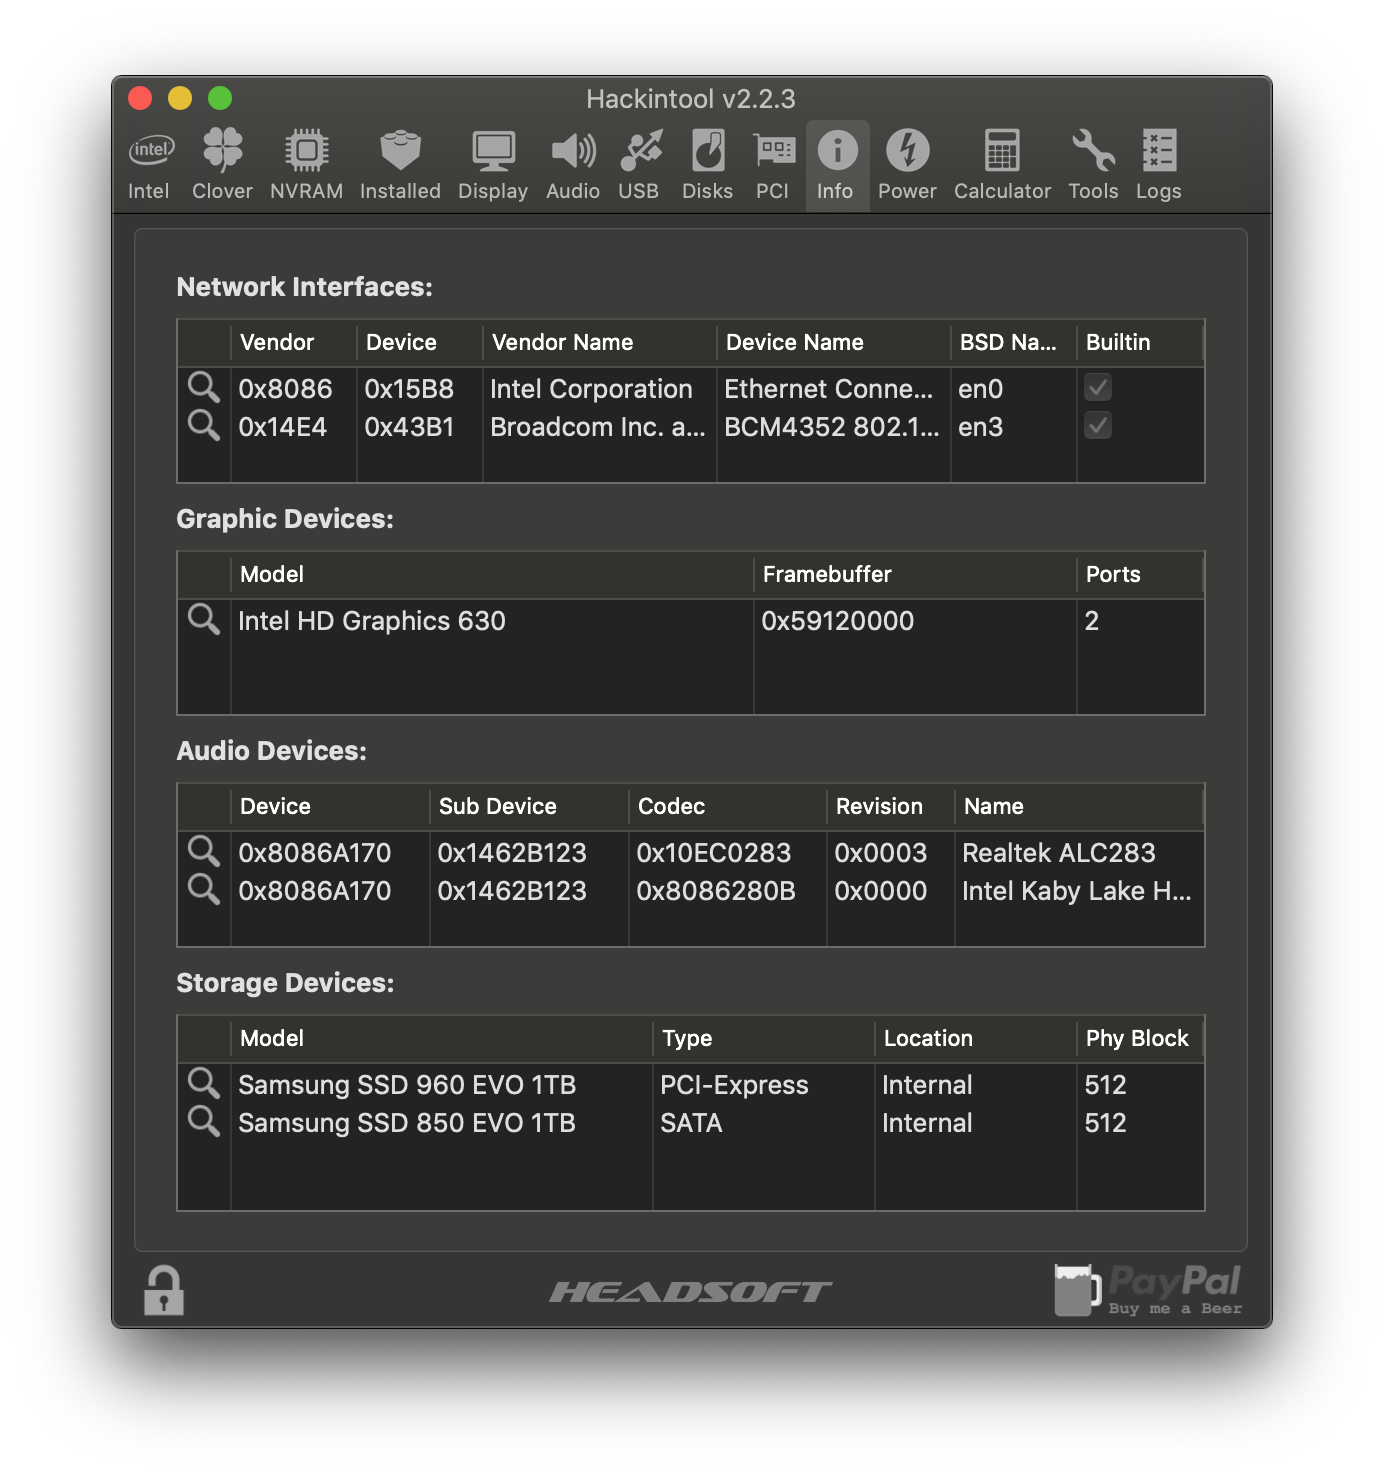
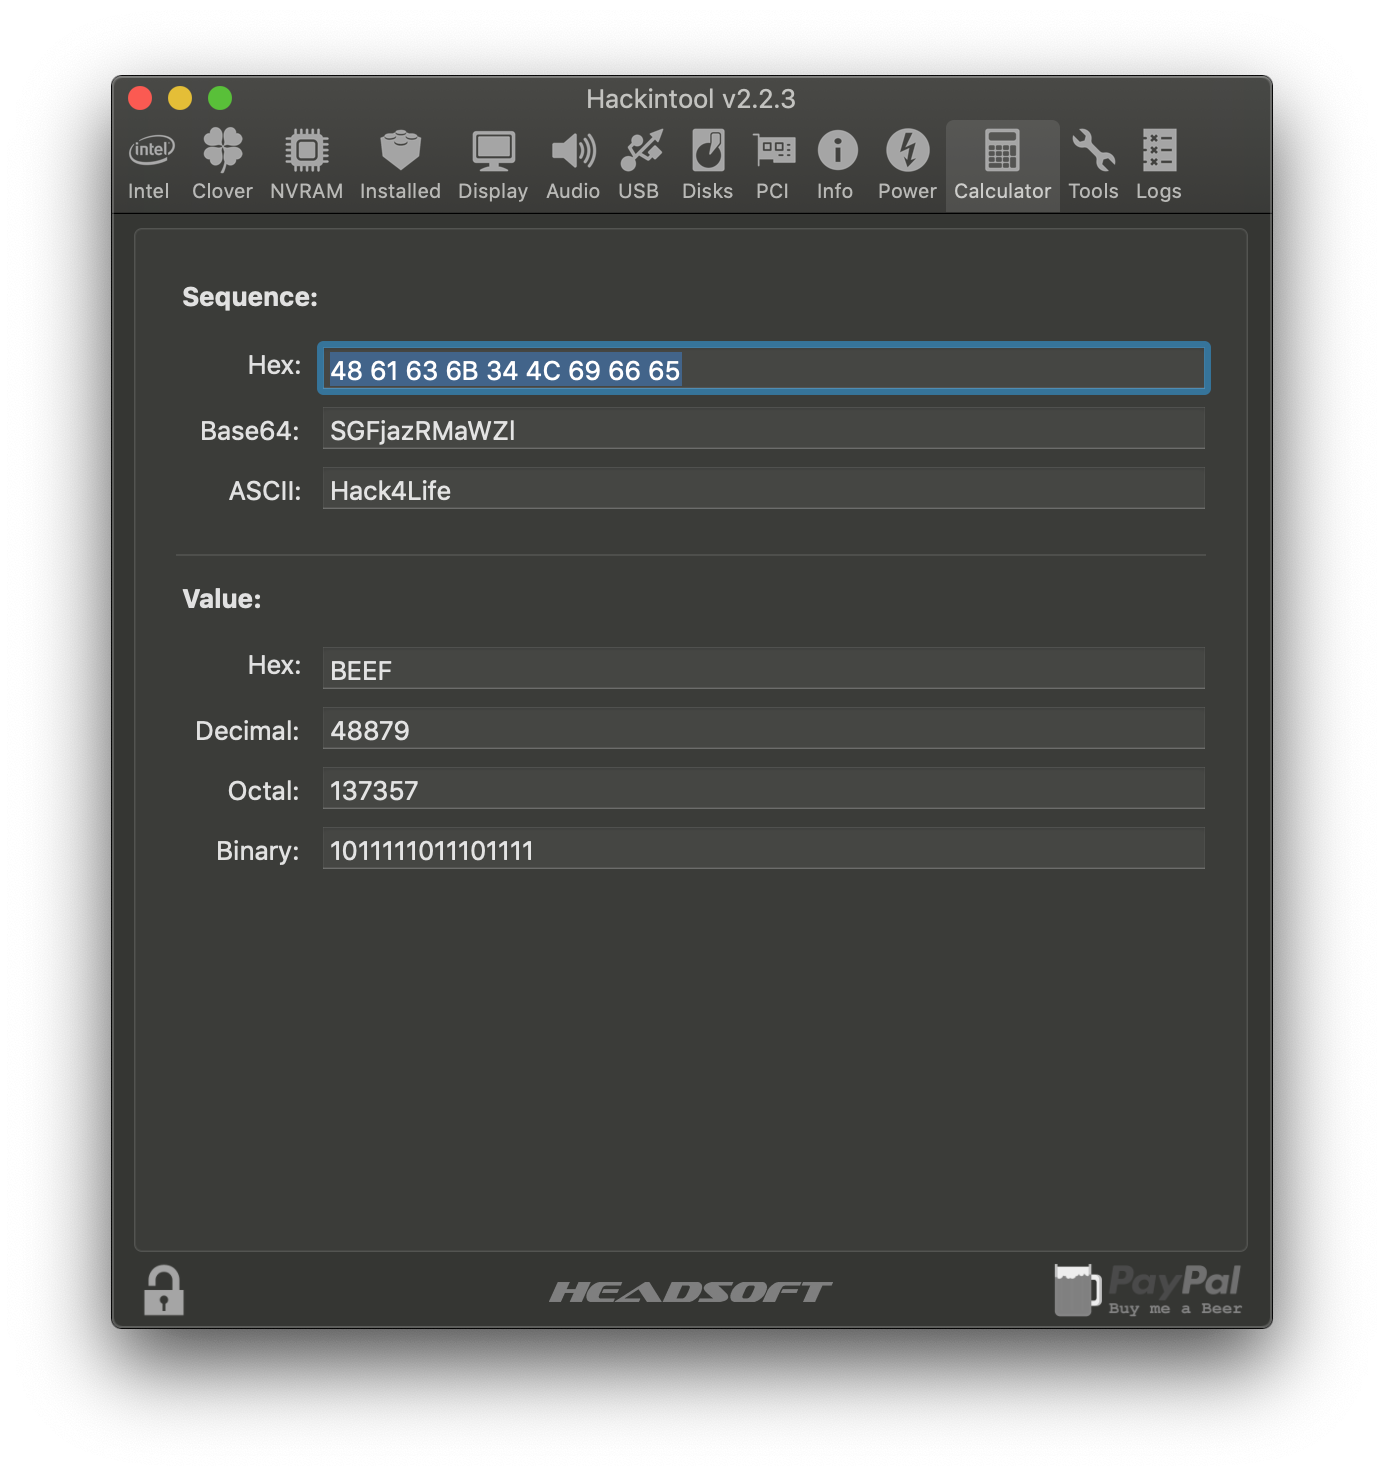
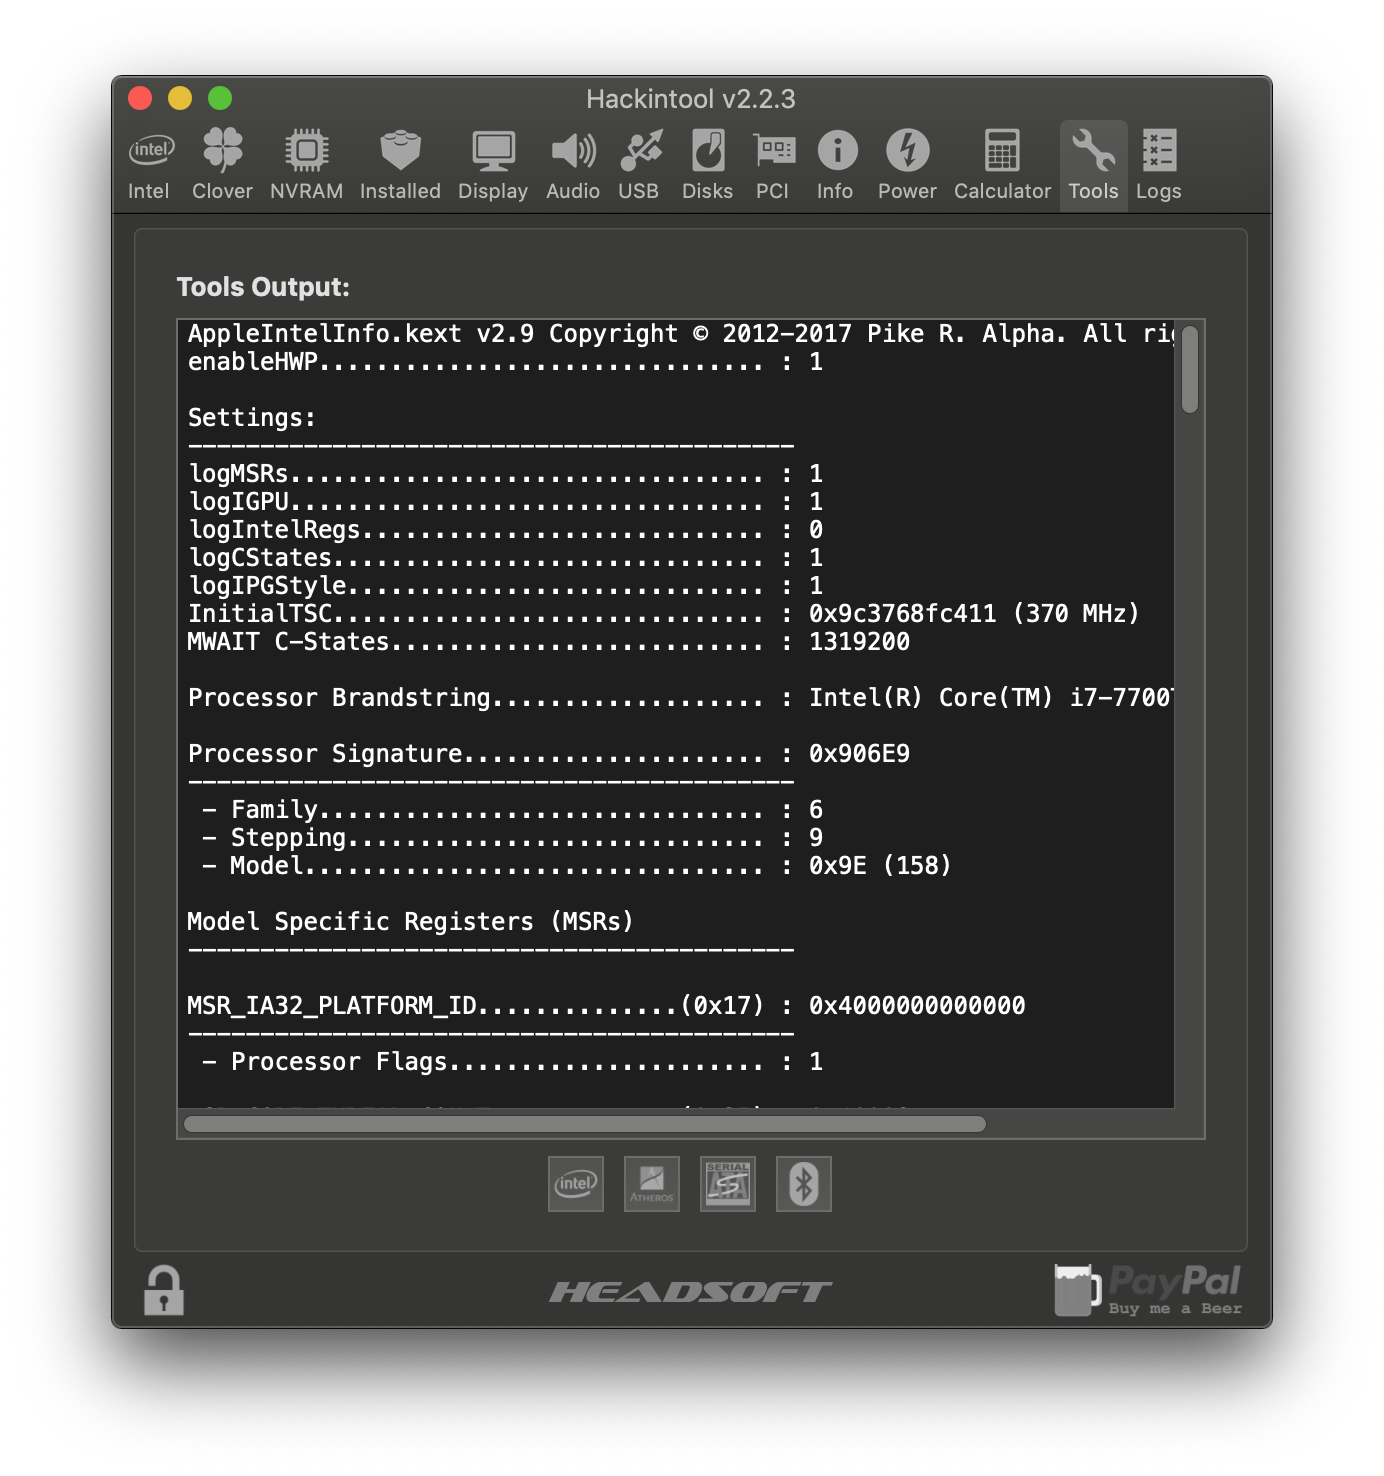
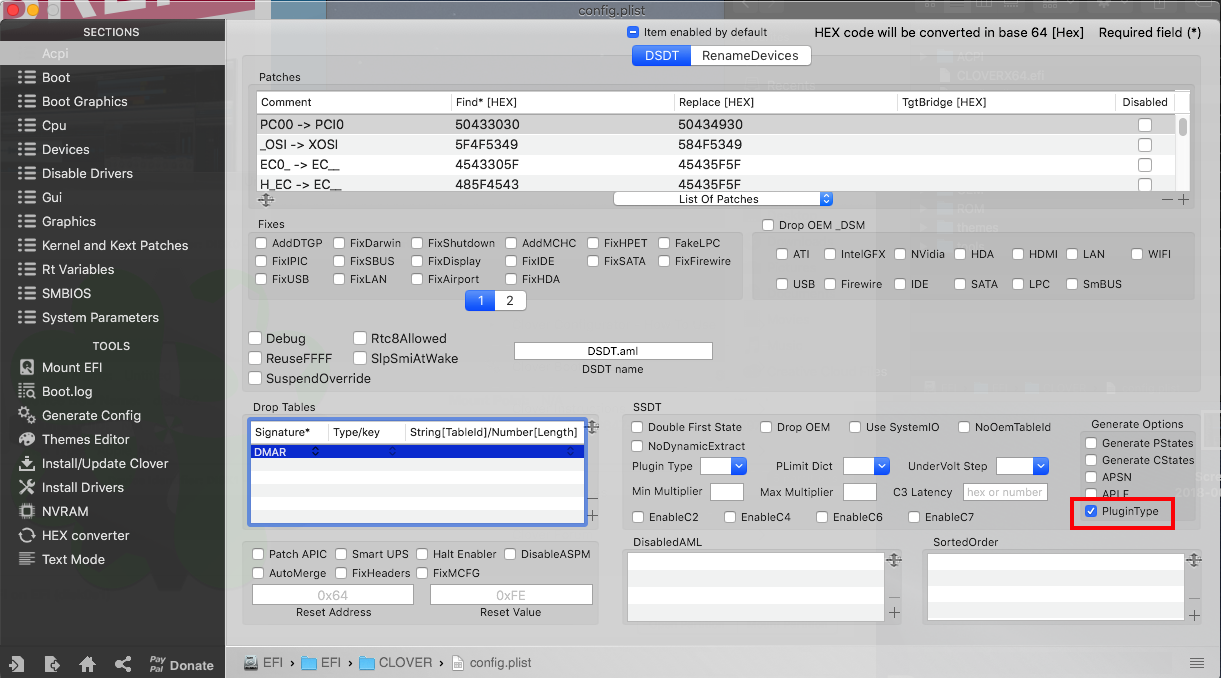
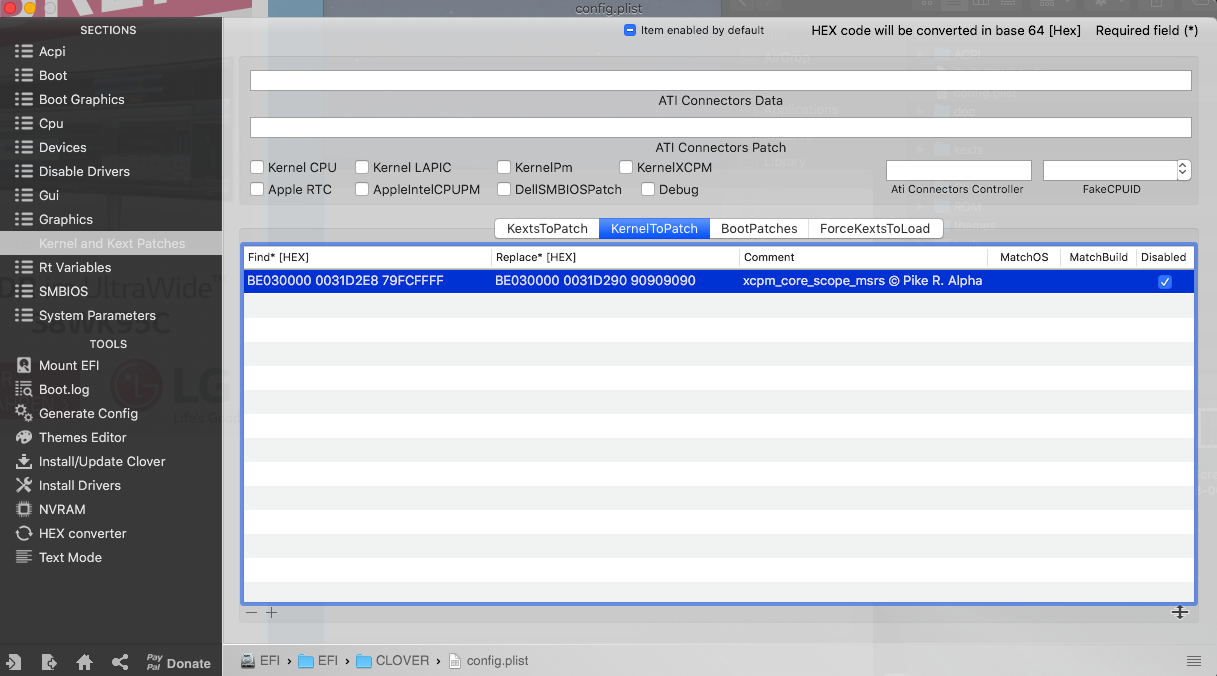
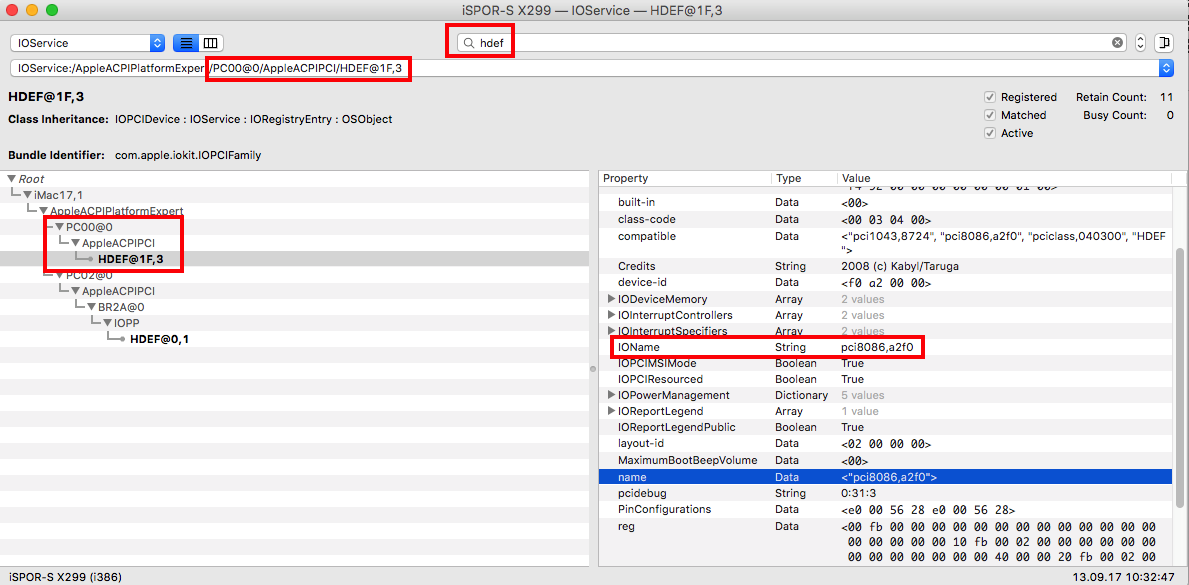
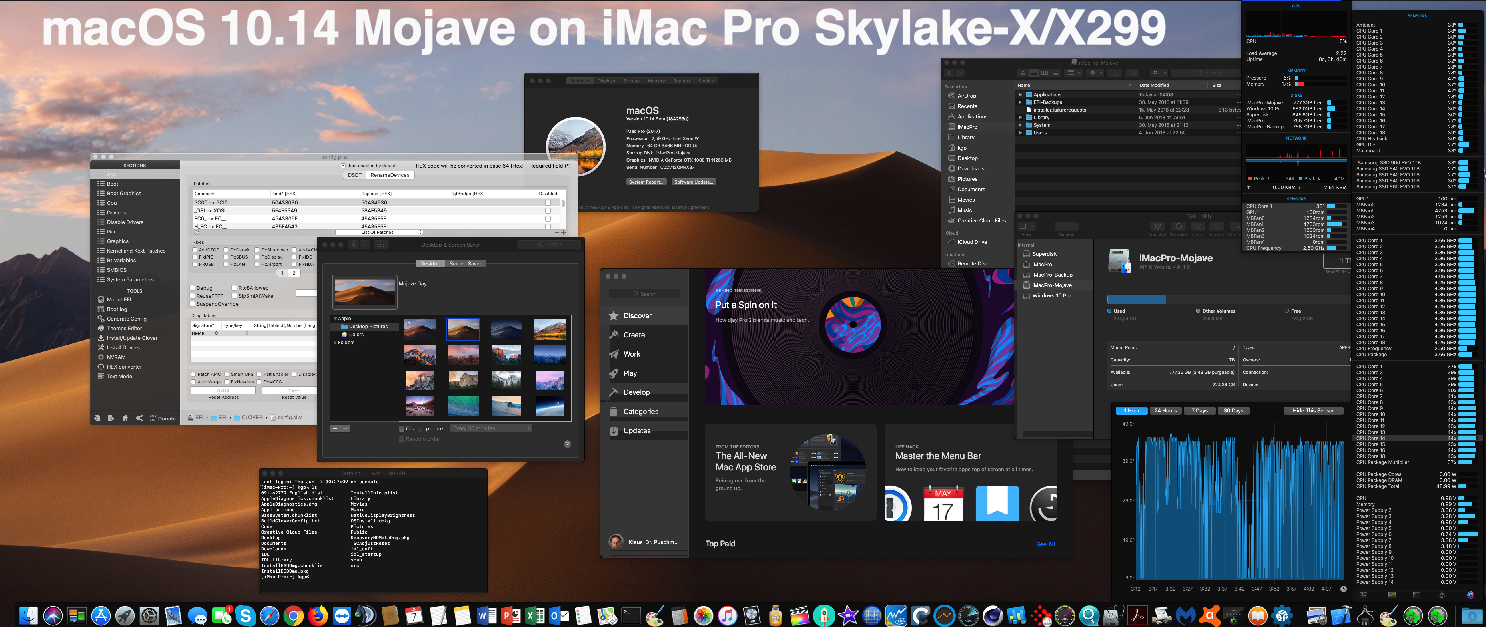
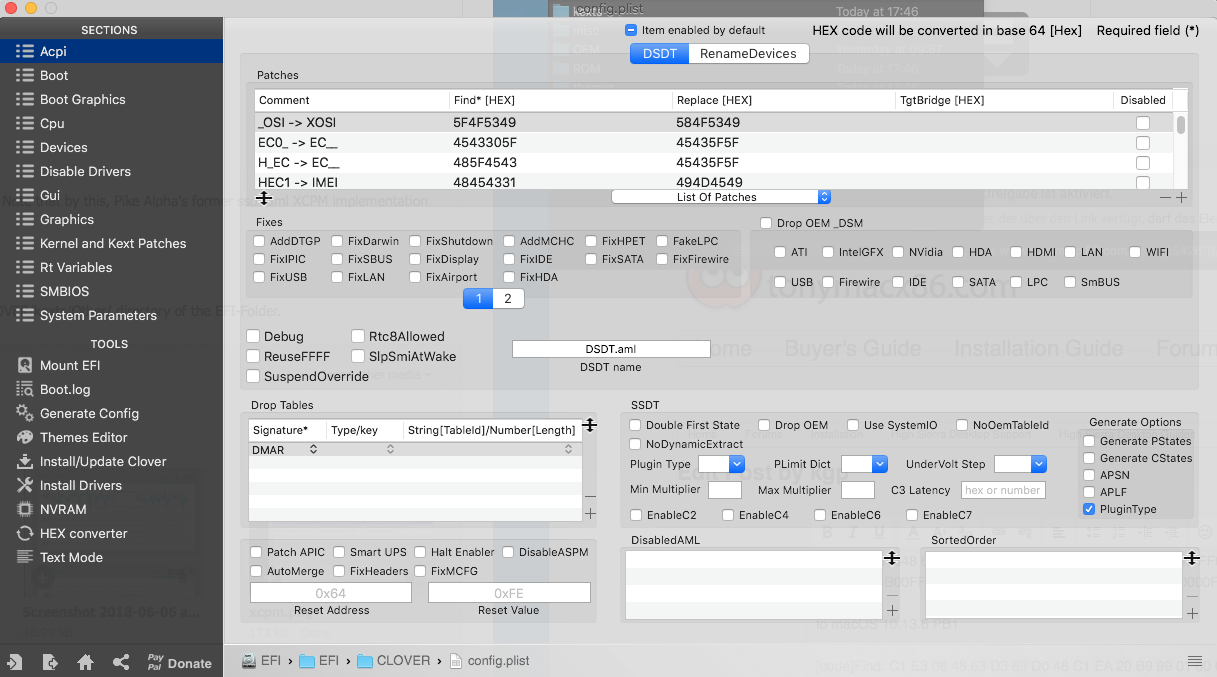
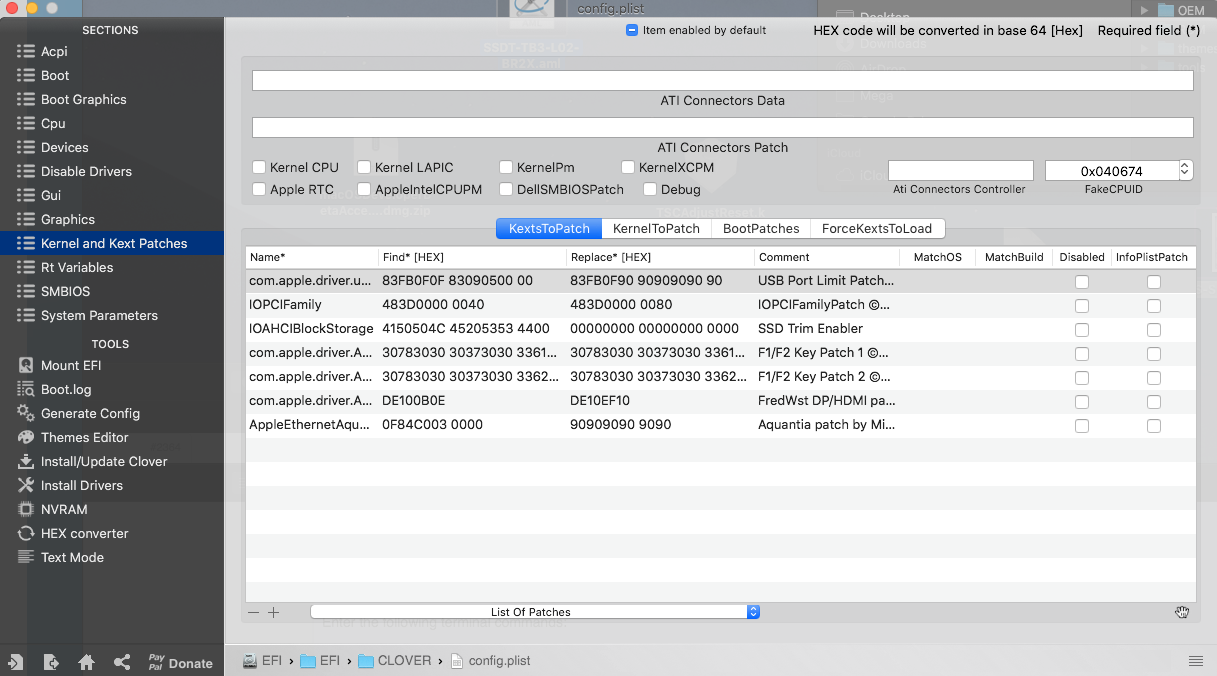
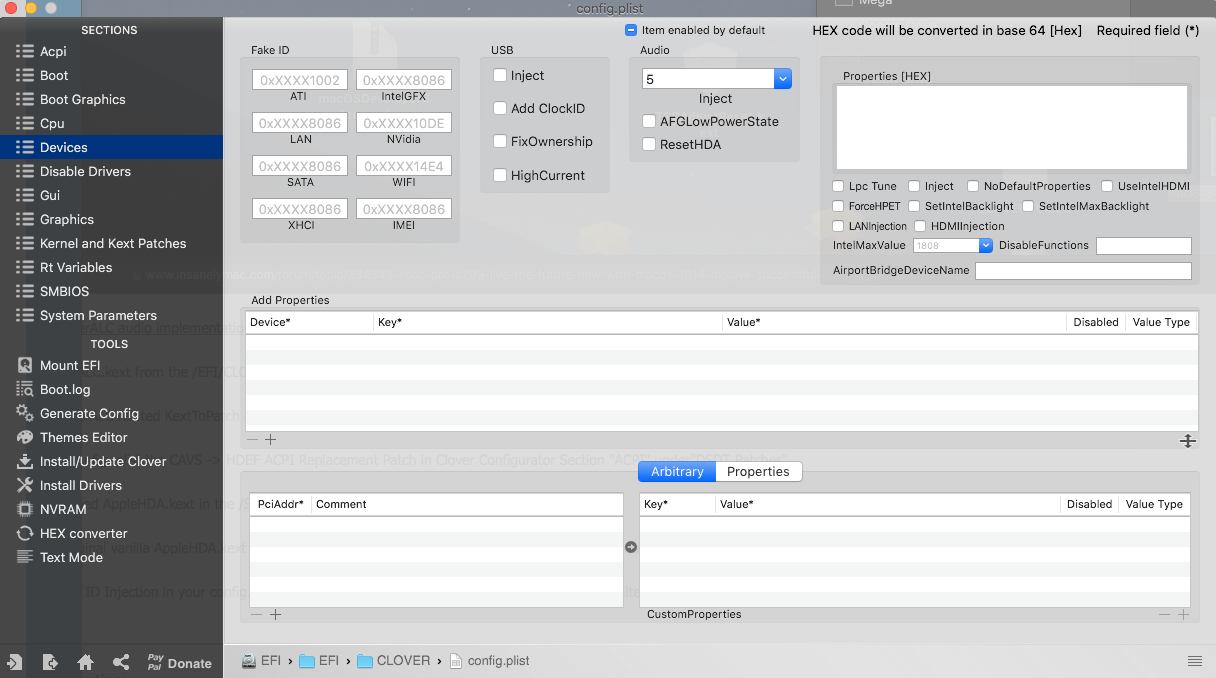
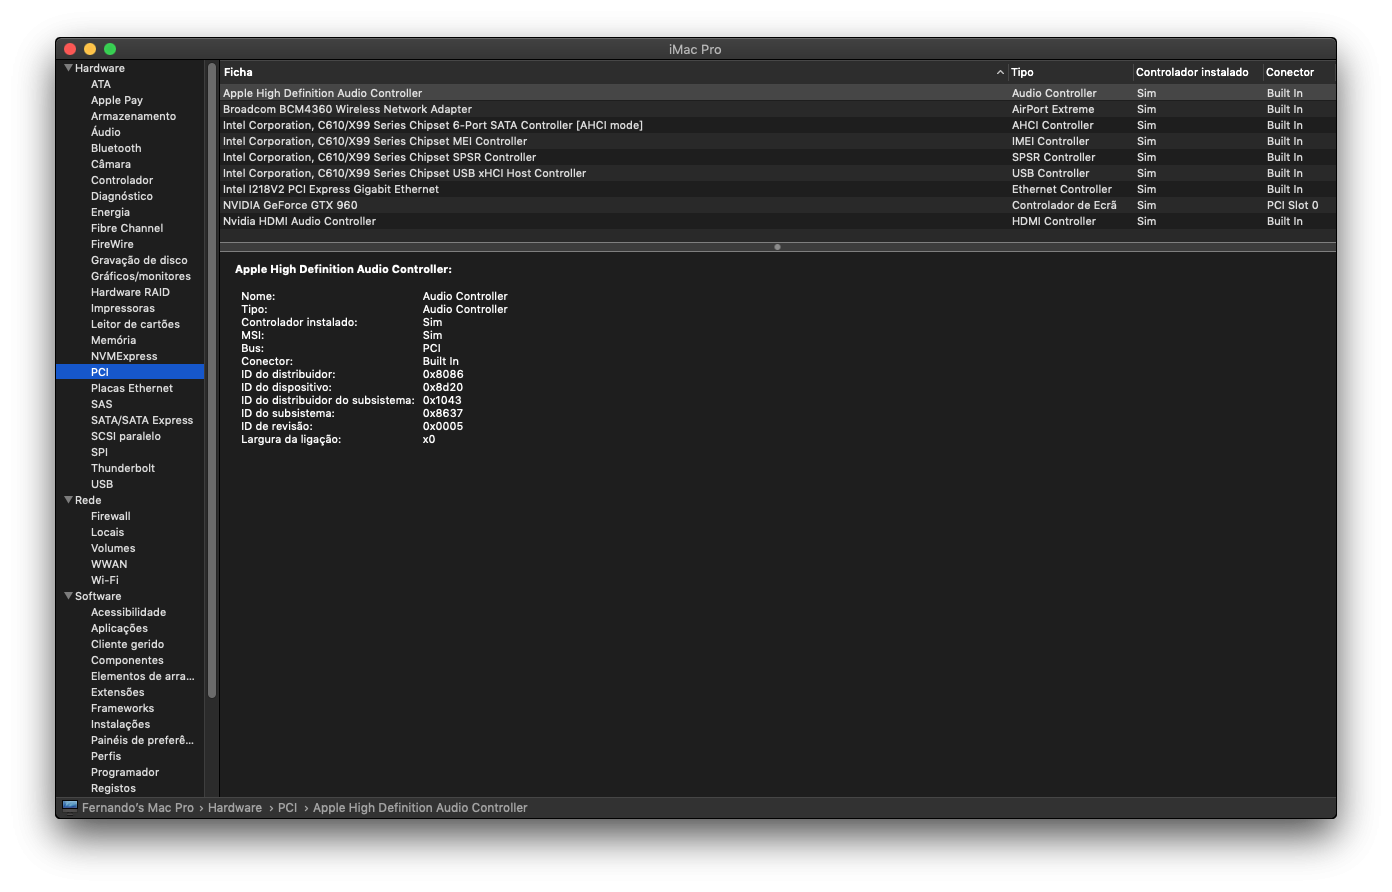
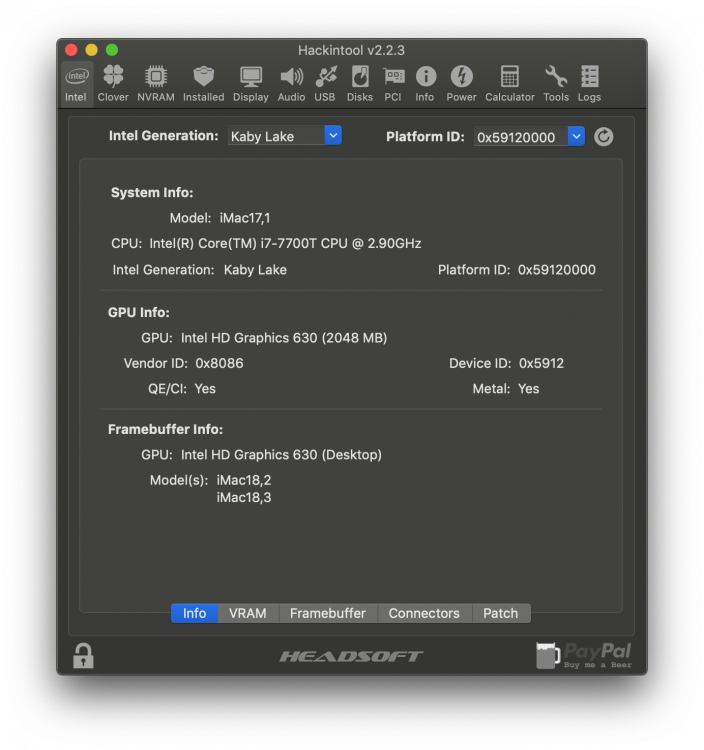
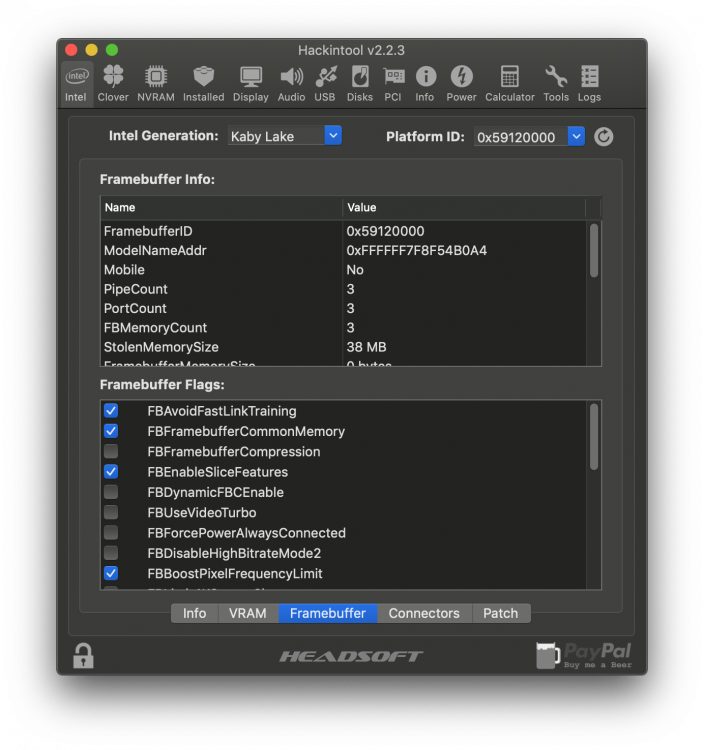
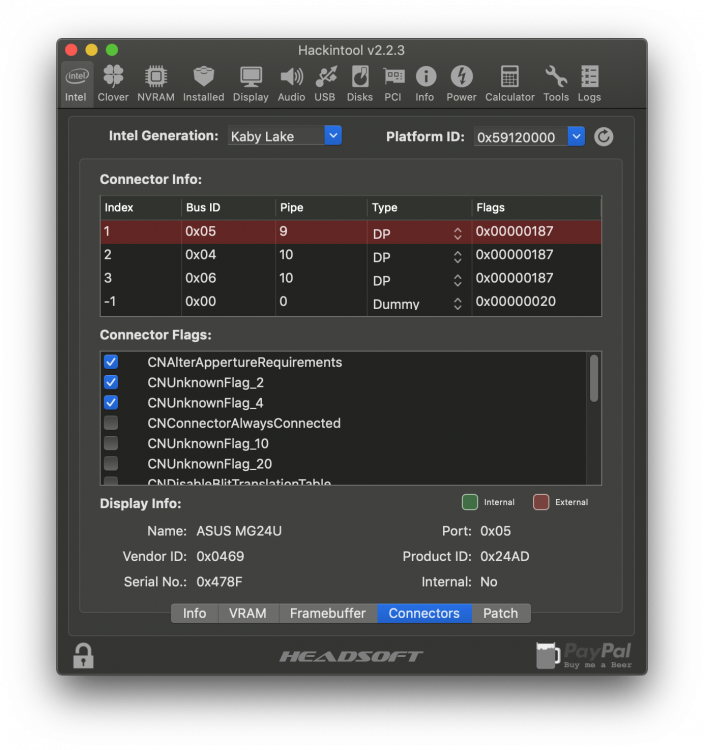
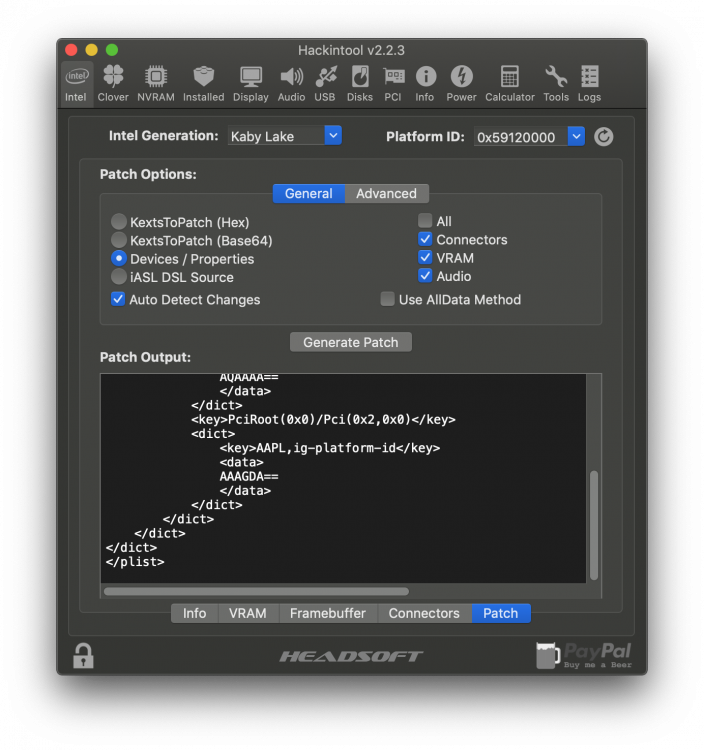
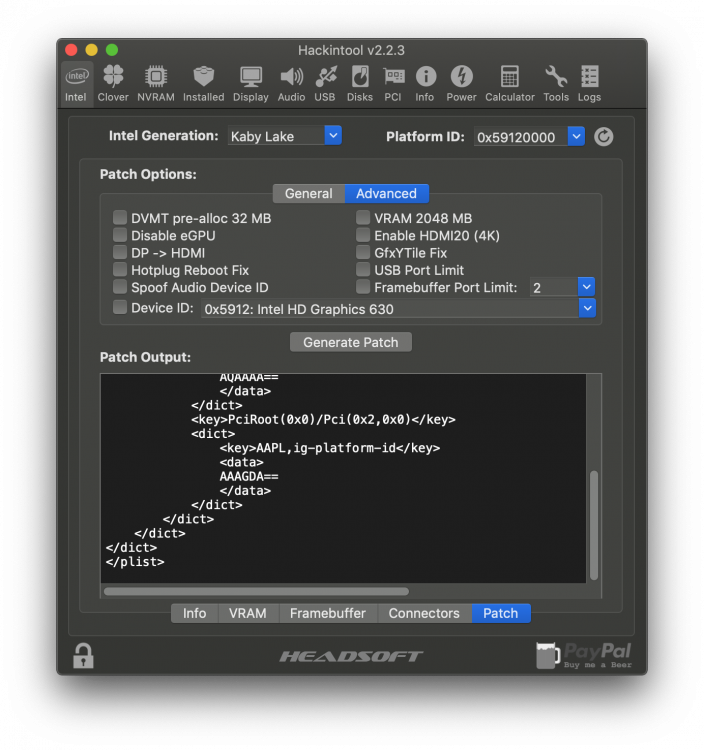
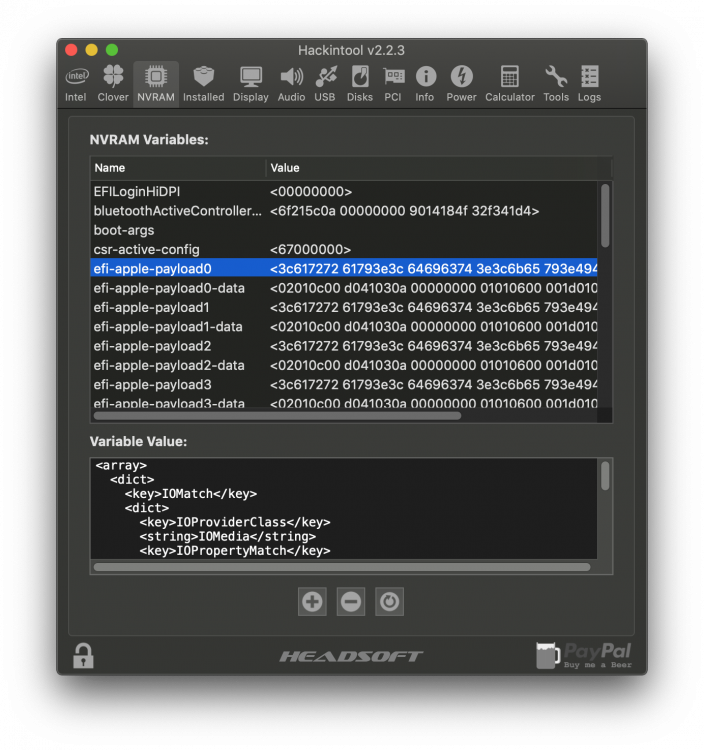
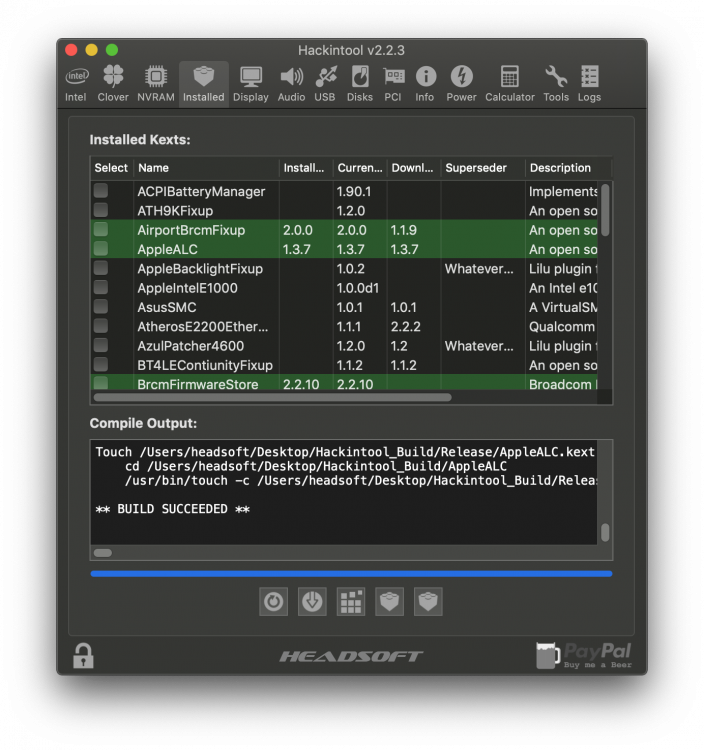
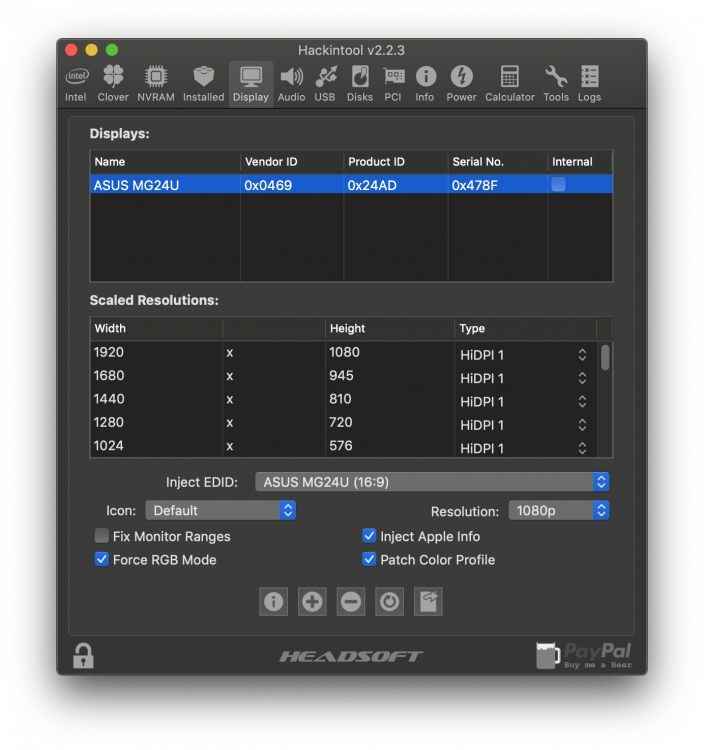
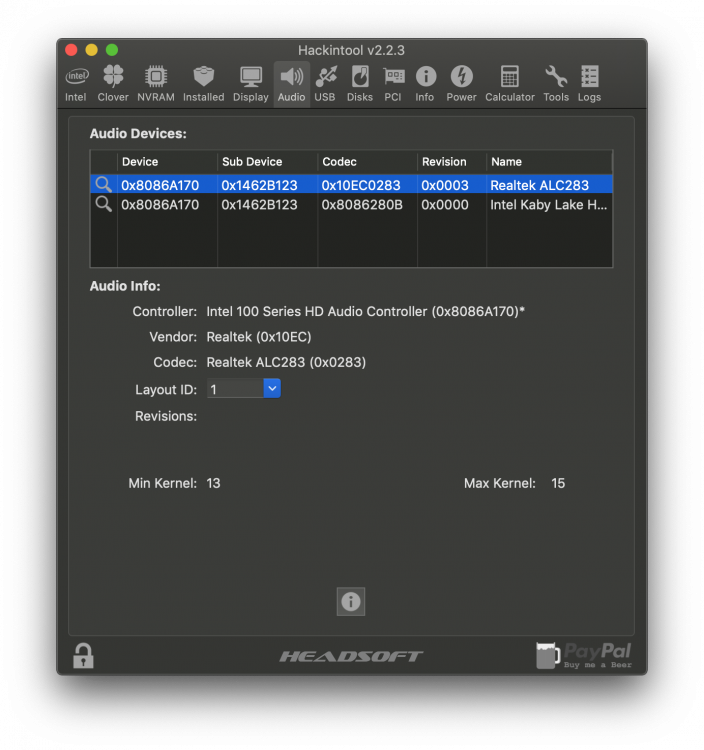
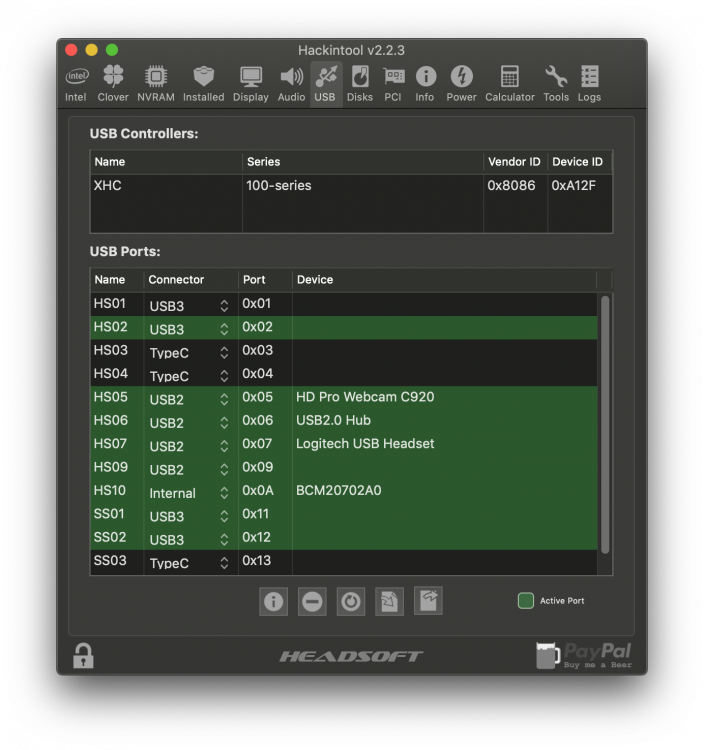
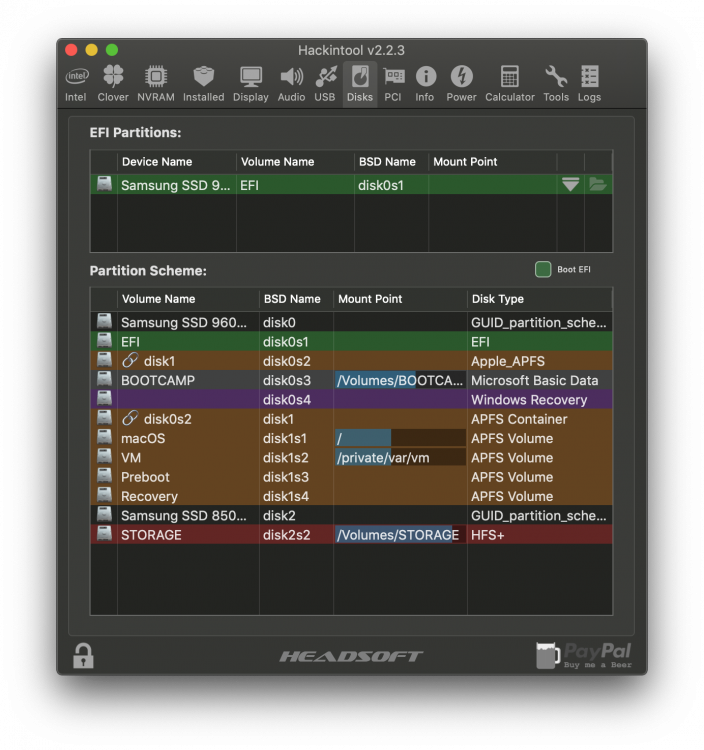
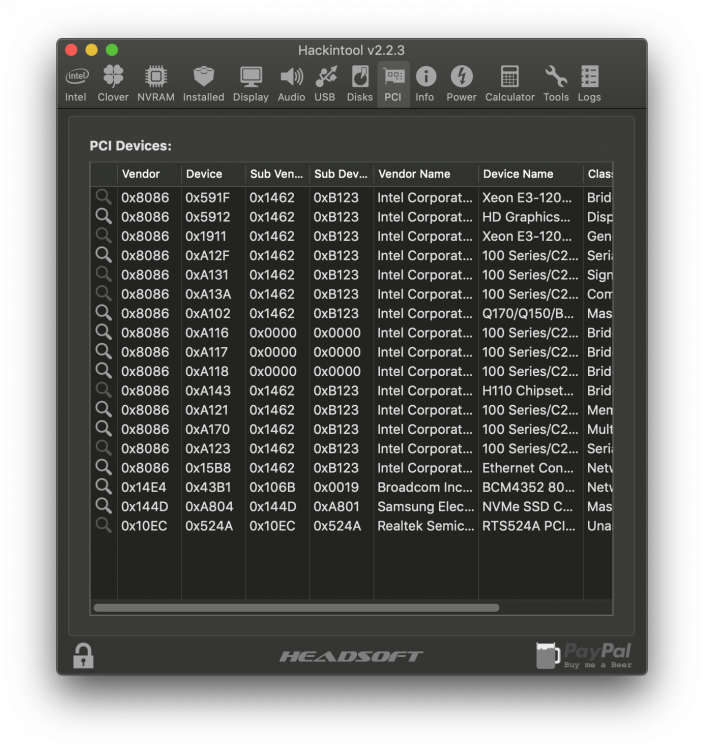
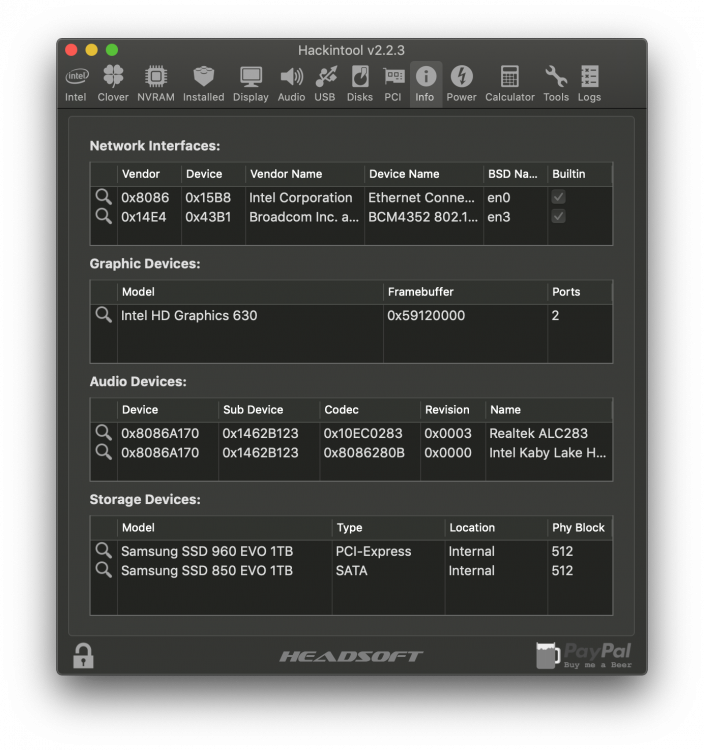
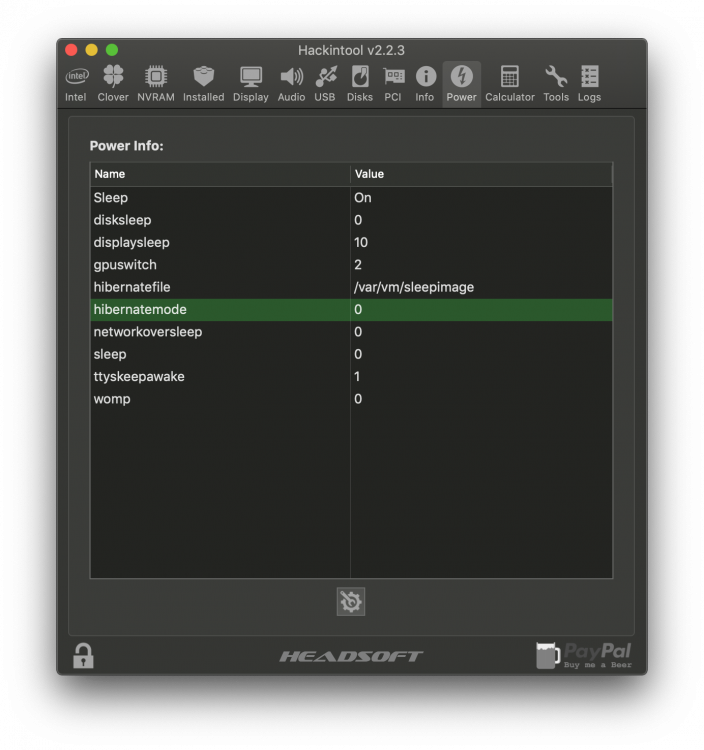
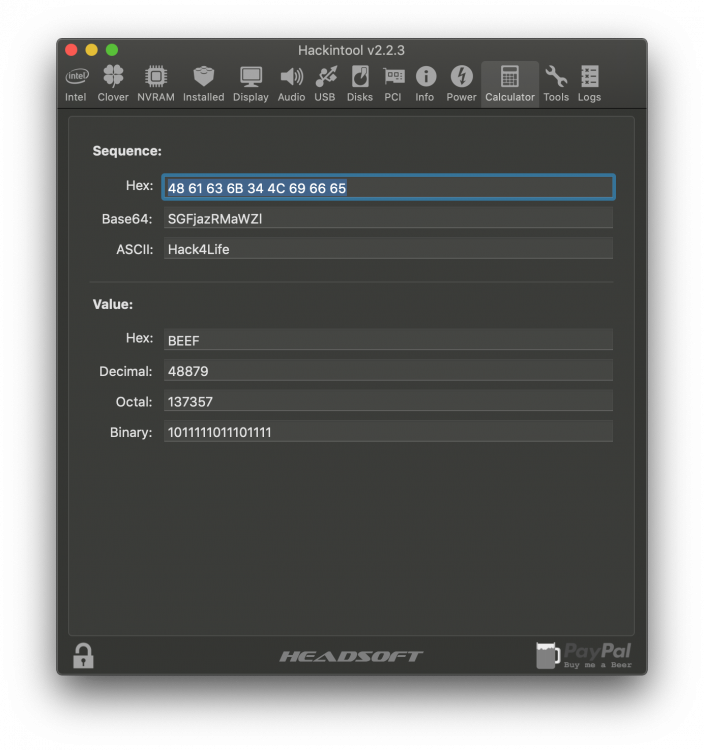
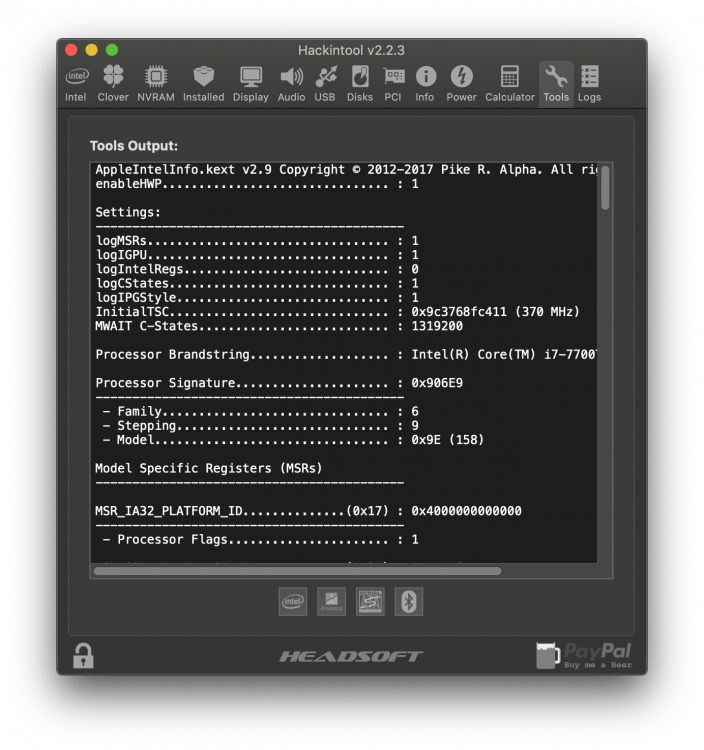
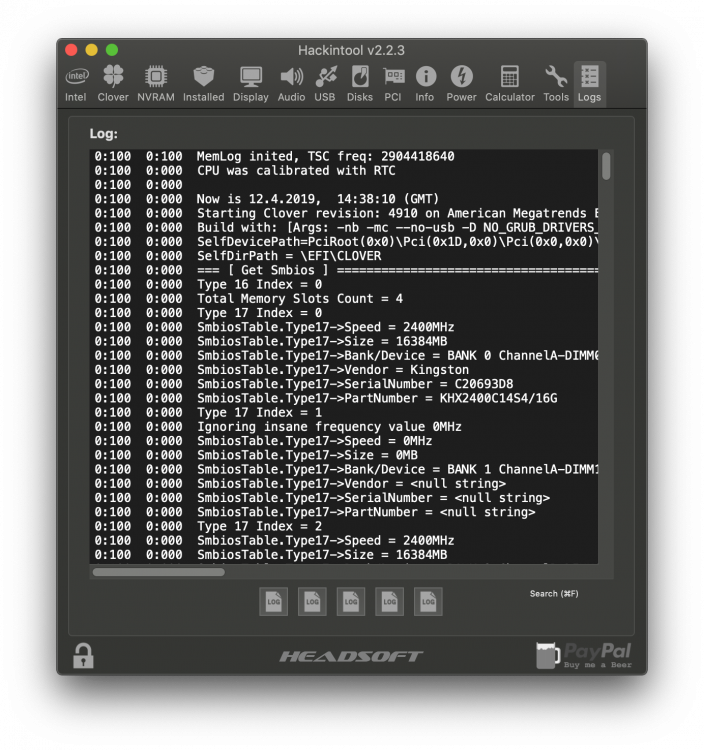
HACKINTOOL The Swiss army knife of vanilla Hackintoshing WARNING! Hackintool is not an automated patching tool that does all the work for you. Knowledge is required on how to patch before using it. Please read the Intel Framebuffer patching using WhateverGreen guide before you download this tool! I also recommend you read Daliansky's Hackintool tutorial (a proper English translation would be welcome). Mojave, Lilu + WhateverGreen You cannot use the Clover's KextsToPatch for framebuffer patching in Mojave for Skylake and above Framebuffer Dumps There are a few ways to dump your framebuffer data (the second two require WhateverGreen + Lilu debug versions) to read in Hackintool: 1. Use the Framebuffer->macOS 10.13.6 / Framebuffer->macOS 10.14 menu to create patches without a framebuffer dump 2. Use the -igfxdump boot flag to dump IGPU framebuffer kext to /AppleIntelFramebuffer_X_Y (root of your boot drive) and then File->Open menu 3. Use the -igfxfbdump boot flag to dump native and patched framebuffer table to ioreg and then File->Import->IOReg Dump menu Features - Supports Sandy Bridge, Ivy Bridge, Haswell, Broadwell, Skylake, Kaby Lake, Coffee Lake, Cannon Lake and Ice Lake generations - Create All, Connectors or VRAM patches - Detect Changes for auto patch creation - Create Clover patches in hex, base64 or Devices/Properties formats - Displays native GPU and Model identifiers - Display and edit Memory Info such as Stolen, Framebuffer, VRAM, Cursor etc. - Roll over some items for additional info (Tooltips) - Reads "live" data directly from Framebuffer kexts (if available; see Mojave note below) - File->Open framebuffer file generated by WhateverGreen's -igfxdump boot flag - File->Export->Clover config.plist / File->Export->Framebuffer.txt file - Patch audio layout id - Add USB port limit patch - Plug and unplug USB2 / USB3 devices and set port connector types then generate a USBPorts.kext - Advanced patching options (DVMT pre-alloc 32 MB, VRAM 2048 MB, Disable eGPU, Enable HDMI20 (4K), DP -> HDMI, GfxYTile Fix, Reboot Fix, USB port Limit, Spoof Audio Device Id, FB Port Limit, Spoof Gfx Device Id) Release Notes Updates are on Github 2.8.6 - Fix crash in getEDIDData, fix Import KextsToPatch 2.8.5 - Add "Show Installed Only" option for installed kexts 2.8.4 - Improved framebuffer enumeration, updated codecs and pci.ids 2.8.3 - Improved version checking routine, updated Turkish translation 2.8.2 - Updated Clover download location / OpenCore download support, Chinese translation update 2.8.1 - Data file updates 2.8.0 - Fixed OpenCore KextsToPatch format. Removed DSDT Rename auto selection 2.7.9 - Source is now on Github here 2.7.8 - Fix pcidevices.dsl compile error 2.7.7 - pcidevices.dsl export will now compile. Fix for Device Path 2.7.6 - Custom Device Path generation code (big thanks to @jaymonkey for helping test). Updated Chinese translation 2.7.5 - PCI DevicePath fix 2.7.4 - Added EveryMac.com Serial Check 2.7.3 - Added Serial Number Generator (thanks to vit9696 / MacInfoPkg team) 2.7.2 - Added EDID injection to IGPU. Added DPCD Max Link Rate patching. Added tooltips for Advanced / LSPCON patch options. Updated pci.ids / AppleALC audio data 2.7.1 - Bug fixes. Updated pci.ids / AppleALC audio data 2.7.0 - Launch process output fix (big thanks to @jaymonkey for the help testing this). Prepends "Intel" for IGPU name for Intel Power Gadget (thanks again to @jaymonkey for discovering this). System Info now includes all graphics cards. iMessage Keys are now clearly labeled. Added new OpenCore logo. Updated pci.ids / AppleALC audio data 2.6.9 - Disable Gatekeeper tool fix 2.6.8 - Catalina fixes 2.6.7 - Added "HDMI Infinite Loop Fix". Added LSPCON patching. Fixes 2.6.6 - Added "Disable Gatekeeper and mount the disk in read/write mode" tool. Change GFX0 to IGPU selection no longer shows for dGPU 2.6.5 - Improved BT hardware detection (when installed) and will show if FW Loaded (if using BrcmPatchRAM) 2.6.4 - Fixes 2.6.3 - Added Atheros BT device detection 2.6.2 - Added Bluetooth to Info->Misc 2.6.1 - Fixed USB device speeds 2.6.0 - USB fixes for macOS Catalina. USB now shows device speeds. Much improved Log viewer. Installing kexts on macOS Catalina will prompt to disable Gatekeeper and mount the disk in read/write mode. Fixed Atheros install for macOS Catalina. Added NativeDisplayBrightness to kext install list. Updated translations for Korean / Chinese 2.5.9 - ACPI names must be 4 characters (thanks P1LGRIM) 2.5.8 - Now using pci.ids for Audio Controllers 2.5.7 - Removed kextcache -u / call for rebuild cache. Added more command output for tools 2.5.6 - Added column sorting to PCI table 2.5.5 - Added ASRock DeskMini 310 system config 2.5.4 - Will now output mounting errors 2.5.3 - Fixed EveryMac.com Visit link 2.5.2 - Added Host, OS, Kernel and RAM System Info 2.5.1 - Add support for 0x3EA50005 0x3EA60005 0x3E980003 frame id for CFL refresh 2.5.0 - Fixed stdout/stderr output capture for admin privilege shell commands (thanks jaymonkey) 2.4.9 - Fixes 2.4.8 - Fixes 2.4.7 - Fixes 2.4.6 - "Rebuild KextCache and Repair Permissions" moved to tools section now has progress bar 2.4.5 - Output added for "Rebuild KextCache and Repair Permissions" 2.4.4 - Chinese language updates. Compiler improvements 2.4.3 - Chinese language updates. USB configurator fixes 2.4.2 - Changed Framebuffer Info to Selected / Current Framebuffer Info for easier comparison 2.4.1 - Chinese language update 2.4.0 - Now includes iMessageDebug data (ElNono / mdmwii / flux84 / sugarface / pokenguyen). Export system info data. View model info (everymac.com). Check serial feature. Preliminary OpenCore support (thanks vit9696) 2.3.9 - ComboBox fix (thanks telepati) 2.3.8 - Bug fixes (thanks ReddestDream) 2.3.7 - Improved Clover EFI Mounting. Clover PCI export now uses SubClass for device_type 2.3.6 - Bug fixes. "Use Intel HDMI" option added (hda-gfx=onboard-x). Added "Non Scaled" resolution type 2.3.5 - Fixed bug in Device Path generator (gfxutil). Added "Generate Windows UTC Registry Files" tool 2.3.4 - Updated audio codecs, Export PCI list in Clover and dsl format, Now dumps all ACPI tables and decompiles to dsl 2.3.3 - Extract DSDT (phpdev32), Auto update PCIIDs (MuntashirAkon), Export PCI list in JSON format 2.3.2 - Monitor PCI hotplug 2.3.1 - UI Updates 2.3.1 - Right-click on a PCI device and select "Copy IOReg Path". Launch IORegistryExplorer and select Go->Go to Path... menu, paste in the path and click the "Go to Path" button. 2.2.8 - Added warning for HWP state logging (previous state can only be restored after a reboot) 2.2.7 - Added VDA Decoder status. Added DevicePath for PCI devices. Export PCI Devices list to desktop 2.2.6 - Improved Boot EFI detection. Set Boot EFI manually. AppleIntelInfo shows 30 second timer to log CStates. Restores HWP state after logging. Added Intel Regs warning. Calculator now shows reverse bytes 2.2.4 - Added AppleIntelInfo options (Enable HWP, Log: CStates, IGPU, IPG Style, Intel Regs, MSRs). Added AppleIntelInfo 20 second delay for CState capture. 2.2.2 - Added Info tab (Network Interfaces, Graphic Devices, Audio Devices and Storage Devices). Will highlight power settings green or red to indicate issues 2.2.1 - Fixes 2.2.0 - New PCI Devices, Network, Power and Tools tab 2.1.9 - Added Github kext downloading. The download version may be older than the source version. Also due to Github API rate limits it will store the latest download urls. Added Install kext(s) function. Added Rebuild KextCache and Repair Permissions function 2.1.8 - Uses kextstat to get the versions 2.1.7 - Now detects more kexts 2.1.6 - Can now download the current version numbers of Lilu + Plugins 2.0.8 - Patch->System Configs menu with various configurations you can try if your Coffee Lake system is being troublesome (CaseySJ) 2.0.4 - Apply Clover patches (KernelToPatch, KextToPatch, DSDT Renames). View, create and edit NVRAM variables (be careful!). View installed Lilu + Plugins, download and automatically compile the latest versions 1.9.6 - Disk display enhancements (icons / mount / unmount buttons) 1.9.2 - Fixes 1.9.1 - Added SSDT-UIAC.aml / SSDT-USBX.aml export support 1.9.0 - Fixed launch bug (thanks @Pavo) 1.8.7 - Added USB Power DSDT Renames 1.8.6 - Added DSDT Renames 1.8.5 - Fixes 1.8.4 - Auto update capability using Sparkle framework 1.8.3 - Improved Audio Device detection / selection, window can now be resized 1.8.2 - Added translations; French (Matgen84), German (al6042), Korean (zisqo), Russian / Ukrainian (ctich) 1.8.1 - Clover downloader (Kozlek / JrCs / slice), NVRAM boot-args edit, improved authorization, UI update 1.8.0 - Improved USB power export (corpnewt), other fixes, new icon 1.7.9 - Added USB power export, EFI partition mounting, calculator and log viewer 1.7.8 - Added resolution injection from one-key-hidpi script (xzhih) 1.7.7 - Added EDID patching support for AMD & nVidia 1.7.6 - EDID overrides can now export custom icons 1.7.5 - Improved USB guide, added print button 1.7.4 - Fixed defaults 1.7.3 - Updates 1.7.2 - Renamed app to Hackintool, added EDID injection support (Andy Vandijck) 1.7.1 - Dark mode fixes 1.7.0 - USB & Audio info added, shows possible spoof / kext requirements 1.6.9 - Updates 1.6.8 - Added framebuffer-camellia and framebuffer-flags patching support 1.6.7 - Added Macmini8,1 and MacBookAir8,1 definitions 1.6.6 - Data file updates 1.6.5 - Fixed USBInjectAll detection 1.6.4 - Audio layout id detection improvement 1.6.3 - Now shows Audio Controller 1.6.2 - USB fixes 1.6.1 - Improved Spoof Audio Device Id option 1.6.0 - Fixes 1.5.9 - Now shows USB Controllers 1.5.8 - Will store and restore USB ports between app sessions for use with new USBInjectAll.kext (0.7.0) to include boot flags for excluding groups of ports 1.5.7 - Now detects EHC and hub ports (thanks to RehabMan & SavageAUS). Multi-select USB Ports. Now detects if USBInjectAll is installed 1.5.4 - Fixed audio codec detection when user has multiple audio devices. Added "Reboot Fix" advanced patch (sets connector pipe values to 18) 1.5.3 - Improved Export->Clover config.plist and now makes a backup (config-backup.plist) 1.5.2 - Added Patch->AzulPatcher4600 1.5.1 - USBPorts port-count fix 1.5.0 - Fixes 1.4.9 - Added tab to show if Lilu, WhateverGreen and AppleALC are installed and version info 1.4.8 - Fixed framebuffer-cursormem output for iASL DSL Source patching 1.4.7 - Added support for new WEG -igfxfbdump boot flag using File->Import->IOReg Dump menu 1.4.6 - Fixes. Added Framebuffer->macOS 10.14 menu item. Added QE/CI and Metal support detection 1.4.5 - Added support for framebuffer-cursormem (Haswell) 1.4.4 - Added ability to inject valid device-id's 1.4.3 - Fixes 1.4.2 - Added Patch->Import KextsToPatch / Apply Current Patches menu. Renamed USBPower.kext -> USBPorts.kext 1.4.1 - Added TypeC USB ports 1.4.0 - Improved Intel Generation detection 1.3.9 - Now using AppleIntelFramebuffer@X index for connector association 1.3.8 - Fixed bug AppleIntelFramebuffer port-number should be connecter index + 4 or 0 for internal (RehabMan) 1.3.7 - Shows Display Info for connected displays on connector ports (with display hot plug support), fixed iASL DSL Source hex output, connector drag-drop to change order 1.3.6 - Fixes 1.3.5 - Will try HDAS if HDEF is not found 1.3.4 - Added AllData connector patch method (RehabMan). Will try GFX0 if IGPU is not found 1.3.3 - Fixes. Added more audio layout-id's (vandroiy2013) 1.3.2 - Fixes 1.3.1 - Fixes. Added new menu Framebuffer->Current Version / macOS 10.13.6 1.3.0 - Added audio patching, Clover config.plist exporting, USB patching, advanced auto patching 1.2.8 - Added iASL DSL Source patch output, display detected Intel gen and platform-id 1.2.7 - File->Export framebuffer text file 1.2.6 - Fix preallocated memory calculation formula (vit9696) 1.2.5 - Still outputs a config.plist/Devices/Properties patch when "Auto Detect Changes" is selected 1.2.4 - Fixes 1.2.3 - config.plist/Devices/Properties patch now outputs data format 1.2.2 - Fixes 1.2.1 - Updates and fixes 1.2.0 - Added support for Cannon Lake and Ice Lake 1.1.0 - Added MacBookPro15,1 and MacBookPro15,2 models 1.0.9 - Support for Mojave, Coffee Lake, WhateverGreen's -igfxdump boot flag and Clover's config.plist/Devices/Properties patch output 1.0.8 - Updates 1.0.7 - Fixed support for dark mode 1.0.6 - Better backwards compatibility 1.0.5 - Detects Chipset / Address on Startup, Edit Memory Values Easier 1.0.4 - Added GPU / Model Info 1.0.3 - Added Tooltips 1.0.2 - Added Memory tab 1.0.1 - Minor Fixes 1.0.0 - Initial Release Credits - vit9696 for WhateverGreen (full credits), Lilu (full credits), AppleALC (full credits), USBPorts.kext and additional help - vit9696 for IntelFramebuffer.bt with additional work by bcc9, Piker-Alpha and joevt - DalianSky for Intel Core Platform ID and SMBIOS Quick Reference - vandroiy2013 for audio id data from AppleALC - RehabMan for all data patching method, ioreg framebuffer dump and other contributions Download Download Hackintool

 1 point
 -
Up and running macOS Mojave 10.14.4 (18E226) on iMac Pro Skylake-X/X299 Hackintosh! This afternoon @DSM2 advised me that yesterday Apple seems to have added a second special build of MacOS 10.14.4 (18E2034) on swcdn.apple.com, likely for new devices. Abstract and Introduction: This originating post constitutes a new macOS 10.14 Mojave Desktop Guide for Skylake-X/X299, which certainly will further grow not only thanks to your estimated feedback and contributions. It is the logical continuation of my successful iMac Pro Skylake-X/X299 Build and Desktop Guide published for macOS High Sierra 10.13. To avoid jumping back and forth, I will make this guide as consistent as the former, which however implies also some redundancy. As everybody already might now, my Skylake-X/X299 Desktop Guide bases on the ASUS Prime X299 Deluxe. However, also other X299 ASUS mainboard models or X299 mainboards of other brands might be compatible after likely considering and implementing few mandatory modifications. The same states for guide compatibility with all Skylake-X/299 CPUs different form the i9-7980XE employed here. I recently changed from the ASUS Prime X299 Deluxe to the ASUS WS X299 Sage 10G. While the default EFI-Folder distribution remains the same, very few differences in the post installation process for the ASUS WS X299 Sage 10G will be added to my guidelines during the next days. Before starting with all detailed instructions, please find a Table of Content that provides an overview of the individual topics addressed within this guide: --------------------------------------------------------------------------------------------------------------------------------------------------------------- Table of Contents A.) Hardware Overview Details about the build configuration that states the baseline of this guide. B.) Mainboard BIOS B1.) ASUS BIOS Firmware Patching B2.) ASUS BIOS Configuration B3.) Gigabyte BIOS Configuration C.) Important General Note/Advice and Error Prevention Hardware and System Configuration recommendations. Make sure you've read all of this before complaining that something does not work. D.) iMac Pro macOS 10.14 Mojave System Setup This chapter includes a general guideline how to perform the initial setup of your iMac Pro with macOS Mojave 10.14. D.1) iMac Pro EFI-Folder Preparation D.2) iMac Pro macOS Mojave 10.14 Installer Package Creation D.3) iMac Pro macOS Mojave 10.14 USB Flash Drive Installer Creation D.4) iMac Pro macOS Mojave 10.14 Clean Install on Skylake-X/X299 D.5) Direct iMac Pro conversions of a functional Skylake-X/X299 system with a SMBIOS System Definition different from iMacPro1,1 and a standard macOS build implementation D.6) iMac Pro macOS 10.14 Mojave Update Procedure E.) Post Installation Process E.1) HWP (Intel SpeedShift Technology) CPU Power Management Configuration E.2) Graphics Configuration General ATI and Nvidia GPU advices including a detailed guideline for Nvidia Web Driver Installation and Black Screen Prevention E.3) Audio Configuration Use only one of the following, where E.3.1 is recommended by the author. E.3.1.) AppleALC Audio Implementation E.3.2) VoodooHDA Audio Implementation E.3.3) cloverALC Audio Implementation E.4) USB Configuration including some initial benchmarks E.5) NVMe compatibility E.6.) SSD/NVMe TRIM Support E.7) GC-Titan Ridge / GC-Alpine Ridge /Asus TBEX 3 PCIe Add-In Implementation Extend the life of your SSD and maintained its normal speed E.8) Gbit and 10-Gbit Ethernet Implementations E.8.1) ASUS Prime X299 Deluxe on-board Gbit Ethernet Functionality E.8.2) 10-Gbit LAN Implementations E.8.2.1) ASUS XG-C100C Aquantia AQC107 10-Gbit NIC E.8.2.2) Intel X540-T1 10-Gbit NIC E.8.2.3) Onboard Intel X550-AT2 10-Gbit NICs of the ASUS WS X299 Sage 10G E.8.2.4) Small-Tree P2EI0G-2T 10-Gbit NIC E.8.2.5) NetGear ProSave XS508M 8-port 10-Gbit Switch E.8.2.6) QNAP TS-431X2 Quad-core 4-Bay NAS tower E.8.2.7) 10-GBit Ethernet Optimisation E.9) ASUS Prime X299 Deluxe PCI Device Implementation E.9.1) ACPI DSDT Replacement Implementation E.9.2) System SSDT PCI Device ImplementationE.9.2.1) - HDEF - onboard PCI Audio Controller PCI ImplementationE.9.2.2) - GFX0, HDAU - GPU and HDMI/DP Audio PCI implementationE.9.2.3) - PMCR - onboard Power Management Controller (PMC) PCI ImplementationE.9.2.4) - USBX - fixing XHCI USB Power errors during BootE.9.2.5) - XHCI - onboard Extended Host Controller Interface (XHCI) PCI ImplementationE.9.2.6) - XHC2,3,4 - ASMedia ASM3142 USB 3.1 Controller PCI ImplementationE.9.2.7) - ANS1, ANS2 - Apple NVMe Controller PCI ImplementationE.9.2.8) - SAT1 - Intel AHCI SATA Controller PCI ImplementationE.9.2.9) - THSS - Intel Thermal Subsystem Controller ImplementationE.9.2.10) XGBE - 10GBit NIC ImplementationE.9.2.11) - ETH0/ETH1 - onboard LAN Controller PCI ImplementationE.9.2.12) - ARPT - OSX WIFI Broadcom BCM94360CD 802.11 a/b/g/n/ac + Bluetooth 4.0 AirPort Controller PCI ImplementationE.9.2.13) - GC-Titan Ridge / GC-Alpine Ridge / Asus TBEX 3 Thunderbolt HotPlug System ImplementationE.9.2.14) - DTGP MethodE.9.2.15) - Debugging Sleep Issues E.10) iMac Pro Boot Splash Screen Cosmetics E.11) iMac Pro Desktop Background cosmetics E.12) iStatMenus Hardware Monitoring F.) Benchmarking F.1) Sylake-X Intel I9-7980XE CPU Benchmarking F.2) Gigabyte AORUS GTX 1080 Ti Waterforce EB 11GB Extreme Edition Benchmarking G.) Summary and Conclusion ---------------------------------------------------------------------------------------------------------------------------------------------------------------------------- A.) Hardware Overview Mainboard: ASUS WS X299 Sage 10G, former Asus Prime X299 DeluxeCPU: i9-7980XE (18 core, 4.4Ghz)RAM Memory: Corsair Dominator Platinum 128GB (8x16GB) DDR4 3200 MHz C16 Kit @3600MHz OCGPU: Sapphire Nitro+ Radeon RX Vega 64 8GBGPU Water-Blocking: Bykski Sapphire Nitro+ Radeon RX Vega 64 8GB water block from AliexpressSystem Disks: EVO 970 PRO NVMe M.2 1TB (MacOS); EVO 960 NVMe M.2 1TB (Windows 10)Thunderbolt 3: GC-Titan Ridge 40GB/s Intel Thunderbolt 3 Certified Add-in PCIe AdaptorPower Supply: Corsair AX1500iMonitor: LG 34WK95U-W 34" 21:9 Ultra Wide 5K2K Nano IPS LED Monitor with HDR600 and DP1.4/TB3WebCam: Logitech C930eMouse: Apple Magic Mouse 2Keyboard: Apple Magic Keyboard WirelessBluetooth + Wifi: PC/HACKINTOSH - APPLE BROADCOM BCM94360CD - 802.11 A/B/G/N/AC + BLUETOOTH 4.0Internal USB2.0 HUB: NZXT AC-IUSBH-M1T (Prime X299 Deluxe)Case: Lian Li PC-D888WX 8Pack Limited Edition (WS X299 Sage 10G), fromer: Thermaltake Core X71 Tempered Glass Edition Full Tower Chassis (Prime X299 Deluxe) 10Gbit Ethernet components: - 1x ASUS XG-C100C AQC107 PCIe x4 10GBit LAN Adapter (Prime X299 Deluxe) - 1x Intel X540-T1 single port 10GBit LAN PCIe Adapter (Prime X299 Deluxe, now installed in my X99 rig) - 1x Small-Tree P2EI0G-2T 2-Port 10GBit LAN PCIe Adapter (Prime X299 Deluxe) - 2x Intel X550-AT2 (onboard WS X299 Sage 10G) - 1x NetGear ProSave XS508M 8-port 10GBit switch - 1x QNAP TS-431X2 Quad-core 4-Bay NAS tower with Built-in 10GbE SFP+ Port and 4x 12 TB Seagate IronWolf in RAID 0 configuration. Let me express once more my gratitude to @gxsolace at this place for providing me with 1x Intel X540-T1, 1x Small-tree P2EI0G-2T and 4x 12 TB Seagate IronWolf hardware. CPU/GPU Cooling: Water Cooling main components: - 1x EK-Velocity D-RGB - Nickel + Plexi (WS X299 Sage 10G); former: 1x EK-FB ASUS Prime X299 RGB Monoblock - Nickel (Prime X299 Deluxe) - 1x EK-CoolStream PE 360 (Triple, 39 mm, Roof - TT Core X71, Roof - right chamber - Lian Li) - 1x EK-CoolStream Ce 280 (Dual, 45mm, Front - TTCore X71); 2x Alphacool NexXxos XT 45 240mm (Dual, 45mm, back side - right chamber -Lian Li) - 2x EK-CoolStream XE 360 (Triple, 60 mm, Cellar - TT Core X71, top and front - left chamber - Lian Li) - 1x XSPC Twin D5 Dual Bay Reservoir/Pump Combo - 15x (TT Core X71), 18x (Lian Li) Thermaltake Riing 12 High Static Pressure LED Radiator Fan (120mm) - 5x Thermaltake Riing 14 High Static Pressure LED Radiator Fan (140mm, TT Core X71) - 3x Phantek PMW Fan Hub (up to 12 fans or 30W power consumption) - 1x Alphacool Eisflügel Flow Indicator Black G1/4 IG - 1x Phobya Temperatur Sensor G1/4 + C/F Display Most of the components purchased at Amazon.de, Caseking.de, Mindfactory.de, Alernate.de B.) Mainboard BIOS On a real Mac with native OSX XCPM power management, the MSR 0xE2 register is unlocked and therefore writeable. However, on ASUS mobos this register was usually read only for ages. When the kernel tried to write to this locked register, it caused a kernel panic. This panic could happen very early in the boot process, with the result that the system freezes or reboots during the boot process. We could circumvent the MSR 0xE2 register write with a dedicated KernelToPatch entry in the config.plist, namely "xcpm_core_scope_msrs © Pike R. Alpha" and by enabling the "KernelPM" in the config.plist in Section "Kernel and Kext Patches" of the Clover Configurator. Thanks to recent modifications in CodeRush's Longsoft UEFIPatch distributions and thanks to three sophisticated MSR 0xE2 Register patches provided by @interferenc (partly former work of CodeRush, Pike Alpha and Adrian_dsl), we were able to successfully patch any ASUS X299 mainboard BIOS firmware distribution and unlock the MSR 0xE2 register. The patched ASUS mainboard BIOS firmware finally has been uploaded to the specific ASUS X299 mainboard by means of the ASUS EZ BIOS Flashback Procedure. This made the "xcpm_core_scope_msrs © Pike R. Alpha" KernelToPatch entry obsolete and allowed full native read/write MSR 0xE2 register access by the OSX kernel. Since ASUS Prime X299 Deluxe BIOS firmware 1301, ASUS now allows upon my user request for the first time to manually unlock the MSR 0xE2 register within the most recent BIOS settings. This makes the ASUS BIOS firmware patching obsolete. MSI and ASRock X299 mainboards allowed the manual unlock of the MSR 0xE2 BIOS Register right from the beginning and the MSR 0xE2 BIOS Register of all Gigabyte mainboards is anyway unlocked by factory default. However, yet we witness some TSC desynchronisation of the Skylake-X threads at boot and wake from S3. Until further microcode updates are performed by the mainboard manufacturers, we therefore have to use the TSCAdjustRest.kext provided by @inteferenc (see error prevention C.4 of this guide) to circumvent this TSC desynchronisation issue. By this we achieve fully native HWP (Intel SpeedShift Technology) CPU Power Management for all Skylake-X processors on all X299 mainboards with unlocked MSR 0xE2 BIOS Register, resulting in absolutely brilliant and top-end CPU performance (see Section E.1). Before summarising all necessary ASUS and Gigabyte BIOS settings, let me provide X299D.CAP, the best working ASUS Prime X299 Deluxe BIOS Firmware 1503 with an iMacPro Splash Screen Image (see Section E.10), which can be flashed by means of the well known ASUS EZ BIOS Flashback procedure. You should stay away from subsequent BIOS firmware versions 1603 and 1704, as they can either introduce XHCI related issues or prevent GPU firmware load at boot. Thus please, stay with 1503 as the best firmware implementation for the ASUS Prime X299 Deluxe! For the ASUS WS X299 Sage 10G, I also attach below BIOS Firmware version 0905 with the iMacPro Splash Screen Image, i.e WSXTG.CAP, also to be flashed with the ASUS EZ BIOS Flashback procedure. B2.) ASUS BIOS Configuration After Updating System time and System Date, enable X.M.P for your DDR4 modules. Don't forget to enable the EZ XMP Switch previously to this step on your ASUS Mainboard! Subsequently switch form the easy to the advanced ASUS BIOS Setup mode by pressing F7. I use all optimized BIOS settings (OoB, no OC yet) despite a few changes listed in detail below: 1.) /AI Tweaker/ a.) ASUS MultiCore Enhancement: Auto b.) AVX Instruction Core Ratio Negative Offset: "3" c.) AVX-512 Instruction Core Ratio Negative Offset: "2" d.) CPU Core Ratio: Sync All Cores e.) CPU SVID Support: Enabled f.) DRAM Frequency: DDR4-3200MHz (in my particular case) 2.) /Advanced/CPU Configuration/ a.) Hyper Threading [ALL]: Enabled b.) MSR Lock Control: Disabled 3.) /Advanced/CPU Configuration/CPU Power Management Configuration/ a.) Enhanced Intel Speed Step Technology (EIST): Enabled b.) Autonomous Core C-States: Enabled c.) Enhanced Halt State (C1E): Enabled d.) CPU C6 report: Enabled e.) Package C-State: C6(non retention) state f.) Intel SpeedShift Technology: Enabled g.) MFC Mode Override: OS Native 4.) /Advanced/Platform Misc Configuration/ a.) PCI Express Native Power Management: Disabled b.) PCH DMI ASPM: Disabled d.) ASPM: Disabled e.) DMI Link ASPM Control: Disabled f.) PEG - ASMP: Disabled 5.) /Advanced/System Agent Configuration/ a.) Intel VT for Directed I/O (VT-d): Disabled/Enabled 6.) /Boot/ a.) Fast Boot: Disabled b.) Above 4G Decoding: Off (must be ON with Prime X299 Deluxe BIOS firmware 1603 and 1704 and WS X299 Sage 10G BIOS firmware 0905 in case of GPU firmware load and XHCI ACPI implementation issues. When employing WS X299 Sage 10G BIOS firmware 0905 and enabling Above 4G Decoding in the respective BIOS settings as required, "First VGA 4G Decode" must be set to "Auto", as both Windows 10 and macOS can become irresponsive with different "First VGA 4G Decode" settings. c.) Set your specific Boot Option Priorities 7.) /Boot/Boot Configuration a.) Boot Logo Display: Auto b.) Boot up NumLock State: Disabled c.) Setup Mode: Advanced 8.) /Boot/Compatibility Support Module/ a.) Launch CSM: Disabled 9.) /Boot/Secure Boot/ a.) OS Type: Other OS With F7 and F10 you can save the modified BIOS settings. Note the important additional comments to the above BIOS settings provided in Section B.2) of my iMac Pro Syklake-X/X299 macOS 10.13 High Sierra Build and Desktop Guide. B.3) - Gigabyte BIOS Configuration Please find below the BIOS settings for the Gigabyte Designare EX kindly provided by @jyavenard and @DSM2. 1.) /M.I.T/Advanced Frequency Settings/ a.) Extreme Memory Profile: (X.M.P): Profile1 2.) /M.I.T/Advanced Frequency Settings/Advanced CPU Core Settings a.) Active Cores Control: Auto b.) Hyper-Threading Technology: Enabled c.) Intel Turbo Boost Max Technology 3.0 : Enabled d.) Intel Speed Shift Technology : Enabled e.) Enhanced Multi-Core Performance: Enabled/Disabled f.) CPU Enhanced Halt (C1E): Enabled g.) C6/C7 State Support: Enabled h.) Package C State limit: C6 i.) CPU EIST Function: Enabled j.) Energy Efficient Turbo : Disabled 3.) /M.I.T/Advanced Memory Settings/ a.) Extreme Memory Profile (X.M.P): Profile1 4.) /BIOS/ a.) Boot Numlock State: Disabled/Enabled b.) Security option: Setup c.) Full Screen Logo Show: Enabled d.) Fast Boot: Disabled e.) CSM Support: Disabled 5.) /BIOS/Secure Boot/ a.) Secure Boot Enable: Disabled 6.) /Peripherals/USB Configuration/ a.) XHCI Hand-off: Enabled 7.) /Peripheral/Thunderbolt Configuration/ a.) Security Level : SL0 - No Security 8.) /Chipset/ a.) VT-d: Disabled/Enabled 9.) /Save& Exit/ a.) Save & Exit C.) Important General Note/Advice and Error Prevention Please note the following important General Note / Advice and Error Prevention, when implementing macOS Mojave on your Skylake-X/X299 System. 1.) My actual respective X299 EFI-Folder distribution contains by default AptioMemoryFix.efi thanks to @vit9696. Note that already with Clover_v2.4k_r4392, AptioMemoryFix.efi has become an official Customization Option of Clover and can now be selected and therefore also just easily implemented in the frame of the Clover Boot Loader Installation. For native NVRAM implementation, Clover's RC Scripts have to be omitted during the clover boot loader installation. If already previously installed, remove Clover's RC Scripts from the /etc directory of your macOS USB Flash Drive Installer or System Disk: sudo rm -rf /etc/rc.boot.d sudo rm -rf /etc/rc.shutdown.d Also the "slide" boot flag needs to be disabled. 2.a.) Most ATI GPUs, e.g. RX Vega 64, RX Vega Frontier, RX 580, RX 560 are supposed to be "natively" implemented. It is commonly recommended not to use RX 560 and RX 580 GPUs due to the lacking iGPU implementation when using SMBIOS iMacPro1,1. With macOS 10.14.5 Beta 1, also the new Radeon VII is now natively implemented.By means of my RadeonVII/Vega64/Vega56/RX560/RX580 SSDTs, available in my respective X299 SSDT Github repository, and Whatevergreen.kext, all available DP and HDMI ports, including multi-monitor support, display HotPlug and system sleep/wake should be automatically and successfully implemented. Whatevergreen.kext only seems required for all Vegas possessing less than 6 physical ports (including the original Vegas like Frontier and Vega 64), else the current AMD SSDTs do pretty well their job.Important additional comment for all Vega users with 4K monitors though: when connecting a Vega with e.g. the LG 38UC99-W (WUHD, 3840 pix x 1600 pix) via one of the Display Ports (DPs), the screen resolution is fine under both Windows 10 and macOS High Sierra but is totally at odd during boot (VGA like boot screen resolution). The VEGA DP 4K boot screen resolution issue is neither related with the fact that the LG 38UC99-W is an ultra-wide (3840x1600) and not a true UHD (3840x2160) monitor nor related to any likely apparent issue with the ASUS Prime X299 Deluxe firmware. It is definitely a Vega firmware problem in combination with most 4K displays, as the DP 4K boot screen resolution issue is totally absent with any Nvidia GPU and the problem also does not only affect the ASUS Splash Screen but also spreads over the entire boot process until the login screen is reached (Windows and macOS). Splash Screen, Apple logo or verbose boot messages are not stretched but rather have VGA like resolution. Any fix of the AMD vBIOS would be highly appreciated. It is more than disappointing to witness such issues with 600-1000$ GPUs... Fortunately, the 4K boot screen issue is restricted to the Vega DP ports and likely due to the fact that the LG 38UC99-W only supports DP 1.2. Solution: Connect your Vega and your 4K display via the HDMI port. The 30 Hz HDMI monitor frequency issue under 10.13 is successfully removed under Mojave: monitor frequency of 60 Hz with the display connected via HDMI (in contrary to 75 Hz via DP).b.) Also Nvidia Kepler Graphics Cards are natively implemented.c.) All Users with Nvidia Maxwell and Pascal Graphics Cards Users still have to wait for the official release of 10.14 Web Drivers. I was actively requesting Web Driver development for macOS 10.14 Betas from Nvidia, which has been rejected. I really hope that Nvidia will not leave again the respective community without Web Driver support . In the meanwhile, Nvidia GPU users have to live with e.g. patched Web Driver xxx.40.105 for macOS High Sierra 10.13.6 after a simple patching procedure detailed in Section E.2), although the latter Web Driver is not really suited for 10.14 and works without hardware acceleration. 3.) The /EFI/Clover/drivers64UEFI/-directory of all former EFI-Distributions contained a patched version of the actual apfs.efi. The actual apfs.efi can be obtained by following the respective guideline detailed below: Right-click with your mouse on the "Install macOS High Sierra.app" and select "Show Package Contents" -> click with the mouse on "Contents" and subsequently on "Shared Support" -> double-click with the mouse on "BaseSystem.dmg" for mounting. Go to "usr" -> "standalone" -> "i386". Drop the apfs.efi to your Desktop. To patch the apfs.efi for non-verbose boot, follow THIS LINK. Credits to @PMheart and @ermac. Note however, that the entire apsf.efi approach detailed above recently has become totally obsolete. Thanks to the ApfsSupportPkg developed by @acidenthera & Co. and thanks to it's recent implementation to Clover (thanks to @Slice, @Philip Petev & Co.) in form of ApsfDriverLoader.efi, there is no further need of the former apsf.efi in the /EFI/Clover/drivers64UEFI/ directory. The actual Clover distribution package including the ApsfDriverLoader.efi can by build by means of the Build_Clover.command available on Gitub. Since Version 4.8.8, the latter script also can be used with 10.14 and Xcode 10 +Xcode 10 Command Line Tools thanks to @vector sigma. 4.) To avoid Skylake-X thread TSC desynchronisation errors during boot and wake from S3 with unpatched X299 mainboards, likely induced by yet erroneous Skylake-X BIOS microcode implementations, we need to use TSCAdjustReset.kext provided by @interferenc in the /EFI/CLOVER/kexts/Other/ directory of both USB Flash Drive and System Disk. To access TSCAdjustRest.kext, download primarily its source distribution from Github with the following terminal command: git clone https://github.com/interferenc/TSCAdjustReset Subsequently copy the TSCAdjustRest source distribution to your Desktop using the following terminal command: mv /TSCAdjustReset ~/Desktop Now change in the terminal to the TSCAdjustReset source distribution on your Desktop with the following terminal command: cd ~/Desktop/TSCAdjustReset/ Now compile the source distribution with Xcode by using the following terminal command: xcodebuild After successful compilation, you will find the TSCAdjustRest.kext in ~/Desktop/TSCAdjustReset/build/Release/ Please note that the TSCAdjustRest.kext by default is configured for a 8-core CPU (16 threads) like the i7-7820X. To adopt the kext for Skylake-X processers with more or less cores than 8 cores, apply the following approach: a.) Right-click with the mouse on the TSCAdjustRest.kext file and select "Show Packet Contents". b.) Double-click with the mouse on /contents/ . After a right-click on the "Info.plist" file, select "Open with /Other". Select the TextEdit.app and edit the "Info.plist" file. c.) Use the "find"-function of TextEdit.app and search for the term "IOCPUNumber" d.) Note that the adequate IOCPUNumber for your particular Skylake-X processor is the number of its threads -1, by always keeping in mind that the number of it's threads is always 2x the number of it's cores. Thus in case of the 8 core i7-7820X, the IOCPUNumber is 15 (16 threads - 1). <key>IOCPUNumber</key> <integer>15</integer> By following this methodology, the correct IOCPUNumber for the 10-core i9-7900X would be 19 (20 threads -1) <key>IOCPUNumber</key> <integer>19</integer> and the IOCPUNumber for the 18-core i9-7980XE would result in 35 (36 threads -1). <key>IOCPUNumber</key> <integer>35</integer> e.) After adopting the IOCPUNumber for your particular Skylake-X processor, save the info.plist file and copy the modified TSCAdjustRest.kext to the /EFI/CLOVER/kexts/Other/ - directories of both USB Flash Drive Installer and System Disk and you are save and all done! 5.) Like under macOS 10.13 High Sierra also with macOS 10.14 Mojave, Apple forces all users to use the new Apple file system APFS in case of a Clean Install. In case that you want to remain with the HFS+ file system, use @Brumbear's Unsolid.kext in the /EFI/Clover/kexts/Other/ directory. Note that there is no way to convert an APFS disk back to HFS+ without the loss of all data, but one can easily reformat an APFS formatted disk to HFS+ under OSX by using either Apple's Disk Utility App or "diskutil" commands. All you need to do is to previously unmount the APFS volume before erasing it with a journaled HFS+ file system and a GRUB Partition Table (GTP). If you want to maintain the disk's content, perform a backup before erasing the disk with a HFS+ format. The application of Apple's Disk utility is straight forward. The "diskutil" equivalent is detailed below: In the Terminal app, type: diskutil list In the output which you can read by scrolling back, you will find all internal disks named /dev/disk0, /dev/disk1, depending upon how many physical disks are present in your system. Make a note of the disk identifier for the disk you intend to format (you can eliminate risk by removing all disks but the intended target). In the Terminal app, type: diskutil unmount /dev/diskX where diskX is a place holder for the disk to be unmounted. Now delete the APFS container of diskX: diskutil apfs deleteContainer /dev/diskX Subsequently, you can erase the entire disk with HFS+ and a GPT by typing the following terminal command: diskutil partitionDisk /dev/diskX 1 GPT jhfs+ "iMacPro" R where /dev/diskX is again a place holder for disk to be erased and iMacPro would be the label for the single partition created. The remaining 1 GPT jhfs+ and R arguments tell diskutil to create a single partition, within a GUID partition table, formatted as Journaled HFS+ and using the entire disk, respectively. Alternatively one can also use the following terminal command: diskutil partitionDisk /dev/diskX GPT JHFS+ iMacPro 0b where /dev/diskX is again a place holder for disk to be erased and iMacPro is again the label for the disk partition created. The GPT HFFS+ and 0b arguments again tell diskutil to create a single partition, within a GUID partition table, formatted as Journaled HFS+ and covering the entire disk, respectively. In the Terminal app, type now: diskutil mount /dev/diskX where diskX is again a place holder for the disk to be remounted. Note, that by means of the "diskutil approach", brand new unformatted or not compatibly formatted system NVMe, SSD and HDD system drives can be also directly formatted within the macOS Clean Install procedure. When presented with the initial install screen where you are presented options to Restore From Backup or Install, select Terminal from the Utilities menu bar item; The "diskutil" terminal approach is also able to convert a HFS+ macOS 10.14 Mojave System Disk to APFS. To do so enter the following terminal command: diskutil apfs convert /dev/diskX where diskX is again a place holder for the HFS+ disk to be converted to APFS. The same procedure again can also be directly performed by means of Apple's Disk Utility. Important recommendation: If you opt for an APFS System Disk implementation, try to also implement all other disks of your system with APFS file format. On systems with APFS disks and non-APFS disks, the boot duration will increase, as apsf.efi will perform a fsck check of non-AFPS disks (like HFS+ or Fat32) during boot. However, dual boot APFS Systems with an NTFS Windows System Disk are not effected by the apsf.efi issue, as OSX does not know how to properly deal with NTFS. 6.) All ASUS Prime X299 Deluxe users, who enabled the second LAN controller in the ASUS Prime X299 Deluxe BIOS, are advised to download, unzip and copy the SmallTree-Intel-211-AT-PCIe-GBE.kext to the EFI-Folders of both USB Flash Drive Installer and 10.14 System Disk, or to disable the second LAN port in the BIOS during the MacOS Installation. In case of the ASUS WS X299 Sage 10G, remove both IntelMausiEthernet.kext and SmallTree-Intel-211VA-PCIe-GBE.kext from your respective EFI-Folder. 7.) All Gigabite mainboard users need to add the "npci=0x2000" boot flag to their config.plist by checking the latter in Section "Boot" of Clover Configurator under "Arguments". D.) iMac Pro macOS 10.14 Mojave System Setup Below, one finds a detailed description for the Installation/Update of/to macOS Mojave 10.14 . This also includes the EFI-Folder Preparation (D.1), the macOS Mojave 10.14 Installer Package creation (D.2), the macOS Mojave 10.14 USB Flash Drive Installer Creation (D.3) and the macOS Mojave 10.14 Clean Install. One also finds instructions for a direct iMac Pro conversion of a functional Skylake-X/X299 system with a SMBIOS System Definition different from iMacPro1,1 and standard macOS build implementation (D.5) of any former macOS distribution. D.6 finally provides details to the future iMac Pro macOS Mojave Update Procedure. D.1) iMac Pro EFI-Folder Preparation In order to successfully boot a macOS USB Flash Drive Installer or System Disk on a Hackintosh system, both drives must be equipped with an EFI-Folder in their EFI partitions. In this Section we will prepare a fully equipped EFI-Folder with SMBIOS iMacPro1,1 System definition. 1.) Download and unzip my actual respective X299 EFI-Folder distribution and copy the therein contained EFI-Folder to your Desktop. 2.) Open the config.plist in /EFI/Clover/ with the latest version of Clover Configurator (>/= v.4.60.0), proceed to the "SMBIOS" Section and complete the SMBIOS iMacPro1,1 Serial Number, Board Serial Number and SMUUID entries. These details are mandatory to successfully run iMessage and FaceTime on your iMac Pro System. Note that all other iMacPro1,1 SMBIOS Details are already implemented in the config.plist of my actual respective X299 EFI-Folder distribution. Press several times the "Generate New" Button next to the serial number text field to generate a serial number and board serial number.With SMBIOS of an iMacPro1,1 it is not currently possible to verify the validity of the serial number on everymac.com.Therefore, verify the validity of your serial number on appleserialnumberinfo.com instead. Open the https://checkcoverage.apple.com site, paste your Serial Number and confirm that the serial number is not in use yet.Finally press several times the "Generate New" button next to SmUUID. Users of mainboards with locked MSR Register (disabled MSR OSX Kernel write access) have to enable the xcpm_core_scope_msrs © Pike R. Alpha Kernel patch in their config.plist under "KernelToPatch" in Section "Kernel and Kext Patches" of Clover Configurator and also check "KernelPM". Enable "PluginType" in your config.plist under SSDT/Generate Options/ in Section ACPI of Clover Configurator for a fully working XCPM implementation. Note that by this, Pike Alpha's former ssdt.aml XCPM implementation becomes totally obsolete.Enable USB port limit patches:Valid USB port limit patches for 10.14.4 provided by @PMHeart (hardwired but yet disabled in my respective EFI-Folder distribution) by following initial USB port limit patch approach for 10.14.3 by @ydeng : kext : com.apple.iokit.IOUSBHostFamily Find : 83FB0F0F 87 Replace : 83FB3F0F 87 Name : USB Port Limit Patch 1 ©PMHeart kext : com.apple.driver.usb.AppleUSBXHCI Find : 4183FF0F 0F83 Replace : 4183FF3F 0F83 Name : USB Port Limit Patch 2 ©PMHeart kext : com.apple.iokit.IOUSBHostFamily Find : 83E30FD3 E34109DF Replace : 83E33FD3 E34109DF Name : USB Port Limit Patch 3 ©PMHeart Finally save the modified config.plist. 3.) Now copy the appropriate TSCAdjustRest.kext, which has been modified in error prevention C.4), to the /EFI/CLOVER/kexts/Other/ directory of the EFI-Folder. You know have a fully equipped EFI-Folder for subsequent implementations as detailed below. D.2) iMac Pro macOS Mojave 10.14 Installer Package Creation If you are not able to successfully download the macOS Mojave 10.14.4 (18E226) full package installer (6.04 GB) from the Appstore, follow the individual steps detailed below:1.) Open a terminal and create a "041-56507" directory on your Desktop. Subsequently change to the newly created directory. All this can be done with the following terminal commands: mkdir ~/Desktop/041-56507/ cd ~/Desktop/041-56507/ 2.) Download the following files from the Apple server (public links) to your ~/Desktop/041-56507/ directory by a copy & paste of the following terminal commands: curl https://swdist.apple.com/content/downloads/32/45/041-56507/k6okp4vkzucqpoxrgrgycji6jo8z8na8sg/041-56507.English.dist -o 041-56507.English.dist curl http://swcdn.apple.com/content/downloads/32/45/041-56507/k6okp4vkzucqpoxrgrgycji6jo8z8na8sg/InstallAssistantAuto.smd -o InstallAssistantAuto.smd curl http://swcdn.apple.com/content/downloads/32/45/041-56507/k6okp4vkzucqpoxrgrgycji6jo8z8na8sg/AppleDiagnostics.chunklist -o AppleDiagnostics.chunklist curl http://swcdn.apple.com/content/downloads/32/45/041-56507/k6okp4vkzucqpoxrgrgycji6jo8z8na8sg/AppleDiagnostics.dmg -o AppleDiagnostics.dmg curl http://swcdn.apple.com/content/downloads/32/45/041-56507/k6okp4vkzucqpoxrgrgycji6jo8z8na8sg/OSInstall.mpkg -o OSInstall.mpkg curl http://swcdn.apple.com/content/downloads/32/45/041-56507/k6okp4vkzucqpoxrgrgycji6jo8z8na8sg/BaseSystem.chunklist -o BaseSystem.chunklist curl http://swcdn.apple.com/content/downloads/32/45/041-56507/k6okp4vkzucqpoxrgrgycji6jo8z8na8sg/InstallESDDmg.chunklist -o InstallESDDmg.chunklist curl http://swcdn.apple.com/content/downloads/32/45/041-56507/k6okp4vkzucqpoxrgrgycji6jo8z8na8sg/BaseSystem.dmg -o BaseSystem.dmg curl https://swdist.apple.com/content/downloads/32/45/041-56507/k6okp4vkzucqpoxrgrgycji6jo8z8na8sg/RecoveryHDMetaDmg.pkm -o RecoveryHDMetaDmg.pkm curl http://swcdn.apple.com/content/downloads/32/45/041-56507/k6okp4vkzucqpoxrgrgycji6jo8z8na8sg/RecoveryHDMetaDmg.pkg -o RecoveryHDMetaDmg.pkg curl https://swdist.apple.com/content/downloads/32/45/041-56507/k6okp4vkzucqpoxrgrgycji6jo8z8na8sg/InstallAssistantAuto.pkm -o InstallAssistantAuto.pkm curl http://swcdn.apple.com/content/downloads/32/45/041-56507/k6okp4vkzucqpoxrgrgycji6jo8z8na8sg/InstallAssistantAuto.pkg -o InstallAssistantAuto.pkg curl http://swcdn.apple.com/content/downloads/32/45/041-56507/k6okp4vkzucqpoxrgrgycji6jo8z8na8sg/InstallInfo.plist -o InstallInfo.plist curl https://swdist.apple.com/content/downloads/32/45/041-56507/k6okp4vkzucqpoxrgrgycji6jo8z8na8sg/MajorOSInfo.pkm -o MajorOSInfo.pkm curl http://swcdn.apple.com/content/downloads/32/45/041-56507/k6okp4vkzucqpoxrgrgycji6jo8z8na8sg/MajorOSInfo.pkg -o MajorOSInfo.pkg curl https://swdist.apple.com/content/downloads/32/45/041-56507/k6okp4vkzucqpoxrgrgycji6jo8z8na8sg/InstallESDDmg.pkm -o InstallESDDmg.pkm curl http://swcdn.apple.com/content/downloads/32/45/041-56507/k6okp4vkzucqpoxrgrgycji6jo8z8na8sg/InstallESDDmg.pkg -o InstallESDDmg.pkg The full list of package files can be found within the following catalog URL, searching for key "k6okp4vkzucqpoxrgrgycji6jo8z8na8sg": https://swscan.apple.com/content/ca...ion-snowleopard-leopard.merged-1.sucatalog.gz 3.) Create the installer.pkg on your Desktop with the following terminal command: cd .. productbuild --distribution ./041-56507/041-56507.English.dist --package-path ./041-56507/ installer.pkg 4.) Create the "Install MacOS Mojave" in the /Applications folder of your System Disk with the following terminal command: sudo /usr/sbin/installer -pkg installer.pkg -target / In case that you receive an error message, ignore the latter and proceed with 5.)5.) Now add the following files to your "Install macOS Mojave.app" with the following terminal commands: sudo cp ./041-56507/InstallESDDmg.pkg /Applications/Install\ macOS\ Mojave.app/Contents/SharedSupport/InstallESD.dmg sudo cp ./041-56507/AppleDiagnostics.dmg /Applications/Install\ macOS\ Mojave.app/Contents/SharedSupport/ sudo cp ./041-56507/AppleDiagnostics.chunklist /Applications/Install\ macOS\ Mojave.app/Contents/SharedSupport/ sudo cp ./041-56507/BaseSystem.dmg /Applications/Install\ macOS\ Mojave.app/Contents/SharedSupport/ sudo cp ./041-56507/BaseSystem.chunklist /Applications/Install\ macOS\ Mojave.app/Contents/SharedSupport/ Verify your "Install Mojave.app" for completeness. You should now have a complete macOS Mojave 10.14. (18E226) Installer package in your /Applications Folder.The entire "Install macOS Mojave.app" creation procedure has been also fully automatised within one single script, as already implemented for macOS High Sierra with the help off @macandrea. createInstaller-10.14.4-23042019.sh will automatically create on any MacOS System the "Install macOS Mojave.app" for macOS Mojave 10.14.4 (18E226) in the /Applications folder.Just download und unzip createInstaller-10.14.4-23042019.sh.zip and run the following terminal commands: cd ~/Downloads chmod +x createInstaller-10.14.4-23042019.sh ./createInstaller-10.14.4-23042019.sh And here is createInstaller-10.14.4-SB-23042019.sh, which will automatically create on any MacOS System the "Install macOS Mojave.app" for macOS Mojave 10.14.4 (18E2034) - special build in the /Applications folder. Just download und unzip createInstaller-10.14.4-SB-23042019.sh.zip and run the following terminal commands: cd ~/Downloads chmod +x createInstaller-10.14.4-SB-23042019.sh ./createInstaller-10.14.4-SB-23042019.sh D.3) iMac Pro macOS Mojave 10.14 USB Flash Drive Installer Creation Follow the individual steps detailed below to successfully create a bootable iMac Pro macOS Mojave 10.14 USB Flash Drive Installer. 1.) Format a USB Flash Drive of your choice (source, named USB) with HFS+ [(Mac OS Extended (Journaled)] and a GUID partition table by means of Apple's Disk Utility on any other Hackintosh or Mac of your choice. This will create an empty HFS+ Partition and a yet empty EFI-partition on your iMac Pro macOS USB Flash Drive Installer. 2.) With the macOS Mojave 10.14 Installer Package in your /Application Folder, connect your USB Flash Drive (named USB) and run the following terminal command: sudo /Applications/Install\ macOS\ Mojave.app/Contents/Resources/createinstallmedia --volume /Volumes/USB --nointeraction Alternatively, one can create the iMac Pro macOS USB Flash Drive Installer also by means of the Install Disk Creator.app. 3.) For successfully booting your iMac Pro macOS USB Flash Drive Installer, the latter must however also contain a valid EFI- Folder with an SMBIOS iMacPro1,1 system definition. Thus, copy the EFI-Folder you prepared in Section D.1) to the yet empty EFI Partition of yourmacOS USB Flash Drive Installer. You now have a fully functional and bootable macOS Mojave 10.14 USB Flash Drive Installer. D.4) iMac Pro macOS Mojave 10.14 Clean Install on Skylake-X/X299 Follow the individual steps detailed below to successfully setup macOS Mojave 10.14 on a virgin system drive of your choice (NVMe, SSD or HDD). 1.) In order to perform a clean install of macOS Mojave 10.14, prepare a virgin NVMe, SDD or HDD destination drive for the iMac Pro macOS installation by formatting the drive with HFS+ [(Mac OS Extended (Journaled)] and a GUID partition table by means of Apple's Disk Utility on any other Hackintosh or Mac of your choice. This will create an empty HFS+ Partition and a yet empty EFI-partition on the drive. 2.) Copy the EFI-Folder you prepared in Section D.1) to the yet empty EFI Partition. 3.) Now connect the Destination Drive to your Hackintosh System and boot the latter with the plugged macOS Mojave 10.14 USB Flash Drive Installer, your created in Section D.2) 4.) While booting your system, press the F8 button to enter the BIOS boot menu. Select to boot from your macOS USB Flash Drive Installer. 5.) Subsequently, click on the USB Flash Drive Installer Icon in the clover boot menu to boot the respective macOS Installer partition on your macOS USB Flash Drive Installer 6.) After successful boot, pass the individual steps of the macOS 10.14 Mojave installation menu and finally select the destination drive of your macOS 10.14 Mojave Installation, which should be logically the system disk you successfully configured above. In the next step, the Installer will create a macOS Mojave 10.14 Installer Partition on the system disk and subsequently reboot your system. 7.) During system reboot, just press again the F8 button to enter the BIOS boot menu. Select again to boot from your USB Flash Drive. In contrary to 6.), click this time on the "Install MacOS.." Icon in the clover boot screen to boot the newly created macOS Mojave 10.14 Installer Partition on your system disk. 8.) After successful boot, you will enter now the macOS Mojave 10.14 Installer Screen with a progress bar starting at about 34 minutes. 9.) After another reboot, press again the F8 button to enter the BIOS boot menu. Select to boot with your System Disk EFI-folder. Click on the "MacOS Mojave" icon on the clover boot screen to boot the new macOS Mojave partition of your system disk. 10.) After successful boot do the requested iCloud registration and you will have your first iMac Pro macOS Mojave 10.14 system. Proceed with Section D.6) - iMac Pro macOS High Sierra Build Updates (if necessary) or E.) - Post Installation Process. D.5) Direct iMac Pro conversions of a functional Skylake-X/X299 system with a SMBIOS System Definition different from iMacPro1,1 and a standard macOS build implementation 1.) Replace the EFI-Folder of your System Disk by the EFI-Folder you created in Section D.1) 2.) Copy /System/Library/CoreServices/PlatformSupport.plist to your Desktop, add BoardID "Mac-7BA5B2D9E42DDD94" under SupportedBoardIDs by means of Xcode as suggested by user Griven from the German Hackintosh-Forum and copy back the modified PlatformSupport.plist to System/Library/CoreServices/. 3.) If not already in your /Applications folder after performing Section D.2), copy the iMac Pro macOS Installer Package ("Install macOS Mojave.app") to your /Applications folder. 4.) Double click on the "Install macOS Mojave.app" in the /Applications Folder to start the macOS Mojave 10.14 installation. 5.) After reboot, click on the "Install MacOS.." Icon in the clover boot screen to boot the newly created macOS Mojave 10.14 Installer Partition on your system disk. 6.) After successful boot, you will enter now the macOS Mojave 10.14 Installer Screen with a progress bar starting at 43 minutes. 7.) After another reboot, click on the "MacOS Mojave" icon in the clover boot screen to boot the updated macOS Mojave 10.14 on your system disk. 8.) After successful boot you have to register at iCloud at the end of the macOS installation, and you will now have your first iMac Pro macOS Mojave 10.14 build. Proceed with Section D.6) - iMac Pro macOS High Sierra Build Updates (if necessary) or Section E.) - Post Installation Process. D.6) iMac Pro macOS 10.14 Mojave Update Procedure If you already used my 10.13 iMacPro Skylake-X/X299 guide to setup a 10.13 iMac Pro macOS build, you simply have to update your EFI-Folder and directly perform the update to macOS 10.14 Mojave from System Disk by else following steps 4.) to 8.) of D.5) above. Any future macOS Mojave update can be directly performed fully vanilla via "Software Update" under "System Preferences". E.) Post Installation Process E.1) HWP (Intel SpeedShift Technology) CPU Power Management Configuration On Skylake-X/X299 Systems with unlocked mainboard BIOS MSR 0xE2 BIOS register and SMBIOS iMacPro1,1 we gain fully native HWP (IntelSpeedShift) Power Management after disabling the last remaining XCPM KernelToPatch entry "xcpm_core_scope_msrs" in the config.plist under Section "Kernel and Kext Patches" of Clover Configurator, which by default is still implemented but disabled in the config.plist of my actual respective X299 EFI-Folder distribution. Users with locked mainboard BIOS MSR 0xE2 register, still have to use the "xcpm_core_scope_msrs" XCPM KernelToPatch entry to successfully boot their systems. Otherwise the OSX Kernel will write to that BIOS register and cause KP at boot! HWP is a way for the processor itself to manage the power consumption, with minor input from OSX on what it thinks it needs. In contrary, XCPM is the OSX power management part. It directly controls older hardware like Broadwell-E/EP or Haswell-E/EP and enables HWP on newer hardware like Skylake-X. It also sets some HWP variables, like the desired frequency at the maximum. XCPM is enabled by default. For it's complete configuration, XCPM still requires the CPU "plugin-type" injection to properly load the required XCPM frequency vectors from the iMacPro.plist, which can be directly achieved within the config.plist by checking "PluginType" in Section "ACPI" of Clover Configurator. How to verify a working xcpm configuration? a.) Typically the command "sysctl machdep.xcpm.mode" reveals 1, which means that XCPM is active. b.) Verify that in the IORegistryExplorer you have now under CP00@0 the following entry: Property: Type: Value: plugin-type Number 0x1 c.) Also verify with the terminal command: kextstat|grep -y x86plat that the "X86PlatformPlugin.kext" is now loaded. If the command returns something like 112 1 0xffffff7f822bc000 0x17000 0x17000 com.apple.driver.X86PlatformPlugin (1.0.0) FD88AF70-3E2C-3935-99E4-C48669EC274B <111 19 18 13 11 7 6 5 4 3 1> 146 1 0xffffff7f822d3000 0x7000 0x7000 com.apple.driver.X86PlatformShim (1.0.0) DCEA94A4-3547-3129-A888-E9D5C77B275E <112 111 13 7 4 3> d.) Verify with the following terminal command: kextstat|grep -y appleintelcpu that you got rid of the Apple Intel CPU power management. If the result is empty you are fine. e.) Verify with the following terminal command: sysctl -n machdep.xcpm.vectors_loaded_count If this command returns "1", the XCPM FrequencyVectors are properly loaded and you are all set. E.2) Graphics Configuration Most ATI GPUs, e.g. RX Vega 64, RX Vega Frontier, RX 580, RX 560 are supposed to be "natively" implemented. It is commonly recommended not to use RX 560 and RX 580 GPUs due to the lacking iGPU implementation when using SMBIOS iMacPro1,1. With macOS 10.14.5 Beta 1, also the new Radeon VII is now natively implemented.By means of my RadeonVII/Vega64/Vega56/RX560/RX580 SSDTs, available in my respective X299 SSDT Github repository, and Whatevergreen.kext, all available DP and HDMI ports, including multi-monitor support, display HotPlug and system sleep/wake should be automatically and successfully implemented. Whatevergreen.kext only seems required for all Vegas possessing less than 6 physical ports (including the original Vegas like Frontier and Vega 64), else the current AMD SSDTs do pretty well their job. Important additional comment for all Vega users with 4K monitors though: when connecting a Vega with e.g. the LG 38UC99-W (WUHD, 3840 pix x 1600 pix) via one of the Display Ports (DPs), the screen resolution is fine under both Windows 10 and macOS High Sierra but is totally at odd during boot (VGA like boot screen resolution). The VEGA DP 4K boot screen resolution issue is neither related with the fact that the LG 38UC99-W is an ultra-wide (3840x1600) and not a true UHD (3840x2160) monitor nor related to any likely apparent issue with the ASUS Prime X299 Deluxe firmware. It is definitely a Vega firmware problem in combination with most 4K displays, as the DP 4K boot screen resolution issue is totally absent with any Nvidia GPU and the problem also does not only affect the ASUS Splash Screen but also spreads over the entire boot process until the login screen is reached (Windows and macOS). Splash Screen, Apple logo or verbose boot messages are not stretched but rather have VGA like resolution. Any fix of the AMD vBIOS would be highly appreciated. It is more than disappointing to witness such issues with 600-1000$ GPUs... Fortunately, the 4K boot screen issue is restricted to the Vega DP ports and likely due to the fact that the LG 38UC99-W only supports DP 1.2. Solution: Connect your Vega and your 4K display via the HDMI port. The 30 Hz HDMI monitor frequency issue under 10.13 is successfully removed under Mojave: monitor frequency of 60 Hz with the display connected via HDMI (in contrary to 75 Hz via DP). Also Nvidia Kepler Graphics Cards are natively implemented. All Users with Nvidia Maxwell and Pascal Graphics Cards Users still have to wait for the official release of 10.14 Web Drivers. I was actively requesting Web Driver development for macOS 10.14 Betas from Nvidia, which has been rejected. I really hope that Nvidia will not leave the respective community again without Web Driver support. In the meanwhile, Nvidia GPU users have to live with e.g. patched Web Driver xxx.40.105 for macOS High Sierra 10.13.6 after a simple patching procedure detailed below, although the latter Web Driver is not really suited for 10.14 and works without hardware acceleration. How to patch an Nvidia WebDriver: Download the Nvidia WebDriver-Payload Repackager from InsanelyMac. Credits to @Chris111 and @Pavo. The patch procedure is simple and fully described in the implemented Readme.txt and will reveal a Repackaged-WebDriver.pkg, which can be used for installing e.g. the patched Nvidia Web Driver xxx.40.105 under macOS Mojave 10.14. Nvidia Web Driver Installation and Black Screen Prevention: Apparently with SMBIOS iMacPro1,1, the Nvidia Black Screen Prevention has become obsolete. Thanks to @fabiosun for this finding. Thus, Whatevergreen.kext, subverting AppleMobileFileIntegrity banning the driver can be theoretically removed from the /EFI/CLOVER/kexts/Other/ directory of your macOS Flash Drive Installer and 10.13 System Disk. However, the actual releases of Whatevergreen.kext and Lilu.kext apparently help in fixing the Nvidia HDAU implementation and sporadic black screen issues while wake from sleep. Thus, the latter kext combination might still represent potential workarounds for few likely remaining Nvidia GPU system issues. a.) Install the patched Nvidia 10.13 Web Driver Package. b.) Now perform the following additional steps: i.) Copy /L/E/NVDAStartupWeb.kext to your Desktop. ii.) Right-click on NVDAStartupWeb.kext and select show package content. iii.) Change to "Contents" and edit the "Info.plist" with Xcode. iv.) Go to IOKitPersonalities -> NVDAStartup -> change "NVDARequiredOS" from "17G65" to "18D45", the corresponding build number of MacOS Mojave 10.14.3. v.) Save the "Info.plist" file and copy the modified "NVDAStartupWeb.kext" to /L/E/ with root permission. vi.) Open a terminal and enter the following commands: sudo chmod -R 755 /Library/Extensions/NVDAStartupWeb.kext sudo chown -R root:wheel /Library/Extensions/NVDAStartupWeb.kext sudo touch /System/Library/Extensions && sudo kextcache -u / sudo touch /Library/Extensions && sudo kextcache -u / vii.) Reboot. viii.) The patched Web Driver might not be active yet. Therefore, open the Nvidia Driver Manager and select "Nvidia Web Driver". ix.) Now reboot as requested and you will have a Web Driver implementation for MacOS Mojave 10.14. E.3) Audio Configuration Note that my actual respective X299 EFI-Folder distribution does not contain any default audio configuration. You have to implement the audio approach of your choice during the Post Installation process! Please select between one out of three possible audio implementations detailed below. To avoid the loss of analogue onboard audio (S1220A in case of the ASUS Prime X299 Deluxe) on Wake from Sleep, please download, unzip and copy the latest CodecCommander.kext distribution of [USER=429483]@RehabMan[/USER] from bitbucket.org to the /EFI/Clover/kexts/Other directory in the EFI-Folder of your System Disk: https://bitbucket.org/RehabMan/os-x-eapd-codec-commander/downloads/. E.3.1.) AppleALC Audio Implementation The actual AppleALC audio implementation traces back to the extensive efforts and brilliant work of @vit9696 and @apfelnico. This new AppleALC audio approach requires latest versions of AppleALC.kext and Lilu.kext in the /EFI/CLOVER/kexts/Other/ directory of your System Disk. Provided that you use my actual respective X299 EFI-Folder distribution, you need to open the config.plist in the /EFI/CLOVER/ directory of your System Disk with the Clover Configurator and add the CAVS -> HDEF ACPI replacement patch in Clover Configurator Section "ACPI" under "DSDT Patches". Comment: Find*[Hex] Replace [Hex] CAVS -> HDEF 43415653 48444546 When implementing the SSDT in Section 9.2), we will perform the CAVS -> HDEF ACPI replacement directly within the SSDT. We then have to remove again the CAVS -> HDEF ACPI replacement from the config.plist! Note that opposite to the alternative VoodooHDA and CLoverALC approach detailed below, the AppleALC audio implementation requires an Audio ID in injection of "7" instead of "1". Implement the latter Audio ID in the config.plist of your System Disk under "Audio" and "Injection" in the Section "Devices" of the Clover Configurator. The correct HDAU HDMI/DP digital Audio PCI implementation will be detailed in Section E.9) in line with the HDEF and GPU PCI device implementation. To remove the AppleALC Audio Approach Implementation perform the following steps: 1.) Remove AppleALC.kext from the /EFI/CLOVER/kexts/Other/ directory of your System Disk. 2.) Disable in the config. plist the CAVS -> HDEF DSDT Replacement Patch in Clover Configurator Section "ACPI" under "DSDT Patches". 3.) Adopt the Audio ID Injection in your respective config.plist in Clover Configurator Section "Devices" for the alternative audio approach you intent to use. 4.) Reboot E.3.2) VoodooHDA Audio Implementation 1.) Provided that you use my actual respective X299 EFI-Folder distribution, you need to open the config.plist in the /EFI/CLOVER/ directory of your System Disk with the Clover Configurator and enable the CAVS -> HDEF ACPI Replacement Patch in Clover Configurator Section "ACPI" under "DSDT Patches". Comment Find*[HEX] Replace*[HEX] Rename CAVS to HDEF 43415653 48444546 When implementing the SSDT in Section 9.2), we will perform the CAVS -> HDEF ACPI replacement directly within the SSDT. We then have to remove again the CAVS -> HDEF ACPI replacement from the config.plist! 2.) Download VoodooHDA.kext v2.9.0d10 to your Desktop. Mouse Right-Click on VoodooHDA.kext -> select "Show Package Contents" -> click on "Contents" -> Right-Click on "Info.plist" -> "Open With" -> "Other" -> select "TextEdit.app" 3.) a.) In the TextEdit.app select in the menu "Edit" -> "Find" -> "Find..." -> search for "IOPCIClassMatch" and replace <key>IOPCIClassMatch</key> <string>0x04020000&0xfffe0000</string> with <key>IOPCIPrimaryMatch</key> <string>0x43831002</string> b.) Download, unzip and run IORegistryExplorer. Search for HDEF and write down the "IOName"-entry under e.g. PC00@0/AppleACPIPCI/HDEF@1F,3 which can slightly deviate on mainboards different from the ASUS Prime X299 Deluxe. The HDEF-IOName on the ASUS Prime X299 Deluxe is "pci8086,a2f0" Concert the IOName as shown below in case of the HDEF-IOName of the ASUS Prime X299 Deluxe: "0xa2f08086" c.) Now replace in the "Info.plist" of "VoodooHDA.kext" "0x43831002" by "0xa2f08086" and save the "Info.plist". d.) Copy the modified "VoodooHDA.kext" to the /EFI/Clover/kexts/Other/ - directory of your System Disk. 4.) Download and copy the VoodooHDA.prefPane v1.2 attached below to ~/Library/PreferencePanes/ 5.) Note that the VoodooHDA audio approach requires an Audio ID in injection of "1". The corresponding modification of the config.plist has to be implemented by means of the Clover Configurator by modifying the respective entry in Section "Devices". 6.) Reboot To remove the VoodooHDA audio implementation, perform the following steps: 1.) Disable in the config. plist the CAVS -> HDEF ACPI Replacement Patch in Clover Configurator Section "ACPI" under "DSDT Patches". 2.) Remove VoodooHDA.kext from the /EFI/CLOVER/kexts/Other/ directory of your System Disk. 3.) Remove VoodooHDA.prefPane from ~/Library/PreferencePanes/ 4.) Adopt the Audio ID Injection in your config.plist in Section "Devices" of the Clover Configurator for the alternative audio approach you intent to use 5.) Reboot E.3.3) cloverALC Audio Implementation @toleda 's cloverALC audio approach has been implemented thanks to the respective advices and help of user @Ramalama. Note that in contrary to the AppleALC and VoodooHDA approaches, the cloverALC audio approach detailed below will patch the native vanilla AppleHDA.kext in the /S/L/E directory of your System Disk! This before implementing the cloverALC audio approach, backup your native vanilla AppleHDA.kext from the /S/L/E directory on your System Disk! You will have to reinstall the native vanilla AppleHDA.kext from the /S/L/E directory on your System Disk with the appropriate permissions during a removal of the cloverALC Audio Implementation! Thus you need a backup of the latter native vanilla kext in any case! CloverALC audio approach installation: 1.) Provided that you use my actual respective X299 EFI-Folder distribution, you need to open the config.plist in the /EFI/CLOVER/ directory of your System Disk with the Clover Configurator and enable the CAVS -> HDEF ACPI Replacement Patch in Clover Configurator Section "ACPI" under "DSDT Patches". Comment Find*[Hex] Replace[Hex] Rename CAVS to HDEF 43415653 48444546 When implementing the SSDT in Section 9.2), we will perform the CAVS -> HDEF ACPI replacement directly within the SSDT. We then have to remove again the CAVS -> HDEF ACPI replacement from the config.plist! 2.) Change the Audio ID Injection in the config.plist on your System Disk in Section "Devices" under "Audio" and "Inject" to "1". 3.) Add the following cloverALC related KextToPatch entries to your config.plist on your System Disk in section "Kerneland Kext Patches" of Clover Configurator in the "KextsToPatch" listing: Name* Find*[Hex] Replace* [Hex] Comment AppleHDA 8a19d411 00000000 t1-10.12-AppleHDA/Realtek ALC... AppleHDA 8b19d411 2012ec10 t1-10.12-AppleHDA/RealtekALC1220 AppleHDA 786d6c2e 7a6c 7a6d6c2e 7a6c t1-AppleHDA/Resources/xml>zml 4.) Download, unzip and copy the realtekALC.kext v2.8 to the /EFI/CLOVER/kexts/Other/ directory on your System Disk 5.) Download and execute audio_cloverALC-130.sh, which will patch the native vanilla AppleHDA.kext in the /S/L/Edirectory of your System Disk 6.) Reboot To remove the cloverALC audio implementation, perform the following steps: 1.) Remove realtekALC.kext from the /EFI/CLOVER/kexts/Other/ directory on your System Disk 2.) Remove all cloverALC related KextToPatch entries from the config.plist on your System Disk in the "Kernel andKext Patches" section of Clover Configurator. 3.) Disable in the config. plist the CAVS -> HDEF ACPI Replacement Patch in Clover Configurator Section "ACPI" under"DSDT Patches". 4.) Delete the patched AppleHDA.kext in the /S/L/E/ Directory on your System Disk 5.) Reinstall the original vanilla AppleHDA.kext with the appropriate permission in the /S/L/E/ directory on yourSystem Disk using Kext Utility 6.) Adopt the Audio ID Injection in your config.plist in Section "Devices" of the Clover Configurator for the alternative audioapproach you intent to use 7.) Reboot E.4) USB Configuration: Since 10.13 SU and with AppleIntelPCHPMC, Apple implements IOPCIPrimaryMatchID "a2af8068" and AppleUSBXHCISPT also for the ASUS Prime X299 Deluxe. Until 10.14.0, by this all external and internal XHC USB 3.0 (USB 3.1 Gen 1 Type-A) and USB 2.0 (USB 2.0 Gen 1 Type-A) connectors of all X299 mainboards where fully implemented, always provided that one uses a working USB port limit patches. Valid USB port limit patch for 10.14.4 provided by @PMHeart (hardwired but yet disabled in my respective EFI-Folder distribution) by following USB port limit patch approach for 10.14.3 by [USER=1614363]@ydeng[/USER]: USB port limit patch for 10.14.4 provided by @PMheart: kext : com.apple.iokit.IOUSBHostFamily Find : 83FB0F0F 87 Replace : 83FB3F0F 87 Name : USB Port Limit Patch 1 ©PMHeart kext : com.apple.driver.usb.AppleUSBXHCI Find : 4183FF0F 0F83 Replace : 4183FF3F 0F83 Name : USB Port Limit Patch 2 ©PMHeart kext : com.apple.iokit.IOUSBHostFamily Find : 83E30FD3 E34109DF Replace : 83E33FD3 E34109DF Name : USB Port Limit Patch 3 ©PMHeart Former USB port limit patches for 10.14.3 provided by ©ydeng: kext : com.apple.iokit.IOUSBHostFamily Find : 83FB0F0F 871604 00 Replace : 83FB3F0F 871604 00 Name : USB Port Limit Patch 1 ©ydeng kext : com.apple.driver.usb.AppleUSBXHCI Find : 83FB0F0F 838F0400 00 Replace : 83FB3F0F 838F0400 00 Name : USB Port Limit Patch 2 ©ydeng kext : com.apple.iokit.IOUSBHostFamily Find : 83E30FD3 E34109DF Replace : 83E33FD3 E34109DF Name : USB Port Limit Patch 3 ©ydeng However, it is strongly recommended to use board-specific XHC USB kexts in addition. Such board-specific XHC USB kexts can be easily created for any motherboard of any brand by following my respective XHC USB Kext Creation guideline. Being mainboard specific, a XHC USB kext is only valid for one particular mainboard model although users of the same mainboard model naturally can share the same XHC USB kext, if complete and properly implemented without any additional efforts. KGP-iMacPro-ASUS-PX299D-XHCI.kext would be the XHC USB kext for the Prime X299 Deluxe with all 20 ports implemented. However, it is strongly recommend to keep respective USB port limit patches disabled and to use a truncated 15-port kext instead, which might avoid buffer overruns and makes your system more vanilla with respect to future macOS updates. For the truncated 15-port kext, we have to drop some of the 20 HS and SS ports implemented from the kext to stay within Apple's 15 USB port limit. For truncating a fully implemented XHC USB kext (all 20 HS and SS ports implemented), I usually recommend to drop one out of usually two internal USB3.0 connectors (which already reduces the number of implemented ports to 16 for the ASUS Prime X299 Deluxe): To remain within the 15 USB port limit, I also recommend to drop one of the four USB2.0 ports at the backside of the mainboard from the kext (HS09, HS10, HS11 or HS12), which further reduces the number of implemented USB ports by one. Thus, in total we have now 15 implemented HS and SS ports and we just stay within the 15 USB port limit. In the truncated KGP-iMacPro-ASUS-PX299D-XHCI-15port.kext, I removed HS03, HS04, SSP3, SSP4 (assigned to the internal USB3.0 header U31G1_34) and HS12 (assigned to the most left USB2.0 connector on the back panel of the mainboard) from the kext. By this, all other USB2.0 and USB3.0 ASUS Prime X299 Deluxe onboard connectors remain fully functional. Alternatively, one could also drop e.g. HS01, HS01, SSP1, SSP2 (assigned to the internal USB3.0 header U31G1_12) or either HS09, HS10 or HS11 from KGP-iMacPro-ASUS-PX299D-XHCI.kext. Up to your personal taste. All experienced users are kindly invited to provide their fully implemented XHC USB kext and truncated 15-port XHC USB kext for a motherboard not yet being part of the respective XHC USB Kext Library with an implemented port-layout.rtf and by else following the correct kext nomenclatures defined in my XHC USB Kext creation guidelines in line with full motherboard and SMBIOS denominations. Respective XHC USB kexts for the ASUS WS X299 Sage 10G have been kindly provided by @Djlild7hina and are available in the Github repository. However note that DJ7-iMacPro-ASUS-WSX299S10G-XHCI.kext.zip and DJ7-iMacPro-ASUS-WSX299S10G-XHCI-15port.kext.zip are identical as HS/SS ports assigned to the USB3.0 connectors/header of the ASUS WS X299 Sage 10G do not exceed Apple's 15-port Usb limit. Remaining USB ejection issues during sleep/wake likely can be fixed by 3rd party software tools like e.g. mountain.app. E.5.) NVMe Compatibility In contrary to macOS Sierra 10.12 and as already in macOS High Sierra 10.13, under macOS 10.14 Mojave, there is native support of non-4Kn NVMe SSDs, like my Samsung EVO 970 Pro M.2 NVME. All patches applied under macOS Sierra 10.12 are therefore obsolete. The native support of non-4Kn NVMe SSDs enables the unique opportunity to directly perform a clean-install of macOS High Sierra or Mojave on M.2 NVMEs like the Samsung EVO 970 Pro. E.6.) SSD/NVMe TRIM Support: Macs only enable TRIM for Apple-provided solid-state drives they come with. If you upgrade a Mac with an aftermarket SSD/NVMe, the Mac won’t use TRIM with it. The same applies for SSDs/NVMes used by a Hackintosh. When an operating system uses TRIM with a solid-state drive, it sends a signal to the SSD/NVMe every time you delete a file. The SSD/NVMe knows that the file is deleted and it can erase the file’s data from its flash storage. With flash memory, it’s faster to write to empty memory — to write to full memory, the memory must first be erased and then written to. This causes your SSD/NVMe to slow down over time unless TRIM is enabled. TRIM ensures the physical NAND memory locations containing deleted files are erased before you need to write to them. The SSD/NVMe can then manage its available storage more intelligently. Note that the config.plist in my actual respective X299 EFI-Folder distribution, contains an SSD/NVMe "TRIM Enabler" KextsToPatch entry, which can be found in the " Kernel and Kext Patches" Section of the Clover Configurator. Name* Find*[HEX] Replace*[HEX] Comment IOAHCIBlockStorage 4150504c 45205353 4400 00000000 00000000 0000 Trim Enabler With this KextToPatch entry, SSD/NVMe TRIM should be fully enabled on your 10.13 System. See your Apple's System Report. E.7) GC-Titan Ridge / GC-Alpine Ridge or ASUS TBEX 3 Add-in PCIe Adapter Implementation For the successful implementation of the GC-Titan Ridge (recommended), GC-Alpine Ridge (compatible) or ASUS Thunderbolt EX3 (R.I.P) PCIe Add-In Adapters, a fully working Dual Boot System with an UEFI Windows Implementation is unfortunately absolutely mandatory. You will not be able to configure your Thunderbolt 3 Adapter in the mainboard BIOS, until the Adapter has been successfully recognised and initialised by the UEFI Windows System. Fortunately legal and official License Keys for the actual Windows 10 Pro distribution can be purchased with a little bit of temporal effort on Google for an actual price of 20 $ or even below! Thus, the installation of a dual boot system with Windows will require some additional temporal user effort but will not noticeably further affect the users's budget. Please note that I especially emphasize the term UEFI, when speaking about the parallel Windows implementation. Don't use or perform a Legacy Implementation of Windows! In order to properly implement your Windows partition later-on in the Clover Bootloader and to comply with the actual Mainbaord-BIOS settings requirements, it is absolutely mandatory to run or perform an UEFI Windows implementation! So if not already implemented, how to achieve a fully working UEFI Windows Implementation and Dual boot System with Windows? 1.) Important Note! For the implementation of the UEFI Windows Distribution disconnect all usually plugged macOSDrives from your rig! The Windows installer will implement a Windows Boot Loader! If you have any macOS Drive connected during installation, the latter Windows Boot Loader might overwrite and destroy your current Clover Boot Loader. This is the last thing you want! Thus for the windows installation just connect the destination drive for the installation and the Windows USB Flash Drive Installer your will create in the subsequent step below! 2.) This Tutorial explains in all necessary detail how to download an actual Windows 10 Creator distribution, and how tosubsequently create a bootable USB Flash Drive Installer for a subsequent UEFI Windows 10 installation by means RUFUS! Don't put emphasis on alternative optional methods and always take care that you just follow the instructions for a successful subsequent UEFI Windows Installation! 3.) This Tutorial explains in all necessary detail how to properly perform the actual Windows 10 Pro Creator UEFIInstallation, subsequent to the a bootable Windows USB Flash Drive Installer realisation detailed in 2.) above. 4.) This Tutorial explains in all necessary detail, how to migrate/clone/backup your Windows 10 UEFI System Disk afterinstallation for future maintenance and safety. 5.) After successfully performing the UEFI Windows 10 Pro Creator Implementation, you can reconnect your macOS drive to your rig. The newly created UEFI Windows 10 Pro Creator Partition will automatically appear as a further boot option in both BIOS Boot Option Menu (F8) and Clover Boot Menu! No additional or further actions or measurements have to be taken! 6.) Once your Windows 10 Pro Creator Partition is fully operational, install all drivers and programs implemented on the ASUS Prime X299 Deluxe/WS X299 Sage 10G Series DVD attached to your mainboard. This will further allow you to properly adjust the desired AURA Mainboard Settings and offer many other mainboard configuration options. 7.) Now switch off your rig and start with the installation of our Thunderbolt 3 Add-In PCIe Adapter On the ASUS Prime X299 Deluxe, I recommend to install any Thunderbolt 3 Add-In PCIe Adapter in the 4th PCIe Slot from top, which is PCIEX_3, while on the ASUS WS X299 Sage 10G any Thunderbolt 3 Add-In PCIe Adapter must be in the second slot from top PCIEX_2 by default. 8.) Reboot into windows and install accompanying TB3 PCIe Drivers and Software. 9.) Reboot and enter the Mainboard BIOS (F2) Go to /Advanced/ Thunderbolt(TM) Configuration/ and apply the following BIOS Settings detailed below: /Advanced/ Thunderbolt(TM) Configuration/ TBT Root por Selector PCIE16_3 (Prime X299 Deluxe) / PCIE16_2 (WS X299 Sage 10G) Thunderbolt USB Support Enabled Thunderbolt Boot Support Enabled Wake From Thunderbolt(TM Devices) Off Thunderbolt(TM) PCIe Cache-line Size 128 GPIO3 Force Pwr On Wait time in ms after applying Force Pwr 200 Skip PCI OptionRom Enabled Security Level SL0-No Security Reserve mem per phy slot 32 Reserve P mem per phy slot 32 Reserve IO per phy slot 20 Delay before SX Exit 300 GPIO Filter Enabled Enable CLK REQ Disabled Enable ASPM Enabled Enable LTR Disabled Extra Bus Reserved 65 Reserved Memory 386 Memory Alignment 26 Reserved PMemory 960 PMemory Alignment 28 Reserved I/O 0 Alpine Ridge XHCI WA Enabled 10.) Shut down your rig, connect the Thunderbolt Device to your Thunderbolt 3 Adaptor and boot your system. 11.) You are done! Your Thunderbolt 3 Adapter and the connected device should now be fully implemented and functional. 12.) We will add TB XHC USB and TB HotPlug functionality in Section E.9.2) of this guide. Note that with the GC-Titan Ridge, HotPlug functionality can be gained with the THB_C connected. For HotPlug with the other TB adaptors, the THB-C must be removed from most of the available mainboards. E.8) Gbit and 10-Gbit Ethernet Implementations Section E.8.1) and and E.8.2.) below, describe in all necessary detail how to gain full Gbit and 10-Gbit LAN functionality on Skylake-X/X299 systems. E.8.1) ASUS Prime X299 Deluxe on-board Gbit Ethernet Functionality Thanks to the SmallTree-Intel-211-AT-PCIe-GBE.kext, also the Intel I211_AT Gigabit on-board LAN controller of the ASUS Prime X299 Deluxe will be correctly implemented and fully functional, in addition to the Intel I219-V Gigabyte on-board LAN controller of the ASUS Prime X299 Deluxe implemented by means of IntelMausiEthernet.kext (already part of my EFI-Folder distributions). Thus, both ethernet ports on the ASUS Prime X299 Deluxe should now be fully operational.. Just download , unzip and copy the SmallTree-Intel-211-AT-PCIe-GBE.kext attached below to the /EFI/Clover/kexts/Other/, reboot and you should be done. E.8.2) 10-GBit Lan Implementations ASUS Prime X299 Deluxe on-board Gbit Ethernet Functionality E.8.2.1) ASUS XG-C100C Aquantia AQC107 10-Gbit NIC Starting with 10.13.2 there is native support for the Aquantia AQTION AQC107 10-GBit NIC of the iMac Pro in form of vanilla kext "AppleEthernetAquantiaAqtion.kext", which is further part of "IONetworkingFamily.kext/Contents/PlugIns/" placed in /System/Library/Extensions/ (credits to @mikeboss). First success with the ASUS XG-C100C Aquantia AQTION AQC107 10-GBit PCIe x4 NIC under MacOS 10.13.3 has been reported by @d5aqoep. @Mieze finally came up with a AppleEthernetAquantiaAqtion KextPatch for the use of the ASUS XG-C100C Aquantia AQTION AQC107 10-GBit PCIe x4 NIC also under 10.13.4 and and later macOS versions. How to successfully implement the ASUS XG-C100C Aquantia AQTION AQC107 10-GBit PCIe x4 NIC: 1.) A temporal macOS High Sierra 10.13.3 (17D2047 in case of the iMac Pro) installation is absolutely mandatory at first place. Only within the latter macOS High Sierra build, the ASUS XG-C100C Aquantia AQTION AQC107 10GBit PCIe x4 NIC will receive the proper AQC107 Apple firmware to be recognised and fully implemented by OSX. The firmware update will be performed during system boot. Several boot intents might be necessary until the firmware update finally succeeds. Only subsequently, the ASUS XG-C100C Aquantia AQTION AQC107 10GBit PCIe x4 NIC will be natively implemented in macOS High Sierra 10.13.3 and fully functional. 2.) To finally use the ASUS XG-C100C Aquantia AQTION AQC107 10GBit PCIe x4 NIC with macOS builds >10.13.4 and finally also with 10.14, one has to implement the following AppleEthernetAquantiaAqtion KextPatch provided by @Mieze: Name* Find*[HEX] Replace*[HEX] Comment AppleEthernetAquantiaAqtion 6275696C 742D696E 62626262 62626262 Aquantia built-in patch ©Mieze 3.) The proper XGBE ASUS XG-C100C PCI SSDT implementation is detailed in Section E.9.2) 4.) Note that after the firmware update under macOS High Sierra 10.13.3, the ASUS XG-C100C AQTION AQC107 10GBit PCIe x4 NIC will refuse the official Windows Lan drivers provided by ASUS and will only work with Apple's customised Aquantia64v2.0.015.0 boot camp drivers attached below. Preferable AQC107 10-Gbit NIC PCIe solutions now available on the market are the Syba 1 Port PCIe x4 10GB Aquantia AQTION AQC107 NIC (thanks to @mirwaiz for his respective discovery and for all subsequent confirmation of his findings by @mm2margaret , who also pointed me to this extremely valid approach) and the 1 Port PCIe x4 10GB Aquantia AQtion AQC107 10G Gaming NIC (thanks to @izo1 for respective findings and advises), which are natively implemented under macOS OoB and neither need the above firmware update nor the respective AppleEthernetAquantiaAqtion kext patch. E.8.2.2) Intel X540-T1 10-Gbit NIC Thanks to some Ubuntu EEPROM modding, I also achieved the successful implementation of the Intel X540-T1 single port 10GB LAN PCIe Adapter by means of the Small-Tree 10GB macOS 10.13 driver. Some additional notes to the EEPROM modding guideline provided by the above link. 1.) When creating your Ubuntu USB Flash Drive, use RUFUS 3.0 and select the GPT option to obtain a Ubuntu USB boot drive, fully compatible with your UEFI BIOS implementation! 2.) To install "net-tools", enter the following terminal command sudo apt install net-tools 3.) To install "ethtool" enter the following terminal command: sudo apt-get install ethtool 4.) Within the latest Ubuntu distributions, ETH0, ETH1, etc. have been replaced by some weird "enp" port-nomenclature, thus the command "ifconfig" would reveal something like the following: My Intel X540-T1 was assigned to enp225s0. 5.) With the command "lspci -nn -vvv | grep Ethernet" you have to use in 6.) the Vendor/Device-ID entry highlighted by the green rectangle. 6.) By running the "sudo ethtool -e enp225s0 | less" command and eyeballing the offsets, be aware that the latter can be distributed over two lines: You have to count from left to right 0,1,2,3,4,5,6,7,8,9,a,b,c,d,e,f for each pair of digits for each offset. Thus, the commands I had to run to mod the Intel X540-T1 EEPROM were: sudo ethtool -E enp225s0 magic 0x15288086 offset 0x48e value 0x0a sudo ethtool -E enp225s0 magic 0x15288086 offset 0x48f value 0x00 Note that the "magic" value implemented in this command has been taken from the "lspci -nn -vvv | grep Ethernet" command output, again encircled by a green rectangle: The rest is as described in the EEPROM modding guideline linked above. The proper Intel X540-T1 PCI SSDT implementation is detailed in Section E.9.2) Actually, I am now currently using this adaptor in my X99 system configuration. E.8.2.3) Onboard Intel X550-AT2 10-Gbit NICs of the ASUS WS X299 Sage 10G The same Ubuntu EEPROM modding detailed in E.8.2.2) can be also applied for the 2x onboard Intel X550-AT2 NICs of the ASUS WS X299 Sage 10G. In my case I deduced the following Ubuntu terminal commands for performing the final Ubuntu EEPROM modding: sudo ethtool -E enp179s0f0 magic 0x15638086 offset 0x242 value 0x0a sudo ethtool -E enp179s0f0 magic 0x15638086 offset 0x243 value 0x00 sudo ethtool -E enp179s0f1 magic 0x15638086 offset 0x242 value 0x0a sudo ethtool -E enp179s0f1 magic 0x15638086 offset 0x243 value 0x00 Note that the enp address can vary with the Ubuntu version. E.8.2.4) Small-Tree P2EI0G-2T 10-Gbit NIC The Small-Tree P2EI0G-2T 2-Port 10GB LAN PCIe Adapter constitutes the actual base line in my X299 10Gbit LAN configuration. It works OoB with the Small-Tree 10GB macOS 10.13 driver. The proper Small-Tree P2EI0G-2T PCI SSDT implementation is detailed in Section E.9.2) E.8.2.5) NetGear ProSave XS508M 8-port 10-Gbit Switch As already mentioned above, the NetGear ProSave XS508M 8-port 10GBit switch constitutes the turntable of my 10-GBit Ethernet Network. It further connects with a QNAP TS-431X2 Quad-core 4-Bay NAS tower with Built-in 10GbE SFP+ Port. E.8.2.6) QNAP TS-431X2 Quad-core 4-Bay NAS tower The QNAP TS-431X2 Quad-core 4-Bay NAS tower finally harbours 4x 12 TB Seagate IronWolf drives in RAID 0 configuration (as I rather opt for read/write speed than redundancy). E.8.2.7) 10-GBit Ethernet Optimisation 1.) Use SMB 3.0 instead of AFS for your Ethernet communication. 2.) Enable Jumbo Frames on your NAS and macOS network settings. 3.) The service order in your macOS network settings should have your 10-Gbit NIC at first position. 4.) You can turn off the SMB packet signing of the client and server in a secure network. Incoming SMB Enter the following terminal commands: sudo -s echo "[default]" >> /etc/nsmb.conf echo "signing_required=no" >> /etc/nsmb.conf exit Outgoing SMB: Enter the following terminal commands: smbutil statshares -a sudo defaults write /Library/Preferences/SystemConfiguration/com.apple.smb.server SigningRequired 0 E.9) ASUS Prime X299 Deluxe / WS X299 Sage 10G PCI Device Implementation In order to properly implement all PCI device drivers on his/her system and build, one needs adequate ACPI DSDT Replacements and a sophisticated system SSDTs. Both requirements have been originally successfully implemented for the ASUS Prime X299 Deluxe by our gorgeous @apfelnico. Many thanks for the extensive efforts and extremely fruitful and brilliant work! Subsequently, I adopted the ACPI DSDT Replacements and system SSDTs in concordance with SMBIOS iMacPro1,1. Some ACPI DSDT Replacements are still part of the config.plist contained in my actual respective X299 EFI-Folder distribution. Others are part of my System SSDTs provided in my X299-System-SSDTs Github repository.Note that the ACPI DSDT Replacements in config.plist and System SSDTs are build and PCIe slot population dependent and have to be verified and adopted or modified for all mainboards different from the ASUS Prime X299 Deluxe and builds or PCIe slot populations different from the one that constitutes the baseline of this guide. For the ASUS Prime X299 Deluxe and ASUS WS X299 Sage 10G I will use in the following the PCIe Slot nomenclature depicted below: ASUS Prime X299 Deluxe: ASUS WS X299 Sage 10G: The verification and likely adaptation/modification can be performed by the help of IORegistryExplorer. How to adopted or modify the ACPI DSDT Replacement Patches and System SSDT implementations is detailed within this short guideline by means of the OSXWIFI PCIe Adaptor implementation in PCIe Slot-3. I hope that by this specific example it rapidly becomes evident that the correct PCI Device implementation cannot be outlined for each individual "build-in" or "slot-specific" PCI device within this guide. The complexity and effort would just exceed by far all available capacities and indeed require the implementation of a separate guide and thread in addition. I therefore hope on your skills and flexibility to extend and apply the approach and methodology detailed above to any other "build-in" or "slot-specific" PCI device yet to be adopted or implemented Important Note: It is strongly recommend to perform a stepwise SSDT PCI Device implementation, starting with one single specific PCI device. Once this PCI device has been successfully implemented, another SSDT PCI Device module can be added and verified. In case that the implementation of a specific PCI Device would be erroneous and fail, it would simply disappear from Section "PCI" of Apple's System report. To facilitate the stepwise PCI device implementation, the former SSDT-X299-iMacPro.aml has been split into separated modules now forming part of my X299-System-SSDTs Github repository. Also keep always in mind to modify/adopt the ACPI replacements in your config.plist in parallel when ever necessary! Note once more that the ACPI DSDT Replacements in config.plist and System SSDTs require SMBIOS iMacPro1,1. E.9.1) ACPI DSDT Replacement Implementation Note once more that all required ACPI DSDT Replacements are already implemented in the config.plist in the /EFI/CLOVER/ directory of my actual respective X299 EFI-Folder distribution or are directly part of the System SSDTs provided in my X299-System-SSDTs Github repository. In the config.plist, the ACPI DSDT Replacements are disabled by default, thus we will now open the config.plist in the /EFI/CLOVER/ directory of our 10.14 System Disk EFI-Folder with Clover Configurator and stepwise adopt (if necessary) and enable the different required DSDT replacement patches in Clover Configurator Section "ACPI" under "DSDT patches", by also discussing their respective function and impact. a.) The PC00 -> PCI0 ACPI DSDT replacement patch has the main aim to achieve a SMBIOS iMacPro1,1specific PCI implementation. Note that under SMBIOS iMacPro1,1 all other PC0x definitions remain unchanged. Please enable now the PC0x -> PCIx ACPI DSDT replacement patch. Comment: Find*[Hex] Replace [Hex] PC00 -> PCI0 50433030 50434930 b.) OSI -> XOSI, EC0_ -> EC__ and H_EC -> EC__ are once more ACPI DSDT replacement patches to achieveconsistency with the SMBIOS iMacPro1,1 variable naming. i.) XOSI functionality is required as explained by @RehabMan. The ACPI code can use the_OSI method (implemented by the ACPI host) to check which Windows version is running. Most DSDT implementations will vary the USB configuration depending on the active Windows version. When running OS X, none of the DSDT _OSI("Windows <version>") checks will return "true" as there is only response from "Darwin". This issue can be solved by implementing the "OS Check Fix" family of DSDT patches in the SSDT. By DSDT patching we can simulate a certain version of Windows although running Darwin and we can obtain a system behaviour similar to a windows version specific environment. ii.) On the Asus X299 Prime Deluxe / WS X299 Sage 10G and most likely on all other X299 mobos we have the EC0 and H_EC controllers,which have to be renamed to 'EC' for proper USB power management. Thus once more investigate your mainboard specific IOREG entry and enable both EC0_ -> EC__ or and H_EC -> EC__ DSDT Replacement Patches. Comment: Find*[Hex] Replace [Hex] OSI -> XOSI 5f4f5349 584f5349 EC0_ -> EC__ 4543305f 45435f5f H_EC -> EC__ 485f4543 45435f5f c.) The HEC1 -> IMEI and IDER->MEID ACPI DSDT Replacement patches are Intel Management Engine Interface relatedand are vital as MacOS requires the variable names "IMEI" and "MEID" to load the 'AppleIntelMEIDriver'. The latter functionality solves the 'iTunes/Apple Store Content Access Problem' which is discussed here. Please enable now both ACPI DSDT Replacement patches independent from your mainboard. Comment: Find*[Hex] Replace [Hex] HEC1 -> IMEI 48454331 494d4549 IDER->MEID 49444552 4d454944 d.) The LPC0 -> LPCB ACPI DSDT Replacement Patch is AppleLPC and SMBus related and is applied for consistency withthe variable naming on a real Mac. Note that LPCB injects AppleLPC, which however is not required in the X299 environment. X299 Systems seem to have sleep problems with the SMBus properties injected. Thus, LPCB will not be implemented by means of any SSDT. Please enable now this ACPI DSDT replacement patch independent from your mainboard. Comment: Find*[Hex] Replace [Hex] LPC0 -> LPCB 4c504330 4c504342 e.) FPU_->MATH, TMR_->TIMR, PIC_->IPIC are all ACPI DSDT Replacement Patches for consistency with the variablenaming on a real Mac. The variables are however functionless on either our X299 boards or real Macs. Please enable now all three ACPI DSDT Replacement Patches independent from your mainboard. Comment: Find*[Hex] Replace [Hex] FPU_ -> MATH 4650555f 4d415448 TMR_ -> TIMR 544d525f 54494d52 PIC_ -> IPIC 5049435f 49504943 f.) The SMBS._ADR -> XSBU.XADR Replacement frees SBUS two show up in IOREG. In principle we have two devices with the same address, one called SMBS and the other one called SBUS. SBUS will never show up in IOREG as long SMBS exists. But SBUS is exactly the variable we need in concordance with the IOREG from the iMacPro Dump. Please enable now this ACPI DSDT replacement patch independent from your mainboard. Comment: Find*[Hex] Replace [Hex] SMBS._ADR -> XSBU.XADR 534d4253 085f4144 52 58534255 08584144 52 g.) The DSM -> XDSM DSDT replacement patch is vital for loading the SSDT-X299-iMacPro.aml, as all DSM methods used in theoriginal DSDT do have a not compatible structure totally different from the real Mac environment. Without any fix, all DSM methods would be simply ignored. Note that one single device can have only one DSM method, which can assign additional properties to the respective device. Thus please enable the latter DSDT replacement patch completely independent from your mainboard! Comment: Find*[Hex] Replace [Hex] _DSM -> XDSM 5f44534d 5844534d h.) The 56 CPxx -> PRxx replacements are i9-7980XE specific and result in a proper CPU core reordering as well as in a iMac Pro specific CPU core variable naming. All i9-7980XE users can now enable all 56 CPxx -> PRxx replacements. All users of CPUs different from the i9-7980XE have to adopt/modify the 56 CPxx -> PRxx replacements in concordance with their original IOREG CPU core values. Comment: Find*[Hex] Replace [Hex] CP00 -> PR00 43503030 50523030 CP01 -> PR01 43503031 50523031 CP02 -> PR02 43503032 50523032 CP03 -> PR03 43503033 50523033 CP04 -> PR04 43503034 50523034 CP05 -> PR05 43503035 50523035 CP06 -> PR06 43503036 50523036 CP07 -> PR07 43503037 50523037 CP08 -> PR08 43503038 50523038 CP09 -> PR09 43503039 50523039 CP0E -> PR10 43503045 50523130 CP0F -> PR11 43503046 50523131 CP10 -> PR12 43503130 50523132 CP11 -> PR13 43503131 50523133 CP12 -> PR14 43503132 50523134 CP13 -> PR15 43503133 50523135 CP14 -> PR16 43503134 50523136 CP15 -> PR17 43503135 50523137 CP1C -> PR18 43503143 50523138 CP1D -> PR19 43503144 50523139 CP1E -> PR20 43503145 50523230 CP1F -> PR21 43503146 50523231 CP20 -> PR22 43503230 50523232 CP21 -> PR23 43503231 50523233 CP22 -> PR24 43503232 50523234 CP23 -> PR25 43503233 50523235 CP24 -> PR26 43503234 50523236 CP25 -> PR27 43503235 50523237 CP2A -> PR28 43503241 50523238 CP2B -> PR29 43503242 50523239 CP2C -> PR30 43503243 50523330 CP2D -> PR31 43503244 50523331 CP2E -> PR32 43503245 50523332 CP2F -> PR33 43503246 50523333 CP30 -> PR34 43503330 50523334 CP31 -> PR35 43503331 50523335 CP0A -> PR36 43503041 50523336 CP0B -> PR37 43503042 50523337 CP0C -> PR38 43503043 50523338 CP0D -> PR39 43503044 50523339 CP16 -> PR40 43503136 50523430 CP17 -> PR41 43503137 50523431 CP18 -> PR42 43503138 50523432 CP19 -> PR43 43503139 50523433 CP1A -> PR44 43503141 50523434 CP1B -> PR45 43503142 50523435 CP26 -> PR46 43503236 50523436 CP27 -> PR47 43503237 50523437 CP28 -> PR48 43503238 50523438 CP29 -> PR49 43503239 50523439 CP32 -> PR50 43503332 50523530 CP33 -> PR51 43503333 50523531 CP34 -> PR52 43503334 50523532 CP35 -> PR53 43503335 50523533 CP36 -> PR54 43503336 50523534 CP37 -> PR55 43503337 50523535 Resulting CPU Core Implementation: E.9.2) System SSDT PCI Device Implementation ASUS Prime X299 Deluxe ASUS WS X299 Sage 10G For the proper PCI device driver implementation (detailed in the figure above), within my X299-System-SSDTs Github repository one finds two sets of system SSDTs for the ASUS Prime X299 Deluxe and the ASUS WS X299 Sage 10Grespectively, which partly need to be modified/adapted/extended, depending on the user specific motherboard, device or PCIe Slot population/configuration. How to adopted or modify ACPI path, ACPI replacements and respective SSDT Device definitions is detailed within this short guideline by means of the OSXWIFI PCIe Adaptor implementation in PCIe Slot-3 of the ASUS Prime X299 Deluxe. Further note, that any PCIe devices in respective PCIe slots on e.g. the ASUS WS X299 Sage 10G, sharing the same PCI device on different PCI bridges, like PC02.BR2A.SL05 in case of the ANS1 NVME controller in Slot-1 (PCI bridge @10) and in case of the ARPT OSXWIFI Broadcom BCM94360CD BT/WIFI PCIe Adapter in Slot-3 (PCI bridge @08), need to be implemented in the same system SSDT, like in case of SSDT-X299-Slot1-Slot3-PC02-BR2A-SL05-ANS-ARPT.aml for the ASUS WS X299 Sage 10G.Note that each SSDT contains a DefinitionBlock entry and the underlying PCI device implementation. In case of necessary modifications/adaptations, don't forget to also modify/adapt the respective DefinitionBlock entries in concordance with your IOREG entries. The entire SSDT structure is now completely module like. Each module can be independently added, changed or removed in dependence of your specific build, needs and requirements. A stepwise implementation of the individual PCI device modules is highly recommended!E.9.2.1) - HDEF - onboard PCI Audio Controller PCI Implementation:The SSDT-X299-HDEF.aml onboard Realtek ALC S1220A Audio Controller chipset HDEF PCI device implementation is valid for the ASUS Prime X299 Deluxe / ASUS WS X299 Sage 10G and likely for all other mainboards with the same Audio Controller chipset. It is a build-in device and does not have any slot specific dependency. Note the CAVS -> HDEF replacement directly performed within the SSDT!E.9.2.2) - GFX0, HDAU - GPU and HDMI/DP Audio PCI implementation: A.) Radeon RX Vega 64 GPUs The SSDT-X299-Vega.aml GFX0 and HDAU PCI device implementation is valid for SMBIOS iMacPro1,1 (GFX0), the ASUS Prime X299 Deluxe and any Radeon RX Vega 64 GPU implemented in PCIe Slot 1.It is a build and PCIe slot population dependent device implementation. Vega GPU users with more than one graphics card, with with a Vega graphics card in a PCIe slot different from PCIe Slot 1 or with a mainboard different from the ASUS Prime X299 Deluxe, will have to adopt the respective device path entries PC02.BR2A, ACPI DSDT replacements and PCIe Slot definition following their respective IOREG entries. Note in this context the actual SL05 -> PEGP ACPI DSDT replacements directly performed within the SSDT.The above default Vega PCI device implementation performs an OC of an air-flow Nitro+ Vega 64 GPU of up to 1630 Mhz while considering an IDLE fan speed of 1500 Mhz. This seems sufficient to remain with GPU temps of about 80 deg C under GPU load conditions (e.g. Valley Benchmark), while not exceeding any comfortable noise level.The latter Vega properties are achieved by means of a sophisticated "PP_PhmSoftPowerPlayTable" and "PP_DisablePowerContainment" and "PP_FuzzyFanControl" SSDT implementation.Everybody can change the respective Vega properties by means of VTGTab-en.app, which provides a modified "PP_PhmSoftPowerPlayTable" (output-file VegaTab_64_data.txt), which can replace the "PP_PhmSoftPowerPlayTable", currently implemented in my SSDT-X299-Vega.aml distribution. E.g. users with a water-blocked Nitro+ Vega 64 like myself want to further screw the max. GPU OC frequencies, etc., while others might want to further improve the fan speed behaviour on air-flow Vegas..Below the "PP_PhmSoftPowerPlayTable" for my custom water-blocked Sapphire Nitro+ Vega 64 8B, with P7 Core Frequency of 1680 Mhz, P7 Core Voltage of 1200 mV, P3 Memory Frequency of 1050 Mhz and a Memory Voltage of 1350 mV. PP_PhmSoftPowerPlayTable: with the help of the IORegistryExplorer. 0x9d, 0x02, 0x08, 0x01, 0x00, 0x5c, 0x00, 0x37, 0x07, 0x00, 0x00, 0xec, 0x2b, 0x00, 0x00, 0x1b, 0x00, 0x48, 0x00, 0x00, 0x00, 0x80, 0xa9, 0x03, 0x00, 0xf0, 0x49, 0x02, 0x00, 0x32, 0x00, 0x08, 0x00, 0x00, 0x00, 0x00, 0x00, 0x00, 0x00, 0x00, 0x00, 0x00, 0x00, 0x00, 0x00, 0x00, 0x02, 0x01, 0x5c, 0x00, 0x36, 0x02, 0x2d, 0x02, 0x94, 0x00, 0x85, 0x01, 0xaf, 0x00, 0x19, 0x01, 0x7a, 0x00, 0x8c, 0x00, 0xa3, 0x01, 0x00, 0x00, 0x00, 0x00, 0x59, 0x02, 0x00, 0x00, 0x90, 0x00, 0x8f, 0x02, 0x54, 0x01, 0x2a, 0x01, 0x7e, 0x01, 0x00, 0x71, 0x02, 0x00, 0x71, 0x02, 0x02, 0x02, 0x00, 0x00, 0x00, 0x00, 0x00, 0x00, 0x08, 0x00, 0x00, 0x00, 0x00, 0x00, 0x00, 0x00, 0x04, 0x00, 0x07, 0x00, 0x03, 0x00, 0x05, 0x00, 0x00, 0x00, 0x00, 0x00, 0x00, 0x00, 0x01, 0x08, 0x20, 0x03, 0x84, 0x03, 0xb6, 0x03, 0xe8, 0x03, 0x1a, 0x04, 0x4c, 0x04, 0x7e, 0x04, 0xb0, 0x04, 0x01, 0x01, 0x46, 0x05, 0x01, 0x01, 0x84, 0x03, 0x00, 0x05, 0x60, 0xea, 0x00, 0x00, 0x00, 0xdc, 0x4a, 0x01, 0x00, 0x01, 0x00, 0x77, 0x01, 0x00, 0x02, 0x90, 0x91, 0x01, 0x00, 0x03, 0x6c, 0xb0, 0x01, 0x00, 0x04, 0x01, 0x08, 0xd0, 0x4c, 0x01, 0x00, 0x00, 0x00, 0x80, 0x00, 0x00, 0x00, 0x00, 0x00, 0x00, 0x88, 0xbc, 0x01, 0x00, 0x01, 0x00, 0x00, 0x00, 0x00, 0x00, 0x00, 0x00, 0x00, 0x98, 0xfc, 0x01, 0x00, 0x02, 0x00, 0x00, 0x00, 0x00, 0x00, 0x00, 0x00, 0x00, 0x90, 0x0e, 0x02, 0x00, 0x03, 0x00, 0x00, 0x00, 0x00, 0x00, 0x00, 0x00, 0x00, 0xc4, 0x2f, 0x02, 0x00, 0x04, 0x00, 0x00, 0x00, 0x00, 0x00, 0x00, 0x00, 0x00, 0x70, 0x56, 0x02, 0x00, 0x05, 0x00, 0x00, 0x00, 0x00, 0x01, 0x00, 0x00, 0x00, 0x60, 0x7a, 0x02, 0x00, 0x06, 0x00, 0x00, 0x00, 0x00, 0x01, 0x00, 0x00, 0x00, 0x40, 0x90, 0x02, 0x00, 0x07, 0x00, 0x00, 0x00, 0x00, 0x01, 0x00, 0x00, 0x00, 0x00, 0x03, 0x60, 0xea, 0x00, 0x00, 0x00, 0xdc, 0x4a, 0x01, 0x00, 0x00, 0x90, 0x5f, 0x01, 0x00, 0x00, 0x00, 0x08, 0x28, 0x6e, 0x00, 0x00, 0x00, 0x2c, 0xc9, 0x00, 0x00, 0x01, 0xf8, 0x0b, 0x01, 0x00, 0x02, 0x80, 0x38, 0x01, 0x00, 0x03, 0x90, 0x5f, 0x01, 0x00, 0x04, 0xf4, 0x91, 0x01, 0x00, 0x05, 0xd0, 0xb0, 0x01, 0x00, 0x06, 0xc0, 0xd4, 0x01, 0x00, 0x07, 0x00, 0x08, 0x6c, 0x39, 0x00, 0x00, 0x00, 0x24, 0x5e, 0x00, 0x00, 0x01, 0xfc, 0x85, 0x00, 0x00, 0x02, 0xac, 0xbc, 0x00, 0x00, 0x03, 0x34, 0xd0, 0x00, 0x00, 0x04, 0x68, 0x6e, 0x01, 0x00, 0x05, 0x08, 0x97, 0x01, 0x00, 0x06, 0xec, 0xa3, 0x01, 0x00, 0x07, 0x00, 0x01, 0x68, 0x3c, 0x01, 0x00, 0x00, 0x01, 0x04, 0x3c, 0x41, 0x00, 0x00, 0x00, 0x00, 0x00, 0x50, 0xc3, 0x00, 0x00, 0x00, 0x00, 0x00, 0x60, 0x35, 0x01, 0x00, 0x01, 0x00, 0x00, 0x28, 0x9a, 0x01, 0x00, 0x02, 0x00, 0x00, 0x01, 0x08, 0x00, 0x98, 0x85, 0x00, 0x00, 0x78, 0xb4, 0x00, 0x00, 0x60, 0xea, 0x00, 0x00, 0x50, 0xc3, 0x00, 0x00, 0x01, 0x78, 0xff, 0x00, 0x00, 0x40, 0x19, 0x01, 0x00, 0xb4, 0x27, 0x01, 0x00, 0x50, 0xc3, 0x00, 0x00, 0x02, 0x80, 0x38, 0x01, 0x00, 0xdc, 0x4a, 0x01, 0x00, 0xdc, 0x4a, 0x01, 0x00, 0x50, 0xc3, 0x00, 0x00, 0x03, 0xdc, 0x4a, 0x01, 0x00, 0x90, 0x5f, 0x01, 0x00, 0x90, 0x5f, 0x01, 0x00, 0x50, 0xc3, 0x00, 0x00, 0x04, 0x90, 0x5f, 0x01, 0x00, 0x00, 0x77, 0x01, 0x00, 0x90, 0x5f, 0x01, 0x00, 0x50, 0xc3, 0x00, 0x00, 0x05, 0x00, 0x77, 0x01, 0x00, 0x90, 0x91, 0x01, 0x00, 0x90, 0x5f, 0x01, 0x00, 0x50, 0xc3, 0x00, 0x00, 0x06, 0x6c, 0xb0, 0x01, 0x00, 0x6c, 0xb0, 0x01, 0x00, 0x00, 0x77, 0x01, 0x00, 0x50, 0xc3, 0x00, 0x00, 0x07, 0xc0, 0xd4, 0x01, 0x00, 0xc0, 0xd4, 0x01, 0x00, 0x90, 0x91, 0x01, 0x00, 0x50, 0xc3, 0x00, 0x00, 0x01, 0x18, 0x00, 0x00, 0x00, 0x00, 0x00, 0x00, 0x00, 0x0b, 0xe4, 0x12, 0xdc, 0x05, 0xfc, 0x08, 0x41, 0x00, 0x0f, 0x00, 0x54, 0x03, 0x90, 0x01, 0x90, 0x01, 0x90, 0x01, 0x90, 0x01, 0x90, 0x01, 0x90, 0x01, 0x90, 0x01, 0x00, 0x00, 0x00, 0x00, 0x00, 0x02, 0x04, 0x21, 0x07, 0x08, 0x01, 0x08, 0x01, 0x08, 0x01, 0x2c, 0x01, 0x00, 0x00, 0x4a, 0x00, 0x69, 0x00, 0x4a, 0x00, 0x4a, 0x00, 0x5f, 0x00, 0x73, 0x00, 0x73, 0x00, 0x64, 0x00, 0x40, 0x00, 0x90, 0x92, 0x97, 0x60, 0x96, 0x00, 0x90, 0x46, 0x00, 0x00, 0x00, 0x00, 0x00, 0x00, 0x00, 0x00, 0x00, 0x00, 0x00, 0x00, 0x00, 0x00, 0x00, 0x00, 0x00, 0x02, 0x02, 0xd4, 0x30, 0x00, 0x00, 0x02, 0x10, 0x60, 0xea, 0x00, 0x00, 0x02, 0x10 Note that I also changed the Nitro+ Vega 64 firmware to https://www.techpowerup.com/vgabios/200283/200283 (at BIOS jumper position 1). Don't forget to backup the original firmware, in case you return it to the seller! This thread might provide additional information in this context: https://forums.macrumors.com/threads/amd-polaris-vega-gpu-macos-support.2083168/.As already mentioned before, within my current Vega SSDT PCI device implementation, all available ports on the Gigabyte Vega 64 (3x HDMI, 3x DP), including multi-monitor support and display hot plug are automatically and successfully implemented. However, it seems that DP-port issues (black screen) remain, when employing the respective Vega SSDT PCI device implementation on Sapphire Nitro+ Vega 64 (2x HDMI, 2xDP) or ASUS Strix Vega 64 (2x HDMI, 2x DP, 1x DVI) GPUs, which only can be removed by adding Whatevergreen.kext v.1.2.2. Within such configuration, multi-monitor support and display hot plug can be fully achieved also in case of the latter custom Vegas (both 10.13.6 and 10.14.0). Whatevergreen.kext only seems required for all Vegas possessing less than 6 physical ports (including the original Vegas like Frontier and Vega 64), else the current Vega SSDT PCI device implementation does pretty well it's job, including successful system sleep/wake.. SSDT-X299-Vega-Frontier.aml contains former Kamarang frame buffer SSDT implementation by @apfelnico for 1x Radeon Vega Frontier in PCIe Slot 1 of ASUS Prime X299 Deluxe. For any AMD RX Vega 64 in Slot-5 under PCI device PC01.BR1A.SL01 on PCI bridge @10, one finds a dedicated system SSDT SSDT-X299-Slot5-PC01-BR1A-SL01-Vega64.aml in the ASUS WS X299 Sage 10G subdirectory of the X299 SSDT Github repository. Be careful though, the implemented OC load table is for my water blocked Nitro+ RX Vega 64 and should not be used for any Vegas with air flow fan cooling. Latter users should implement the load table from SSDT-X299-Vega64.aml for the ASUS Prime X299 Deluxe or generate their own GPU load table suited for their respective Vega 64 hardware implementation. B.) Radeon VII, Vega56, RX560 and RX580 GPUsNote that there also Radeon VII, Vega56, RX580 and RX560 SSDTs available in my X299 SSDT Github repository, which likely need to be adopted depending on your motherboard and GPU PCIe slot population by following your original IOREG ACPI table information. C.) Nvidia GPUs The actual SSDT-X299-Nvidia.aml GFX0 and HDAU PCI device implementation is valid for SMBIOS iMacPro1,1 (GFX0), the ASUS Prime X299 Deluxe and any Nvidia Graphics Card implemented in PCIe Slot 1.It is a build and PCIe slot population dependent device implementation. Nvidia Graphics Card users with more than one graphics card, with a Nvidia graphics card in a PCIe slot different from PCIe Slot 1 or with a mainboard different form the ASUS Prime X299 Deluxe, will have to adopt the respective device path entries PC02.BR2A, ACPI DSDT replacements and PCIe Slot definitions following their respective IOREG entries. Note in this context the actual SL05 -> PEGP and PEGP -> GFX0 ACPI replacements directly performed within the SSDT.Also note that with 10.13.4, Apple changed the com.apple.driver.AppleHDAController implementation. To make the NVIDIA HDAU PCI device driver work for e.g. a GeForce GTX 1080 Ti, one needs to add the following KextToPatch entry in Section "Kernel and kext Patches" of Clover Configurator, as already implemented but yet disabled in the config.plist contained in my actual respective X299 EFI-Folder distribution: Name* Find* [HEX] Replace* [HEX] Comment com.apple.driver.AppleHDAController DE100B0E DE10EF10 FredWst DP/HDMI patch Thus, please all Nvidia users enable and like adopt the NVIDIA HDAU patch for your particular Nvidia GPU in dependence of the respective device-id.Credits to @FreedWst and thanks to @fabiosun for pointing me to this solution. Users of Whatevergreen.kext might be able to drop this KextToPatch entry, as the latter kext already properly implements the Nvidia HDAU PCI driver. E.9.2.3) - PMCR - onboard Power Management Controller (PMC) PCI Implementation:The SSDT-X299-PMCR.aml onboard Power Management PMCR PCI device implementation should be valid for all X299 mainboards and should not require any build specific adaptation/modification. Note the PMC1 -> PMCR ACPI replacement directly performed within the SDDT.E.9.2.4) - USBX:When using the XHCI device name for USB (see the XHCI PCI Device Implementation below), one observes a bunch of USB Power Errors when booting the system. The SSDT-X299-USBX.aml PCI device implementation fixes this errors.E.9.2.5) - XHCI - onboard Extended Host Controller Interface (XHCI) PCI Implementation:The SSDT-X299-XHCI.aml USB3.0 ASMedia ASM1074 / Intel X299 Series Chipset XHCI PCI device implementation is valid for the ASUS Prime X299 Deluxe / ASUS WS X299 Sage 10G and for all other X299 mainboards with the same XHC controller chipset. Verify and adopt/modify if necessary device path "PCI0.XHCI" and XHCI PCI device implementation by means of IOREG.E.9.2.6) - XHC2,3,4 - ASMedia ASM3142 USB 3.1 Controller PCI Implementation:The SSDT-X299-XHC.aml onboard ASMedia ASM3142/ASM1543 USB 3.1 XHC2,XHC3,XHC4 controller PCI device implementation is valid for the ASUS Prime X299 Deluxe and for all other X299 mainboards with the same XHC USB3.1 controller ASMedia ASM3142 chipset configuration. Note the following ACPI ReplacementsPCI0.RP01.PXSX -> PCI0.RP01.XHC2PCI0.RP05.PXSX -> PCI0.RP01.XHC3PCI0.RP07.PXSX -> PCI0.RP01.XHC4within the SSDT in concordance with the respective SMBIOS iMacPro1,1 variable naming. Verify and adopt/modify if necessary the corresponding "PCI0.RP01.XHC2", "PCI0.RP05.XHC3", "PCI0.RP07.XHC4" PCI device implementations by means of IOREG. Note that there is a separate SSDT-X299-XHC.aml device implementation for the ASMedia ASM3142 USB3.1 XHC1 and XHC2 controllers on the ASUS WS X299 Sage 10G in the ASUS WS X299 Sage 10G subdirectory of the X299 SSDT Github repository.E.9.2.7) ANS1, ANS2 - Apple NVMe Controller PCI Implementation:The SSDT-X299-ANS.aml Apple NVMe Controller ANS1 and ANS2 PCI implementations are of purely cosmetic nature and are valid for the ASUS Prime X299 Deluxe. Note the following ACPI ReplacementsPCI0.RP09.PXSX -> PCI0.RP09.ANS1PCI0.RP21.PXSX -> PCI0.RP21.ANS2performed within the SDDT in concordance with the respective SMBIOS iMacPro1,1 variable naming.Verify and adopt/modify if necessary the "PCI0.RP09.ANS1" and "PCI0.RP21.ANS2" PCI device implementations by means of IOREG. Note that there is a separate SSDT-X299-ANS.aml device implementation for the ASUS WS X299 Sage 10G in the ASUS WS X299 Sage 10G subdirectory of the X299 SSDT Github repository.E.9.2.8) - SAT1 - Intel AHCI SATA Controller PCI Implementation:The SSDT-X299-SAT1.aml onboard Intel AHCI SATA controller PCI device implementation is valid for the ASUS Prime X299 Deluxe / ASUS WS X299 Sage 10G and for all other X299 mainboards with the same AHCI SATA controller chipset. Verify and adopt/modify if necessary device path "PCI0.SAT1" and PCI device implementations by means of IOREG.E.9.2.9) - THSS - Intel Thermal Subsystem Controller Implementation:The SSDT-X299-THSS.aml onboard Intel X299 Series Thermal Subsystem controller PCI device implementation, recently provided by @apfelnico is valid for the ASUS Prime X299 Deluxe / ASUS WS X299 Sage 10G and for all other ASUS X299 mainboards with the same Thermal Subsystem controller chipset.E.9.2.10) XGBE - 10GBit NIC Implementation:SSDT-X299-ACQU.aml, SSDT-X299-X540-T1.aml and SSDT-X299-P2EI0G-2T.aml perform a XGBE (XGBF) PCI implementation of an Acquantia AQC107-AFW, Intel X540-T1 and Small-Tree P2EI0G-2T 10GB NIC, respectively and are mainly of cosmetic nature. For each PCIe Adapter and for different PCIe slot populations or mainboard implementations, the XGBE PCI device implementation needs to be adopted/modified accordingly. This also states for the respective ACPI path entries "PC03", "BR3A" and respective SL09 -> PEGP and PEGP -> XGBE ACPI Replacements (in compliance with the iMac Pro 10GB ACPI variable nomenclature), directly performed within each SSDT. Note that there is a separate XGBE/XGBF PCI device implementation SSDT-X299-ETH.aml available for the 2x Intel X550-AT2 10GB onboard NICs of the ASUS WS X299 Sage 10G, which one finds in the ASUS WS X299 Sage 10G subdirectory of the X299 SSDT Github repository.E.9.2.11) - ETH0/ETH1 - onboard LAN Controller PCI Implementation:Note that the SSDT-X299-ETH.aml Intel I219V2 PCI Express Gigabit Ethernet and Intel I211VA PCI Express Gigabit Ethernet onboard LAN controller ETH0/ETH1 PCI implementations are of pure cosmetic nature and only valid for ASUS Prime X299 Deluxe or X299 mainboards with the same LAN Controller configuration. Owners of different X299 mainboards have to verify and adopt/modify if necessary the device these PCI device implementations by means of IOREG. Note the PCI0.GBE1 -> PCI0.ETH0, PCI0.RP02.D0A4 -> PCI0.RP02.PXSX and PCI0.RP02.PXSX -> PCI0.RP02.ETH1 ACPI replacements directly performed within the SSDT. Note that there are no onboard 1GB hardware implementations on the ASUS WS X299 Sage 10G, thus E.9.2.11 can be skipped entirely by all users of the latter motherboard. E.9.2.12) - ARPT - OSX WIFI Broadcom BCM94360CD 802.11 a/b/g/n/ac + Bluetooth 4.0 AirPort Controller PCI Implementation:The SSDT-X299-ARPT.aml OSX WIFI Broadcom BCM94360CD 802.11 a/b/g/n/ac + Bluetooth 4.0 AirPort Controller PCI device implementation is of pure cosmetic nature and only valid for users of the latter WIFI/Bluetooth PCIe Adapter in PCIe Slot 3 of the ASUS Prime X299 Deluxe. Users of this PCIe Adapter within a PCIe slot population different from PCIe Slot 3 or on a mainboard different form the ASUS Prime X299 Deluxe have to likely adapt/modify the respective device path "PC03","BR3D","ARPT" and likely also the respective ACPI Replacements PC03.BR3D.SL0C -> PC03.BR3D.PEGP and PC03.BR3D.PEGP -> PC03.BR3D.ARPT, directly performed within the SSDT. Users of the Asus Prime X299 Deluxe onboard Bluetooth chipset controller or with a completely different WIFI/Bluetooth configuration have to adopt the entire Airport PCI implementation by means of IOREG. On the ASUS WS X299 Sage 10G, the ANS2 NVME controller in Slot-1 (PCI bridge @10) and the ARPT OSXWIFI Broadcom BCM94360CD BT/WIFI PCIe Adapter in Slot-3 (PCI bridge @08) share the same PCI device on different PCI bridges and therefore need to be implemented within the same system SSDT, namely SSDT-X299-Slot1-Slot3-PC02-BR2A-SL05-ANS-ARPT.aml, which one finds in the ASUS WS X299 Sage 10G subdirectory of the X299 SSDT Github repository. E.9.2.13) - GC-Titan Ridge / GC-Alpine Ridge / ASUS TBEX 3 Thunderbolt HotPlug System Implementation:The current Thunderbolt development carefully focuses on iMac Pro SSDT-9.aml and DSDT.aml from @TheOfficialGypsy 's iMac Pro dump, which appear to be the cornerstone for a correct, proper and complete Thunderbolt Hackintosh Local Node implementation.The current development status is briefly reflected in posts and Constructive contributions by experts are highly desired.Until reaching a complete Thunderbolt Hackintosh Local Node implementation, SSDT-X299-TB3HP.aml constitute workarounds for achieving TB HotPlug and USB-C HotPlug functionality with the respective GC-Titan Ridge, GC-Alpine Ridge and TBEX 3 Add-In adapters. For all TB3 SSDTs provided above, partial contributions by by @apfelnico, @nmano, @Mork vom Ork, @Matthew82, @maleorderbride and @TheRacerMaster shall be mentioned and outlined. Their use with mainboards different from ASUS and within PCIe slot populations different from PCIe Slot 4 requires the adaptation/modification of respective ACPI path definitions ("PC01", "BR1A") or ACPI DSDT Table replacements (SL01 -> PEGP and PEGP -> UPSB), directly performed within the SSDTs. Video: GC-Titan Ridge TB HotPlug + TB USB-C HotPlug under macOS Mojave 10.14.0 GC-Titan Ridge + ASUS Prime X299 Deluxe + SSDT-X299-TB3HP-TTR.aml +TB HotPlug TB + TB USB-C HotPlug successfully verified under macOS Mojave 10.14.0 Klick the link below to see the video: https://youtu.be/8P0X5Z7giEg Like always, I verified TB HotPlug with my 5 TB Lacie Rugged Thunderbolt 2 HDD (+ Apple TB3 -> TB2 adopter) and TB USB-C HotPlug with my Transcend JetFlash 850 USB 3.1 Type-C Stick. In the meanwhile, I also successfully verified GC-Titan Ridge + ASUS Prime X299 Deluxe + SSDT-X299-TB3HP-TTR.aml +TB HotPlug TB + TB USB-C HotPlug under macOS High Sierra 10.13.6 I also successfully verified the GC-Titan Ridge DisplayPort 1.4 and DisplayPort 1.4 HotPlug functionality as well as the Kanex Premium USB-C -> HDMI 4K Adapter and Kanex Premium USB-C -> HDMI 4K Adapter HotPlug functionality. Remaining issues: With the ASUS Prime X299 Deluxe, one faces a black screen (KP) issue on wake from sleep with TB devices connected to the GC-Titan Ridge during sleep. The issue can be omitted by disconnecting TB devices primer to system sleep. There are no sleep/wake issues with USB-C devices connected to the GC-Titan Ridge. Note that there is a separate SSDT-X299-TB3H.aml for TB3 Add-in PCIe adapters in Slot-2 under PCI0.RP05.PXSX of the ASUS WS X299 Sage 10G, which is also compatible with the ASUS Prime X299 Deluxe II onboard TTR implementation and accessible in the ASUS WS X299 Sage 10G subdirectory of the X299 SSDT Github repository. Test on GC-TTR / ASUS WS X299 Sage 10G functionality/compatibility are currently ongoing. E.9.2.14) - DTGP Method: SSDT-DTPG.aml is mandatory for all SSDT implementations listed above (note the external DTPG method call in the definition block of each respective SSDT) and must be always part of /EFI/Clover/ACPI/patched.. External (DTGP, MethodObj) // 5 Arguments (from opcode) E.9.2.15) - Debugging Sleep Issues: For debugging sleep issues as proposed by Pike Alpha, one can add SSDT-SLEEP.aml to /EFI/CLOVER/ACPI/patched and follow Pike's comment and advices provided at https://pikeralpha.wordpress.com/2017/01/12/debugging-sleep-issues/ E.10) iMac Pro Boot Splash Screen Cosmetics Based on the ideas and instructions of @Matthew82, I achieved an iMacPro ASUS Boot Splash Screen by means of the following procedure: 1.) Installation of the BREW distribution (if not already performed in Section B.1): a.) Open a terminal and change to "bash" shell. bash b.) Now enter the following "bash" terminal command and follow the standard BREW installation instructions: /usr/bin/ruby -e "$(curl -fsSL https://raw.githubusercontent.com/Homebrew/install/master/install)" 2.) After the successful installation of the BREW distribution, we have to implement the QT5 distribution, again by using a "bash" terminal shell. If not already performed in Section B1.), just enter the following "bash" terminal commands: brew install qt5 brew link qt5 --force 3.) After successfully implementing BREW and QT5 and if not already performed in Section B.1), we can now download the actual CodeRush UEFIPatch distribution from Github to our home directory with the following terminal command: git clone https://github.com/LongSoft/UEFITool 4.) Now compile the UEFI Tool distribution with the following terminal commands: cd /UEFITools/ qmake uefitool.pro make 5.) Download and unzip iMacPro.raw to your Desktop. 6.) Now launch by UEFITool by clicking on the newly compiled UEFITool.app in the UEFITools Folder in your home directory. a.) Select "File" -> "Open image file" and load your patched or unpatched BIOS Firmware distribution. Select "Search.." in the UEFITool "Edit" Menu and perform a "GUID" search of "7BB28B99-61BB-11D5-9A5D-0090273FC14D" with "Header only"... You will receive a message "GUID pattern "7BB28B99-61BB-11D5-9A5D-0090273FC14D" found as .... in 7BB28B99-....". Double click on that message and search for the "Raw section" accompanying the "7BB28B99-...." entry, which indeed is the Boot Image, which you can easily verify by extracting the raw section body (right-click on "Raw section" and select "Extract body") to your Desktop and by subsequently opening the extracted raw-file directly with Apple's "Preview.app" (right-click an the raw file and select "Open with.." -> Preview.app). b.) To exchange the default original ASUS Boot Logo image file stored in "Raw Section" by the iMacPro.raw image file that you previously downloaded to your Desktop, right-click again on "Raw section", select this time "Replace body" and select the iMacPro.raw image file on your Desktop. Note that the actual image dimension of iMacPro.raw (2131pix x 1457pix) was adopted for its use on my 38" LG 38UC99. For monitors with reduce screen resolution, iMacPro.raw might have to be adopted to an image dimension that suites your particular screen resolution, before its upload to "Raw section". If the Boot Logo image dimension is too big for your Monitor's screen resolution, you might just end up with a black screen during the BIOS initialisation at boot. To do so, select in the Preview.app Menu -> "Tools" -> "Adjust Size". Change the image dimension and save the modified image with "File" -> "Export". In the "Export menu" press "Save", after selecting "JPEG" under "Format" , after choosing "Desktop" as the place to store the image, and after entering the new file name, which has to end with ".jpg". Double-check by right-clicking on the resulting jpg image file and selecting "Get Info" that its file size does no exceed 200KB by far. If the latter would be the case, you would not be able to save the modified BIOS Firware file subsequently. Finally just rename your new "XXXX.jpg" file to "XXXX.raw.... I guess, that by following the procedure detailed above, it is obvious that iMacPro.raw also can be substituted by any other image of your personal choice. Just be aware that it's background colour should be black (ecstatic reason for a its nice integration within the else black ASUS BIOS Boot Screen) c.) After replacing "Raw Section" with iMacPro.raw or the XXX.raw image of your choice, save your modified BIOS Firmware File with the Option "File" -> "Save Image File..." d.) Copy your modified BIOS Firmware file to a USB3.0 Flash Drive, formatted with FAT32. e.) Reboot, enter the Mainboard BIOS and save your BIOS settings to the USB Flash Drive f.) Flash your mainboard BIOS with the modified BIOS Firmware g.) Renter the Mainboard BIOS and restore your BIOS settings from the USB Flash Drive h.) Save your restored BIOS settings with (F7) and (F10), reboot and you are done. Just don't forget to set BIOS Setting "Boot Logo Display" to "Auto", when using this new approach. Any different setting might result in a black screen during BIOS initialisation. E.11) iMac Pro Desktop Background cosmetics It might be nice to equip your iMac Pro X299 also with the adequate iMac Pro Desktop Background. 1.) Download, unzip and copy imac-pro-wallpaper.jpg.zip to your Dektop 2.) Right-click with the mouse on your Desktop and select "Change Desktop Background.." 3.) In the left column click on the "+" and add your Desktop Folder 4.) Select imac-pro-wallpaper.jpg to be your new Desktop Background E.12) iStatMenus Hardware Monitoring Thanks to extended tweet session between @BJango, @gxsolace and myself, it seems that we achieved a major step forward in properly monitoring Skylake-X/X299 Hardware with iStatMenus. iStatMenus now correctly interfaces with the HWSensor and FakeSMC kext distribution provided by @interferenc. The actual iStatMenus v6.2 distribution can be assessed at https://bjango.com/mac/istatmenus/ The actual HWSensor and FakeSMC kext distribution of @interferenc can be assessed at https://github.com/interferenc/HWSensors To compile the the HWSensor and FakeSMC kexts of @interferenc, perform the individual steps detailed below: 1.) git clone https://github.com/interferenc/HWSensors 2.) cp HWSensors ~/Desktop/ 3.) cd ~/Desktop/HWSensors 4.) xcodebuild -project Versioning\ And\ Distribution.xcodeproj/ 5.) xcodebuild -project HWMonitor.xcodeproj/ 6.) xcodebuild -project HWSensors.xcodeproj -alltargets Subsequently, one finds the all compiled binaries in ~/Desktop/HWSensors/Binaries/. Many thanks to both @interferenc and @Bjango for their awesome and extensive contributions and brilliant work! Note that I recently modified the Kozlek/Interferenc Source Code distribution locally to also support GPU Temp sensor information for all Vegas and the new Radeon VII. In my recent 10.14 X299 EFI-Folder distributions, the resulting FakeSMC.kext and HWSensor.kexts supporting all Vegas already have been implemented by default in /EFI/CLOVER/kexts/Other. The actual 10.14.5 Beta X299 EFI-Folder distribution contains FakeSMC.kext and HWSensor.kexts also supporting the new Radeon VII. Skylake-X/X299 iStatMenus Hardware Sensor Data: Skylake-X CPU Thread Utilisation Graphs: To change from CPU core to thread utilisation monitoring, uncheck "Hide Hyper-Threading cores" in Section "CPU & GPU" of iStatMenus Preferences. Temperature unites can be adjusted between Celsius, Fahrenheit and Kelvin in Section "Sensors" of iStatMenus Preferences. F.) Benchmarking F.1) Sylake-X Intel I9-7980XE (4.7GHz) CPU Benchmarking Jesus F.2) Sapphire Nitro+ RX Vega 64 8GB G.) Summary and Conclusion Already under macOS 10.13 High Sierra, Syklake-X/X299 systems reached full functionality together with flawless stability. Now with macOS 10.14 Mojave, it might be another opportunity to follow my iMac Pro Build and Desktop Guide to unfold the unbelievable Skylake-X/X299 potential! High-end builds based on extremely novel Skylake-X/X299 technology have found manifold application, not only in science and research at universities or research institutions, engineering facilities, or medical labs, etc... Skylake-X processors with up to 18 cores (36 threads) and turbo frequencies up to 4.8 GHz have made X299 to a "relatively cheap" but really serious alternative to real iMac Pro's and Mac Pro's. The principal intention of my desktop guides is to demonstrate, that we are able to build and configure fully functional and relatively "low-cost" high-end systems, which go far beyond of what Apple is able to offer at present or will be ever able to offer for some reasonable pricing. Skylake-X/X299-Systems, that allow the use of all software-packages developed for MacOS, Unix, Linux or even Windows at the same time (e.g. think on Vine, Parallels, or a dual boot system configuration). The flexibility between different mainboards (Asus, Gigabyte, ASRock, MSI, etc.), different Skylake-X processors, and different RAM memory configurations (16-128GB) make such systems affordable for anybody (also home office, audio and video editing/production, etc.) and allows their perfect adaptation for each specific purpose, requirement and available budget. It might not be necessary to outline, that current Skylake-X/X299 Systems perform absolutely stable on a 24/7/365 basis.

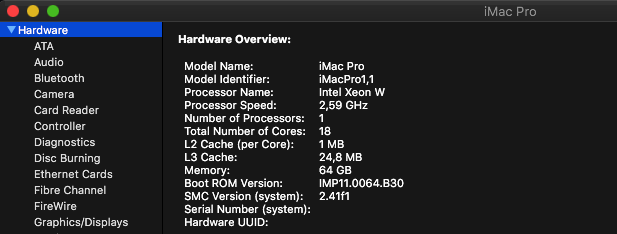
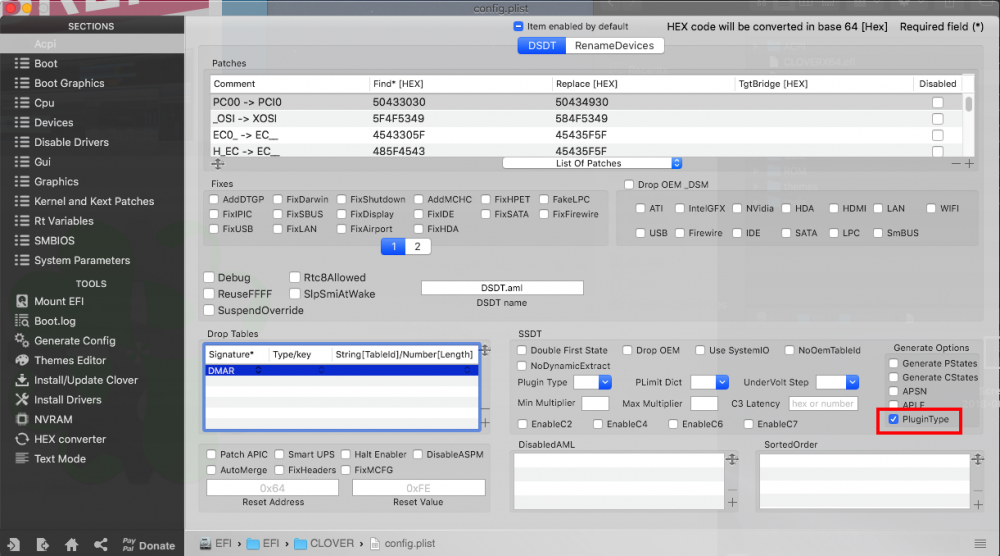
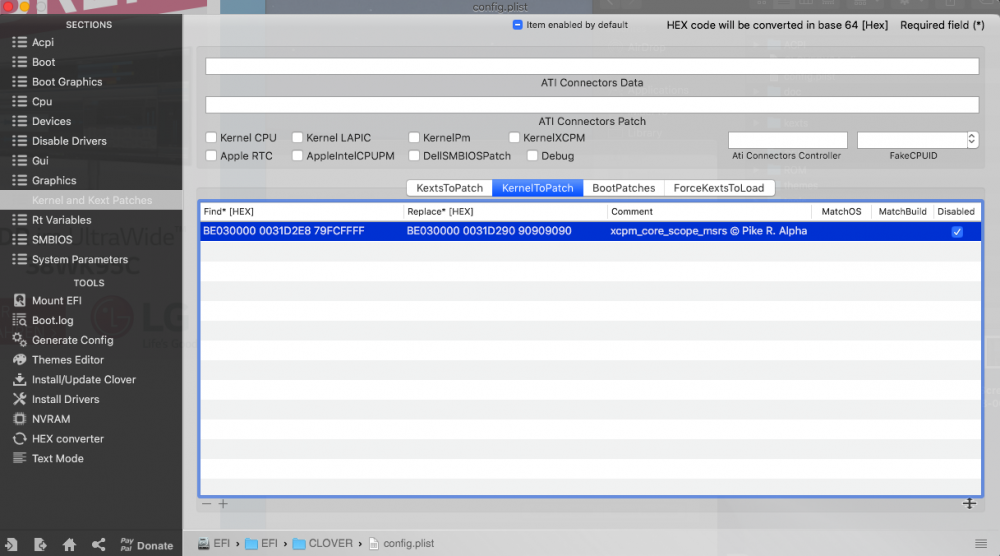
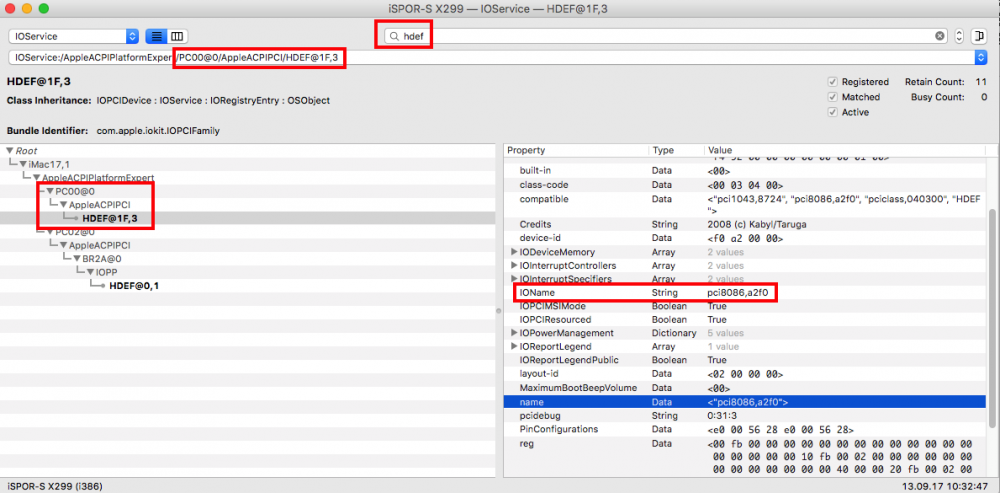
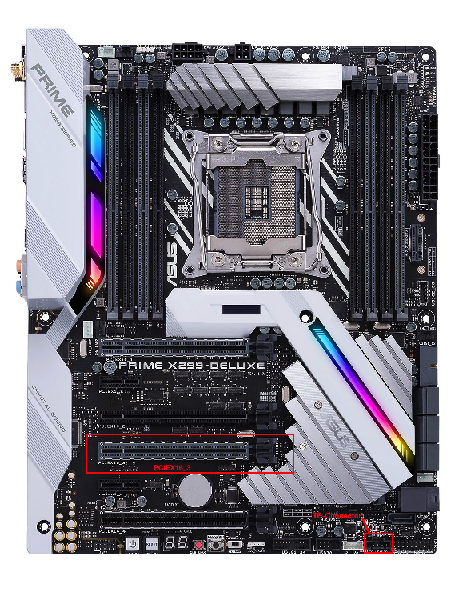
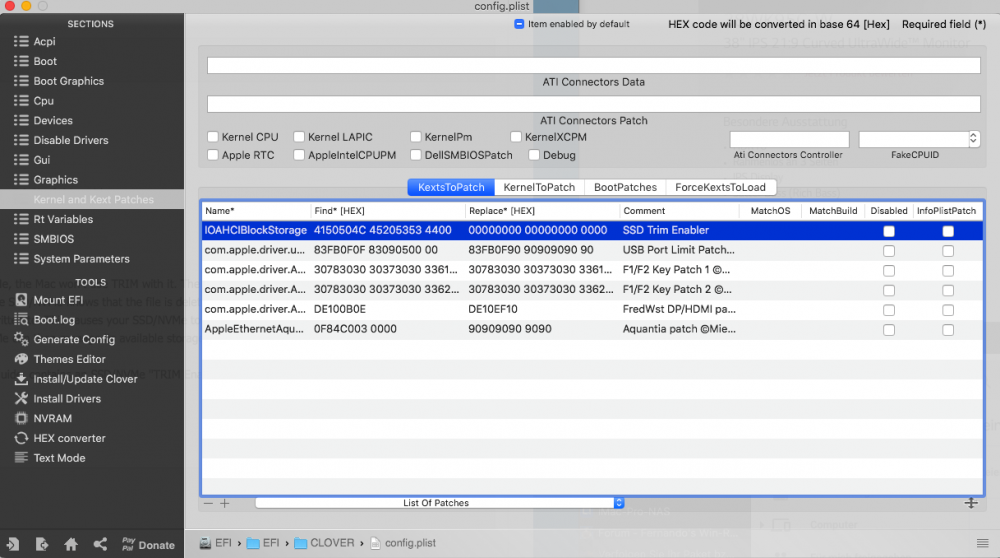
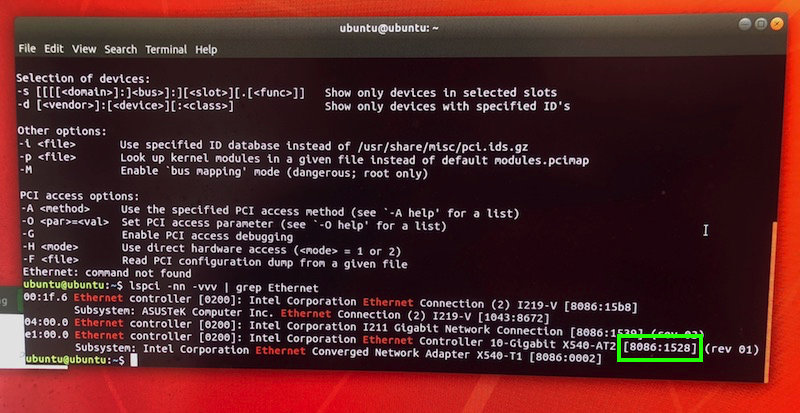


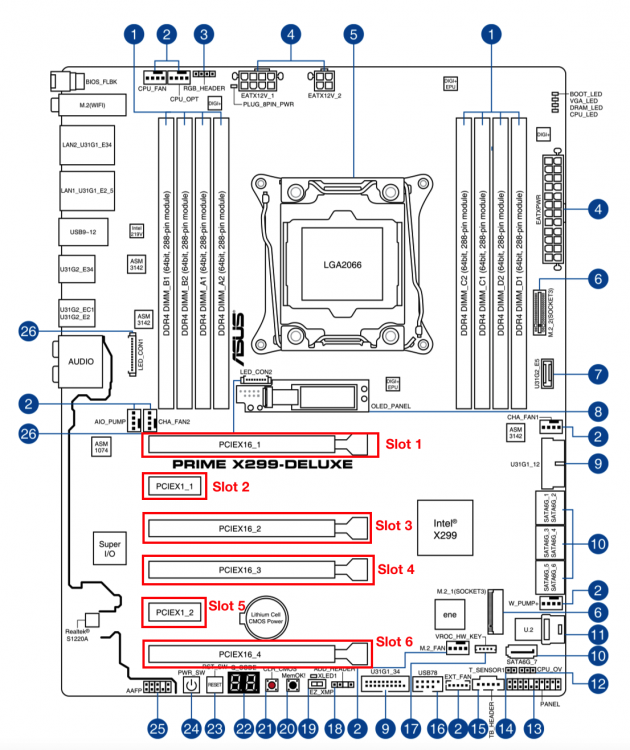


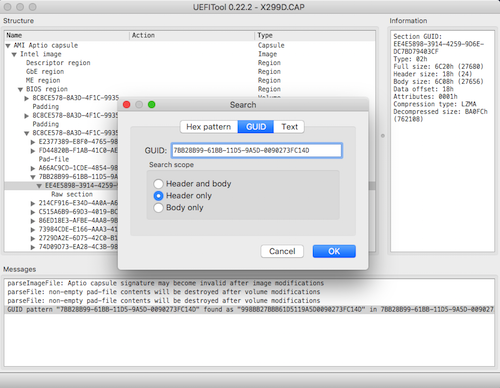

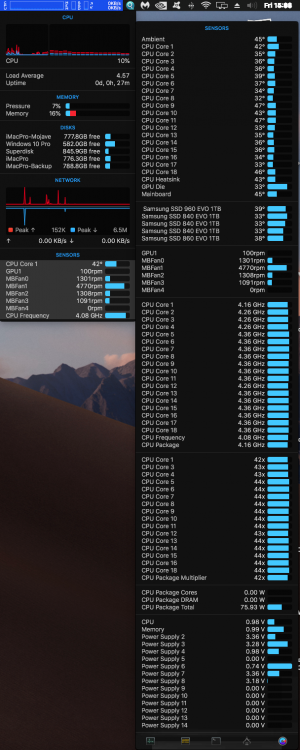

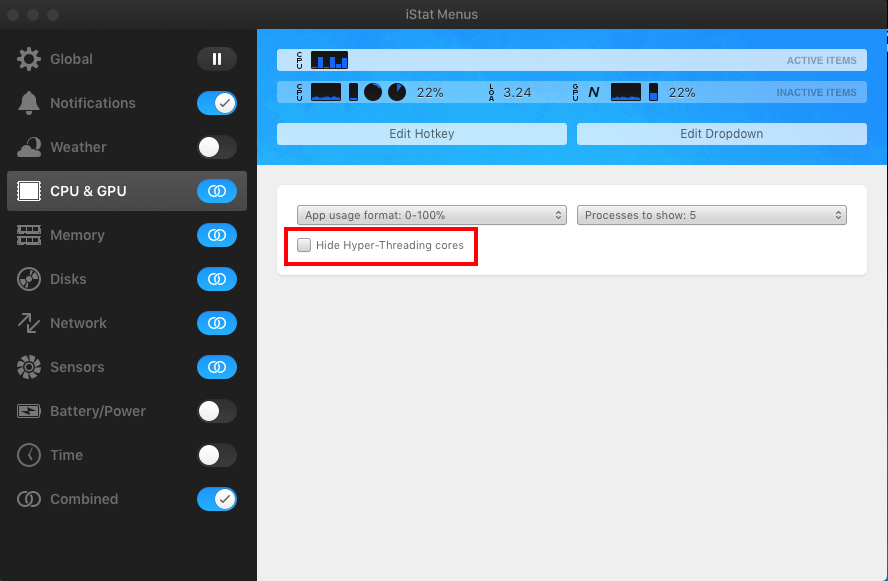

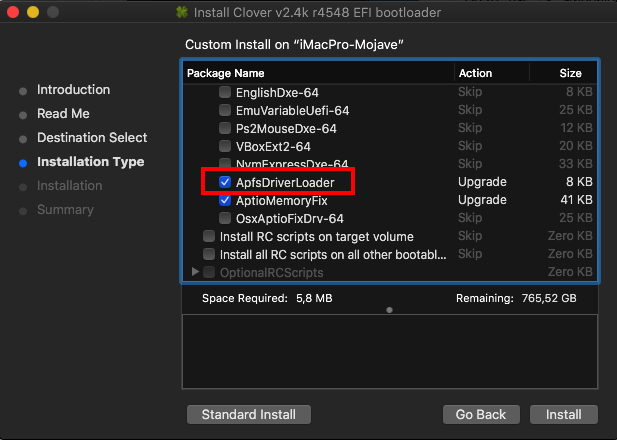
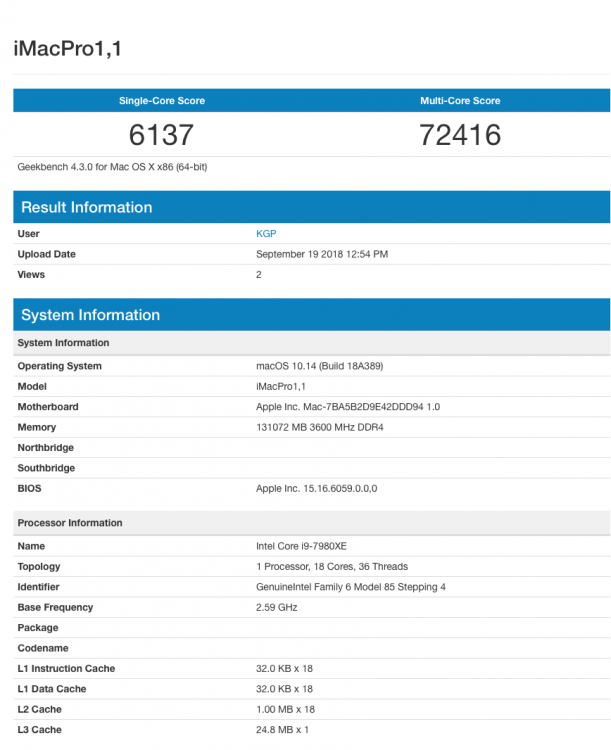

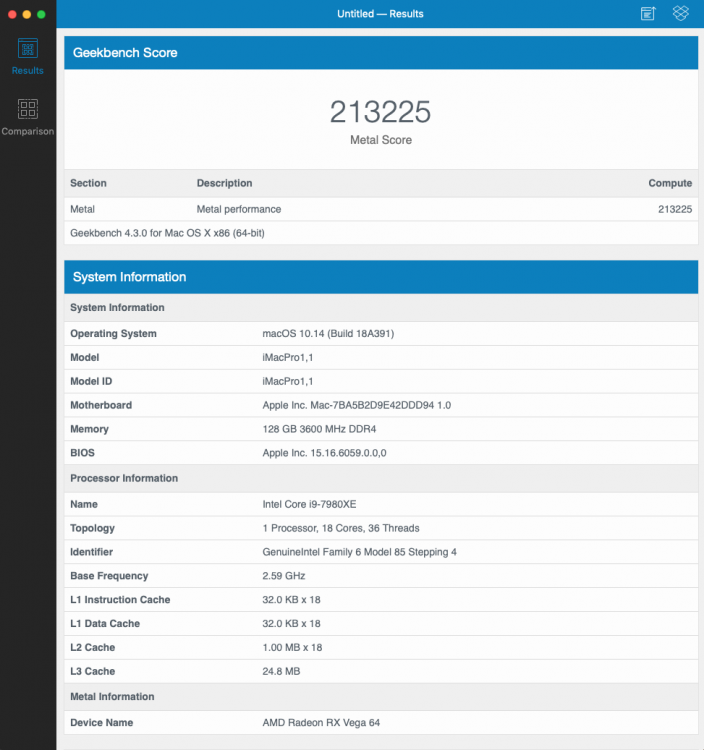
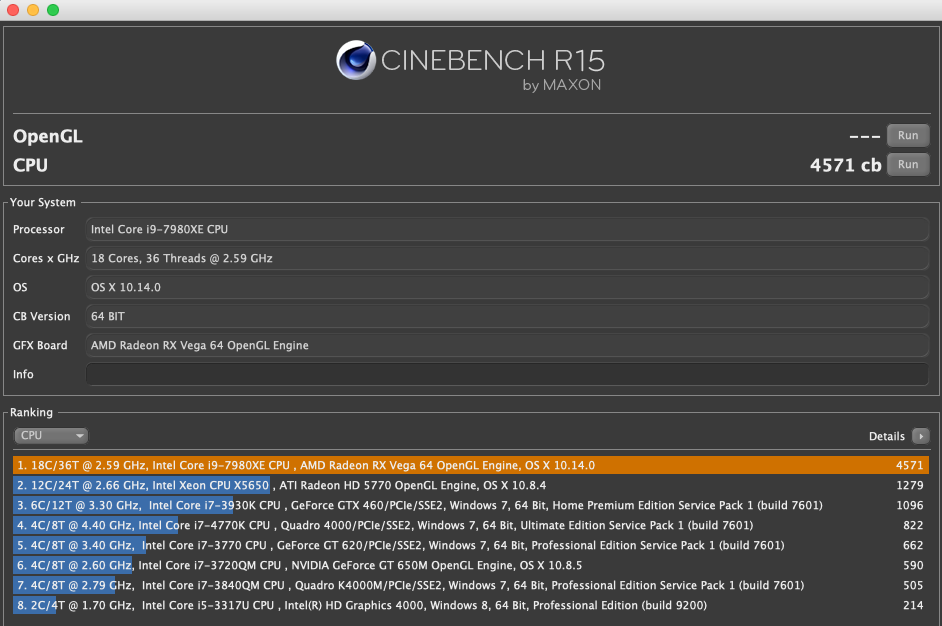
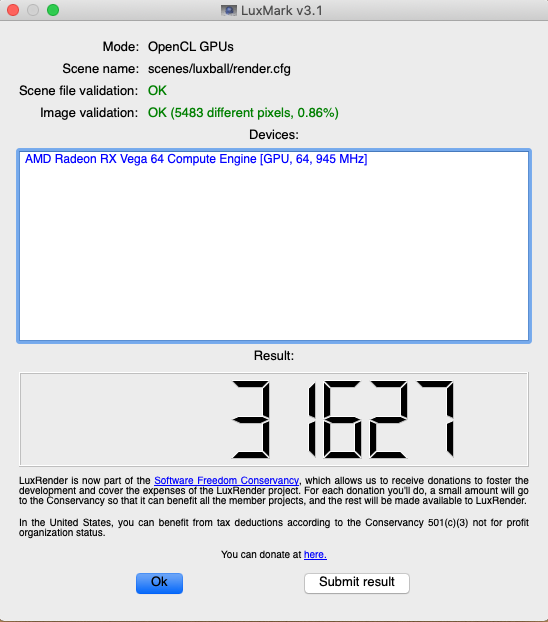
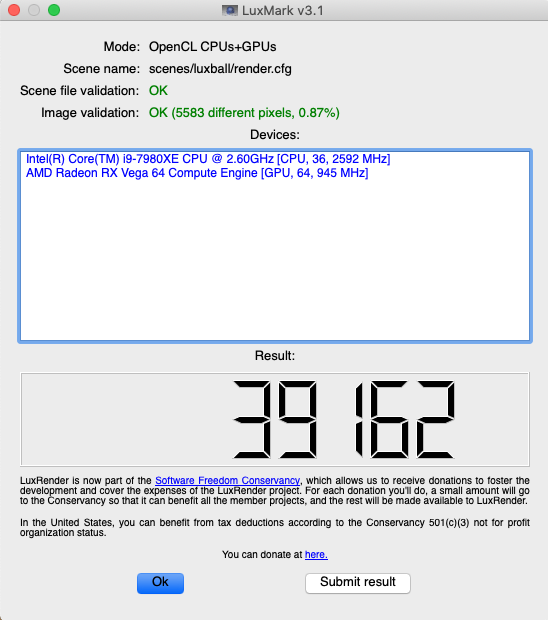


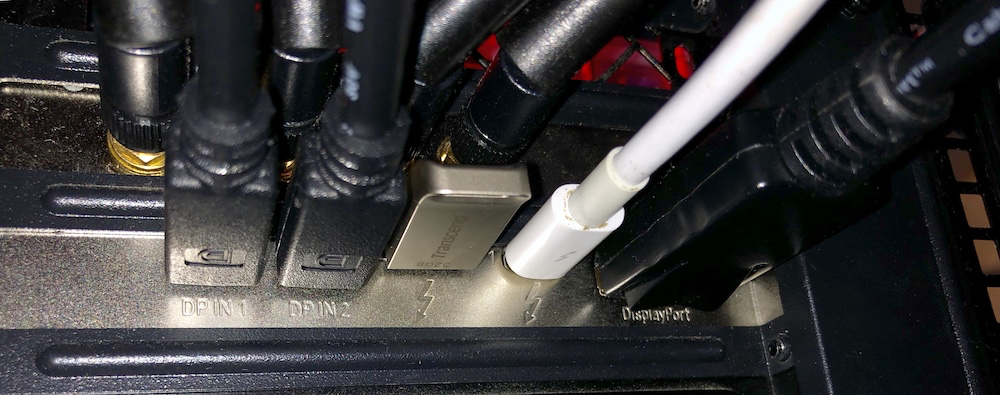
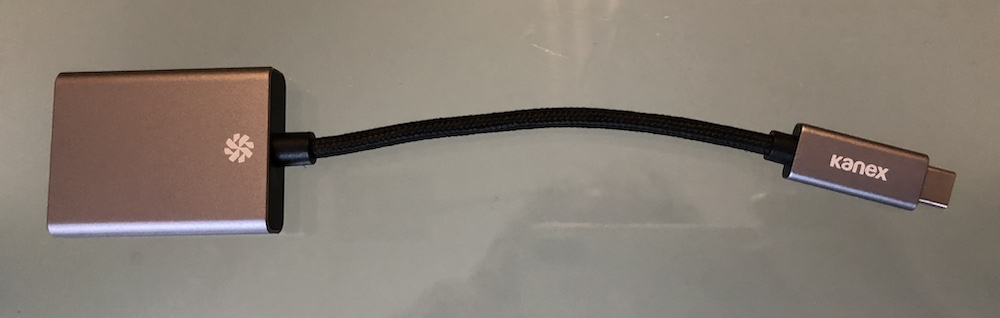
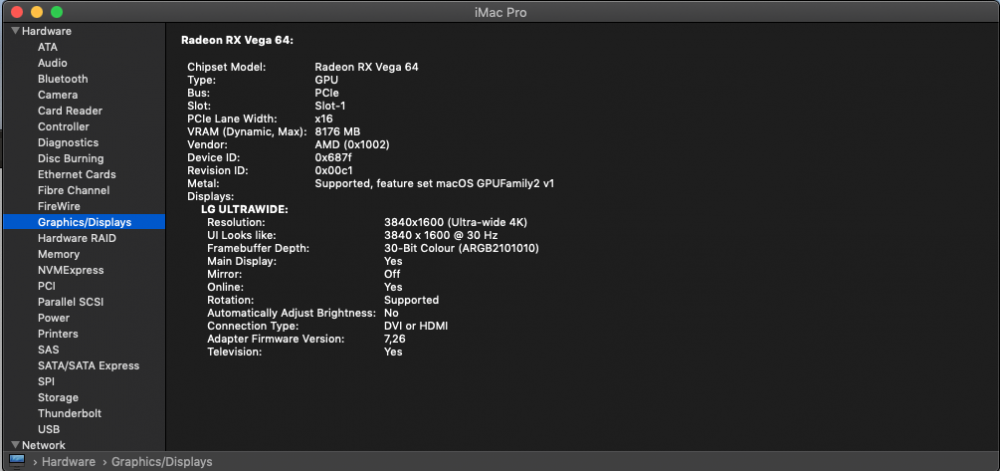
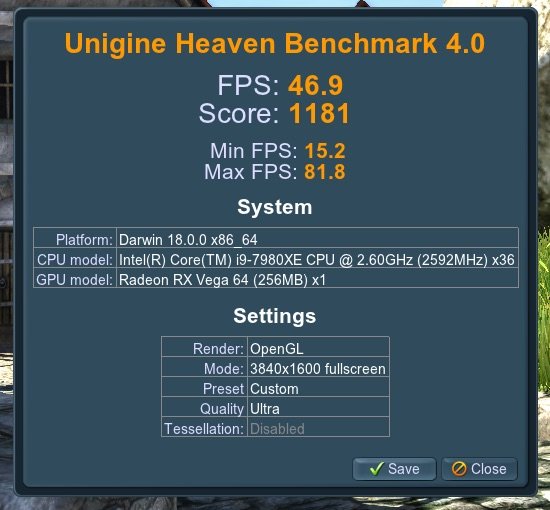
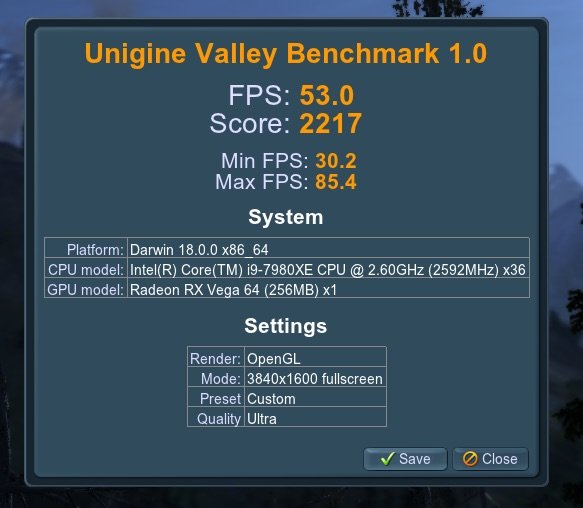
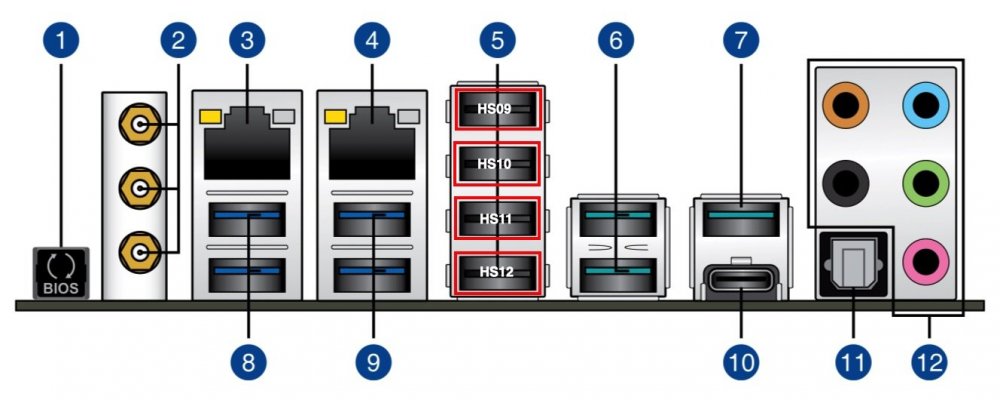
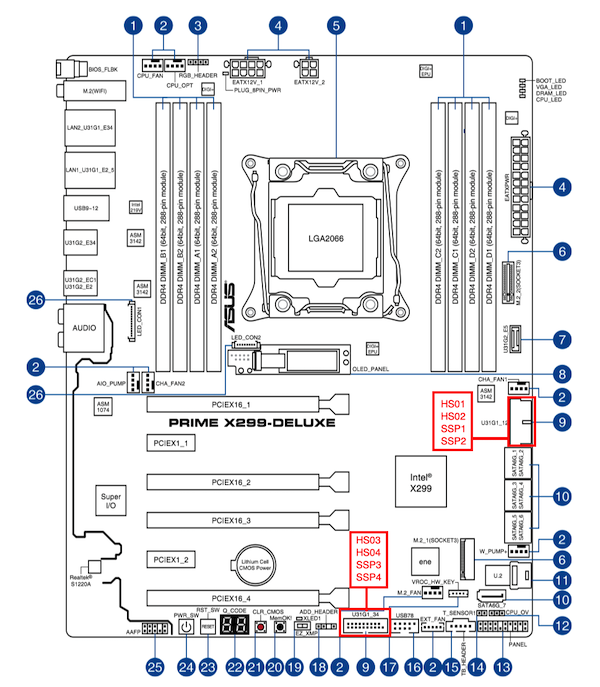

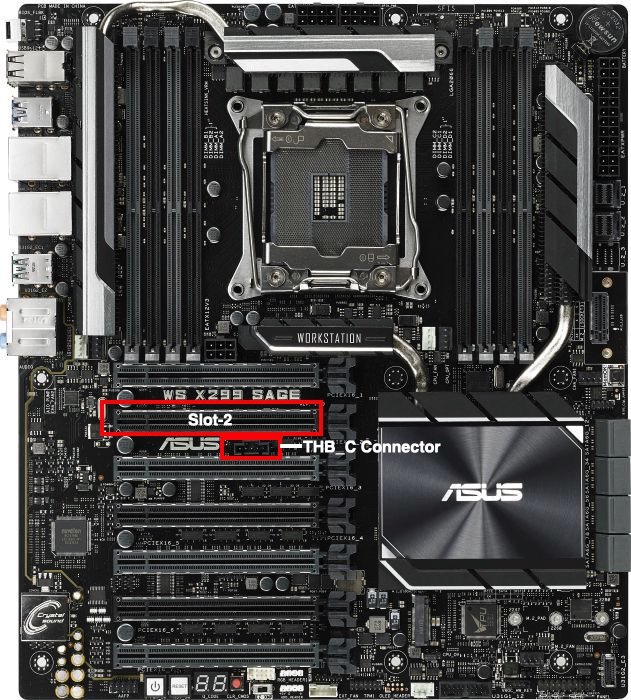
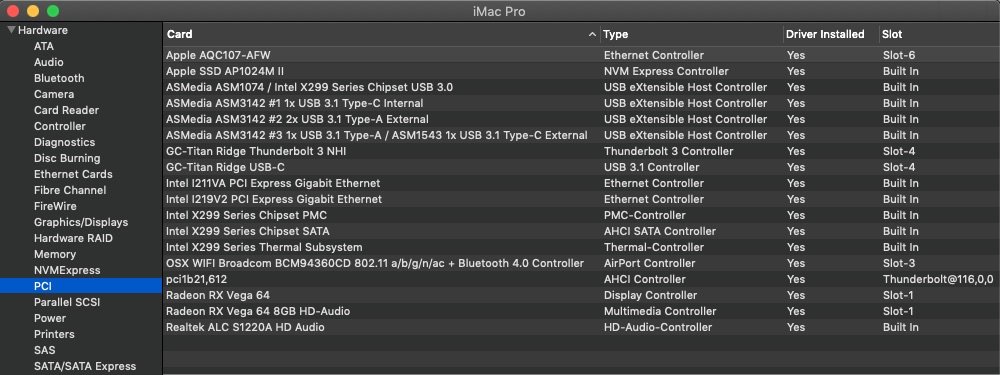
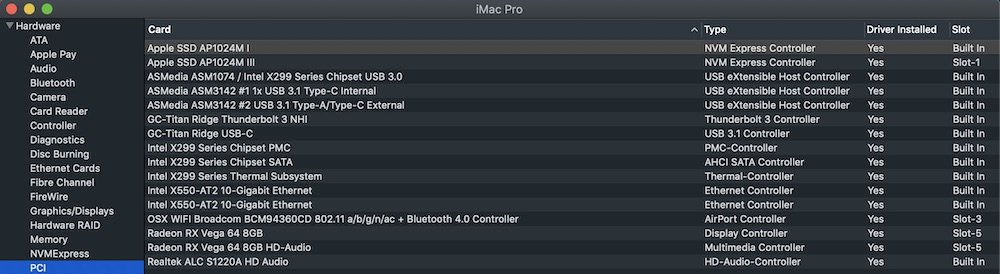
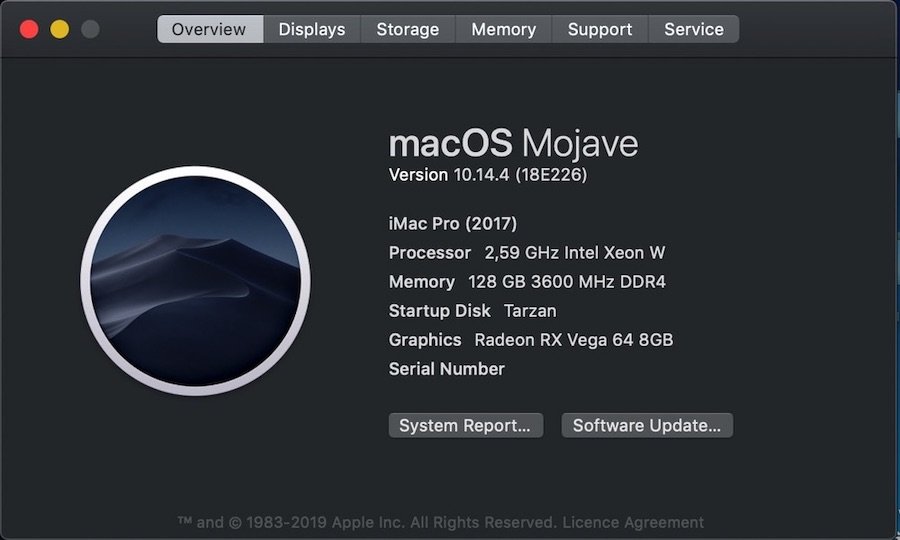
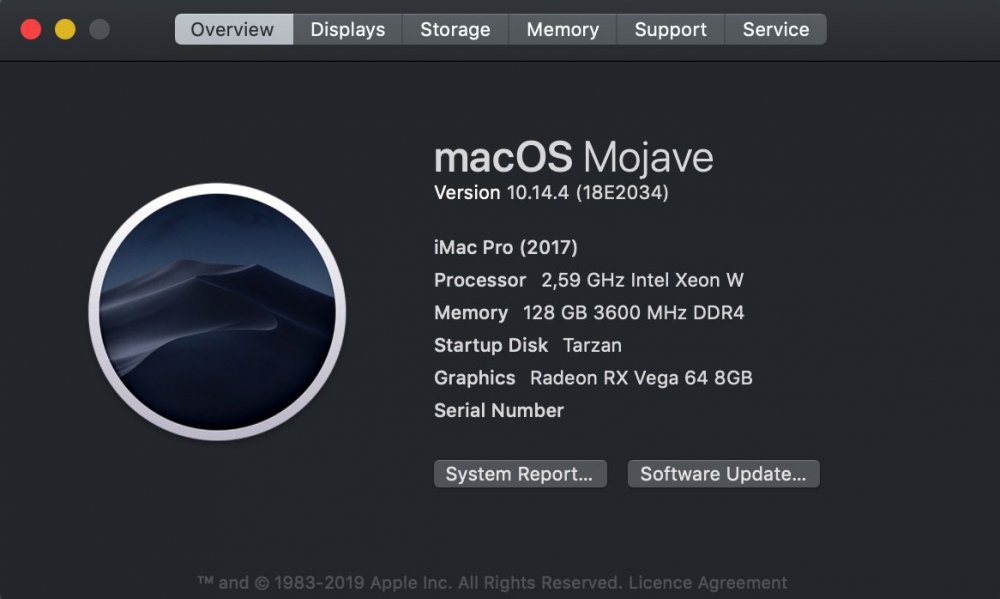
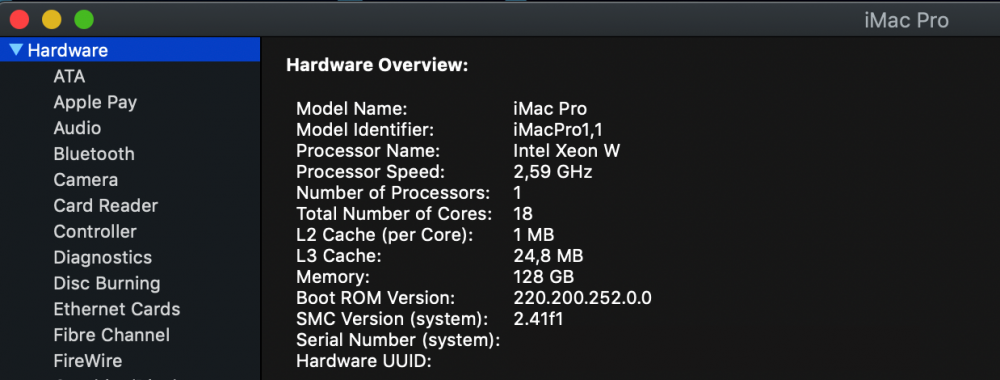 1 point
 -
Up and running macOS Mojave 10.14.4 (18E226) on my Broadwell-E/X99 iMac Pro Hackintosh! This afternoon @DSM2 advised me that yesterday Apple seems to have added a second special build of MacOS 10.14.4 (18E2034) on swcdn.apple.com, likely for new devices. Abstract and Introduction: This originating post constitutes an innovative and brand new iMac Pro macOS 10.14 Mojave Build and Desktop Guide for Broadwell-E/EP, Haswell-E/EP and X99, which certainly will further grow not only thanks to your estimated feedback and contributions. It is the logical continuation of my successful iMac Pro Broadwell-E/EP, Haswell-E/EP and X99 Build and Desktop Guide published for macOS High Sierra 10.13 in the other forum. Being an iMac Pro Desktop Guide, it has also large similarities with my Skylake-X/X299 iMac Pro macOS 10.14 Mojave Desktop Guide. However, to avoid jumping back and forth, I will make this guide as consistent as the other, which however implies also some redundancy. As everybody already might know, my Broadwell-E/EP, Haswell-E/EP and X99 Desktop Guides base on the ASUS X99-A II. However, also other X99 ASUS mainboard models or X99 mainboards of other brands might be compatible after likely considering and implementing few mandatory modifications. The same states for guide compatibility with all Broadwell-E/EP and Haswell-E/EP CPUs different form the i7-6950X employed here. Before starting with all detailed instructions, please find a Table of Content that provides an overview of the individual topics addressed within this guide: -------------------------------------------------------------------------------------------------------------- Table of Contents: A.) Hardware Summary B.) ASUS Mainboard BIOS B.1) ASUS BIOS Firmware Patching B.1.1) CPU Microcode Update B.1.2) MSR 0xE2 register unlock for OSX Kernel Write B.2) ASUS X99-A II BIOS Configuration C.) Important General Note/ Advice and Error Prevention D.) iMac Pro macOS 10.14 Mojave System Setup This chapter includes a general guideline how to perform the initial setup of a Broadwell-E/EP, Haswell-E/EP, X99 iMac Pro with macOS Mojave DP1 (18A293u). D.1) iMac Pro EFI-Folder Preparation D.2) iMac Pro macOS Mojave Installer Package Creation D.3) iMac macOS Mojave USB Flash Drive Installer Creation D.4) iMac Pro macOS Mojave Clean Install on Broadwell-E/EP, Haswell-E/EP, X99 D.5) Direct iMac Pro conversion of a functional Broadwell-E/EP, Haswell-E/EP, X99 system with a SMBIOS System Definition different from iMac Pro1,1 and a standard macOS build implementation. D.6) iMac Pro macOS High Sierra Build Update Procedure E.) Post Installation Process E.1) Xnu CPU Power Management (XCPM) Configuration E.2) Graphics Configuration E.3) Audio Configuration E.4) USB Configuration E.5) M.2/NVMe Configuration E.6) SSD/NVMe TRIM Support E.7) GC-Titan Ridge / GC-Alpine Ridge /Asus TBEX 3 PCIe Add-In Implementation E.8) Gbit and 10-Gbit Ethernet Implementations E.8.1) ASUS X99-A II on-board Gbit Ethernet Functionality E.8.2) 10-Gbit LAN Implementations E.8.2.1) ASUS XG-C100C Aquantia AQC107 10-Gbit NIC E.8.2.2) Intel X540-T1 10-Gbit NIC E.8.2.3) Small-Tree P2EI0G-2T 10-Gbit NIC E.8.2.4) NetGear ProSave XS508M 8-port 10-Gbit Switch E.8.2.5) QNAP TS-431X2 Quad-core 4-Bay NAS tower E.8.2.6) 10-GBit Ethernet Optimisation E.9) ASUS X99-A II PCI Device Implementation E.9.1) ACPI DSDT Replacement Implementation E.9.2) System SSDT PCI Device Implementation E.9.2.1) HDEF - onboard Audio Controller PCI Implementation E.9.2.2) GFX0, HDAU - GPU and HDMI/DP Audio PCI implementation E.9.2.3) XGBE - 10GBit NIC PCI Implementation: E.9.2.4) ETH0 - onboard LAN Controller PCI Implementation E.9.2.5) SAT1 - Intel AHCI SATA Controller PCI Implementation E.9.2.6) EVSS - Intel X99 sSata Controller PCI Implementation E.9.2.7) ANS1 - NVMe Controller PCI Implementation E.9.2.8) - USBX: E.9.2.9) XHCI - onboard Extended Host Controller Interface (XHCI) PCI Implementation E.9.2.10) XHC2 - ASMedia ASM1142 USB 3.1 Controller PCI Implementation E.9.2.11) ARPT - OSX WIFI Broadcom BCM94360CD 802.11 a/b/g/n/ac + Bluetooth 4.0 AirPort Controller PCI Implementation: E.9.2.12) GC-Titan Ridge / GC-Alpine Ridge / Asus TBEX 3 Thunderbolt HotPlug System Implementation E.9.2.13) DTGP Method E.9.2.14) - Debugging Sleep Issues E.10) iMac Pro Boot Splash Screen Cosmetics E.11) iMac Pro Desktop Background cosmetics E.12) iStatMenus Hardware Monitoring F.) Benchmarking F.1) i7-6950X CPU Benchmarks F.2) Sapphire Nitro+ Radeon RX Vega 64 8GB OpenGL and Metal Benchmarks G.) Summary and Conclusion -------------------------------------------------------------------------------------------------------------- A.) Hardware Summary Motherboard: Asus X99-A II CPU: I7-6950X (10-core) RAM: 128 KIT (8X16GB) G.Skill TridentZ (F4-3200C14Q2-128GTZSW) System Disk: Samsung 850 EVO 1TB (SSD) / Samsung 960 EVO 1TB (NVMe, M.2) RAID: 3x Western Digital Red Pro 6TB (18TB); Graphics: Sapphire Nitro+ Radeon RX Vega 64 8GB Thunderbolt 3 Add-in: GC-Titane Ridge 40GB/s Intel Thunderbolt 3 Certified Add-in PCIe Adaptor Wifi + Bluetooth: OSXWIFI PC/Hackintosh - Apple Broadcom Bcm9436cd - 802.11 A/B/G/N/AC +Bluetooth 4.0 PCIe Power Supply: Corsair AX860 CPU Cooler: Corsair H80i v2 Webcam: Logitech HD Pro WebCam C930 Monitor: LG 38UC99-W, 38", WQHD, 21:9, 3840x1600 pixel, 75 Hz. Case: Corsair CC600TWM-WHT, Graphite Series 600T, Mid Tower Keyboard: Logitech K811 Mouse: Logitech Ultra-Thin Touch Mouse T631 Blu-Ray/DVD Writer: LG Super Multi Blue BH16 (BH16NS55) Thunderbolt: ASUS TBEX 3 and Gigabyte Alpine Ridge 10Gbit Ethernet components: - 1x ASUS XG-C100C AQC107 PCIe x4 10GBit LAN Adapter (for testing purposes) - 1x Intel X540-T1 single port 10GBit LAN PCIe Adapter (for testing purposes, now installed in my X99 rig) - 1x Small-Tree P2EI0G-2T 2-Port 10GBit LAN PCIe Adapter (now default configuration) - 1x NetGear ProSave XS508M 8-port 10GBit switch - 1x QNAP TS-431X2 Quad-core 4-Bay NAS tower with Built-in 10GbE SFP+ Port and 4x 12 TB Seagate IronWolf in RAID 0 configuration. Let me express my gratitude to @gxsolace at this place for providing me with 1x Intel X540-T1, 1x Small-tree P2EI0G-2T and 4x 12 TB Seagate IronWolf hardware. B.) Asus Mainboard BIOS Please find below a detailed instruction for ASUS X99 mainboard BIOS Firmware patching, as well as a summary of my actual Asus X99-A II BIOS settings. B.1) Asus Mainboard BIOS Firmware Patching B.1.1) CPU Microcode Update Not every BIOS firmware provided by the different Mainbaord manufacturers always accounts for all CPU microcodes distributed by Intel. Recently we witnessed for instance along the latest macOS 10.13 High Sierra distributions and even during the first macOS Mojave 10.14 distribution a Broadwell/Haswell CPU performance issue (no overclocking) in combination with most X99 mainboard implementations to be traced back a missing Intel CPU microcode implementation in most of the distributed Mainbaord BIOS firmwares. To overcome the OC issue, an Intel CPU microcode update within the respective BIOS firmware distributions is absolutely vital and mandatory. How to perform the Intel CPU microcode update for a given BIOS firmware distribution e.g. under Windows 10 is detailed below for the ASUS X99-A II 1902 BIOS firmware distribution. The same approach, initially provided and described by @michaeljeger (once more many thanks from all of us ) can be applied to any other BIOS Firmware distribution of any mainboard manufacturer. In Windows 10, download the latest UBU software distribution from https://cloud.mail.ru/public/HLDj/6cT1gUPke: a.) From online directory "UEFI BIOS Updater" download und unrar "UBU_v1_70_rc12.rar" or any newer distribution to an "UBU" directory on your Windows Desktop yet to be created b.) Also download and unrar "mms.tar" from the online directory "UEFI BIOS Updater". This will create an "mmt" folder, where from the "5.2.0.24" directory you copy "MMTool.exe" to your "UBU" Desktop directory c.) Download the latest BIOS firmware distribution for your particular mainboard from the respective web page of your mainboard manufacturer. In case of the ASUS X99-A II, it is X99-A-II-ASUS-1902.CAP. Copy the respective BIOS Firmware file to your "UBU" Desktop directory. Now you have all necessary ingredients in your "UBU" Desktop directory. d.) Open a windows terminal, change to the "UBU" Desktop directory and launch the UBU software with the terminal command: ubu On UBU software launch, UBU will now scan your BIOS firmware file that you previously added to your "UBU" Desktop directory and detect BIOS platform, manufacturer and mainboard model, as well as EFI Driver and OROM components. When you are asked to "Press any key to continue..", follow this request. e.) From the listed options in the consecutive terminal text menu choose option 5 - CPU Microcode by typing "5" and subsequently pressing the "Enter" button. f.) Now the tool will analyse whether are not all respective available CPU microcodes are properly implemented in your BIOS firmware. All implemented CPU microcodes will be highlighted by "YES", all missing CPU microcodes will be highlighted by "No". To download the missing Intel CPU microcodes, choose option "C - Create FFS with MicroCodes" by typing "C" and subsequently pressing the "Enter" button. g.) In the next terminal text menu the tool will summarise all additional downloaded Intel CPU microcodes: To implement the new and complete set of available Intel CPU microcodes in your BIOS firmware file, launch "MMTool", which you previously added to your "UBU" desktop directory, by typing "M" and subsequently pressing the "Enter" button. h.) Now MMTool now will do it's magics and summarise once more the complete Intel microcode table successfully implemented in your BIOS firmware file. Now choose menu option "0 - Exit to Main Menu" by pressing "0" and subsequently "Enter". i.) In the next terminal text menu choose "Rename to ASUS USB BIOS Flashback" by pressing "1" and subsequently "Enter". By this, the UBU tool will save the modified BIOS firmware file in the "UBU" desktop directory already with the correct EZ Flashback convention. For mainboards different from ASUS, this last step might be different though. We have to wait on further user feedback. In case of our ASUS X99-A II 1902 BIOS firmware, we will find X99A2.CAP as the result of the UBU Intel CPU microcode procedure. After providing our firmware with a complete set of Intel microcode implementations, we can now continue with the firmware patching procedure and unlock the MSR 0xE2 register for OSX Kernel write. B.1.2) MSR 0xE2 register unlock for OSX Kernel Write On a real Mac with native OSX XCPM power management, the MSR 0xE2 register is unlocked and therefore writeable. However, on ASUS mobos this register is usually read only. This is also the case for all ASUS X99 mobos. When the kernel tries to write to this locked register, it causes a kernel panic. This panic can happen very early in the boot process, with the result that your system freezes or reboots during the boot process. We can circumvent the MSR 0xE2 register write with a dedicated KernelToPatch entry in the config.plist, namely "xcpm_core_scope_msrs © Pike R. Alpha" and by enabling the "KernelPM" in the config.plist in Section "Kernel and Kext Patches" of the Clover Configurator. See Section E.1) for further details. However, thanks to CodeRush's Longsoft UEFIPatch distribution and sophisticated MSR 0xE2 Register patches, we are able to successfully patch any ASUS X99 mainboard BIOS distribution and unlock the MSR 0xE2 register. This makes the "xcpm_core_scope_msrs © Pike R. Alpha" KernelToPatch entry obsolete and allows full native read/write MSR 0xE2 register access by the OSX kernel. The patched ASUS mainboard BIOS firmware finally can be uploaded each specific ASUS X99 mainboard by means of the ASUS EZ BIOS Flashback Procedure. The individual steps for the ASUS X99 BIOS Patching are detailed below: 1.) Download and unzip the CodeRush's UEFI patch (attached towards the bottom of this guide) to your Desktop. 2.) To unlock the MSR 0xE2 register for kernel write copy the BIOS firmware file modified in section B.1.1) to the "UEFIPatch_0.3.9_osx" directory on your Desktop. 3.) Open a terminal; type "cd " and drag the "UEFIPatch_0.3.9_osx"-folder on your Desktop into the Terminal window and press "Enter". One can also use the terminal command equivalent: cd ~/Desktop/UEFIPatch_0.3.9_osx/ Note that this step is important to successfully execute the UEFI-Patch procedure! You must be in the UEFIPatch directory on your terminal, in order to successfully execute step 5.) below! Once in the UEFIPatch directory on your terminal, drop the "UEFIPatch"-executable into the terminal window; Also drop the actual BIOS CAP file into the terminal window; Press enter to execute the "UEFIPatch"-procedure. The equivalent terminal command in case of the ASUS X99-A II BIOS firmware is: ./UEFIPatch X99A2.CAP For other mobos, please adapt the adequate BIOS CAP-filename in the command! During the patch procedure, you will see something like the following message, which can be simply ignored: parseImageFile: Aptio capsule signature may become invalid after image modifications parseSection: section with unknown type 52h parseFile: non-empty pad-file contents will be destroyed after volume modifications parseSection: section with unknown type 52h parseFile: non-empty pad-file contents will be destroyed after volume modifications patch: replaced 6 bytes at offset F69h 0FBA6C24400F -> 0FBA7424400F Image patched 6.) You will now find a "***.CAP.patched" BIOS-file in the UEFIPatch folder, which is your patched (MSR 0xE2 unlocked) BIOS file. 7.) Rename the "***.CAP.patched BIOS" file again to X99A2.CAP or to the correct EZ Flashback filename for your particular ASUS Mainbaord by following the ASUS BIOS Flashback filename convention. 8.) Copy the X99A2.CAP (or it's derivative in case you use a different ASUS mobo) to a FAT-formatted USB2.0 storage device. 9.) Shut-down your hack, connect the USB2.0 storage device to the USB-port assigned to the ASUS BIOS Flashback procedure (see the mobo manual for details). Press the BIOS-Flashback button for three seconds until the flashback-led starts to blink, indicating that the BIOS Flashback is in progress. Release the button. The locations of the BIOS-Flashback button and the USB-port assigned to the BIOS-Flashback procedure on the ASUS X99-A II are indicated in the figure below: 10.) Wait until the Flashback-led stops blinking and turns off, indicating that the BIOS Flashback process as been successfully completed. You now successfully installed the actual patched BIOS, compatible with native OSX/MacOS power management. 11.) Boot your system and apply the BIOS settings described below. Instead of stepwise applying the entire Bios firmware patching procedure detailed above, all ASUS X99A-II users can simply download, unzip and flash X99A2.CAP.zip, actual BIOS firmware 1902, accounting for the complete set of available Intel CPU Microcodes, an unlocked MSR register and an iMac Pro Splash Screen Boot Image to be displayed at boot. B.2) Asus X99-A II BIOS Configuration To overclock your RAM memory in concordance with your RAM specifications, enable the EZ XMP Switch on your ASUS Mainboard and enable posteriorly XMP in the Standard ASUS BIOS Setup mode (F7). Subsequently switch from standard to advanced ASUS BIOS Setup mode by pressing again F7. Important Note: "ASUS MultiCore Enhancement": When set to "Auto", MCE allows you to maximise the overclocking performance optimised by the ASUS core ratio settings. When disabled, MCE allows to set to default core ratio settings. "Sync All Cores": Tremendous increase in CPU performance can be achieved with the CPU Core Ratio set to "Sync All Cores". In case of i9-7980XE stock settings (4.4 Ghz, Sync All Cores), the Geekbench score difference is approx. 51.000 (disabled) compared to 58.000 (enabled)! Note however, that Sync All Cores should be used only in case of the availability of an excellent water cooling system! Otherwise, CPU Core Ratio should be set to "Auto". Further note that with CPU Core Ratio set to "Sync All Cores", one might have to set the AVX Instruction Core Ratio Negative Offset to "3" in case of system freezes or system instabilities. VT-d Note: For compatibility with VM or parallels, VT-d can be also ENABLED... Verify however, in this case that in your config.plist the boot flag "dart=0" is checked under Arguments in the "Boot" Section of Clover Configurator! Above 4G Decoding Note: Enable BIOS function "Above 4G Decoding" to avoid memory relocation errors when using AptioMemoryFix.efi on X99 systems. CPU SVID Support: In addition to the BIOS settings mentioned above one should also Enable CPU SVID support in BIOS Section AI Tweaker, which is fundamental for the proper Intel Power Gadget (IPG) CPU power consumption display. C.) Important General Note/Advice and Error Prevention Please note the following important General Note / Advice and Error Prevention, when setting up your X99 System by implementing the latest macOS Mojave distribution. 1.) The /EFI/Clover/drivers64UEFI/-directory of my actual respective X99 EFI-Folder distribution contains by default AptioMemoryFix.efi thanks to @vit9696. Note that with Clover_v2.4k_r4392, AptioMemoryFix.efi has become an official Customization Option of Clover and can now be selected and therefore also just easily implemented in the frame of the Clover Boot Loader Installation. For native NVRAM implementation, Clover's RC Scripts have to be omitted during the clover boot loader installation. If already previously installed, remove Clover's RC Scripts from the /etc directory of your macOS USB Flash Drive Installer or System Disk: sudo rm -rf /etc/rc.boot.d sudo rm -rf /etc/rc.shutdown.d Also the "slide" boot flag needs to be disabled. 2.a) Most ATI GPUs, e.g. RX Vega 64, RX Vega Frontier, RX 580, RX 560 are supposed to be "natively" implemented. It is commonly recommended not to use RX 560 and RX 580 GPUs due to the lacking iGPU implementation when using SMBIOS iMacPro1,1. With macOS 10.14.5 Beta 1, also the new Radeon VII is now natively implemented. By means of my RadeonVII/Vega64/Vega56/RX560/RX580 SSDTs, available in my respective X99 SSDT Github repository, and Whatevergreen.kext, all available DP and HDMI ports, including multi-monitor support, display HotPlug and system sleep/wake should be automatically and successfully implemented. Whatevergreen.kext only seems required for all Vegas possessing less than 6 physical ports (including the original Vegas like Frontier and Vega 64), else the current AMD SSDTs do pretty well their job. Important additional comment for all Vega users with 4K monitors though: when connecting a Vega with e.g. the LG 38UC99-W (WUHD, 3840 pix x 1600 pix) via one of the Display Ports (DPs), the screen resolution is fine under both Windows 10 and macOS High Sierra but is totally at odd during boot (VGA like boot screen resolution). The VEGA DP 4K boot screen resolution issue is neither related with the fact that the LG 38UC99-W is an ultra-wide (3840x1600) and not a true UHD (3840x2160) monitor nor related to any likely apparent issue with the ASUS X99-A II firmware. It is definitely a Vega firmware problem in combination with most 4K displays, as the DP 4K boot screen resolution issue is totally absent with any Nvidia GPU and the problem also does not only affect the ASUS Splash Screen but also spreads over the entire boot process until the login screen is reached (Windows and macOS). Splash Screen, Apple logo or verbose boot messages are not stretched but rather have VGA like resolution. Any fix of the AMD vBIOS would be highly appreciated. It is more than disappointing to witness such issues with 600-1000$ GPUs... Fortunately, the 4K boot screen issue is restricted to the Vega DP ports and likely due to the fact that the LG 38UC99-W only supports DP 1.2. Solution: Connect your Vega and your 4K display via the HDMI port. The 30 Hz HDMI monitor frequency issue under 10.13 is successfully removed under Mojave: monitor frequency of 60 Hz with the display connected via HDMI (in contrary to 75 Hz via DP). b.) Also Nvidia Kepler Graphics Cards are natively implemented. c.) All Users with Nvidia Maxwell and Pascal Graphics Cards Users still have to wait for the official release of 10.14 Web Drivers. I was actively requesting Web Driver development for macOS 10.14 Betas from Nvidia, which has been rejected. I really hope that Nvidia will not leave again the respective community without Web Driver support. In the meanwhile, Nvidia GPU users have to live with e.g. patched Web Driver xxx.40.105 for macOS High Sierra 10.13.6 after a simple patching procedure detailed in Section E.2), although the latter Web Driver is not really suited for 10.14 and works without hardware acceleration. 3.) The /EFI/Clover/drivers64UEFI/-directory of all former EFI-Folder distributions contained a patched version of the actual apfs.efi. The actual apfs.efi can be obtained by following the respective guideline detailed below: Right-click with your mouse on the "Install macOS High Sierra.app" and select "Show Package Contents" -> click with the mouse on "Contents" and subsequently on "Shared Support" -> double-click with the mouse on "BaseSystem.dmg" for mounting. Go to "usr" -> "standalone" -> "i386". Drop the apfs.efi to your Desktop. To patch the apfs.efi for non-verbose boot, follow THIS LINK. Credits to @PMheart and @ermac. Note however, that the entire apsf.efi approach detailed above recently has become totally obsolete. Thanks to the ApfsSupportPkg developed by @acidenthera & Co. and thanks to it's recent implementation to Clover (thanks to @Slice, @Philip Petev & Co.) in form of ApsfDriverLoader.efi, there is no further need of the former apsf.efi in the /EFI/Clover/drivers64UEFI/ directory. The actual Clover distribution package including the ApsfDriverLoader.efi can by build by means of the Build_Clover.command available on Gitub. Since Version 4.8.8, the latter script also can be used with 10.14 and Xcode 10 + Xcode 10 Command Line Tools thanks to @vector sigma. By adding export PATH="/usr/local/bin:/usr/bin:/bin:/usr/sbin:/sbin" && buildclover to the script, the latter also can be used in case of Brew, QT5, UEFITool or MacPorts implementations like Latex, X11, gcc, etc. not yet fully compatible with 10.14 Mojave. Again thanks to @vector sigma for also providing/enabling this trick/possibility . 4.) To avoid CPU thread TSC desynchronisation errors during boot and wake from S3, likely induced by yet erroneous CPU BIOS microcode implementations, we need to use TSCAdjustReset.kext provided by @interferenc in the /EFI/CLOVER/kexts/Other/ directory of both USB Flash Drive and System Disk in the latter case. To access TSCAdjustRest.kext, download primarily its source distribution from Github with the following terminal command: git clone https://github.com/interferenc/TSCAdjustReset Subsequently copy the TSCAdjustRest source distribution to your Desktop using the following terminal command: mv /TSCAdjustReset ~/Desktop Now change in the terminal to the TSCAdjustReset source distribution on your Desktop with the following terminal command: cd ~/Desktop/TSCAdjustReset/ Now compile the source distribution with Xcode by using the following terminal command: xcodebuild After successful compilation, you will find the TSCAdjustRest.kext in ~/Desktop/TSCAdjustReset/build/Release/ Please note that the TSCAdjustRest.kext by default is configured for a 8-core CPU (16 threads) like the i7-7900K. To adopt the kext for Broadwell-E and Haswell-E processors with more or less cores than 8 cores, apply the following approach: a.) Right-click with the mouse on the TSCAdjustRest.kext file and select "Show Packet Contents". b.) Double-click with the mouse on /contents/ . After a right-click on the "Info.plist" file, select "Open with /Other". Select the TextEdit.app and edit the "Info.plist" file. c.) Use the "find"-function of TextEdit.app and search for the term "IOCPUNumber" d.) Note that the adequate IOCPUNumber for your particular CPU is the number of its threads -1, by always keeping in mind that the number of it's threads is always 2x the number of it's cores. Thus, in case of the 10 core i7-6950X, the IOCPUNumber is 19 (20 threads - 1). <key>IOCPUNumber</key> <integer>19</integer> and following the same methodology, the correct IOCPUNumber for the 6-core i7-6800K is 11 (12 threads -1) <key>IOCPUNumber</key> <integer>11</integer> e.) After adopting the IOCPUNumber for your particular Broadwell-E/EP, Haswell-E/EP processor, save the info.plist file and copy the modified VoodooTSCSync.kext to the /EFI/CLOVER/kexts/Other/ - directories of both USB Flash Drive Installer and System Disk! 5.) Like under macOS 10.13 High Sierra also with macOS 10.14 Mojave, Apple forces all users to use the new Apple file system APFS in case of a Clean Install. In case that you want to remain with the HFS+ file system, use @Brumbear's Unsolid.kext in the /EFI/Clover/kexts/Other/ directory. Note that there is no way to convert an APFS disk back to HFS+ without the loss of all data, but one can easily reformat an APFS formatted disk to HFS+ under OSX by using either Apple's Disk Utility App or "diskutil" commands. All you need to do is to previously unmount the APFS volume before erasing it with a journaled HFS+ file system and a GRUB Partition Table (GTP). If you want to maintain the disk's content, perform a backup before erasing the disk with a HFS+ format. The application of Apple's Disk utility is straight forward. The "diskutil" equivalent is detailed below: In the Terminal app, type: diskutil list In the output which you can read by scrolling back, you will find all internal disks named /dev/disk0, /dev/disk1, depending upon how many physical disks are present in your system. Make a note of the disk identifier for the disk you intend to format (you can eliminate risk by removing all disks but the intended target). In the Terminal app, type: diskutil unmount /dev/diskX where diskX is a place holder for the disk to be unmounted. Now delete the APFS container of diskX: diskutil apfs deleteContainer /dev/diskX Subsequently, you can erase the entire disk with HFS+ and a GPT by typing the following terminal command: diskutil partitionDisk /dev/diskX 1 GPT jhfs+ "iMacPro" R where /dev/diskX is again a place holder for disk to be erased and iMacPro would be the label for the single partition created. The remaining 1 GPT jhfs+ and R arguments tell diskutil to create a single partition, within a GUID partition table, formatted as Journaled HFS+ and using the entire disk, respectively. Alternatively one can also use the following terminal command: diskutil partitionDisk /dev/diskX GPT JHFS+ iMacPro 0b where /dev/diskX is again a place holder for disk to be erased and iMacPro is again the label for the disk partition created. The GPT HFFS+ and 0b arguments again tell diskutil to create a single partition, within a GUID partition table, formatted as Journaled HFS+ and covering the entire disk, respectively. In the Terminal app, type now: diskutil mount /dev/diskX where diskX is again a place holder for the disk to be remounted. Note, that by means of the "diskutil approach", brand new unformatted or not compatibly formatted system NVMe, SSD and HDD system drives can be also directly formatted within the macOS Clean Install procedure. When presented with the initial install screen where you are presented options to Restore From Backup or Install, select Terminal from the Utilities menu bar item; The "diskutil" terminal approach is also able to convert a HFS+ macOS Mojave System Disk to APFS. To do so enter the following terminal command: diskutil apfs convert /dev/diskX where diskX is again a place holder for the HFS+ disk to be converted to APFS. The same procedure again can also be directly performed by means of Apple's Disk Utility. Important recommendation: If you opt for an APFS System Disk implementation, try to also implement all other disks of your system with APFS file format. On systems with APFS disks and non-APFS disks, the boot duration will increase, as apsf.efi will perform a fsck check of non-AFPS disks (like HFS+ or Fat32) during boot. However, dual boot APFS Systems with an NTFS Windows System Disk are not effected by the apsf.efi issue, as OSX does not know how to properly deal with NTFS. 6.) In order to successfully boot your X99 macOS 10.14 Mojave System system, carefully verify that your config.plist contains in Section "KextsToPatch" of Section "Kernel and Kext Patches" of Clover Configurator the 10.14 IOPCIFamily Kext Patch kindly provided by @PMHeart. D.) iMac macOS 10.14 Mojave System Setup Below, one finds a detailed description for the Installation/Update of/to macOS Mojave 10.14. This also includes the EFI-Folder Preparation (D.1), the macOS Mojave 10.14 Installer Package creation (D.2), the macOS Mojave 10.14 USB Flash Drive Installer Creation (D.3) and the macOS Mojave 10.14 Clean Install. One also finds instructions for a direct iMac Pro conversion of a functional Broadwell-E/EP, Haswell-E/EP X99 system with a SMBIOS System Definition different from iMacPro1,1 and standard macOS build implementation (D.5) of any former macOS distribution. D.6 finally provides details to the future iMac Pro macOS Mojave Update Procedure. D.1) iMac Pro EFI-Folder Preparation In order to successfully boot a macOS USB Flash Drive Installer or System Disk on a Hackintosh system, both drives must be equipped with an EFI-Folder in their EFI partitions. In this Section we will prepare a fully equipped EFI-Folder with SMBIOS iMacPro1,1 System definition. 1.) Download and unzip my actual respective X99 EFI-Folder distribution and copy the therein contained EFI-Folder to your Desktop. 2.) Open the config.plist in /EFI/Clover/ with the latest version of Clover Configurator (>/= v.4.60.0), proceed to the "SMBIOS" Section and complete the SMBIOS iMacPro1,1 Serial Number, Board Serial Number and SMUUID entries. These details are mandatory to successfully run iMessage and FaceTime on your iMac Pro System. Note that all other iMacPro1,1 SMBIOS Details are already implemented in the config.plist of my actual respective X99 EFI-Folder distribution. Press several times the "Generate New" Button next to the serial number text field to generate a serial number and board serial number.With SMBIOS of an iMacPro1,1 it is not currently possible to verify the validity of the serial number on everymac.com.Therefore, verify the validity of your serial number on appleserialnumberinfo.com instead. Open the https://checkcoverage.apple.com site, paste your Serial Number and confirm that the serial number is not in use yet.Finally press several times the "Generate New" button next to SmUUID. Depending on your system configuration (Broadwell-E/EP or Haswell-E/EP) change or adopt the following settings if necessary a.) Users of mainboards with locked MSR Register (disabled MSR OSX Kernel write access) have to add the xcpm_core_scope_msrs © Pike R. Alpha Kernel patch in their config.plist under "KernelToPatch" in Section "Kernel and Kext Patches" of Clover Configurator xcpm_core_scope_msrs © Pike R. Alpha 10.14 (kindly provided by @PMHeart) Find: 31 d2 e8 91 fc ff ff Replace: 31 d2 90 90 90 90 90 and also to check "KernelPm". b.) "FakeCPUID" in "Kernel and Kext Patches" Section of Clover Configurator: Broadwell-E/EP FakeCPUID: "0x040674" Haswell-E/EP standard FakeCPUID: "0x0306F2" c.) All Broadwell-E/EP and Haswell-E/EP users have to enable the macOS independent _xcpm performance kernel patch for 10.13.6+ and all 10.14 version (kindly provided by @PMheart and based on the method developed by @vit9696) in their config.plist under "KernelToPatch" in Section "Kernel and Kext Patches" of Clover Configurator to enable the OC capability of their respective CPUs. macOS independent _xcpm performance kernel patch for 10.13.6+ and all 10.14 version (kindly provided by @PMheart and based on the method developed by @vit9696) Find: C1E30848 63D389D0 48C1EA20 Replace: C1E308B8 00FF0000 31D29090 To successfully boot my Broadwell-E X99 System and to obtain full XCPM-performance I also need to include the following Kernel patch: d.) xcpm_pkg_scope_msrs © Pike R. Alpha (kindly provided by @PMHeart) Find: BE070000 0031D2E8 91FCFFFF Replace: BE070000 0031D290 90909090 Further one might want to include: e.) _xcpm_SMT_scope_msrs 1 & 2 © Pike R. Alpha 10.14 (kindly provided by @PMHeart) Find: BE0B0000 0031D2E8 66FCFFFF Replace: BE0B0000 0031D290 90909090 Find: 31D2E87E FCFFFF Replace: 31D29090 909090 f.) Enable "PluginType" in your config.plist under SSDT/Generate Options/ in Section ACPI of Clover Configurator for a fully working XCPM implementation. Note that by this, Pike Alpha's former ssdt.aml XCPM implementation becomes totally obsolete. g.) Aslo verify once more that your config.plist contains the 10.14 IOPCIFamily kext patch! Name* Find*[HEX] Replace*[HEX] Comment IOPCIFamily 483D0000 0040 483D0000 0080 IOPCIFamily patch © PMHeart h.) Enable USB port limit patches: Valid USB port limit patches for 10.14.4 provided by @PMHeart (hardwired but yet disabled in my respective EFI-Folder distribution) by following initial USB port limit patch approach for 10.14.3 by @ydeng : kext : com.apple.iokit.IOUSBHostFamily Find : 83FB0F0F 87 Replace : 83FB3F0F 87 Name : USB Port Limit Patch 1 ©PMHeart kext : com.apple.driver.usb.AppleUSBXHCI Find : 4183FF0F 0F83 Replace : 4183FF3F 0F83 Name : USB Port Limit Patch 2 ©PMHeart kext : com.apple.iokit.IOUSBHostFamily Find : 83E30FD3 E34109DF Replace : 83E33FD3 E34109DF Name : USB Port Limit Patch 3 ©PMHeart i.) config.plist "Type" entry in Section "CPU" of Clover Configurator: By default, "0x0F01" for XEON-W is implemented for Cpu "Type" in the config.plist of the default EFI-Folder configuration, in compliance with SMBIOS iMacPro1,1. While "0x0F01" is fully valid for Syklake-X on X299 platforms, one should better use the correct "Type" entries for the different Broadwell and Haswell CPUs tabled below and kindly provided by @PMHeart: Haswell-E: ⁃ Core i7 Extreme (5960X, 5930K, 5820K): 0x0705 ⁃ Xeon E7: 0x0501 Haswell-EP: ⁃Xeon E5: 0x0A01 Broadwell-E: Core i7 (6950X, 6900K, 6850K, 6800K): 0x0706 Broadwell-EP: ⁃ Xeon E5: 0x0A01 Finally save the modified config.plist. 3.) Copy the appropriate TSCAdjustRest.kext, which you modified in error prevention C.4), to the /EFI/CLOVER/kexts/Other/ directory of the EFI-Folder. You know have a fully equipped EFI-Folder for subsequent implementations as detailed below. D.2) iMac Pro macOS Mojave 10.14 Installer Package Creation If you are not able to successfully download the macOS Mojave 10.14.4 (18E226) full package installer (6.04 GB) from the Appstore, follow the individual steps detailed below:1.) Open a terminal and create a "041-56507" directory on your Desktop. Subsequently change to the newly created directory. All this can be done with the following terminal commands: mkdir ~/Desktop/041-56507/ cd ~/Desktop/041-56507/ 2.) Download the following files from the Apple server (public links) to your ~/Desktop/041-56507/ directory by a copy & paste of the following terminal commands: curl https://swdist.apple.com/content/downloads/32/45/041-56507/k6okp4vkzucqpoxrgrgycji6jo8z8na8sg/041-56507.English.dist -o 041-56507.English.dist curl http://swcdn.apple.com/content/downloads/32/45/041-56507/k6okp4vkzucqpoxrgrgycji6jo8z8na8sg/InstallAssistantAuto.smd -o InstallAssistantAuto.smd curl http://swcdn.apple.com/content/downloads/32/45/041-56507/k6okp4vkzucqpoxrgrgycji6jo8z8na8sg/AppleDiagnostics.chunklist -o AppleDiagnostics.chunklist curl http://swcdn.apple.com/content/downloads/32/45/041-56507/k6okp4vkzucqpoxrgrgycji6jo8z8na8sg/AppleDiagnostics.dmg -o AppleDiagnostics.dmg curl http://swcdn.apple.com/content/downloads/32/45/041-56507/k6okp4vkzucqpoxrgrgycji6jo8z8na8sg/OSInstall.mpkg -o OSInstall.mpkg curl http://swcdn.apple.com/content/downloads/32/45/041-56507/k6okp4vkzucqpoxrgrgycji6jo8z8na8sg/BaseSystem.chunklist -o BaseSystem.chunklist curl http://swcdn.apple.com/content/downloads/32/45/041-56507/k6okp4vkzucqpoxrgrgycji6jo8z8na8sg/InstallESDDmg.chunklist -o InstallESDDmg.chunklist curl http://swcdn.apple.com/content/downloads/32/45/041-56507/k6okp4vkzucqpoxrgrgycji6jo8z8na8sg/BaseSystem.dmg -o BaseSystem.dmg curl https://swdist.apple.com/content/downloads/32/45/041-56507/k6okp4vkzucqpoxrgrgycji6jo8z8na8sg/RecoveryHDMetaDmg.pkm -o RecoveryHDMetaDmg.pkm curl http://swcdn.apple.com/content/downloads/32/45/041-56507/k6okp4vkzucqpoxrgrgycji6jo8z8na8sg/RecoveryHDMetaDmg.pkg -o RecoveryHDMetaDmg.pkg curl https://swdist.apple.com/content/downloads/32/45/041-56507/k6okp4vkzucqpoxrgrgycji6jo8z8na8sg/InstallAssistantAuto.pkm -o InstallAssistantAuto.pkm curl http://swcdn.apple.com/content/downloads/32/45/041-56507/k6okp4vkzucqpoxrgrgycji6jo8z8na8sg/InstallAssistantAuto.pkg -o InstallAssistantAuto.pkg curl http://swcdn.apple.com/content/downloads/32/45/041-56507/k6okp4vkzucqpoxrgrgycji6jo8z8na8sg/InstallInfo.plist -o InstallInfo.plist curl https://swdist.apple.com/content/downloads/32/45/041-56507/k6okp4vkzucqpoxrgrgycji6jo8z8na8sg/MajorOSInfo.pkm -o MajorOSInfo.pkm curl http://swcdn.apple.com/content/downloads/32/45/041-56507/k6okp4vkzucqpoxrgrgycji6jo8z8na8sg/MajorOSInfo.pkg -o MajorOSInfo.pkg curl https://swdist.apple.com/content/downloads/32/45/041-56507/k6okp4vkzucqpoxrgrgycji6jo8z8na8sg/InstallESDDmg.pkm -o InstallESDDmg.pkm curl http://swcdn.apple.com/content/downloads/32/45/041-56507/k6okp4vkzucqpoxrgrgycji6jo8z8na8sg/InstallESDDmg.pkg -o InstallESDDmg.pkg The full list of package files can be found within the following catalog URL, searching for key "k6okp4vkzucqpoxrgrgycji6jo8z8na8sg": https://swscan.apple.com/content/ca...ion-snowleopard-leopard.merged-1.sucatalog.gz 3.) Create the installer.pkg on your Desktop with the following terminal command: cd .. productbuild --distribution ./041-56507/041-56507.English.dist --package-path ./041-56507/ installer.pkg 4.) Create the "Install MacOS Mojave" in the /Applications folder of your System Disk with the following terminal command: sudo /usr/sbin/installer -pkg installer.pkg -target / In case that you receive an error message, ignore the latter and proceed with 5.)5.) Now add the following files to your "Install macOS Mojave.app" with the following terminal commands: sudo cp ./041-56507/InstallESDDmg.pkg /Applications/Install\ macOS\ Mojave.app/Contents/SharedSupport/InstallESD.dmg sudo cp ./041-56507/AppleDiagnostics.dmg /Applications/Install\ macOS\ Mojave.app/Contents/SharedSupport/ sudo cp ./041-56507/AppleDiagnostics.chunklist /Applications/Install\ macOS\ Mojave.app/Contents/SharedSupport/ sudo cp ./041-56507/BaseSystem.dmg /Applications/Install\ macOS\ Mojave.app/Contents/SharedSupport/ sudo cp ./041-56507/BaseSystem.chunklist /Applications/Install\ macOS\ Mojave.app/Contents/SharedSupport/ Verify your "Install Mojave.app" for completeness. You should now have a complete macOS Mojave 10.14. (18E226) Installer package in your /Applications Folder.The entire "Install macOS Mojave.app" creation procedure has been also fully automatised within one single script, as already implemented for macOS High Sierra with the help off @macandrea. createInstaller-10.14.4-23042019.sh will automatically create on any MacOS System the "Install macOS Mojave.app" for macOS Mojave 10.14.4 (18E226) in the /Applications folder.Just download und unzip createInstaller-10.14.4-23042019.sh.zip and run the following terminal commands: cd ~/Downloads chmod +x createInstaller-10.14.4-23042019.sh ./createInstaller-10.14.4-23042019.sh And here is createInstaller-10.14.4-SB-23042019.sh, which will automatically create on any MacOS System the "Install macOS Mojave.app" for macOS Mojave 10.14.4 (18E2034) - special build in the /Applications folder. Just download und unzip createInstaller-10.14.4-SB-23042019.sh.zip and run the following terminal commands: cd ~/Downloads chmod +x createInstaller-10.14.4-SB-23042019.sh ./createInstaller-10.14.4-SB-23042019.sh D.3) iMac Pro macOS Mojave 10.14 USB Flash Drive Installer Creation Follow the individual steps detailed below to successfully create a bootable iMac Pro macOS Mojave 10.14 USB Flash Drive Installer. 1.) Format a USB Flash Drive of your choice (source, named USB) with HFS+ [(Mac OS Extended (Journaled)] and a GUID partition table by means of Apple's Disk Utility on any other Hackintosh or Mac of your choice. This will create an empty HFS+ Partition and a yet empty EFI-partition on your iMac Pro macOS USB Flash Drive Installer. 2.) With the macOS Mojave 10.14 Installer Package in your /Application Folder, connect your USB Flash Drive (named USB) and run the following terminal command: sudo /Applications/Install\ macOS\ Mojave.app/Contents/Resources/createinstallmedia --volume /Volumes/USB --nointeraction Alternatively, one can create the iMac Pro macOS USB Flash Drive Installer also by means of the Install Disk Creator.app. 3.) For successfully booting your iMac Pro macOS USB Flash Drive Installer, the latter must however also contain a valid EFI- Folder with an SMBIOS iMacPro1,1 system definition. Thus, copy the EFI-Folder you prepared in Section D.1) to the yet empty EFI Partition of your macOS USB Flash Drive Installer. You now have a fully functional and bootable macOS Mojave 10.14 USB Flash Drive Installer. D.4) iMac Pro macOS Mojave 10.14 Clean Install on Broadwell-E/EP, Haswell-E/EP, X99 Follow the individual steps detailed below to successfully setup macOS Mojave 10.14 on a virgin system drive of your choice (NVMe, SSD or HDD). 1.) In order to perform a clean install of macOS Mojave 10.14, prepare a virgin NVMe, SDD or HDD destination drive for the iMac Pro macOS installation by formatting the drive with HFS+ [(Mac OS Extended (Journaled)] and a GUID partition table by means of Apple's Disk Utility on any other Hackintosh or Mac of your choice. This will create an empty HFS+ Partition and a yet empty EFI-partition on the drive. 2.) Copy the EFI-Folder you prepared in Section D.1) to the yet empty EFI Partition. 3.) Now connect the Destination Drive to your Hackintosh System and boot the latter with the plugged macOS Mojave 10.14 USB Flash Drive Installer, your created in Section D.2) 4.) While booting your system, press the F8 button to enter the BIOS boot menu. Select to boot from your macOS USB Flash Drive Installer. 5.) Subsequently, click on the USB Flash Drive Installer Icon in the clover boot menu to boot the respective macOS Installer partition on your macOS USB Flash Drive Installer 6.) After successful boot, pass the individual steps of the macOS 10.14 Mojave installation menu and finally select the destination drive of your macOS 10.14 Mojave Installation, which should be logically the system disk you successfully configured above. In the next step, the Installer will create a macOS Mojave 10.14 Installer Partition on the system disk and subsequently reboot your system. 7.) During system reboot, just press again the F8 button to enter the BIOS boot menu. Select again to boot from your USB Flash Drive. In contrary to 6.), click this time on the "Install MacOS.." Icon in the clover boot screen to boot the newly created macOS Mojave 10.14 Installer Partition on your system disk. 8.) After successful boot, you will enter now the macOS Mojave 10.14 Installer Screen with a progress bar starting at about 34 minutes. 9.) After another reboot, press again the F8 button to enter the BIOS boot menu. Select to boot with your System Disk EFI-folder. Click on the "MacOS Mojave" icon on the clover boot screen to boot the new macOS Mojave partition of your system disk. 10.) After successful boot you have to perform the iCloud registration to have your first iMac Pro macOS Mojave 10.14 build. Proceed with Section D.6) - iMac Pro macOS High Sierra Build Updates (if necessary) or E.) - Post Installation Process. D.5) Direct iMac Pro conversions of a functional Broadwell-E/EP, Haswell-E/EP, X99 system with a SMBIOS System Definition different from iMacPro1,1 and a standard macOS build implementation 1.) Replace the EFI-Folder of your System Disk by the EFI-Folder you created in Section D.1) 2.) Copy /System/Library/CoreServices/PlatformSupport.plist to your Desktop, add BoardID "Mac-7BA5B2D9E42DDD94" under SupportedBoardIDs by means of Xcode as suggested by user Griven from the German Hackintosh-Forum and copy back the modified PlatformSupport.plist to System/Library/CoreServices/. 3.) If not already in your /Applications folder after performing Section D.2), copy the iMac Pro macOS Installer Package to your /Applications folder. 4.) Double click on the "Install macOS Mojave.app" in the /Applications Folder to start the macOS Mojave 10.14 installation. 5.) After reboot, click on the "Install MacOS.." Icon in the clover boot screen to boot the newly created macOS Mojave 10.14 Installer Partition on your system disk. 6.) After successful boot, you will enter now the macOS Mojave 10.14 Installer Screen with a progress bar starting at 43 minutes. 7.) After another reboot, click on the "MacOS Mojave" icon in the clover boot screen to boot the updated macOS Mojave 10.14 on your system disk. 8.) After successful boot you have to register at iCloud at the end of the macOS installation, and you will now have your first iMac Pro macOS Mojave 10.14 build. Proceed with Section D.6) - iMac Pro macOS 10.14 Mojave Update Procedure (if necessary) or Section E.) - Post Installation Process. D.6) iMac Pro macOS 10.14 Mojave Update Procedure If you already used my 10.13 iMacPro X99 guide to setup a 10.13 iMac Pro macOS build, you simply have to update your EFI-Folder and directly perform the update to macOS 10.14.0 Mojave from System Disk by else following steps 4.) to 8.) of D.5) above. Any future macOS Mojave update can be directly performed via "Software Update" under "System Preferences". E.) Post Installation Process E.1) XNU CPU Power Management (XCPM) Configuration The config.plist of my actual respective X99 EFI-Folder distribution already contains a fully functional XCPM configuration for the i7-6950X Broadwell-E CPU, which just needs to be adopted for other CPU configurations (Broadwell-E/EP different from i7-6950X, Haswell-E/EP). Before adapting the XCPM configuration, verify the following BIOS settings: Advanced\CPU Configuration\CPU Power Management Configuration\ Enhanced Intel SpeedStep Technology (EIST): Disabled Turbo mode: Enabled CPU C-State: Enabled Enhanced C1 State: Enabled CPU C3 Report: Enabled CPU C6 Report: Enabled Package C State Limit: C6(non Retention) state Subsequently, follow the individual steps below. 1.) Open the config.plist of your 10.14 system disk and revise the "Kernel and Kext Patches" Section. a.) Users of mainboards with locked MSR Register (disabled MSR OSX Kernel write access) have to add the xcpm_core_scope_msrs © Pike R. Alpha Kernel patch in their config.plist under "KernelToPatch" in Section "Kernel and Kext Patches" of Clover Configurator xcpm_core_scope_msrs © Pike R. Alpha 10.14 (kindly provided by @PMHeart) Find: 31 d2 e8 91 fc ff ff Replace: 31 d2 90 90 90 90 90 and also to check "KernelPm". b.) Verify "FakeCPUID" in "Kernel and Kext Patches" Section of Clover Configurator: Broadwell-E/EP FakeCPUID: "0x040674" Haswell-E/EP standard FakeCPUID: "0x0306F2" c.) All Broadwell-E/EP and Haswell-E/EP users have to enable the macOS independent _xcpm performance kernel patch for 10.13.6+ and all 10.14 version (kindly provided by @PMheart and based on the method developed by @vit9696) in their config.plist under "KernelToPatch" in Section "Kernel and Kext Patches" of Clover Configurator to enable the OC capability of their respective CPUs. macOS independent _xcpm performance kernel patch for 10.13.6+ and all 10.14 version (kindly provided by @PMheart and based on the method developed by @vit9696) Find: C1E30848 63D389D0 48C1EA20 Replace: C1E308B8 00FF0000 31D29090 To successfully boot my Broadwell-E X99 System and to obtain full XCPM-performance I also need to include the following Kernel patch: d.) xcpm_pkg_scope_msrs © Pike R. Alpha (kindly provided by @PMHeart) Find: BE070000 0031D2E8 91FCFFFF Replace: BE070000 0031D290 90909090 Further one also might like to implement: e.) _xcpm_SMT_scope_msrs 1 & 2 © Pike R. Alpha 10.14 (kindly provided by @PMHeart) Find: BE0B0000 0031D2E8 66FCFFFF Replace: BE0B0000 0031D290 90909090 Find: 31D2E87E FCFFFF Replace: 31D29090 909090 f.) Enable "PluginType" in your config.plist under SSDT/Generate Options/ in Section ACPI of Clover Configurator for a fully working XCPM implementation. Note that by this, Pike Alpha's former ssdt.aml XCPM implementation becomes totally obsolete. g.) Also verify once more in concordance with Error Protection C.6) that the 10.14 IOPCIFamily kext patch is enabled in your config.plist! Name* Find*[HEX] Replace*[HEX] Comment IOPCIFamily 483D0000 0040 483D0000 0080 IOPCIFamily patch © PMHeart There is also no need for injecting any additional frequency vector.h.) config.plist "Type" entry in Section "CPU" of Clover Configurator:By default, "0x0F01" for XEON-W is implemented for Cpu "Type" in the config.plist of the default EFI-Folder configuration, in compliance with SMBIOS iMacPro1,1. While "0x0F01" is fully valid for Syklake-X on X299 platforms, one should better use the correct "Type" entries for the different Broadwell and Haswell CPUs tabled below and kindly provided by @PMHeart: Haswell-E: ⁃ Core i7 Extreme (5960X, 5930K, 5820K): 0x0705 ⁃ Xeon E7: 0x0501 Haswell-EP: ⁃Xeon E5: 0x0A01 Broadwell-E: Core i7 (6950X, 6900K, 6850K, 6800K): 0x0706 Broadwell-EP: ⁃ Xeon E5: 0x0A01 2.) Reboot after applying any changes. To verify your XCPM configuration, perform the following steps: 1.) Verify with the terminal command "sysctl machdep.xcpm.mode" if the XCPM mode is active. If so, "sysctl machdep.xcpm.mode" should return "1". 2.) Verify that in the IORegistryExplorer you have the following entry under CP00@0: Property: Type: Value: plugin-type Number 0x1 3.) Verify with the terminal command kextstat|grep -y x86plat that the "X86PlatformPlugin.kext" is loaded. If the command returns something like 112 1 0xffffff7f822bc000 0x17000 0x17000 com.apple.driver.X86PlatformPlugin (1.0.0) FD88AF70-3E2C-3935-99E4-C48669EC274B <111 19 18 13 11 7 6 5 4 3 1> 146 1 0xffffff7f822d3000 0x7000 0x7000 com.apple.driver.X86PlatformShim (1.0.0) DCEA94A4-3547-3129-A888-E9D5C77B275E <112 111 13 7 4 3> you are fine. 4.) Verify with the terminal command [code]kextstat|grep -y appleintelcpu[/code] that you got rid of the Apple Intel CPU power management. If the result is empty you are fine. 5.) To verify that the Frequency-Vectors are loaded, use the following terminal command: sysctl -n machdep.xcpm.vectors_loaded_count If everything is ok, the command returns "1". 6.) To obtain further information on your XCPM Power Management configuration, download Piker Alpha’s AppleIntelInfo.kext from Github. To compile the source code, you need to primarily install Xcode (Appstore) and Xcode Command Line Tools! This guideline might be helpful for the successfully installation of the latter. Now enter the following terminal commands: cd ~/Downloads/AppleIntelInfo-master xcodebuild cd build/Release chmod -R 755 AppleIntelInfo.kext sudo chown -R root:wheel AppleIntelInfo.kext Load the AppleIntelInfo.kext with "kextload" and "cat" the info-results with the following terminal commands: sudo kextload AppleIntelInfo.kext sudo cat /tmp/AppleIntelInfo.dat The cat command should reveal something like the following result: AppleIntelInfo.kext v2.5 Copyright © 2012-2017 Pike R. Alpha. All rights reserved. Settings: ------------------------------------------ logMSRs..................................: 1 logIGPU..................................: 0 logCStates...............................: 1 logIPGStyle..............................: 1 InitialTSC...............................: 0x11d3a1760ecb2 (10453 MHz) MWAIT C-States...........................: 8480 Processor Brandstring....................: Intel(R) Core(TM) i7-6950X CPU @ 3.00GHz Processor Signature..................... : 0x406F1 ------------------------------------------ - Family............................... : 6 - Stepping............................. : 1 - Model................................ : 0x4F (79) Model Specific Registers (MSRs) ------------------------------------------ MSR_CORE_THREAD_COUNT............(0x35) : 0x0 ------------------------------------------ - Core Count........................... : 10 - Thread Count......................... : 20 MSR_PLATFORM_INFO................(0xCE) : 0x20080C3BF3811E00 ------------------------------------------ - Maximum Non-Turbo Ratio.............. : 0x1E (3000 MHz) - Ratio Limit for Turbo Mode........... : 1 (programmable) - TDP Limit for Turbo Mode............. : 1 (programmable) - Low Power Mode Support............... : 1 (LPM supported) - Number of ConfigTDP Levels........... : 1 (additional TDP level(s) available) - Maximum Efficiency Ratio............. : 12 - Minimum Operating Ratio.............. : 8 MSR_PMG_CST_CONFIG_CONTROL.......(0xE2) : 0x1E000005 ------------------------------------------ - I/O MWAIT Redirection Enable......... : 0 (not enabled) - CFG Lock............................. : 0 (MSR not locked) - C3 State Auto Demotion............... : 1 (enabled) - C1 State Auto Demotion............... : 1 (enabled) - C3 State Undemotion.................. : 1 (enabled) - C1 State Undemotion.................. : 1 (enabled) - Package C-State Auto Demotion........ : 0 (disabled/unsupported) - Package C-State Undemotion........... : 0 (disabled/unsupported) MSR_PMG_IO_CAPTURE_BASE..........(0xE4) : 0x10414 ------------------------------------------ - LVL_2 Base Address................... : 0x414 - C-state Range........................ : 1 (C-States not included, I/O MWAIT redirection not enabled) IA32_MPERF.......................(0xE7) : 0xACF485063 IA32_APERF.......................(0xE8) : 0xB96AC7BB7 MSR_0x150........................(0x150) : 0x0 MSR_FLEX_RATIO...................(0x194) : 0xE0000 ------------------------------------------ MSR_IA32_PERF_STATUS.............(0x198) : 0x204900001E00 ------------------------------------------ - Current Performance State Value...... : 0x1E00 (3000 MHz) MSR_IA32_PERF_CONTROL............(0x199) : 0x2A00 ------------------------------------------ - Target performance State Value....... : 0x2A00 (4200 MHz) - Intel Dynamic Acceleration........... : 0 (IDA engaged) IA32_CLOCK_MODULATION............(0x19A) : 0x0 IA32_THERM_INTERRUPT.............(0x19B) : 0x0 IA32_THERM_STATUS................(0x19C) : 0x883D0000 ------------------------------------------ - Thermal Status....................... : 0 - Thermal Log.......................... : 0 - PROCHOT # or FORCEPR# event.......... : 0 - PROCHOT # or FORCEPR# log............ : 0 - Critical Temperature Status.......... : 0 - Critical Temperature log............. : 0 - Thermal Threshold #1 Status.......... : 0 - Thermal Threshold #1 log............. : 0 - Thermal Threshold #2 Status.......... : 0 - Thermal Threshold #2 log............. : 0 - Power Limitation Status.............. : 0 - Power Limitation log................. : 0 - Current Limit Status................. : 0 - Current Limit log.................... : 0 - Cross Domain Limit Status............ : 0 - Cross Domain Limit log............... : 0 - Digital Readout...................... : 61 - Resolution in Degrees Celsius........ : 1 - Reading Valid........................ : 1 (valid) MSR_THERM2_CTL...................(0x19D) : 0x0 IA32_MISC_ENABLES................(0x1A0) : 0x850089 ------------------------------------------ - Fast-Strings......................... : 1 (enabled) - FOPCODE compatibility mode Enable.... : 0 - Automatic Thermal Control Circuit.... : 1 (enabled) - Split-lock Disable................... : 0 - Performance Monitoring............... : 1 (available) - Bus Lock On Cache Line Splits Disable : 0 - Hardware prefetch Disable............ : 0 - Processor Event Based Sampling....... : 0 (PEBS supported) - GV1/2 legacy Enable.................. : 0 - Enhanced Intel SpeedStep Technology.. : 1 (enabled) - MONITOR FSM.......................... : 1 (MONITOR/MWAIT supported) - Adjacent sector prefetch Disable..... : 0 - CFG Lock............................. : 0 (MSR not locked) - xTPR Message Disable................. : 1 (disabled) MSR_TEMPERATURE_TARGET...........(0x1A2) : 0x640A00 ------------------------------------------ - Turbo Attenuation Units.............. : 0 - Temperature Target................... : 100 - TCC Activation Offset................ : 0 MSR_MISC_PWR_MGMT................(0x1AA) : 0x402000 ------------------------------------------ - EIST Hardware Coordination........... : 0 (hardware coordination enabled) - Energy/Performance Bias support...... : 1 - Energy/Performance Bias.............. : 0 (disabled/MSR not visible to software) - Thermal Interrupt Coordination Enable : 1 (thermal interrupt routed to all cores) MSR_TURBO_RATIO_LIMIT............(0x1AD) : 0x2A2A2A2A2A2A2A2A ------------------------------------------ - Maximum Ratio Limit for C01.......... : 2A (4200 MHz) - Maximum Ratio Limit for C02.......... : 2A (4200 MHz) - Maximum Ratio Limit for C03.......... : 2A (4200 MHz) - Maximum Ratio Limit for C04.......... : 2A (4200 MHz) - Maximum Ratio Limit for C05.......... : 2A (4200 MHz) - Maximum Ratio Limit for C06.......... : 2A (4200 MHz) - Maximum Ratio Limit for C07.......... : 2A (4200 MHz) - Maximum Ratio Limit for C08.......... : 2A (4200 MHz) MSR_TURBO_RATIO_LIMIT1...........(0x1AE) : 0x2222222222222A2A ------------------------------------------ - Maximum Ratio Limit for C09.......... : 2A (4200 MHz) - Maximum Ratio Limit for C10.......... : 2A (4200 MHz) IA32_ENERGY_PERF_BIAS............(0x1B0) : 0x5 ------------------------------------------ - Power Policy Preference...............: 5 (balanced performance and energy saving) MSR_POWER_CTL....................(0x1FC) : 0x2904005B ------------------------------------------ - Bi-Directional Processor Hot..........: 1 (enabled) - C1E Enable............................: 1 (enabled) MSR_RAPL_POWER_UNIT..............(0x606) : 0xA0E03 ------------------------------------------ - Power Units.......................... : 3 (1/8 Watt) - Energy Status Units.................. : 14 (61 micro-Joules) - Time Units .......................... : 10 (976.6 micro-Seconds) MSR_PKG_POWER_LIMIT..............(0x610) : 0x7FFF80015FFF8 ------------------------------------------ - Package Power Limit #1............... : 4095 Watt - Enable Power Limit #1................ : 1 (enabled) - Package Clamping Limitation #1....... : 1 (allow going below OS-requested P/T state during Time Window for Power Limit #1) - Time Window for Power Limit #1....... : 10 (2560 milli-Seconds) - Package Power Limit #2............... : 4095 Watt - Enable Power Limit #2................ : 1 (enabled) - Package Clamping Limitation #2....... : 1 (allow going below OS-requested P/T state setting Time Window for Power Limit #2) - Time Window for Power Limit #2....... : 3 (20 milli-Seconds) - Lock................................. : 0 (MSR not locked) MSR_PKG_ENERGY_STATUS............(0x611) : 0xC06AC ------------------------------------------ - Total Energy Consumed................ : 48 Joules (Watt = Joules / seconds) MSR_PKGC3_IRTL...................(0x60a) : 0x0 MSR_PKGC6_IRTL...................(0x60b) : 0x0 MSR_PKG_C2_RESIDENCY.............(0x60d) : 0x298ED1EE0 MSR_PKG_C3_RESIDENCY.............(0x3f8) : 0xD638F0 MSR_PKG_C2_RESIDENCY.............(0x60d) : 0x298ED1EE0 MSR_PKG_C3_RESIDENCY.............(0x3f8) : 0xD638F0 MSR_PKG_C6_RESIDENCY.............(0x3f9) : 0x44911A9AC IA32_TSC_DEADLINE................(0x6E0) : 0x11D3A1BDB3826 CPU Ratio Info: ------------------------------------------ Base Clock Frequency (BLCK)............. : 100 MHz Maximum Efficiency Ratio/Frequency.......: 12 (1200 MHz) Maximum non-Turbo Ratio/Frequency........: 30 (3000 MHz) Maximum Turbo Ratio/Frequency............: 42 (4200 MHz) P-State ratio * 100 = Frequency in MHz ------------------------------------------ CPU P-States [ (12) 27 30 ] CPU C3-Cores [ 1 2 4 6 8 10 12 14 16 18 ] CPU C6-Cores [ 0 2 4 6 8 10 12 14 16 18 ] CPU P-States [ 12 17 27 (30) ] CPU C3-Cores [ 1 2 3 4 6 7 8 10 11 12 14 15 16 18 19 ] CPU C6-Cores [ 0 2 4 6 8 9 10 12 14 16 17 18 ] CPU P-States [ (12) 17 27 30 31 ] CPU C3-Cores [ 0 1 2 3 4 6 7 8 9 10 11 12 14 15 16 18 19 ] CPU P-States [ (12) 14 17 27 30 31 ] CPU C3-Cores [ 0 1 2 3 4 5 6 7 8 9 10 11 12 13 14 15 16 18 19 ] CPU C6-Cores [ 0 2 4 6 8 9 10 12 14 15 16 17 18 ] CPU P-States [ (12) 14 17 20 27 30 31 ] CPU C3-Cores [ 0 1 2 3 4 5 6 7 8 9 10 11 12 13 14 15 16 17 18 19 ] CPU C6-Cores [ 0 1 2 4 6 7 8 9 10 12 14 15 16 17 18 ] CPU P-States [ (12) 14 16 17 20 27 30 31 ] CPU P-States [ (12) 14 16 17 18 20 27 30 31 ] CPU P-States [ (12) 14 16 17 18 20 27 30 31 32 ] CPU P-States [ (12) 14 16 17 18 20 22 27 30 31 32 ] CPU C6-Cores [ 0 1 2 3 4 6 7 8 9 10 12 14 15 16 17 18 ] CPU P-States [ (12) 13 14 16 17 18 20 22 27 30 31 32 ] CPU C6-Cores [ 0 1 2 3 4 6 7 8 9 10 12 13 14 15 16 17 18 19 ] CPU P-States [ (12) 13 14 16 17 18 20 22 23 27 30 31 32 ] CPU P-States [ 12 13 14 (15) 16 17 18 20 22 23 27 30 31 32 ] CPU P-States [ (12) 13 14 15 16 17 18 20 22 23 25 27 30 31 32 ] CPU P-States [ (12) 13 14 15 16 17 18 20 21 22 23 25 27 30 31 32 ] CPU C6-Cores [ 0 1 2 3 4 6 7 8 9 10 11 12 13 14 15 16 17 18 19 ] CPU P-States [ 12 13 14 15 16 17 18 20 21 22 23 (24) 25 27 30 31 32 ] CPU P-States [ (12) 13 14 15 16 17 18 19 20 21 22 23 24 25 27 30 31 32 ] CPU P-States [ 12 13 14 15 16 17 18 19 20 21 22 23 24 25 27 29 (30) 31 32 ] CPU C6-Cores [ 0 1 2 3 4 5 6 7 8 9 10 11 12 13 14 15 16 17 18 19 ] CPU P-States [ 12 13 14 15 16 17 18 19 20 21 22 23 24 25 27 28 29 30 31 32 (42) ] CPU P-States [ 12 13 14 15 16 17 18 19 20 21 22 23 24 25 27 28 29 30 31 32 36 (42) ] CPU P-States [ 12 13 14 15 16 17 18 19 20 21 22 23 24 25 27 28 29 30 31 32 34 36 (42) ] CPU P-States [ 12 13 14 15 16 17 18 19 20 21 22 23 24 25 27 28 29 30 31 32 34 35 36 (42) ] CPU P-States [ 12 13 14 15 16 17 18 19 20 21 22 23 24 25 27 28 29 30 31 32 34 35 36 41 (42) ] CPU P-States [ 12 13 14 15 16 17 18 19 20 21 22 23 24 25 27 28 29 30 31 32 34 35 36 37 41 (42) ] CPU P-States [ 12 13 14 15 16 17 18 19 20 21 22 23 24 25 27 28 29 30 31 32 34 35 36 37 38 41 (42) ] CPU P-States [ 12 13 14 15 16 17 18 19 20 21 22 23 24 25 27 28 29 30 31 32 34 35 36 37 38 39 41 (42) ] CPU P-States [ (12) 13 14 15 16 17 18 19 20 21 22 23 24 25 27 28 29 30 31 32 34 35 36 37 38 39 40 41 42 ] CPU P-States [ (12) 13 14 15 16 17 18 19 20 21 22 23 24 25 26 27 28 29 30 31 32 34 35 36 37 38 39 40 41 42 ] CPU P-States [ 12 13 14 15 16 17 18 19 20 21 22 23 24 25 26 27 28 29 30 31 32 33 34 35 36 37 38 39 40 41 (42) ] To unload the AppleIntelInfo.kext, enter the terminal command: sudo kextunload AppleIntelInfo.kext E.2) Graphics Configuration Most ATI GPUs, e.g. RX Vega 64, RX Vega Frontier, RX 580, RX 560 are supposed to be "natively" implemented. It is commonly recommended not to use RX 560 and RX 580 GPUs due to the lacking iGPU implementation when using SMBIOS iMacPro1,1. With macOS 10.14.5 Beta 1, also the new Radeon VII is now natively implemented. By means of my RadeonVII/Vega64/Vega56/RX560/RX580 SSDTs, available in my respective X99 SSDT Github repository, and Whatevergreen.kext, all available DP and HDMI ports, including multi-monitor support, display HotPlug and system sleep/wake should be automatically and successfully implemented. Whatevergreen.kext only seems required for all Vegas possessing less than 6 physical ports (including the original Vegas like Frontier and Vega 64), else the current AMD SSDTs do pretty well their job. Important additional comment for all Vega users with 4K monitors though: when connecting a Vega with e.g. the LG 38UC99-W (WUHD, 3840 pix x 1600 pix) via one of the Display Ports (DPs), the screen resolution is fine under both Windows 10 and macOS High Sierra but is totally at odd during boot (VGA like boot screen resolution). The VEGA DP 4K boot screen resolution issue is neither related with the fact that the LG 38UC99-W is an ultra-wide (3840x1600) and not a true UHD (3840x2160) monitor nor related to any likely apparent issue with the ASUS X99-A II firmware. It is definitely a Vega firmware problem in combination with most 4K displays, as the DP 4K boot screen resolution issue is totally absent with any Nvidia GPU and the problem also does not only affect the ASUS Splash Screen but also spreads over the entire boot process until the login screen is reached (Windows and macOS). Splash Screen, Apple logo or verbose boot messages are not stretched but rather have VGA like resolution. Any fix of the AMD vBIOS would be highly appreciated. It is more than disappointing to witness such issues with 600-1000$ GPUs... Fortunately, the 4K boot screen issue is restricted to the Vega DP ports and likely due to the fact that the LG 38UC99-W only supports DP 1.2. Solution: Connect your Vega and your 4K display via the HDMI port. The 30 Hz HDMI monitor frequency issue under 10.13 is successfully removed under Mojave: monitor frequency of 60 Hz with the display connected via HDMI (in contrary to 75 Hz via DP). Also Nvidia Kepler Graphics Cards are natively implemented. All Users with Nvidia Maxwell and Pascal Graphics Cards Users still have to wait for the official release of 10.14 Web Drivers. I was actively requesting Web Driver development for macOS 10.14 Public Betas from Nvidia, which has been rejected. I really hope that Nvidia will not leave again the respective community without Web Driver support. In the meanwhile, Nvidia GPU users have to live with e.g. patched Web Driver xxx.40.105 for macOS High Sierra 10.13.6 after a simple patching procedure detailed below, although the latter Web Driver is not really suited for 10.14 and works without hardware acceleration. How to patch an Nvidia WebDriver: Download the Nvidia WebDriver-Payload Repackager from InsanelyMac. Credits to @Chris111 and @Pavo. The patch procedure is simple and fully described in the implemented Readme.txt and will reveal a Repackaged-WebDriver.pkg, which can be used for installing the patched Nvidia Web Driver xxx.35.106 under macOS Mojave 10.14. Nvidia Web Driver Installation and Black Screen Prevention: Apparently with SMBIOS iMacPro1,1, the Nvidia Black Screen Prevention has become obsolete. Thanks to @fabiosun for this finding. Thus, NvidiaGraphicsFixup.kext, subverting AppleMobileFileIntegrity banning the driver can be theoretically removed from the /EFI/CLOVER/kexts/Other/ directory of your macOS Flash Drive Installer and 10.13 System Disk. However, actual releases of Whatevergreen.kext and Lilu.kext apparently also help in fixing the Nvidia HDAU implementation and sporadic black screen issues while wake from sleep. Thus, the latter kext combination might still represent potential workarounds for few likely remaining system issues. a.) Install the patched Nvidia 10.13 Web Driver Package. b.) Now perform the following additional steps: i.) Copy /L/E/NVDAStartupWeb.kext to your Desktop. ii.) Right-click on NVDAStartupWeb.kext and select show package content. iii.) Change to "Contents" and edit the "Info.plist" with Xcode. iv.) Go to IOKitPersonalities -> NVDAStartup -> change "NVDARequiredOS" from "17F77" to "18D42", the corresponding build number of MacOS Mojave 10.14.3. v.) Save the "Info.plist" file and copy the modified "NVDAStartupWeb.kext" to /L/E/ with root permission. vi.) Open a terminal and enter the following commands: sudo chmod -R 755 /Library/Extensions/NVDAStartupWeb.kext sudo chown -R root:wheel /Library/Extensions/NVDAStartupWeb.kext sudo touch /System/Library/Extensions && sudo kextcache -u / sudo touch /Library/Extensions && sudo kextcache -u / vii.) Reboot. viii.) The patched Web Driver might not be active yet. Therefore, open the Nvidia Driver Manager and select "Nvidia Web Driver". ix.) Now reboot as requested and you will have a fully functional patched Web Driver for MacOS Mojave 10.14.1. E.3) Audio Configuration My actual respective X99 EFI-Folder distribution contains an already fully functional AppleALC audio configuration. The latter consist of: 1.) Actual versions of codeccommander.kext, AppleALC.kext and Lilu.kext in "/EFI/CLOVER/kexts/Other/ 2.) Note that ALZA -> HDEF ACPI patch needs to be added to the config.plist in Section "ACPI" of Clover Configurator, in case one does not use the adopted system SSDT discussed in Section 9.2). Comment: Find: Replace: ALZA -> HDEF 414c5a41 48444546 3.) Audio ID Injection "5" in the config.plist under Audio/Inject in Section "Devices" of Clover Configurator. This audio configuration provides a correct analogue onboard audio chipset system implementation. The correct digital HDMI/DP HDAU PCI device implementation will be detailed in Section E.9) in line with the HDEF and GPU PCI device implementation. Thanks to @nmano for helping me with the initial AppleALC audio setup for 10.14 Mojave. E.4) USB Configuration Since 10.13.SU and with AppleIntelPCHPMC, macOS should properly implement all external and internal XHC USB 3.0 (USB 3.1 Gen 1 Type-A) and USB 2.0 (USB 2.0 Gen 1 Type-A) connectors, always provided that one uses working USB port limit patches. Valid USB port limit patch for 10.14.4 provided by @PMHeart (hardwired but yet disabled in my respective EFI-Folder distribution) by following USB port limit patch approach for 10.14.3 by [USER=1614363]@ydeng[/USER]: USB port limit patch for 10.14.4 provided by @PMheart: kext : com.apple.iokit.IOUSBHostFamily Find : 83FB0F0F 87 Replace : 83FB3F0F 87 Name : USB Port Limit Patch 1 ©PMHeart kext : com.apple.driver.usb.AppleUSBXHCI Find : 4183FF0F 0F83 Replace : 4183FF3F 0F83 Name : USB Port Limit Patch 2 ©PMHeart kext : com.apple.iokit.IOUSBHostFamily Find : 83E30FD3 E34109DF Replace : 83E33FD3 E34109DF Name : USB Port Limit Patch 3 ©PMHeart Former USB port limit patches for 10.14.3 provided by ©ydeng: kext : com.apple.iokit.IOUSBHostFamily Find : 83FB0F0F 871604 00 Replace : 83FB3F0F 871604 00 Name : USB Port Limit Patch 1 ©ydeng kext : com.apple.driver.usb.AppleUSBXHCI Find : 83FB0F0F 838F0400 00 Replace : 83FB3F0F 838F0400 00 Name : USB Port Limit Patch 2 ©ydeng kext : com.apple.iokit.IOUSBHostFamily Find : 83E30FD3 E34109DF Replace : 83E33FD3 E34109DF Name : USB Port Limit Patch 3 ©ydeng However, it is strongly recommended to use board-specific XHC USB kexts in addition. Such board-specific XHC USB kexts can be easily created for any motherboard of any brand by following my respective XHC USB Kext Creation guideline. Being mainboard specific, a XHC USB kext is only valid for one particular mainboard model although users of the same mainboard model naturally can share the same XHC USB kext, if complete and properly implemented without any additional efforts. KGP-iMacPro-ASUS-X99AII-XHCI.kext would be the XHC USB kext for the ASUS X99-A II with all 20 ports implemented. However, it is strongly recommend to keep respective USB port limit patches disabled and to use a truncated 15-port kext instead, which might avoid buffer overruns and makes your system more vanilla with respect to future macOS updates. For the truncated 15-port kext, we have to drop some of the 20 HS and SS ports implemented from the kext to stay within Apple's 15 USB port limit. For truncating a fully implemented XHC USB kext (all 20 HS and SS ports implemented), I usually recommend to drop one out of usually two internal USB3.0 connectors (which already reduces the number of implemented ports to 16 for the ASUS ASUS X99-A II): To remain within the 15 USB port limit, I also recommend to drop one of the four USB2.0 ports at the backside of the mainboard from the kext (HS05, HS06, HS13 or HS14), which further reduces the number of implemented USB ports by one. Thus, in total we have now 15 implemented HS and SS ports and we just stay within the 15 USB port limit. In the truncated KGP-iMacPro-ASUS-X99AII-XHCI-15port.kext attached below, I removed HS03, HS04, SSP3, SSP4 (assigned to the internal USB3.0 header USB3_34) and HS05 (assigned to the most right USB2.0 connector in the second column from top on the back panel of the mainboard) from the kext. By this, all other USB2.0 and USB3.0 ASUS-A II onboard connectors remain fully functional. Alternatively, one could also drop e.g. HS01, HS01, SSP1, SSP1 (assigned to the internal USB3.0 header USB3_12) and either HS13, HS14 or HS06 from KGP-iMacPro-ASUS-X99AII-XHCI.kext. Up to your personal taste. All experienced users are kindly invited to provide their fully implemented XHC USB kext and truncated 15-port XHC USB kext for a motherboard not yet being part of the respective XHC USB Kext Library with an implemented port-layout.rtf and by else following the correct kext nomenclatures defined in my XHC USB Kext creation guidelines in line with full motherboard and SMBIOS denominations. Remaining USB ejection issues during sleep/wake likely can be fixed by 3rd party software tools like e.g. mountain.app E.5) M.2/NVMe Configuration In contrary to macOS Sierra 10.12, and like already in case of macOS High Sierra 10.13, also macOS 10.14 Mojave provides native support of non-4Kn NVMe SSDs, like my Samsung EVO 960 M.2/NVMe. All patches applied under macOS Sierra 10.12 are obsolete. The native support of non-4Kn NVMe SSDs enables the unique opportunity to directly perform a clean-install of macOS High Sierra 10.13 on M.2 NVMEs like the Samsung EVO 960. The only current drawback consists in the external drive implementation of NVMEs. This minor issue should be easily solved by adding the actual External NVME Icon KextToPatch entry to the config.plist by means of the Clover Configurator. [code] Name* Find* [HEX] Replace* [HEX] Comment IONVMeFamily 4885c074 07808b20 4885c090 90808b20 External NVME Icon Patch[/code] Not however that within the actual 10.14 Mojave distribution, this approach does not seem to work anymore, despite the KextToPatch entry detailed above. If you still have your NVMe implemented in form of an external drive you have to perform the following workaround, detailed below. 1.) Disable the not working External NVME Icon KextToPatch entry. 2.) Open the IORegistryExplorer, in the upright search field type nvme and take not of values in the left column, i.e. indicated as v.1, v.2 and v.3 and marked by red rectangles in the figure below. As you can see by following these entries, your nvme device shows up in PCI0@0 > BR1B@1,1 > H000@0 3.) Download and unzip the SSDT-NVMe-extern-icon-patch.aml.zip, and open the SSDT-NVMe-extern-icon-patch.aml with MaciASL-DSDT.app, both attached towards the end of this guide. For deviating system configurations, replace the values highlighted in blue color in the figure below with those of your IOReg, marked by red rectangles and indicated by v.1, v.2 and v.3 in the figure of my IOReg above. 4.) Save and copy the modified SSDT-NVMe-extern-icon-patch.aml to the /EFI/CLOVER/ACPI/patched/ folder of your system drive. 5.) Reboot Now your NVMe drive should correctly show up as internal. E.6) SSDT/NVMe TRIM Support Macs only enable TRIM for Apple-provided solid-state drives they come with. If you upgrade a Mac with an aftermarket SSD/NVMe, the Mac won’t use TRIM with it. The same applies for SSDs/NVMes used by a Hackintosh. When an operating system uses TRIM with a solid-state drive, it sends a signal to the SSD/NVMe every time you delete a file. The SSD/NVMe knows that the file is deleted and it can erase the file’s data from its flash storage. With flash memory, it’s faster to write to empty memory — to write to full memory, the memory must first be erased and then written to. This causes your SSD/NVMe to slow down over time unless TRIM is enabled. TRIM ensures the physical NAND memory locations containing deleted files are erased before you need to write to them. The SSD/NVMe can then manage its available storage more intelligently. Note that the config.plist of my actual respective X99 EFI-Folder distribution contains an SSD/NVMe "TRIM Enabler" KextsToPatch entry, which can be found in the " Kernel and Kext Patches" Section of the Clover Configurator. Name* Find*[HEX] Replace*[HEX] Comment IOAHCIBlockStorage 4150504c 45205353 4400 00000000 00000000 0000 Trim Enabler With this KextToPatch entry, SSD/NVMe TRIM should be fully enabled also on your 10.14 System. See your Apple's System Report. E.7) GC-Titan Ridge / GC-Alpine Ridge or ASUS TBEX 3 Add-in PCIe Adapter Implementation For the successful implementation of the GC-Titan Ridge (recommended), GC-Alpine Ridge (compatible) or ASUS Thunderbolt EX3 (R.I.P) PCIe Add-In Adapters, a fully working Dual Boot System with an UEFI Windows Implementation is unfortunately absolutely mandatory. You will not be able to configure your Thunderbolt 3 Adapter in the mainboard BIOS, until the Adapter has been successfully recognised and initialised by the UEFI Windows System. Fortunately legal and official License Keys for the actual Windows 10 Pro distribution can be purchased with a little bit of temporal effort on Google for an actual price of 20 $ or even below! Thus, the installation of a dual boot system with Windows will require some additional temporal user effort but will not noticeably further affect the users's budget. Please note that I especially emphasize the term UEFI, when speaking about the parallel Windows implementation. Don't use or perform a Legacy Implementation of Windows! In order to properly implement your Windows partition later-on in the Clover Bootloader and to comply with the actual Mainbaord-BIOS settings requirements, it is absolutely mandatory to run or perform an UEFI Windows implementation! So if not already implemented, how to achieve a fully working UEFI Windows Implementation and Dual boot System with Windows? 1.) Important Note! For the implementation of the UEFI Windows Distribution disconnect all usually plugged macOSDrives from your rig! The Windows installer will implement a Windows Boot Loader! If you have any macOS Drive connected during installation, the latter Windows Boot Loader might overwrite and destroy your current Clover Boot Loader. This is the last thing you want! Thus for the windows installation just connect the destination drive for the installation and the Windows USB Flash Drive Installer your will create in the subsequent step below! 2.) This Tutorial explains in all necessary detail how to download an actual Windows 10 Creator distribution, and how tosubsequently create a bootable USB Flash Drive Installer for a subsequent UEFI Windows 10 installation by means RUFUS! Don't put emphasis on alternative optional methods and always take care that you just follow the instructions for a successful subsequent UEFI Windows Installation! 3.) This Tutorial explains in all necessary detail how to properly perform the actual Windows 10 Pro Creator UEFIInstallation, subsequent to the a bootable Windows USB Flash Drive Installer realisation detailed in 2.) above. 4.) This Tutorial explains in all necessary detail, how to migrate/clone/backup your Windows 10 UEFI System Disk afterinstallation for future maintenance and safety. 5.) After successfully performing the UEFI Windows 10 Pro Creator Implementation, you can reconnect your macOS driveto your rig. The newly created UEFI Windows 10 Pro Creator Partition will automatically appear as a further boot option in both BIOS Boot Option Menu (F8) and Clover Boot Menu! No additional or further actions or measurements have to be taken! 6.) Once your Windows 10 Pro Creator Partition is fully operational, install all mainboard drivers and programs implemented on the DVD attached to your mainboard. 7.) Now switch off your rig and start with the installation of our Thunderbolt 3 Add-In PCIe AdapterI recommend to install the Thunderbolt 3 Add-In PCIe Adapter in the 4th PCIe Slot from top, which is PCIEX_3 8.) Reboot into windows and install accompanying TB3 PCIe Drivers and Software.9.) Reboot and enter the Mainboard BIOS (F2)Go to /Advanced/ Thunderbolt(TM) Configuration/ and apply the following BIOS Settings detailed below: 10.) Shut down your rig, connect the Thunderbolt Device to your Thunderbolt 3 Adaptor and boot your system. 11.) You are done! Your Thunderbolt 3 Adapter and the connected device should now be fully implemented and functional.12.) We will add TB XHC USB and TB HotPlug functionality in Section E.9.2) of this guide. Note that with the GC-Titan Ridge, HotPlug functionality can be gained with the THB_C connected. For HotPlug with the other TB adaptors, the THB-C must be removed from most of the available mainboards. E.8) Gigabit and 10-Gbit Ethernet Implementations Section E.8.1) and and E.8.2.) below, describe in all necessary detail how to gain full Gbit and 10-Gbit LAN functionality on X99 systems. E.8.1) ASUS X99-A onboard Gbit functionality The Intel I218-V2 Gigabit on-board LAN controller of the ASUS X99-A II is implemented by means of IntelMausiEthernet.kext (already part of my EFI-Folder distributions). E.8.2) 10-Gbit Lan Implementations E.8.2.1) ASUS XG-C100C Aquantia AQC 10-Gbit NIC Starting with 10.13.2 there is native support for the Aquantia AQTION AQC107 10-GBit NIC of the iMac Pro in form of vanilla kext "AppleEthernetAquantiaAqtion.kext", which is further part of "IONetworkingFamily.kext/Contents/PlugIns/" placed in /System/Library/Extensions/ (credits to @mikeboss). First success with the ASUS XG-C100C Aquantia AQTION AQC107 10-GBit PCIe x4 NIC under MacOS 10.13.3 has been reported by @d5aqoep. @Mieze finally came up with a AppleEthernetAquantiaAqtion KextPatch for the use of the ASUS XG-C100C Aquantia AQTION AQC107 10-GBit PCIe x4 NIC also under 10.13.4 and and later macOS versions. For further information and discussion see . How to successfully implement the ASUS XG-C100C Aquantia AQTION AQC107 10-GBit PCIe x4 NIC: 1.) A temporal macOS High Sierra 10.13.3 (17D2047 in case of the iMac Pro) installation is absolutely mandatory at first place. Only within the latter macOS High Sierra build, the ASUS XG-C100C Aquantia AQTION AQC107 10-GBit PCIe x4 NIC will receive the proper AQC107 Apple firmware to be recognised and fully implemented by OSX. The firmware update will be performed during system boot. Several boot intents might be necessary until the firmware update finally succeeds. Only subsequently, the ASUS XG-C100C Aquantia AQTION AQC107 10-GBit PCIe x4 NIC will be natively implemented in macOS High Sierra 10.13.3 and fully functional. 2.) To finally use the ASUS XG-C100C with macOS builds >10.13.4, one has to implement the built-in AppleEthernetAquantiaAqtion KextPatch provided by [USER=389154]@Mieze[/USER]: Name* Find*[HEX] Replace*[HEX] Comment AppleEthernetAquantiaAqtion 6275696C 742D696E 62626262 62626262 Aquantia "built-in" patch ©Mieze 3.) The proper XGBE ASUS XG-C100C PCI SSDT implementation is detailed in Section E.9.2) 4.) Note that after the firmware update under macOS High Sierra 10.13.3, the ASUS XG-C100C Aquantia AQTION AQC107 10-GBit PCIe x4 NIC will refuse the official Windows Lan drivers provided by ASUS and will only work with Apple's customised Aquantia64.zip boot camp drivers attached below. Preferable AQC107 10-Gbit NIC PCIe solutions now available on the market are the Syba 1 Port PCIe x4 10GB Aquantia AQTION AQC107 NIC (thanks to @mirwaiz for his respective discovery and for all subsequent confirmation of his findings by @mm2margaret , who also pointed me to this extremely valid approach) and the 1 Port PCIe x4 10GB Aquantia AQtion AQC107 10G Gaming NIC (thanks to @izo1 for respective findings and advises), which are natively implemented under macOS OoB and neither need the above firmware update nor the respective AppleEthernetAquantiaAqtion kext patch. E.8.2.2) Intel X540-T1 10-Gbit NIC Thanks to some Ubuntu EEPROM modding, I also achieved the successful implementation of the Intel X540-T1 single port 10GB LAN PCIe Adapter by means of the Small-Tree 10GB macOS 10.13 driver. Important additional notes to the EEPROM modding guideline linked above can be assessed in Section E.8.2.2) of my iMac Pro Skylake-XX299 macOS 10.14 Mojave Build and Desktop guide. The proper Intel X540-T1 PCI SSDT implementation is detailed in Section E.9.2) E.8.2.3) Small-Tree P2EI0G-2T 10-GBit NIC The Small-Tree P2EI0G-2T 2-Port 10GB LAN PCIe Adapter constitutes now the actual base line in my iMac Pro X299 10Gbit LAN configuration. It works OoB with the Small-Tree 10GB macOS 10.13 driver. The proper Small-Tree P2EI0G-2T PCI SSDT implementation is detailed in Section E.9.2) E.8.2.4) NetGear ProSave XS508M 8-port 10-Gbit Switch As already mentioned above, the NetGear ProSave XS508M 8-port 10GBit switch constitutes the turntable of my 10-GBit Ethernet Network. It further connects with a QNAP TS-431X2 Quad-core 4-Bay NAS tower with Built-in 10GbE SFP+ Port. E.8.2.5) QNAP TS-431X2 Quad-core 4-Bay NAS The QNAP TS-431X2 Quad-core 4-Bay NAS tower finally harbours 4x 12 TB Seagate IronWolf drives in RAID 0 configuration (as I rather opt for read/write speed than redundancy). E.8.2.5) 10-Gbit Ethernet Optimization 1.) Use SMB 3.0 instead of AFS for your Ethernet communication. 2.) Enable Jumbo Frames on your NAS and macOS network settings. 3.) The service order in your macOS network settings should have your 10-Gbit NIC at first position. 4.) You can turn off the SMB packet signing of the client and server in a secure network. Incoming SMB Enter the following terminal commands: sudo -s echo "[default]" >> /etc/nsmb.conf echo "signing_required=no" >> /etc/nsmb.conf exit Outgoing SMB: Enter the following terminal commands: smbutil statshares -a sudo defaults write /Library/Preferences/SystemConfiguration/com.apple.smb.server SigningRequired 0 E.9) ASUS X99-A II PCI Device Implementation In order to properly implement all PCI device drivers on his/her system and build, one needs adequate ACPI DSDT Replacements and a sophisticated system SSDTs. Both requirements have been originally successfully implemented for the ASUS Prime X299 Deluxe by our gorgeous @apfelnico with partial contributions of @TheOfficialGypsy. Many thanks for the extensive efforts and extremely fruitful and brilliant work! Subsequently, I adopted the ACPI DSDT Replacements and system SSDTs in concordance with SMBIOS iMacPro1,1. Some ACPI DSDT Replacements are still part of the config.plist contained in my actual respective X99 EFI-Folder distribution. Others are part of my System SSDTs provided in my X99-System-SSDTs Github repository. Note that the ACPI DSDT Replacements in config.plist, System SSDTs and TB-SSDTs are build and PCIe slot population dependent and have to be verified and adopted or modified for all mainboards different from the ASUS X99-A II and builds or PCIe slot populations different from the one that constitutes the baseline of this guide. For the ASUS X99-A II I will use in the following the PCIe Slot nomenclature depicted below: The verification and likely adaptation/modification can be performed by the help of IORegistryExplorer. How to adopted or modify the ACPI DSDT Replacement Patches and System SSDT implementations is detailed within this short guideline by means of the OSXWIFI PCIe Adaptor implementation in PCIe Slot-3. I hope that by this specific example it rapidly becomes evident that the correct PCI Device implementation cannot be outlined for each individual "build-in" or "slot-specific" PCI device within this guide. The complexity and effort would just exceed by far all available capacities and indeed require the implementation of a separate guide and thread in addition. I therefore hope on your skills and flexibility to extend and apply the approach and methodology detailed above to any other "build-in" or "slot-specific" PCI device yet to be adopted or implemented Important Note: It is strongly recommend to perform a stepwise SSDT PCI Device implementation, starting with one single specific PCI device. Once this PCI device has been successfully implemented, another SSDT PCI Device module can be added and verified. In case that the implementation of a specific PCI Device would be erroneous and fail, it would simply disappear from Section "PCI" of Apple's System report. To facilitate the stepwise PCI device implementation, the former SSDT-X99-iMacPro.aml has been split into separated modules now forming part of my X99-System-SSDTs Github repository. Also keep always in mind to modify/adopt the ACPI replacements in your config.plist in parallel when ever necessary! Note once more that the ACPI DSDT Replacements in config.plist and System SSDTs require SMBIOS iMacPro1,1. E.9.1) ACPI DSDT Replacement Implementation Note once more that all required ACPI DSDT Replacements are already implemented in the config.plist of my actual respective X99 EFI-Folder distribution or are directly part of of the System SSDTs provided in my X99-System-SSDTs Github repository. In the config.plist, the ACPI DSDT Replacements are disabled by default, thus we will now open the config.plist in the /EFI/CLOVER/ directory of our 10.14 System Disk EFI-Folder with Clover Configurator and stepwise adopt (if necessary) and enable the different required DSDT replacement patches in Clover Configurator Section "ACPI" under "DSDT patches", by also discussing their respective function and impact.. a.) OSI -> XOSI and EC0_ -> EC__ or H_EC -> EC__ are DSDT replacement patches to achieve consistency with a real Mac variable naming. i.) The XOSI functionality is required as explained by @RehabMan. Thus please enable the OSI -> XOSI DSDT Replacement patch. ii.) On the ASUS X99-A II and ASUS X99 Deluxe II we have EC0 and H_EC controllers, which have to be renamed to 'EC' for proper USB power management. Thus enable both EC0_ -> EC__ and H_EC -> EC__ DSDT Replacement Patches. Comment: Find*[Hex] Replace [Hex] OSI -> XOSI 5f4f5349 584f5349 EC0_ -> EC__ 4543305f 45435f5f H_EC -> EC__ 485f4543 45435f5f b.) The HEC1 -> IMEI and IDER->MEID DSDT Replacement patches are Intel Management Engine Interface related and are vital as MacOS requires the variable names "IMEI" and "MEID" to load the 'AppleIntelMEIDriver'. The latter functionality solves the 'iTunes/Apple Store Content Access Problem' which is discussed here. Please enable now both DSDT Replacement patches independent from your mainboard. Comment: Find*[Hex] Replace [Hex] HECI -> IMEI 48454331 494d4549 IDER->MEID 49444552 4d454944 c.) The LPC0 -> LPCB DSDT Replacement Patch is AppleLPC and SMBus related and is applied for consistency with the variable naming on a real Mac. Please enable now this DSDT replacement patch independent from your mainboard. Comment: Find*[Hex] Replace [Hex] LPC0 -> LPCB 4c504330 4c504342 d.) FPU_->MATH, TMR_->TIMR, PIC_->IPIC are all DSDT Replacement Patches for consistency with the variable naming on a real Mac. The variables are however functionless on either X99 systems or real Macs. Please enable now all three DSDT Replacement Patches independent from your mainboard. Comment: Find*[Hex] Replace [Hex] FPU_ -> MATH 4650555f 4d415448 TMR_ -> TIMR 544d525f 54494d52 PIC_ -> IPIC 5049435f 49504943 e.) The DSM -> XDSM DSDT replacement patch will be vital for loading the SSDT-ASUS-X99-A-II.aml, as all DSM methods used in the original DSDT do have a not compatible structure totally different from the real Mac environment. Without any fix, all DSM methods would be simply ignored. Note that one single device can have only one DSM method, which can assign additional properties to the respective device. Thus please enable the latter DSDT replacement patch completely independent from your mainboard! Comment: Find*[Hex] Replace [Hex] _DSM -> XDSM 5f44534d 5844534d f.) The 48 CPxx -> PRxx replacements are i7-6950X specific and result in a proper CPU core reordering as well as in a iMac Pro specific CPU core variable naming. All i7-6950X users can now enable all 48 CPxx -> PRxx replacements. All users of CPUs different from the i7-6950X have to adopt/modify the 48 CPxx -> PRxx replacements in concordance with their original IOREG CPU core values. Comment: Find*[Hex] Replace [Hex] CP00 -> PR00 43503030 50523030 CP01 -> PR01 43503031 50523031 CP02 -> PR02 43503032 50523032 CP03 -> PR03 43503033 50523033 CP04 -> PR04 43503034 50523034 CP05 -> PR05 43503035 50523035 CP06 -> PR06 43503036 50523036 CP07 -> PR07 43503037 50523037 CP08 -> PR08 43503038 50523038 CP09 -> PR09 43503039 50523039 CP0A -> PR10 43503041 50523130 CP0B -> PR11 43503042 50523131 CP0C -> PR12 43503043 50523132 CP0D -> PR13 43503044 50523133 CP0E -> PR14 43503045 50523134 CP0F -> PR15 43503046 50523135 CP10 -> PR16 43503130 50523136 CP11 -> PR17 43503131 50523137 CP12 -> PR18 43503132 50523138 CP13 -> PR19 43503133 50523139 CP14 -> PR20 43503134 50523230 CP15 -> PR21 43503135 50523231 CP16 -> PR22 43503136 50523232 CP17 -> PR23 43503137 50523233 CP18 -> PR24 43503138 50523234 CP19 -> PR25 43503139 50523235 CP1A -> PR26 43503141 50523236 CP1B -> PR27 43503142 50523237 CP1C -> PR28 43503143 50523238 CP1D -> PR29 43503144 50523239 CP1E -> PR30 43503145 50523330 CP1F -> PR31 43503146 50523331 CP20 -> PR32 43503230 50523332 CP21 -> PR33 43503231 50523333 CP22 -> PR34 43503232 50523334 CP23 -> PR35 43503233 50523335 CP24 -> PR36 43503234 50523336 CP25 -> PR37 43503235 50523337 CP26 -> PR38 43503236 50523338 CP27 -> PR39 43503237 50523339 CP28 -> PR40 43503238 50523430 CP29 -> PR41 43503239 50523431 CP2A -> PR42 43503241 50523432 CP2B -> PR43 43503242 50523433 CP2C -> PR44 43503243 50523434 CP2D -> PR45 43503244 50523435 CP2E -> PR46 43503245 50523436 CP2F -> PR47 43503246 50523437 Resulting CPU Core Implementation E.9.2) System SSDT PCI Device Implementation For the proper PCI device driver implementation (detailed in the figure above), we now have to revise and likely adopt or modify all System SSDTs provided within my X99-System-SSDTs Github repository. Note that each SSDT contains a DefinitionBlock entry and the underlying PCI device implementation. In case of necessary modifications/adaptations, don't forget to also modify/adapt the respective DefinitionBlock entries in concordance with your IOREG entries. The entire SSDT structure is now completely module like. Each module can be independently added, changed or removed in dependence of your specific build, needs and requirements. A stepwise implementation of the individual PCI device modules is highly recommended! E.9.2.1) HDEF - onboard Audio Controller PCI Implementation: The SSDT-X99-HDEF.aml onboard Realtek ALC 1150 Audio Controller HDEF PCI device implementation is valid for the ASUS X99-A II and likely for all other mainboards with the same Audio Controller chipset. It is a build in device and does not have any slot specific dependency. Note the ALZA -> HDEF ACPI Replacement within the SSDT! E.9.2.2) GFX0, HDAU - GPU and HDMI/DP Audio PCI implementation A.) Radeon RX Vega 64 GPUs The SSDT-X99-Vega.aml GFX0 and HDAU PCI device implementation is valid for SMBIOS iMacPro1,1 (GFX0), the ASUS X99-A II and any Radeon RX Vega 64 GPU implemented in PCIe Slot 1. It is a build and PCIe slot population dependent device implementation. Vega GPU users with more than one graphics card, with a Vega graphics card in a PCIe slot different from PCIe Slot 1, or with a mainboard different from the ASUS X99-A II will have to adopt the respective device path entries PCI0.BR3C, H000, H001, D077 and respective ACPI replacements by following their respective IOREG entries. The above default Vega PCI device implementation performs an OC of an air-flow Nitro+ Vega 64 GPU of up to 1630 Mhz while considering an IDLE fan speed of 1500 Mhz. This seems sufficient to remain with GPU temps of about 80 deg C under GPU load conditions (e.g. Valley Benchmark), while not exceeding any comfortable noise level. The latter Vega properties are achieved by means of a sophisticated "PP_PhmSoftPowerPlayTable", "PP_DisablePowerContainment" and "PP_FuzzyFanControl" SSDT implementation. Everybody can change the respective Vega properties by means of VGTab-en.app, which provides a modified "PP_PhmSoftPowerPlayTable" (output-file VegaTab_64_data.txt), which can replace the "PP_PhmSoftPowerPlayTable", currently implemented in my SSDT-X99-Vega.aml distribution. E.g. users with a water-blocked Nitro+ Vega 64 like myself want to further screw the max. GPU OC frequencies, etc, while others might want to further improve the fan speed behaviour on air-flow Vegas.. Below the "PP_PhmSoftPowerPlayTable" for my custom water-blocked Sapphire Nitro+ Vega 64 8B (used on my Skylake-X/X299 system), with P7 Core Frequency of 1680 Mhz, P7 Core Voltage of 1200 mV, P3 Memory Frequency of 1050 Mhz and a Memory Voltage of 1350 mV. PP_PhmSoftPowerPlayTable: 0x9d, 0x02, 0x08, 0x01, 0x00, 0x5c, 0x00, 0x37, 0x07, 0x00, 0x00, 0xec, 0x2b, 0x00, 0x00, 0x1b, 0x00, 0x48, 0x00, 0x00, 0x00, 0x80, 0xa9, 0x03, 0x00, 0xf0, 0x49, 0x02, 0x00, 0x32, 0x00, 0x08, 0x00, 0x00, 0x00, 0x00, 0x00, 0x00, 0x00, 0x00, 0x00, 0x00, 0x00, 0x00, 0x00, 0x00, 0x02, 0x01, 0x5c, 0x00, 0x36, 0x02, 0x2d, 0x02, 0x94, 0x00, 0x85, 0x01, 0xaf, 0x00, 0x19, 0x01, 0x7a, 0x00, 0x8c, 0x00, 0xa3, 0x01, 0x00, 0x00, 0x00, 0x00, 0x59, 0x02, 0x00, 0x00, 0x90, 0x00, 0x8f, 0x02, 0x54, 0x01, 0x2a, 0x01, 0x7e, 0x01, 0x00, 0x71, 0x02, 0x00, 0x71, 0x02, 0x02, 0x02, 0x00, 0x00, 0x00, 0x00, 0x00, 0x00, 0x08, 0x00, 0x00, 0x00, 0x00, 0x00, 0x00, 0x00, 0x04, 0x00, 0x07, 0x00, 0x03, 0x00, 0x05, 0x00, 0x00, 0x00, 0x00, 0x00, 0x00, 0x00, 0x01, 0x08, 0x20, 0x03, 0x84, 0x03, 0xb6, 0x03, 0xe8, 0x03, 0x1a, 0x04, 0x4c, 0x04, 0x7e, 0x04, 0xb0, 0x04, 0x01, 0x01, 0x46, 0x05, 0x01, 0x01, 0x84, 0x03, 0x00, 0x05, 0x60, 0xea, 0x00, 0x00, 0x00, 0xdc, 0x4a, 0x01, 0x00, 0x01, 0x00, 0x77, 0x01, 0x00, 0x02, 0x90, 0x91, 0x01, 0x00, 0x03, 0x6c, 0xb0, 0x01, 0x00, 0x04, 0x01, 0x08, 0xd0, 0x4c, 0x01, 0x00, 0x00, 0x00, 0x80, 0x00, 0x00, 0x00, 0x00, 0x00, 0x00, 0x88, 0xbc, 0x01, 0x00, 0x01, 0x00, 0x00, 0x00, 0x00, 0x00, 0x00, 0x00, 0x00, 0x98, 0xfc, 0x01, 0x00, 0x02, 0x00, 0x00, 0x00, 0x00, 0x00, 0x00, 0x00, 0x00, 0x90, 0x0e, 0x02, 0x00, 0x03, 0x00, 0x00, 0x00, 0x00, 0x00, 0x00, 0x00, 0x00, 0xc4, 0x2f, 0x02, 0x00, 0x04, 0x00, 0x00, 0x00, 0x00, 0x00, 0x00, 0x00, 0x00, 0x70, 0x56, 0x02, 0x00, 0x05, 0x00, 0x00, 0x00, 0x00, 0x01, 0x00, 0x00, 0x00, 0x60, 0x7a, 0x02, 0x00, 0x06, 0x00, 0x00, 0x00, 0x00, 0x01, 0x00, 0x00, 0x00, 0x40, 0x90, 0x02, 0x00, 0x07, 0x00, 0x00, 0x00, 0x00, 0x01, 0x00, 0x00, 0x00, 0x00, 0x03, 0x60, 0xea, 0x00, 0x00, 0x00, 0xdc, 0x4a, 0x01, 0x00, 0x00, 0x90, 0x5f, 0x01, 0x00, 0x00, 0x00, 0x08, 0x28, 0x6e, 0x00, 0x00, 0x00, 0x2c, 0xc9, 0x00, 0x00, 0x01, 0xf8, 0x0b, 0x01, 0x00, 0x02, 0x80, 0x38, 0x01, 0x00, 0x03, 0x90, 0x5f, 0x01, 0x00, 0x04, 0xf4, 0x91, 0x01, 0x00, 0x05, 0xd0, 0xb0, 0x01, 0x00, 0x06, 0xc0, 0xd4, 0x01, 0x00, 0x07, 0x00, 0x08, 0x6c, 0x39, 0x00, 0x00, 0x00, 0x24, 0x5e, 0x00, 0x00, 0x01, 0xfc, 0x85, 0x00, 0x00, 0x02, 0xac, 0xbc, 0x00, 0x00, 0x03, 0x34, 0xd0, 0x00, 0x00, 0x04, 0x68, 0x6e, 0x01, 0x00, 0x05, 0x08, 0x97, 0x01, 0x00, 0x06, 0xec, 0xa3, 0x01, 0x00, 0x07, 0x00, 0x01, 0x68, 0x3c, 0x01, 0x00, 0x00, 0x01, 0x04, 0x3c, 0x41, 0x00, 0x00, 0x00, 0x00, 0x00, 0x50, 0xc3, 0x00, 0x00, 0x00, 0x00, 0x00, 0x60, 0x35, 0x01, 0x00, 0x01, 0x00, 0x00, 0x28, 0x9a, 0x01, 0x00, 0x02, 0x00, 0x00, 0x01, 0x08, 0x00, 0x98, 0x85, 0x00, 0x00, 0x78, 0xb4, 0x00, 0x00, 0x60, 0xea, 0x00, 0x00, 0x50, 0xc3, 0x00, 0x00, 0x01, 0x78, 0xff, 0x00, 0x00, 0x40, 0x19, 0x01, 0x00, 0xb4, 0x27, 0x01, 0x00, 0x50, 0xc3, 0x00, 0x00, 0x02, 0x80, 0x38, 0x01, 0x00, 0xdc, 0x4a, 0x01, 0x00, 0xdc, 0x4a, 0x01, 0x00, 0x50, 0xc3, 0x00, 0x00, 0x03, 0xdc, 0x4a, 0x01, 0x00, 0x90, 0x5f, 0x01, 0x00, 0x90, 0x5f, 0x01, 0x00, 0x50, 0xc3, 0x00, 0x00, 0x04, 0x90, 0x5f, 0x01, 0x00, 0x00, 0x77, 0x01, 0x00, 0x90, 0x5f, 0x01, 0x00, 0x50, 0xc3, 0x00, 0x00, 0x05, 0x00, 0x77, 0x01, 0x00, 0x90, 0x91, 0x01, 0x00, 0x90, 0x5f, 0x01, 0x00, 0x50, 0xc3, 0x00, 0x00, 0x06, 0x6c, 0xb0, 0x01, 0x00, 0x6c, 0xb0, 0x01, 0x00, 0x00, 0x77, 0x01, 0x00, 0x50, 0xc3, 0x00, 0x00, 0x07, 0xc0, 0xd4, 0x01, 0x00, 0xc0, 0xd4, 0x01, 0x00, 0x90, 0x91, 0x01, 0x00, 0x50, 0xc3, 0x00, 0x00, 0x01, 0x18, 0x00, 0x00, 0x00, 0x00, 0x00, 0x00, 0x00, 0x0b, 0xe4, 0x12, 0xdc, 0x05, 0xfc, 0x08, 0x41, 0x00, 0x0f, 0x00, 0x54, 0x03, 0x90, 0x01, 0x90, 0x01, 0x90, 0x01, 0x90, 0x01, 0x90, 0x01, 0x90, 0x01, 0x90, 0x01, 0x00, 0x00, 0x00, 0x00, 0x00, 0x02, 0x04, 0x21, 0x07, 0x08, 0x01, 0x08, 0x01, 0x08, 0x01, 0x2c, 0x01, 0x00, 0x00, 0x4a, 0x00, 0x69, 0x00, 0x4a, 0x00, 0x4a, 0x00, 0x5f, 0x00, 0x73, 0x00, 0x73, 0x00, 0x64, 0x00, 0x40, 0x00, 0x90, 0x92, 0x97, 0x60, 0x96, 0x00, 0x90, 0x46, 0x00, 0x00, 0x00, 0x00, 0x00, 0x00, 0x00, 0x00, 0x00, 0x00, 0x00, 0x00, 0x00, 0x00, 0x00, 0x00, 0x00, 0x02, 0x02, 0xd4, 0x30, 0x00, 0x00, 0x02, 0x10, 0x60, 0xea, 0x00, 0x00, 0x02, 0x10 Note that I also changed the Nitro+ Vega 64 firmware to https://www.techpowerup.com/vgabios/200283/200283 (at BIOS jumper position 1). Don't forget to backup the original firmware, in case you return it to the seller! This thread might provide additional information in this context: https://forums.macrumors.com/threads/amd-polaris-vega-gpu-macos-support.2083168/. As already mentioned before, within my current Vega SSDT PCI device implementation, all available ports on the Gigabyte Vega 64 (3x HDMI, 3x DP), including multi-monitor support and display hot plug are automatically and successfully implemented. However, it seems that DP-port issues (black screen) remain, when employing the respective Vega SSDT PCI device implementation on Sapphire Nitro+ Vega 64 (2x HDMI, 2xDP) or ASUS Strix Vega 64 (2x HDMI, 2x DP, 1x DVI) GPUs, which only can be removed by adding Whatevergreen.kext v.1.2.1. Within such configuration, multi-monitor support and display hot plug can be fully achieved also in case of the latter custom Vegas (both 10.13.6 SU and 10.14.1). Whatevergreen.kext only seems required for all Vegas possessing less than 6 physical ports (including the original Vegas like Frontier and Vega 64), else the current Vega SSDT PCI device implementation does pretty well it's job, including sleep/wake. SSDT-X99-Vega-Frontier.aml contains former Kamarang frame buffer SSDT implementation by @apfelnico for 1x Radeon Vega Frontier in PCIe Slot 1 of ASUS X99-A II. B.) Radeon VII, Vega56, RX560 and RX580 GPUsNote that there also Radeon VII, Vega56, RX580 and RX560 SSDTs available in my X99 SSDT Github repository, which likely need to be adopted depending on your motherboard and GPU PCIe slot population by following your original IOREG ACPI table information. C.) Nvidia GPUs The actual SSDT-X99-Nvidia.aml GFX0 and HDAU PCI device implementation is valid for SMBIOS iMacPro1,1 (GFX0), the ASUS X99-A II and any Nvidia Graphics Card implemented in PCIe Slot 1. It is a build and PCIe slot population dependent device implementation. Nvidia Graphics Card users with more than one GPU, with a Nvidia graphics card in a PCIe slot different from PCIe Slot 1 or on a mainboard different from ASUS, will have to adopt the respective PCI0, BR3C, H000, H001, D077, GFX0 ACPI path and ACPI replacements following their respective IOREG entries. Also note that with 10.13.4, Apple changed the com.apple.driver.AppleHDAController implementation. To make the NVIDIA HDAU PCI device driver work for e.g. a GeForce GTX 1080 Ti, one needs to add the following KextToPatch entry in Section "Kernel and kext Patches" of Clover Configurator, as already implemented but yet disabled in the config.plist contained in my actual respective X99 EFI-Folder distribution: Name* Find* [HEX] Replace* [HEX] Comment com.apple.driver.AppleHDAController DE100B0E DE10EF10 FredWst DP/HDMI patch Thus, please all Nvidia users enable and like adopt the NVIDIA HDAU patch for your particular Nvidia GPU in dependence of the respective device-id. Credits to @FreedWst and thanks to @fabiosun for pointing me to this solution. With Whatevergreen.kext, mis Nvidia users might be able to drop this KextToPatch entry, as the latter kext already properly implements the Nvidia HDAU PCI driver E.9.2.3) XGBE - 10GBit NIC PCI Implementation: SSDT-X99-ACQU.aml, SSDT-X99-X540-T1.aml and SSDT-X99-P2EI0G-2T.aml perform a 10-Gigabit NIC XGBE (XGBF) PCI implementation of an Acquantia AQC107-AFW, Intel X540-T1 or Small-Tree P2EI0G-2T 10GB NIC, respectively and are mainly of cosmetic nature. For each PCIe Adapter and for different PCIe slot populations or mainboard implementations, the XGBE PCI device implementation needs to be adopted/modified accordingly. This also states for the respective ACPI path entries "PCI0", "BR3A" and respective H000 -> D07C and D07C -> XGBE ACPI Replacements (in compliance with the iMac Pro 10GB ACPI variable nomenclature), directly performed within each SSDT. Those not employing any 10-GBit NIC in their system, can simply skip the corresponding SSDT PCI device implementation. E.9.2.4) ETH0 - onboard LAN Controller PCI Implementation: The SSDT-X99-ETH0.aml onboard Intel i218-V Ethernet controller ETH0 PCI implementation is of pure cosmetic nature and valid for the ASUS X99-A II or X99 mainboards with the same LAN Controller configuration. Owners of different X99 mainboards have to verify and adopt/modify the ACPI path and the PCI device implementations by means of their IOREG entries. Note the GLAN -> ETH0 ACPI replacement directly performed within the SSDT. E.9.2.5) SAT1 - Intel AHCI SATA Controller PCI Implementation: The SSDT-X99-SAT1.aml onboard Intel AHCI SATA controller SAT1 PCI device implementation is valid for the ASUS X99-A II and for all other X99 mainboards with the same AHCI SATA controller chipset. E.9.2.6) EVSS - Intel X99 sSata Controller PCI Implementation: The SSDT-X99-EVSS.aml onboard Intel X99 sSATA controller EVSS PCI device implementation is valid for the ASUS X99-A II and for all other X99 mainboards with the same X99 sSATA controller chipset. Verify and adopt/modify if necessary device path "PCI0.EVSS" and PCI device implementations by means of IOREG. E.9.2.7) ANS1 - NVMe Controller PCI Implementation: The SSDT-X99-ANS1.aml Apple NVMe Controller ANS1 PCI implementation is of purely cosmetic nature and is valid for the ASUS X99-A II. Note ACPI Replacements D075 -> D081 and D081 -> ANS2 directly performed within the SSDT, in concordance with the respective SMBIOS iMacPro1,1 variable naming! E.9.2.8) - USBX: When using the XHCI device name for USB (see the XHCI PCI Device Implementation below), one observes a bunch of USB Power Errors when booting the system. The SSDT-X99-USBX.aml PCI device implementation fixes this errors. E.9.2.9) XHCI - onboard Extended Host Controller Interface (XHCI) PCI Implementation: The SSDT-X99-XHCI.aml onboard USB3.0 controller XHCI PCI device implementation is valid for the ASUS X99-A II and for all other X99 mainboards with the same XHCI controller chipset. Verify and adopt/modify if necessary device path "PCI0.XHCI" and PCI device implementations by means of IOREG. E.9.2.10) XHC2 - ASMedia ASM1142 USB 3.1 Controller PCI Implementation: The SSDT-X99-XHC2.aml onboard ASMedia ASM1142 USB 3.1 AHCI SATA controller XHC2 PCI device implementation is valid for the ASUS X99-A II and for all other X99 mainboards with the same XHC USB3.1 controller chipset configuration. Note the D07D -> D082 and D082 -> XHC2 ACPI replacements directly performed within the SSDT! E.9.2.11) ARPT - OSX WIFI Broadcom BCM94360CD 802.11 a/b/g/n/ac + Bluetooth 4.0 AirPort Controller PCI Implementation: The SSDT-X99-ARPT.aml OSX WIFI Broadcom BCM94360CD 802.11 a/b/g/n/ac + Bluetooth 4.0 AirPort Controller PCI device implementation is of pure cosmetic nature and only valid for users of the latter WIFI/Bluetooth PCIe Adapter in PCIe Slot 5 of the ASUS X99-A II. Users of this PCIe Adapter within a PCIe slot population different from PCIe Slot 5 or on a mainboard different form the ASUS X99-A II have to likely adapt/modify the respective device path "PCI0","RP07","ARPT". Users with a completely different WIFI/Bluetooth configuration have to adopt the entire Airport PCI implementation by means of IOREG. E.9.2.12) GC-Titan Ridge / GC-Alpine Ridge / ASUS TBEX 3 Thunderbolt HotPlug System Implementation: The current Thunderbolt development carefully focuses on iMac Pro SSDT-9.aml and DSDT.aml from @TheOfficialGypsy 's iMac Pro dump, which appear to be the cornerstone for a correct, proper and complete Thunderbolt Hackintosh Local Node implementation. The current development status is briefly reflected in posts and Constructive contributions by experts are highly desired. Until reaching a complete Thunderbolt Hackintosh Local Node implementation, SSDT-X99-TB3HP-TTR.aml (for GC-Titan Ridge and ASUS TBEX 3) and SSDT-X99-TB3HP-APR.aml (for GC-Alpine Ridge) constitute workarounds for achieving TB HotPlug and TB XHC USB HotPlug functionality with the respective TB3 PCIe Add-In adopters. Note once more that with the GC-Titan Ridge, HotPlug functionality can be reached with the THB_C connected. For HotPlug with the other TB adaptors, the THB_C must be removed from most of the available mainboards.For all TB3 SSDTs provided above, partial contributions by by @apfelnico, @nmano, @Mork vom Ork, @Matthew82, @maleorderbride and @TheRacerMaster shall be mentioned and outlined. Their use with mainboards different from ASUS and within PCIe slot populations different from PCIe Slot 4 requires the adaptation/modification of respective ACPI path definitions ("PC01", "BR1A") or ACPI DSDT Table replacements (SL01 -> PEGP and PEGP -> UPSB), directly performed within the SSDTs. >>> https://youtu.be/Jakp5dCoFvY <<< E.9.2.13) DTGP Method: SSDT-DTPG.aml is mandatory for all SSDT implementations listed above (note the external DTPG method call in the definition block of each respective SSDT) and must be always part of /EFI/Clover/ACPI/patched.. External (DTGP, MethodObj) // 5 Arguments (from opcode) E.9.2.14) - Debugging Sleep Issues For debugging sleep issues as proposed by Pike Alpha, one can add SSDT-SLEEP.aml to /EFI/CLOVER/ACPI/patched and follow Pike's comment and advices provided at https://pikeralpha.wordpress.com/2017/01/12/debugging-sleep-issues/ E.10) iMac Pro Boot Splash Screen Cosmetics Based on the ideas and instructions of @Matthew82, I achieved an iMacPro ASUS Boot Splash Screen by means of the following procedure: 1.) Installation of the BREW distribution: a.) Open a terminal and change to "bash" shell. bash b.) Now enter the following "bash" terminal command and follow the standard BREW installation instructions: /usr/bin/ruby -e "$(curl -fsSL https://raw.githubusercontent.com/Homebrew/install/master/install)" 2.) After the successful installation of the BREW distribution, we have to implement the QT5 distribution, again by using a "bash" terminal shell. Enter the following "bash" terminal commands: brew install qt5 brew link qt5 --force 3.) After successfully implementing BREW and QT5 and if not already performed in Section B.1), we can now download the actual CodeRush UEFIPatch distribution from Github to our home directory with the following terminal command: git clone https://github.com/LongSoft/UEFITool 4.) Now compile the UEFI Tool distribution with the following terminal commands: cd /UEFITools/ qmake uefitool.pro make 5.) Download and unzip iMacPro.raw to your Desktop. 6.) Now launch by UEFITool by clicking on the newly compiled UEFITool.app in the UEFITools Folder in your home directory. a.) Select "File" -> "Open image file" and load your patched or unpatched BIOS Firmware distribution. Select "Search.." in the UEFITool "Edit" Menu and perform a "GUID" search of "7BB28B99-61BB-11D5-9A5D-0090273FC14D" with "Header only"... You will receive a message "GUID pattern "7BB28B99-61BB-11D5-9A5D-0090273FC14D" found as .... in 7BB28B99-....". Double click on that message and search for the "Raw section" accompanying the "7BB28B99-...." entry, which indeed is the Boot Image, which you can easily verify by extracting the raw section body (right-click on "Raw section" and select "Extract body") to your Desktop and by subsequently opening the extracted raw-file directly with Apple's "Preview.app" (right-click an the raw file and select "Open with.." -> Preview.app). b.) To exchange the default original ASUS Boot Logo image file stored in "Raw Section" by the iMacPro.raw image file that you previously downloaded to your Desktop, right-click again on "Raw section", select this time "Replace body" and select the iMacPro.raw image file on your Desktop. Note that the actual image dimension of iMacPro.raw (2131pix x 1457pix) was adopted for its use on my 38" LG 38UC99. For monitors with reduce screen resolution, iMacPro.raw might have to be adopted to an image dimension that suites your particular screen resolution, before its upload to "Raw section". If the Boot Logo image dimension is too big for your Monitor's screen resolution, you might just end up with a black screen during the BIOS initialisation at boot. To do so, select in the Preview.app Menu -> "Tools" -> "Adjust Size". Change the image dimension and save the modified image with "File" -> "Export". In the "Export menu" press "Save", after selecting "JPEG" under "Format" , after choosing "Desktop" as the place to store the image, and after entering the new file name, which has to end with ".jpg". Double-check by right-clicking on the resulting jpg image file and selecting "Get Info" that its file size does no exceed 200KB by far. If the latter would be the case, you would not be able to save the modified BIOS Firware file subsequently. Finally just rename your new "XXXX.jpg" file to "XXXX.raw.... I guess, that by following the procedure detailed above, it is obvious that iMacPro.raw also can be substituted by any other image of your personal choice. Just be aware that it's background colour should be black (ecstatic reason for a its nice integration within the else black ASUS BIOS Boot Screen) c.) After replacing "Raw Section" with iMacPro.raw or the XXX.raw image of your choice, save your modified BIOS Firmware File with the Option "File" -> "Save Image File..." d.) Copy your modified BIOS Firmware file to a USB3.0 Flash Drive, formatted with FAT32. e.) Reboot, enter the Mainboard BIOS and save your BIOS settings to the USB Flash Drive f.) Flash your mainboard BIOS with the modified BIOS Firmware g.) Renter the Mainboard BIOS and restore your BIOS settings from the USB Flash Drive h.) Save your restored BIOS settings with (F7) and (F10), reboot and you are done. Just don't forget to set BIOS Setting "Boot Logo Display" to "Auto", when using this new approach. Any different setting might result in a black screen during BIOS initialisation. E.11) iMac Pro Desktop Background Cosmetics It might be nice to equip your iMac Pro X299 also with the adequate iMac Pro Desktop Background. 1.) Download, unzip and copy imac-pro-wallpaper.jpg.zip to your Dektop 2.) Right-click with the mouse on your Desktop and select "Change Desktop Background.." 3.) In the left column click on the "+" and add your Desktop Folder 4.) Select imac-pro-wallpaper.jpg to be your new Desktop Background E.12) iStatMenus Hardware Monitoring Thanks to extended tweet session between @BJango, @gxsolace and myself, we achieved a major step forward in properly monitoring Skylake-X/X299 Hardware with iStatMenus. iStatMenus v6.2 now correctly interfaces with the HWSensor and FakeSMC kext distribution provided by @interferenc and can now be also used for Broadwell-E/EP, Haswell-E/EP, X99 system monitoring. My distributed EFI-Folder already contains all necessary HWSensor and FakeSMC kexts. The actual iStatMenus v6.2 distribution can be assessed at https://bjango.com/mac/istatmenus/ The actual HWSensor and FakeSMC kext distribution of @interferenc can be separately assessed at https://github.com/interferenc/HWSensors. To compile the the HWSensor and FakeSMC kexts of @interferenc, perform the individual steps detailed below: 1.) git clone https://github.com/interferenc/HWSensors 2.) cp HWSensors ~/Desktop/ 3.) cd ~/Desktop/HWSensors 4.) xcodebuild -project Versioning\ And\ Distribution.xcodeproj/ 5.) xcodebuild -project HWMonitor.xcodeproj/ 6.) xcodebuild -project HWSensors.xcodeproj -alltargets Subsequently, one finds the all compiled binaries in ~/Desktop/HWSensors/Binaries/. Many thanks to both @interferenc and @Bjango for their awesome and extensive contributions and brilliant work! Note that I recently modified the Kozlek/Interferenc Source Code distribution locally to also support GPU Temp sensor information for all Vegas and the new Radeon VII. In my recent 10.14 X99 EFI-Folder distributions, the resulting FakeSMC.kext and HWSensor.kexts supporting all Vegas already have been implemented by default in /EFI/CLOVER/kexts/Other. The actual 10.14.5 Beta X99 EFI-Folder distribution contains FakeSMC.kext and HWSensor.kexts also supporting the new Radeon VII. Broadwell-E/EP, Haswell-E/EP, X99 iStatMenus Hardware Sensor Data: Broadwell-E/EP, Haswell-E/EP CPU Thread Utilisation Graphs: To change from CPU core to thread utilisation monitoring, uncheck "Hide Hyper-Threading cores" in Section "CPU & GPU" of iStatMenus Preferences. Temperature unites can be adjusted between Celsius, Fahrenheit and Kelvin in Section "Sensors" of iStatMenus Preferences. F.) Benchmarking F.1) i7-6950X CPU Benchmarks F.2) Sapphire Nitro+ Radeon RX Vega 64 8GB (Air-Flow) OpenGL and Metal Benchmarks G.) Summary and Conclusions Already under macOS 10.12 Sierra and macOS 10.13 High Sierra, Broadwell-E/EP, Haswell-E/EP, X99 systems reached full functionality together with flawless stability. Now with macOS 10.14 Mojave, it might be another opportunity to follow my iMac Pro Build and Desktop Guide to unfold the unbelievable Broadwell-E/EP, Haswell-E/EP, X99 potential! High-end builds based on Broadwell-E/EP, Haswell-E/EP, X99 technology have found manifold application, not only in science and research at universities or research institutions, engineering facilities, or medical labs, etc... Broadwell-E/EP, Haswell-E/EP, X99 with up to 22 cores (44 threads) and turbo frequencies up to 4.4 GHz have made X99 to a "relatively cheap" but really serious alternative to real iMac Pro's and Mac Pro's. The principal intention of my desktop guides is to demonstrate, that we are able to build and configure fully functional and relatively "low-cost" high-end systems, which go far beyond of what Apple is able to offer at present or will be ever able to offer for some reasonable pricing. Broadwell-E/EP, Haswell-E/EP, X99 Systems that allow the use of all software-packages developed for MacOS, Unix, Linux or even Windows at the same time (e.g. think on Vine, Parallels, or a dual boot system configuration). The flexibility between different mainboards (Asus, Gigabyte, ASRock, MSI, etc.), different Broadwell-E/EP, Haswell-E/EP processors, and different RAM memory configurations (16-128GB) make such systems affordable for anybody (also home office, audio and video editing/production, etc.) and allows their perfect adaptation for each specific purpose, requirement and available budget. It might not be necessary to outline, that current Broadwell-E/EP, Haswell-E/EP, X99 Systems perform absolutely stable on a 24/7/365 basis.
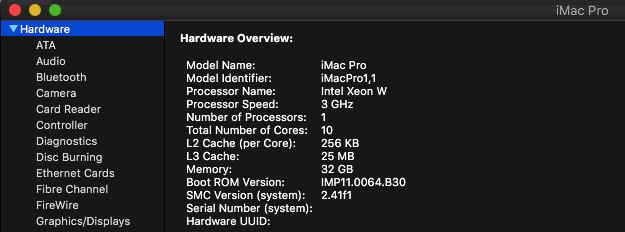
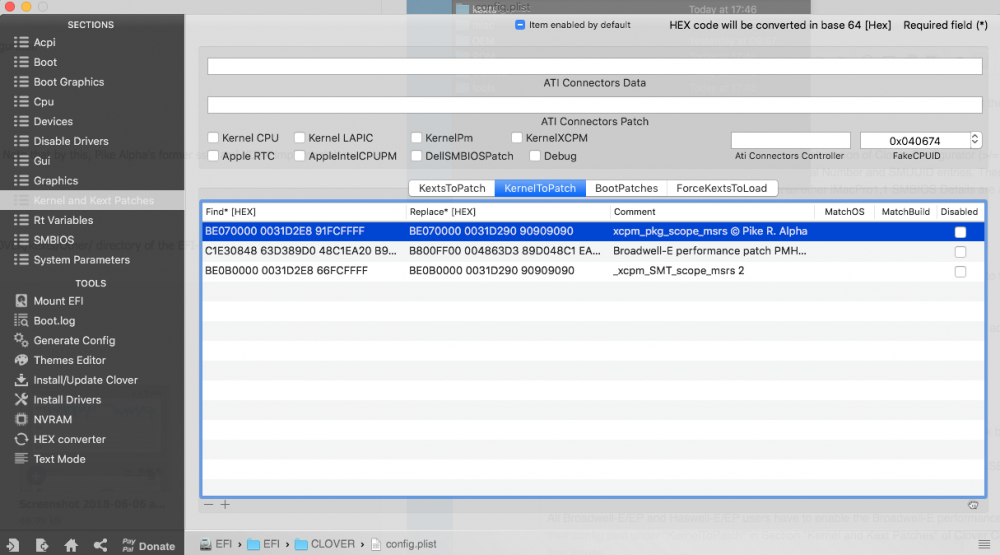

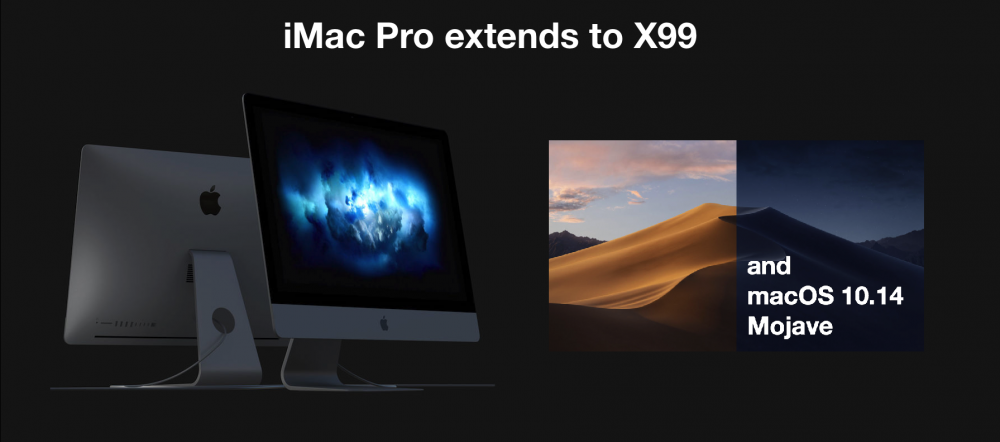
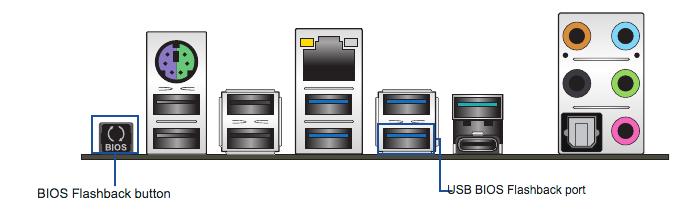
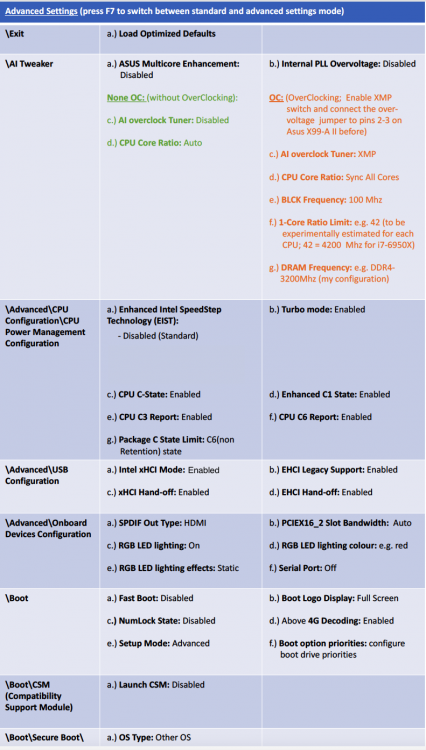
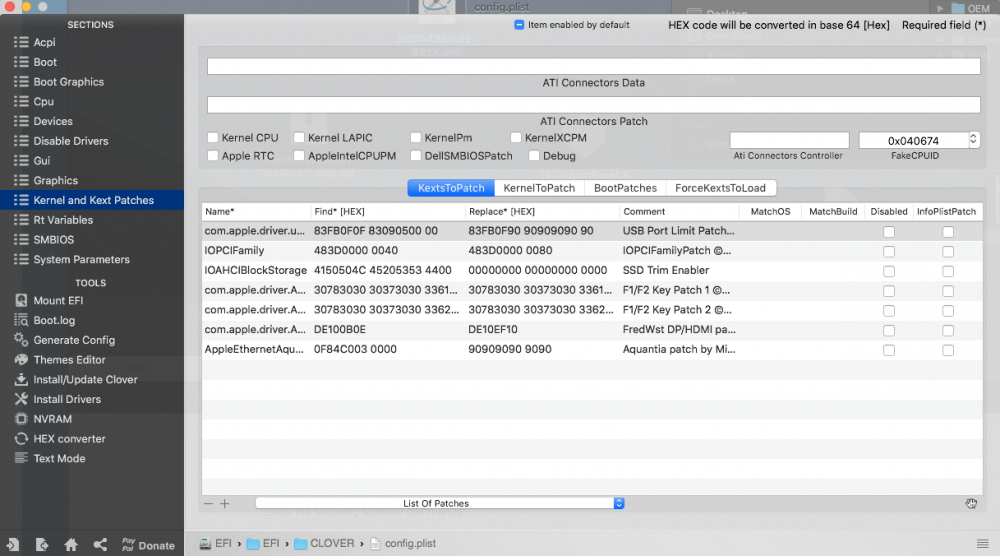
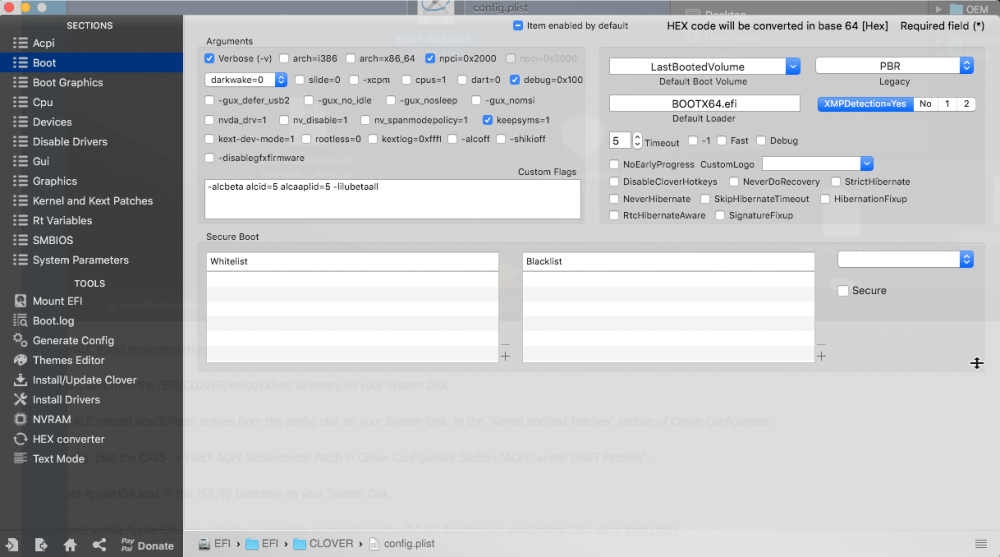


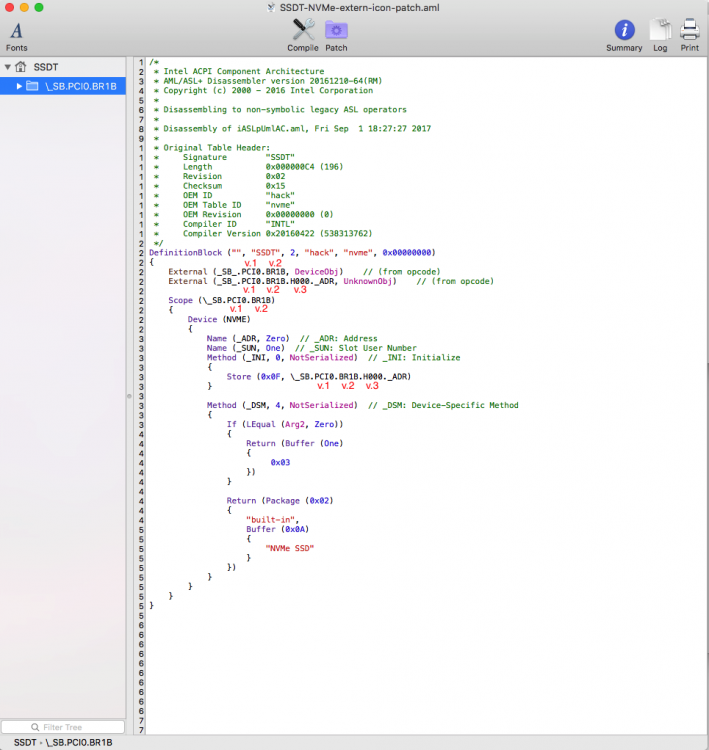
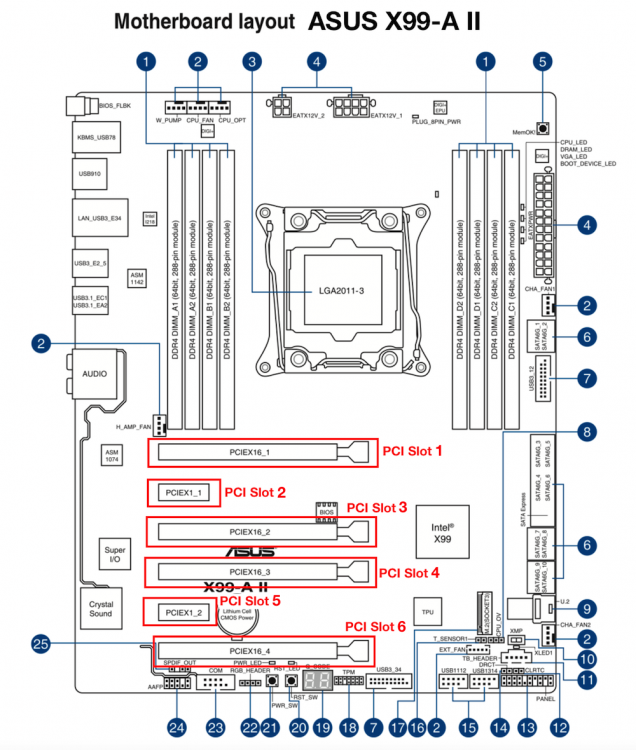
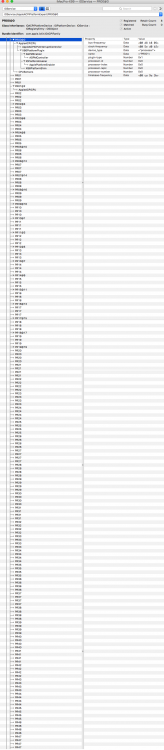
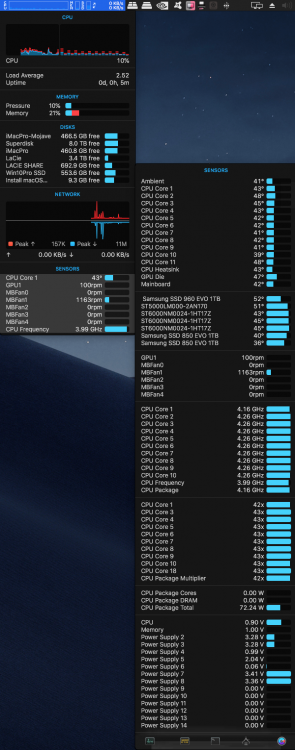
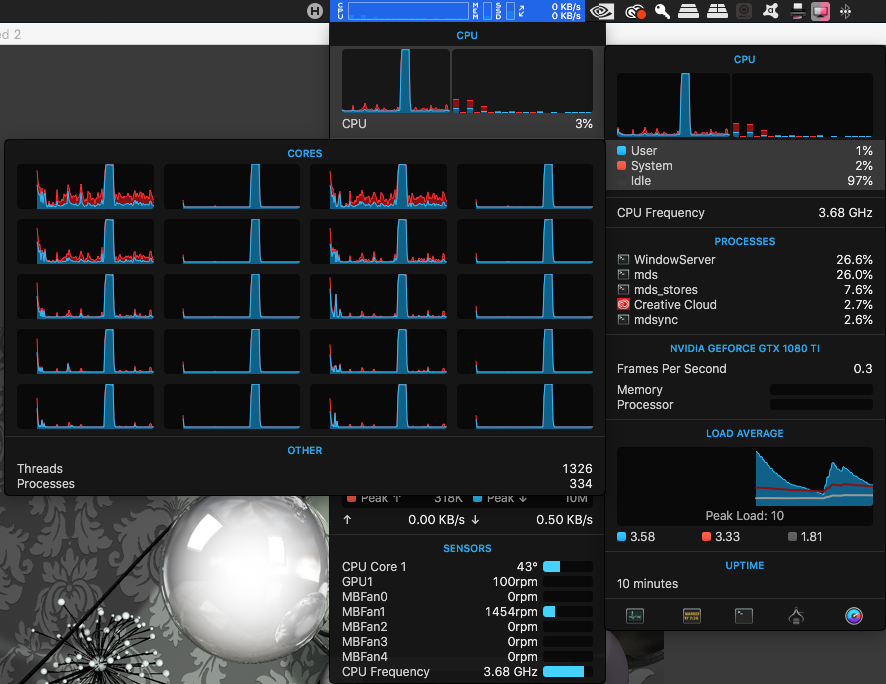


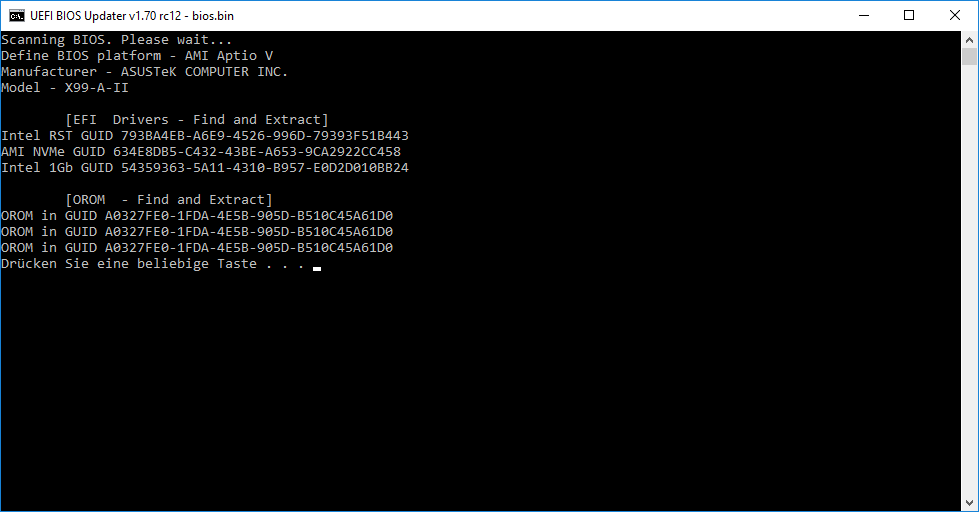
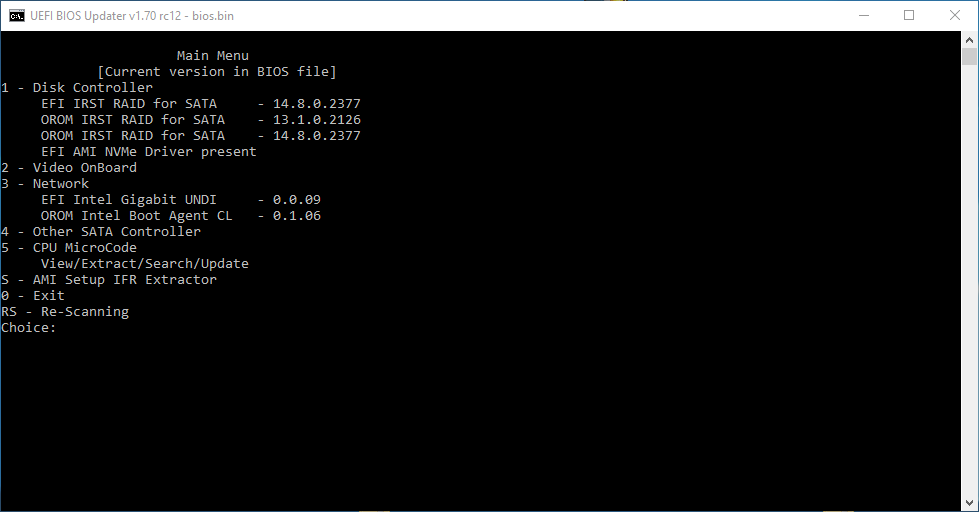
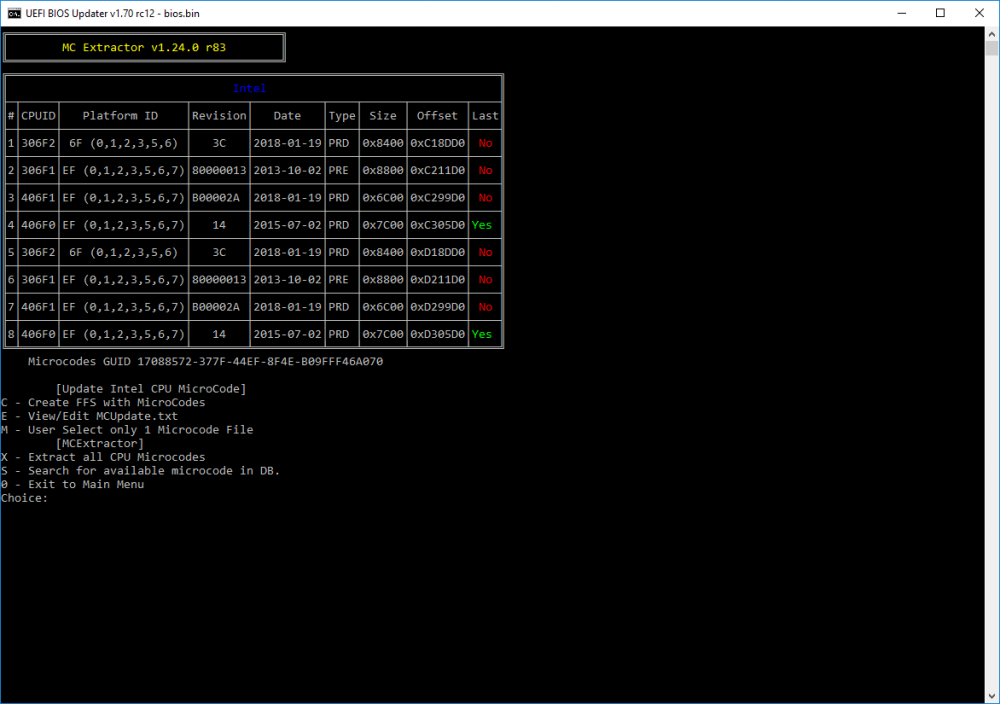
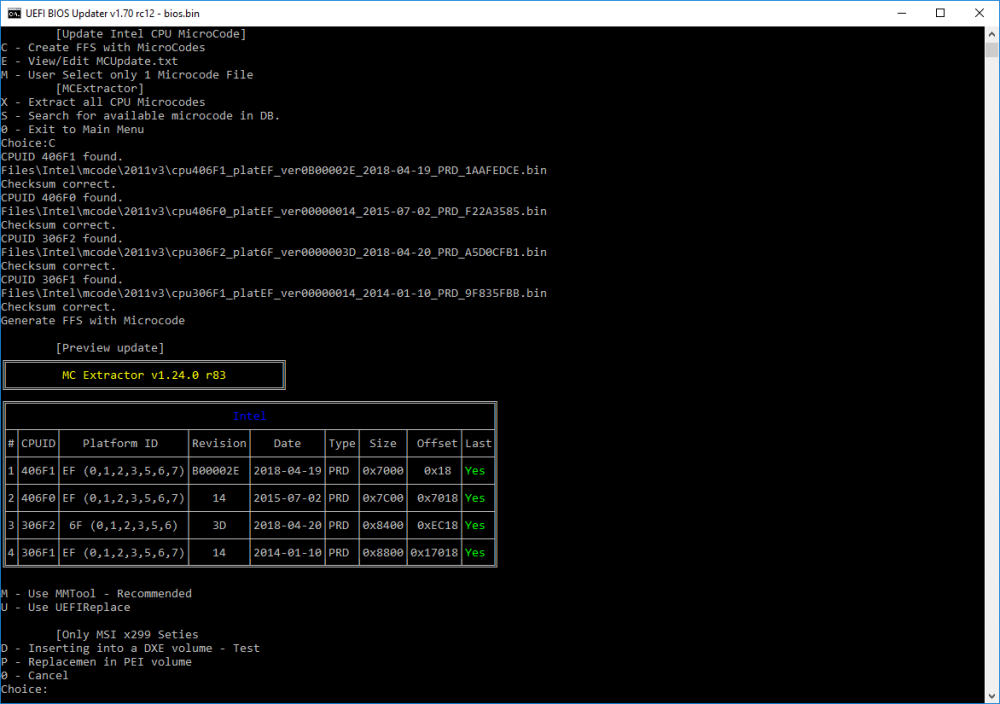
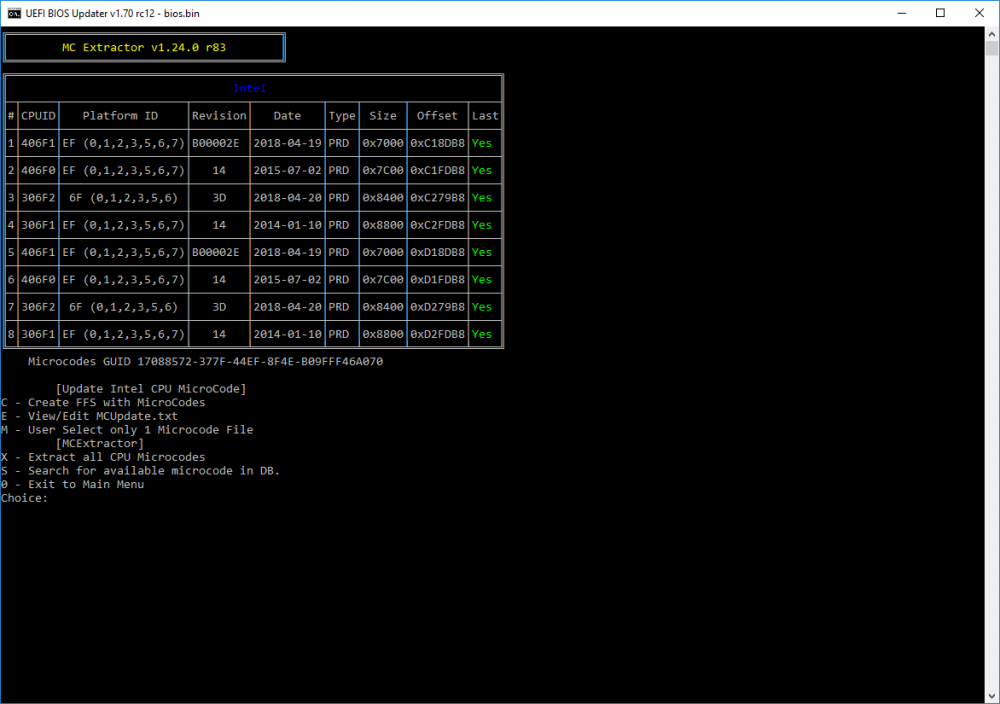
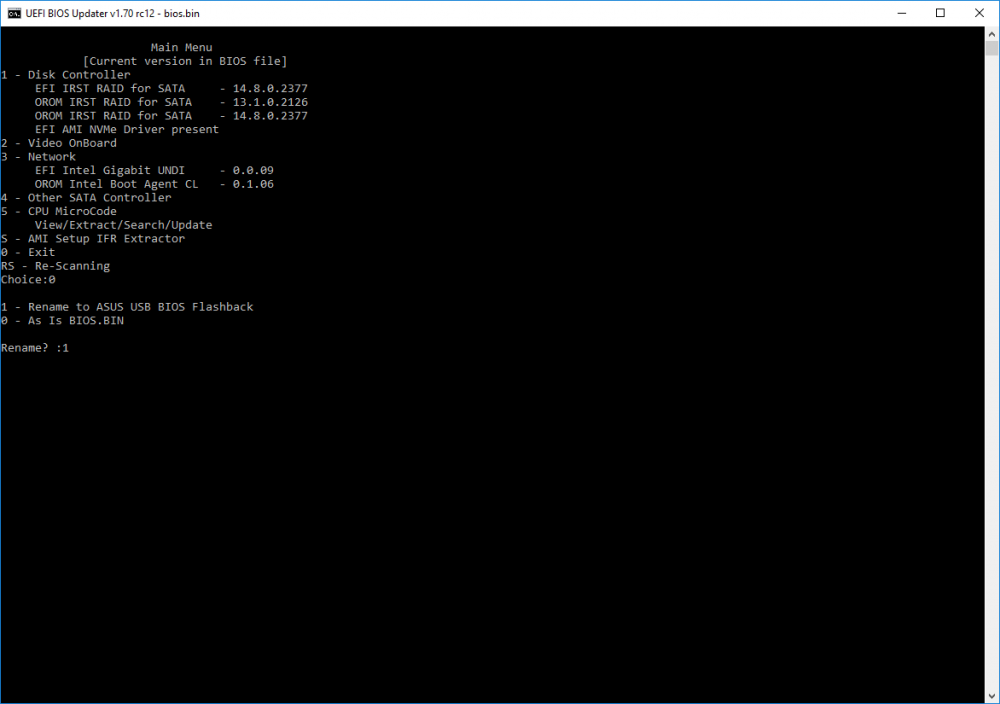


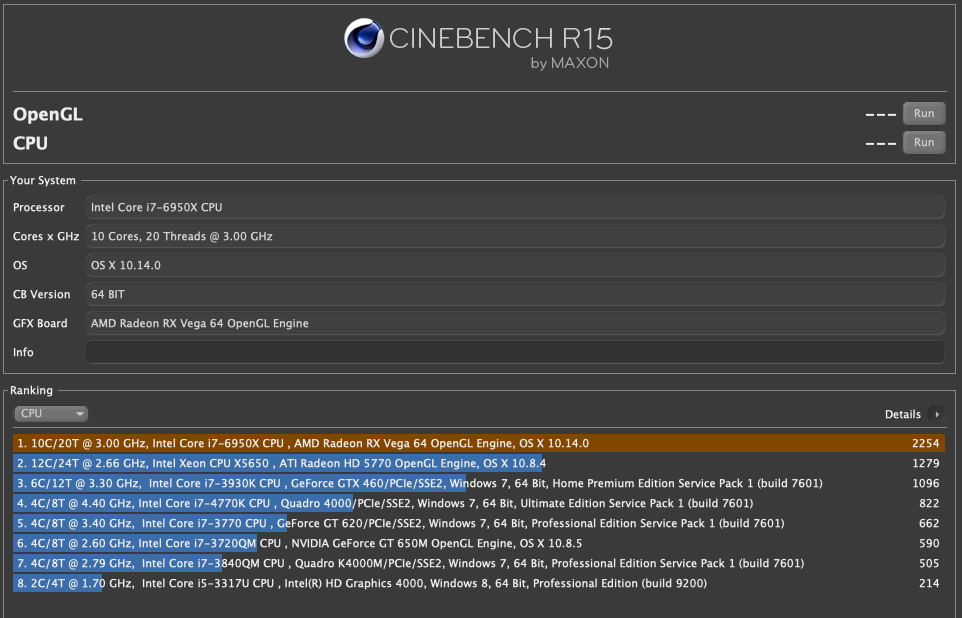
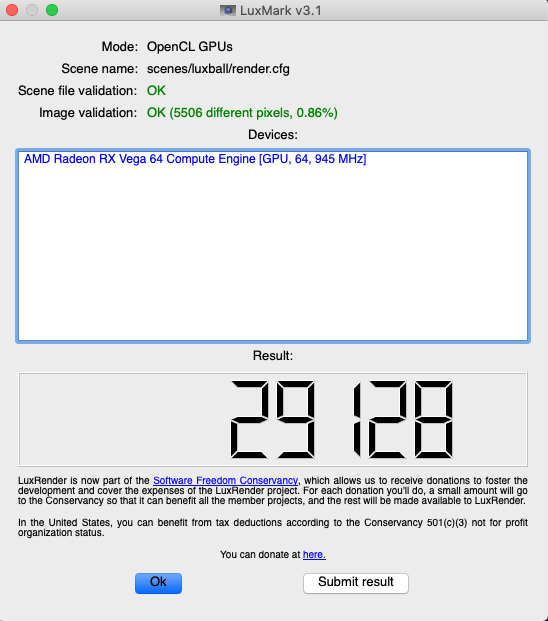
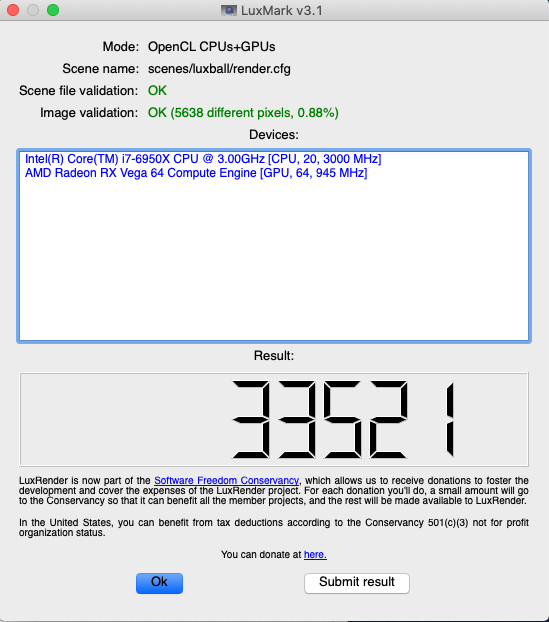

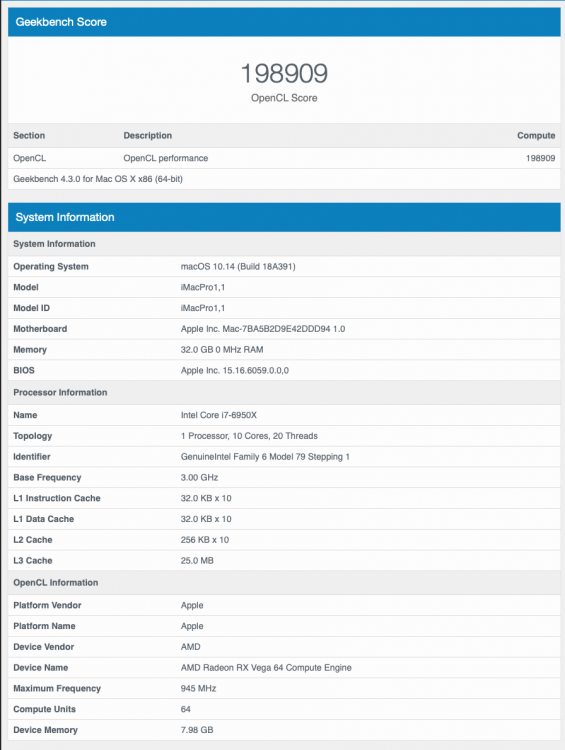
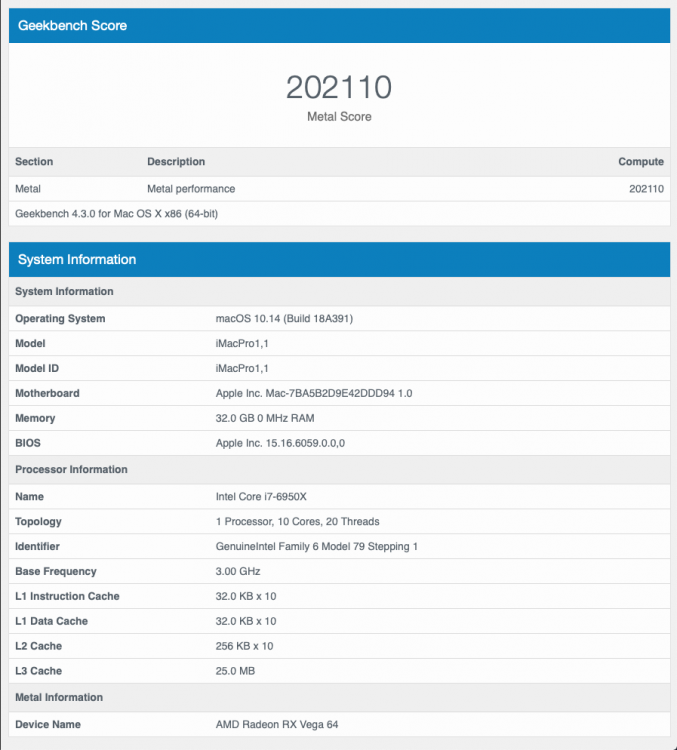
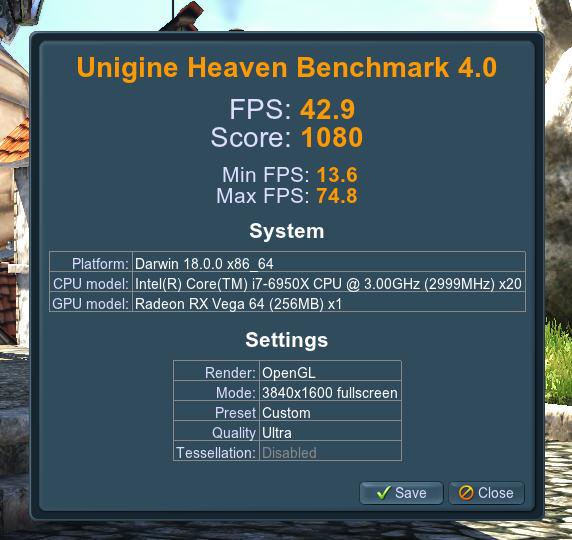
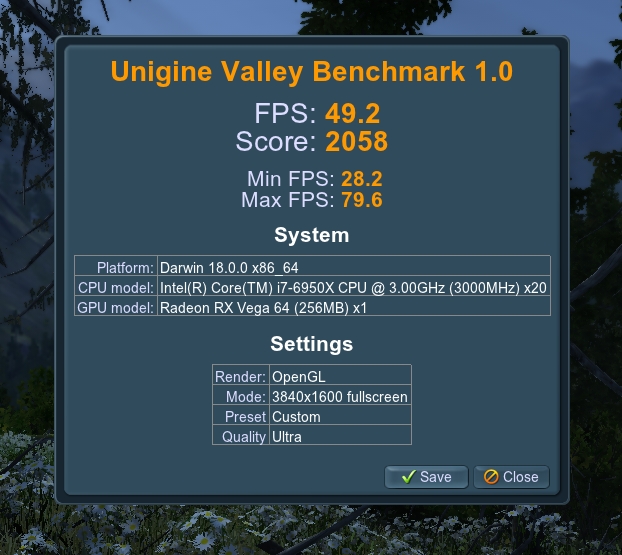
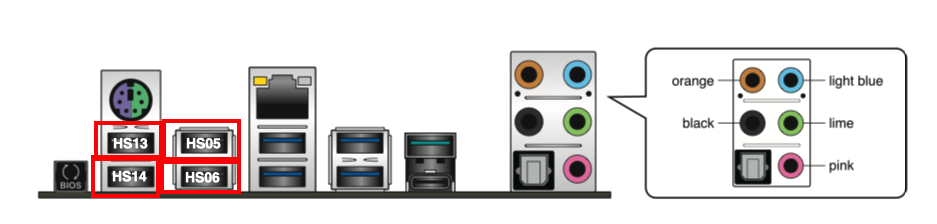


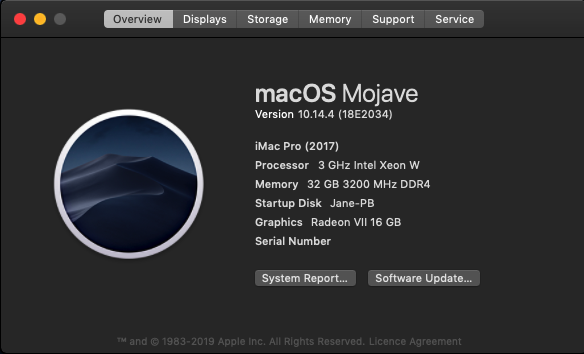
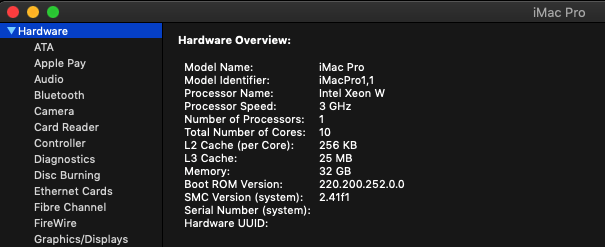 1 point
 -
They're not alone. Every time I start up windoze in my VM it updates the os... Anyway... Straightforward update. I haven't checked anything but all the USB ports I use are still working, as is my GPU
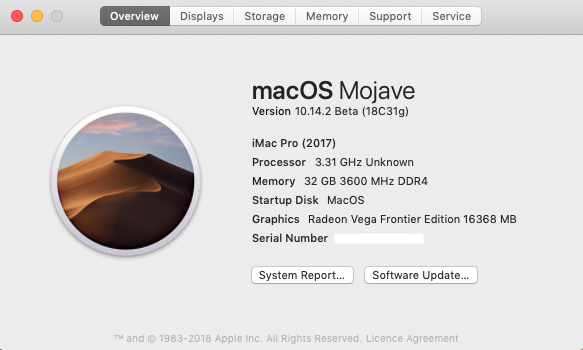 1 point
 -
EDIT: First post has been updated. If you're interested in testing this new feature feel free and let me know how you go.1 point
-
I've excluded IPG to publish the IGPU Utilization, maybe I need adjustment elsewhere. I made a modification to avoid a compiler warning that 'materlial' property of the NSVisualEffectView class is deprecated in newer OSes. I need to think to a replacement.1 point
-
1 point
-
Pulse effect is solved. Gadget it looks like this App in task bar look like this Menu look like this
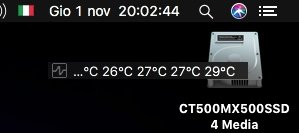

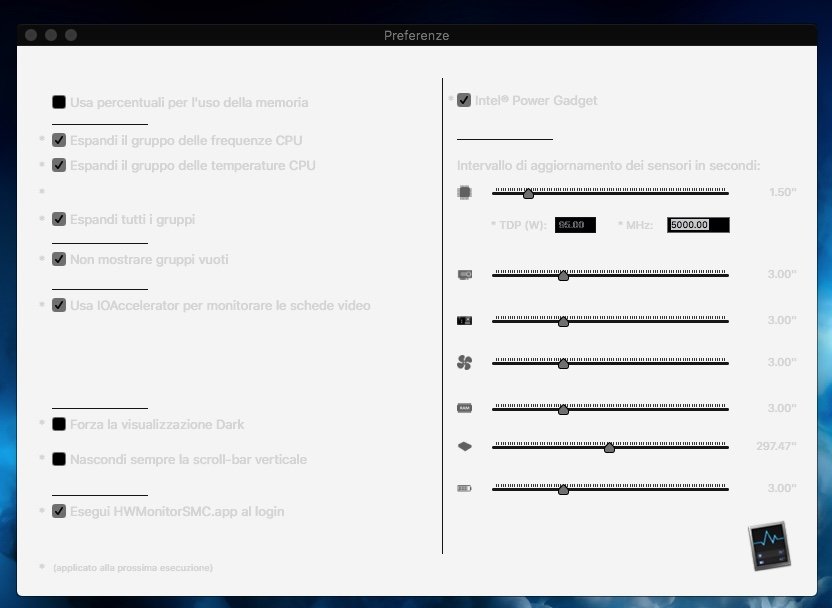 1 point
 -
HWMonitorSMC2.app_SMC_swift4.2_Beta6.zip1 point
-
Mi sono appena accorto che il gadget non ha più la capacità di allargarsi a più di 200 punti, lo sistemo immediatamente...1 point
-
12 sensors max, and must be the space for them. Exceded will be not taken into account. Tried to remove and add it again since different way is used now? And a question, did you try the gadget? ---> is resizable and is good for anyone needs a lot of stuff to be displayed (should be placed in the right upper corner the first time, but you can place where you like and its position is recordered). let me know P.S. You can also try to change the order of login items in System Preferences->Users&group->Login Items by removing and readding them. HWMonitorSMC2 should be the first (quindi basta che lo elimini e lo riaggiungi)
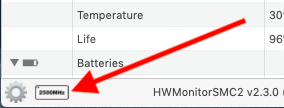 1 point
 -
The problem does not survive but the frequency of the cpu has disappeared and the last diode temp is displayed in the second line
 1 point
 -
Hello I wanted to share my results, as I was reading this forum post for having the same issue with Finder now previewing any Jpeg files. i disabled the integrated intel graphics in my bios to resolve the issue. Quick and easy solution id have to admit ;-)1 point
-
You can simply get the BIOS with ioreg: ioreg -l -n display@0 -r | grep ATY,bin_image Might be at another display (@0 / @1 / etc), but you get the idea. From looking at mine, the PPT starts at offset 37254. The PP_PhmSoftPowerPlayTable, if you're using one is there as well, as is a PP_PhmSoftWTTable? I've adapted your excel-sheet, I can confirm my Accoustic Limit (RPM) is set to 1500, which is exactly the rpm I'm seeing in ioreg. And Throttling (RPM) is set to 2300. I have seen another issue though, my fan RPM drops under load, by up to 33%, tested with Luxmark, Furmark, etc. Only when I quit; remove the load, will the fan RPM rise again, even above 1500 RPM, until the card is cool again. I have a bug report open with Apple, but they haven't told me anything yet. Monitor fanspeed / other PerformanceStatistics: # Grab the column headers from ioreg's output: ioreg -l -n display@0 -r |grep \"PerformanceStatistics\" | cut -d '{' -f 2 | tr '|' ',' | tr -d '}' | tr ',' '\n'|grep 'Temp\|Fan\|%\|(W)\|Hz'|cut -d\" -f2|tr '\n' ',' && printf '\n' # Grab the values every second: while true do ioreg -l -n display@0 -r |grep \"PerformanceStatistics\" | cut -d '{' -f 2 | tr '|' ',' | tr -d '}' | tr ',' '\n'|grep 'Temp\|Fan\|%\|(W)\|Hz'|cut -d\" -f3|tr -d '='|tr '\n' ',' && printf '\n' sleep 1 done1 point
-
Hello! I think you are misssing the method to shut off the NVDA at wake from sleep. Look here: https://github.com/RehabMan/OS-X-Clover-Laptop-Config/tree/master/hotpatch at the SSDT-DDGPU.dsl and SSDT-PTSWAK.dsl. But use only the nvda methods to not shut off your AMD. In config.plist you have to insert the corresponding DSDT patches, add boot argument "nv_disable=1", add for nvda the add properties from this config.plist: https://github.com/RehabMan/OS-X-Clover-Laptop-Config/blob/master/config_HD515_520_530_540.plist In graphics activate inject NVDA. Have fun.1 point
-
You still need AppleBacklightFixup.kext,, To get full range brightness need PNLF patch + AppleBacklightFixup.kext.1 point
-
Try that: HWMonitorSMC2.app_SMC_swift4.2_Beta5.zip1 point
-
Puoi usare anche il comboupdate https://support.apple.com/kb/DL1981?viewlocale=en_US&locale=en_US Prima devi però usare https://github.com/Gengik84/HFS_ComboUpdate_Unlocker1 point
-
thank you for answer.1 point
-
Try to use this,,, put it at your external SSDT or modify it to your DSDT.. I get it from Rehabman's codec commander repository at Github. Don't forget to install CodecCommander at Library/Extensions DefinitionBlock ("", "SSDT", 1, "hack", "ALC283", 0) { External(_SB.PCI0.HDEF, DeviceObj) Name(_SB.PCI0.HDEF.RMCF, Package() { "CodecCommander", Package() { "Custom Commands", Package() { Package(){}, // signifies Array instead of Dictionary Package() { // 0x19 SET_PIN_WIDGET_CONTROL 0x25 "Command", Buffer() { 0x01, 0x97, 0x07, 0x25 }, "On Init", ">y", "On Sleep", ">n", "On Wake", ">y", }, Package() { // 0x21 SET_UNSOLICITED_ENABLE 0x83 "Command", Buffer() { 0x02, 0x17, 0x08, 0x83 }, "On Init", ">y", "On Sleep", ">n", "On Wake", ">y", }, }, "Perform Reset", ">n", "Perform Reset on External Wake", ">n", "Send Delay", 10, "Sleep Nodes", ">n", }, }) }1 point
-
Aggiornata, grazie ancora1 point
-
Ciao puoi usare lo stesso ma seleziona Developer[0] poi 10.14.1 [1] non ti visializzerà la corretta build ma è solo "estetica" nel caso ti basta cambiare alla linea 296 awkNR=13 ---> awkNR=121 point
-
@Dake ???1 point
-
It'll be interesting to see if a new Mac Pro with no igpu and probably shipping with the Vega will impact on the OS and the functionality of the drivers. The smbios 6,1 is still the best in some ways because of the lack of integrated GPU, but a refresh of this with a new Mac Pro release will def be welcome to the hackintosh community...1 point
-
I think it's not the update-script issue, but you can try to boot -s to single user mode, and try the command. the update-script works fine here. update_dyld_shared_cache -force1 point
-
Hi Chris.... similar observations. For some reason, the drivers ignore most of the fan table info that would further control fan speeds. My hunch is that since discrete Vega cards are used only for Egpu, the drivers are for that reason not optimised at all in terms of fan control / noise. For the iMac Pro Vegas, Apple does use a different fan control method, since the Vega is directly implemented on the Mainbord and so they use their proprietary cooling system. I wonder how the Vega 64 would behave in a EGpu Setup through TB3. So my interpretation: accoustic limit is a desirable nominal speed, its the rpm that will be established after heavy load. min and max fan have no effect on fan speed control, they just help calculate percentage of fan speed for display reasons. Regards, Michael1 point
-
Suave suavecito aqui since yesterday...
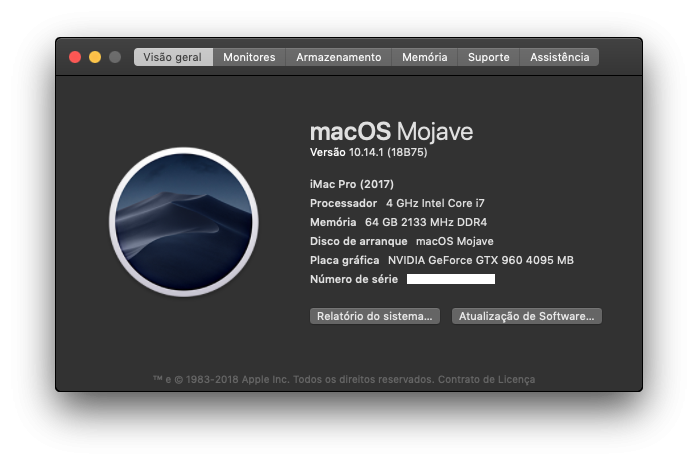
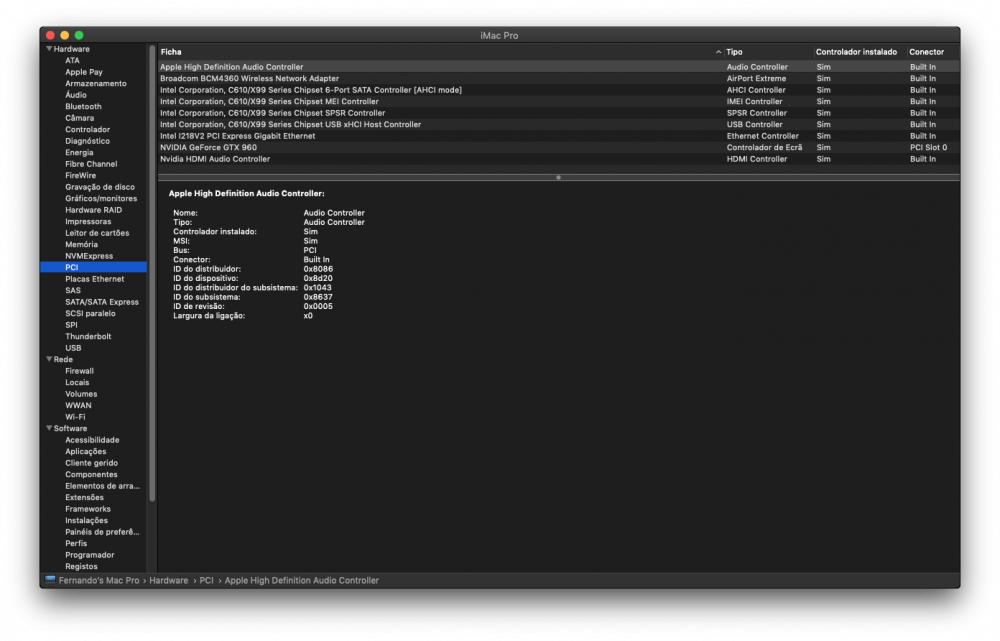
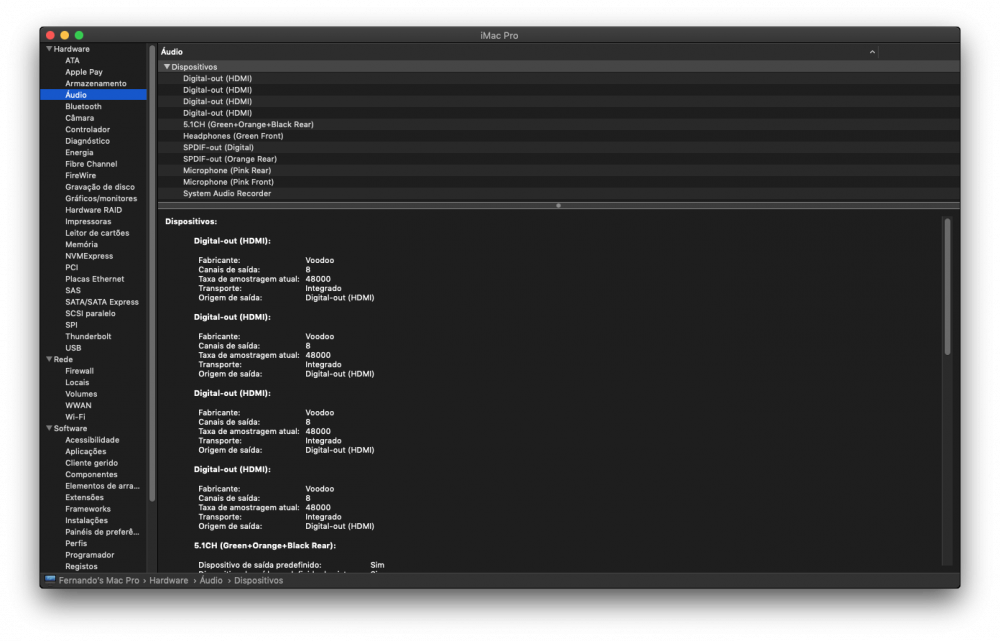
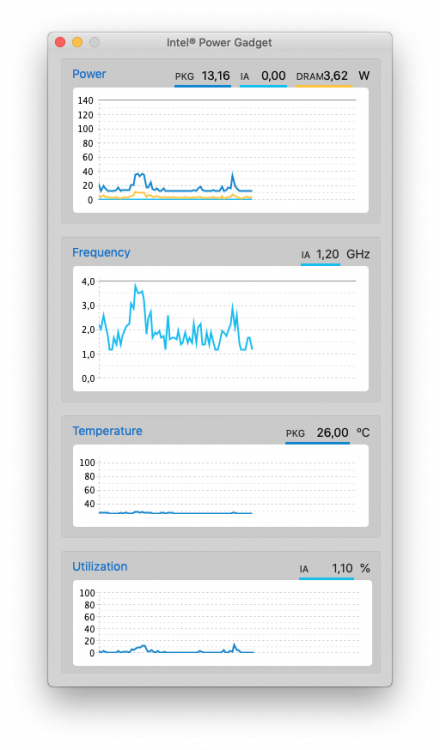 1 point
 -
Hi blackosx, Sorry for the huuuuge delay in feedback. I said I'll come back with feedback on the https issue, and I totally forgot about it. I'm deeply sorry. The good news is that everything works perfectly fine in the same environment, with the newest version (0.76.8). Great job! And thank you very much!1 point
-
What could be the issue here, current installed version is 10.14(18A389). Also, can't see any updates in "Software Update". EDIT: Ended up downloading latest version from App Store and reinstalling...
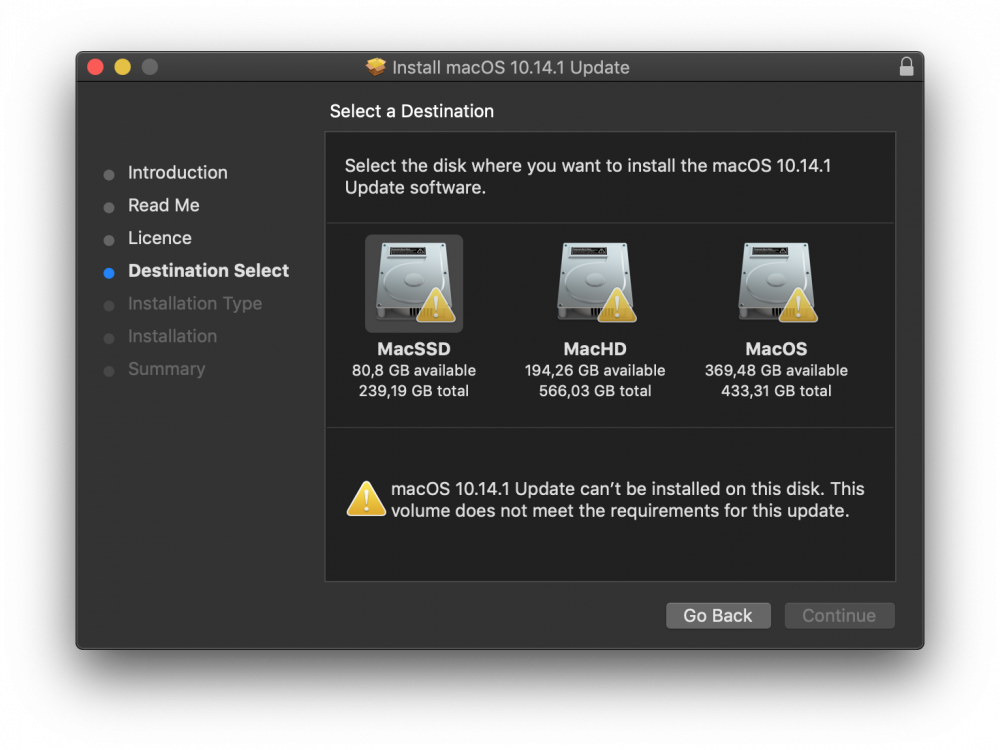 1 point
 -
Okay one last try for me. RehabMan suggests the check could be in AppleUSBXHCIPCI. So I found the only obvious cmp that might be it. Patch 1: Find: 83fb0f0f 838f0400 00 Replace: 83fb0f90 90909090 90 Name: com.apple.driver.usb.AppleUSBXHCI MatchOS: 10.14.x Patch 2: Find: 83f90f0f 87bb0000 00 Replace: 83f90f90 90909090 90 Name: com.apple.driver.usb.AppleUSBXHCIPCI MatchOS: 10.14.x
 1 point
 -
RehabMan just posted that the new patch doesn't work. He thinks there must be another check against the 15 port limit.1 point
-
Clover uses plain RGB and yes it can explain color difference https://sourceforge.net/p/cloverefiboot/code/HEAD/tree/rEFIt_UEFI/libeg/nanosvgrast.c#l1185 nsvg__scanlineSolid1 point
-
My RX 480 is a reference card and the fan does the same but with a Whooosh! The first time I heard it was in Sierra beta a couple of years ago. It pleased me because I knew I finally had acceleration in macOS. My RX 460 did the same about a month earlier so I knew it was a good sign. These cards don't do it in Windows it seems to be an Apple issue but when it doesn't do it there is no acceleration.1 point
-
Go ahead 5GHz on all cores should always be possible. Whether you go higher or not is just a question of your cooling solution and the strength of your wish to pass 7000/40000 Of course a 4% higher benchmark score can not be felt in daily operation, but sometimes you just have to cross that line of nice round numbers1 point
-
Overclocked to 5200. Board Z390 Phantom Gaming itx/ac
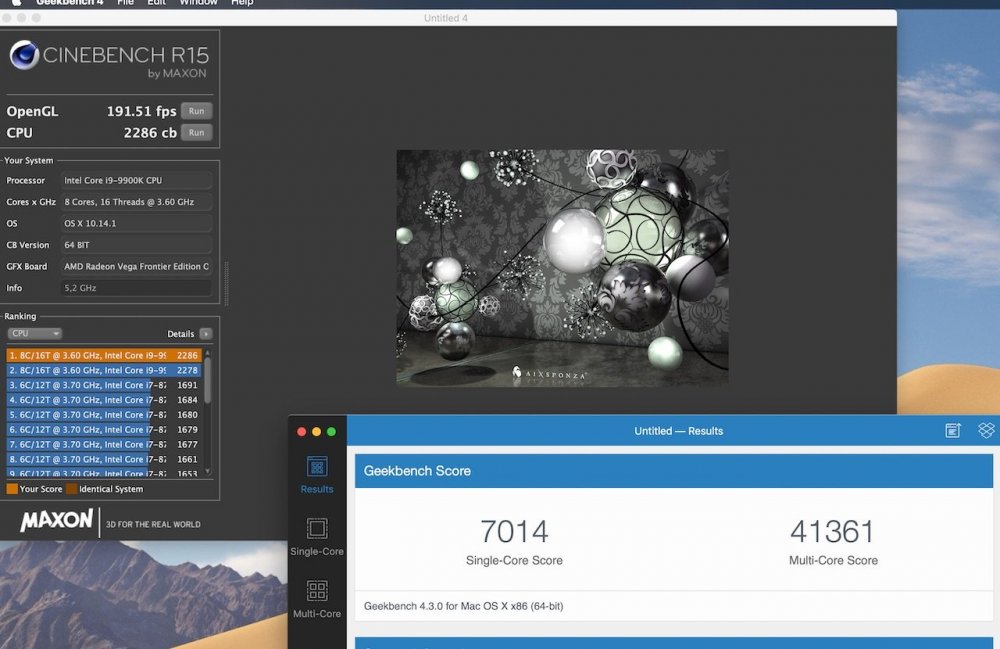 1 point
 -
Rev 4719 Added prelang kbd option if want to keep language when updating macOS with native NVRAM. - This is the key to fixing macOS language problems when using native NVRAM. - This is macOS bug for long time ago. - When using only AptioMemoryFix or OsxAptioFixV3 without emuvariableuefi.efi - When using a language other than English - can fix issues blow if use this key. <key>GUI</key> <dict> <key>KbdPrevLang</key> <true/> <key>Language</key> <string>ru:0</string> <----- you want language </dict> 1. mixed language in restart popup after updating macOS. 2. always keep english when updating macOS in recovery despite to user already use other language in macOS.
 1 point
 -
I could when I have the time. I'm currently updating the build tools and stuff. I'll get around to it.1 point
-
ola... estou com um 10.14.0 e fazendo um update para 10.14.1...sao 6gb mesmo? quando ponho "get" na pagina do Mojave..vem como update....eh isso mesmo? update com 6gb? P.S...na aba leteral em "update" não refere nenhuma update disponível...so quando vou a Mojave tenho o get e aparece como um update P.S. do P.S....nao sei se eh porque estou em um HD externo...quantos gb a atualizaçao deve ter? c.frio0 points
-
I kext di Nvidia sono caricati.0 points