Leaderboard


Popular Content
Showing content with the highest reputation on 08/02/2018 in all areas
-
Já viram a novidade que o @MaLd0n postou no Youtube? Se você é um user dos Hacks série 100/200 e 300, esse video vai te ajudar, e muito!! Vejam e aproveitem: Não se esqueçam de compartilhar3 points
-
I guess it depends on what kind of ads is2 points
-
No i didn't knew that, but why, what's the benefit, i'm curious to know ! Now i realize that @Hervé maybe don't have any problem with the adds, if they are there, it's fine, but i don't know what the benefit!2 points
-
I have made test with 1.3.0, injecting "alc-layout-id" works for me and my "layout-id" automatically filled with zero by ALC. Made another test by injecting them both "alc-layout-id=1" and "layout-id=3", my "layout-id" became same as "alc-layout-id" (1).
 2 points
 -
I wasn't talking about the problem of the editor's bar when editing a post. I've just seen that @Hervé have the adds, and i only had the need, to suggest to him this app, that stop adds or hide them, but nothing related to the problem of that editor's bar. Because i already know that, just because my laptop have only 1366 x 768 resolution screen, then, with the help of @SavageAUS, i used the Resolutionator app, that helps to maximize screen resolution even if it's not supported by the laptop-monitor.2 points
-
This error can be corrected with ./ebuild.sh -fr2 points
-
 Sorry you're wrong because it does work if you follow @crazybirdy's "how to" guide carefully . With no information on what you did or what errors appeared, eg log files, its impossible to help you. Some tips on preparing the target volume manually (the automated script 14MBRinstallerMaker doesn't seem to prepare the target volume fully if it is GUID formatted) ... .IAProductInfo is a hidden file and needs to be copied to the root / of the Target Volume, all other install files should be placed in "/macOS Install Data" folder Determine the volume UUID of the Target Volume (for use in editing .IAProductInfo and minstallconfig.xml) with terminal diskutil info "Target_Volume_Name" | grep UUID The value to enter for <key>IAEndDate</key> can also be determined from terminal (credit to @PikeRAlpha's blog post) date -v -2H "+%Y-%m-%dT%H:%M:%SZ" After the target volume is fully prepared, you should point Clover to boot the Disk1mbrInstaller volume and not macOS Install2 points
 -
The SSDT example is quite outdated. Now that Clover finally supports injecting device properties in a simple form via Properties in config.plist, you are supposed to stop using ACPI and use device properties similarly to Apple. Yet, if you still want to inject device properties via ACPI, you should use the original name of your GPU, as WhateverGreen only renames the macOS internal device name, preserving ACPI intact and avoiding many issues people cause by attempting to edit or patch their ACPI tables. Also, what you try to inject is utter nonsense, good for you it failed. PP overrides should be named as PP,PP_… and I do not think the connector fields even work like this. And slots/models for HDAU is logically insane.2 points
-
try with slide=0 in config.plist only red arrow2 points
-
In this new version, there's a little (very little) issue with the translation: Sorry if this post is silly.
 2 points
 -
1 -Create a USB bootable Use this tool and download Catalina or Big Sur from Apple servers installScript_1016fullapp.zip Credits: crazybirdy Copy Catalina / Big Sur installer to Applications folder, open terminal and run Catalina Big Sur Monterey If you want check one step by step, check here -Opencore Vanilla Tutorial https://tinyurl.com/y2dmt5af -Clover Vanilla Tutorial https://tinyurl.com/rcy7muu4 2- EFI folder USB installation -EFI OpenCore or Clover Folder Intel Processors Paste this EFI folder in EFI partition in your USB STICK https://tinyurl.com/ybr968w3 3- EFI folder SSD -EFI OpenCore or Clover Folder Intel Processors Paste this EFI folder in EFI partition SSD https://tinyurl.com/ybr968w3 4- Start Fine Tune Run this app and post full dump here for full ACPI solution RunMe.app https://tinyurl.com/y9562hz7 If you like a SSDT way, here we go (SSDT is a incomplete way) SSDT-OLARILA.aml.zip 5- USB Solution https://tinyurl.com/bkmcj4ua --DSDT PATCHES-- -FIX ERRORS AND WARNINGS -FIX ACPI ERRORS -REMOVE UNUSED SCOPES / DEVICES -HIGH PRECISION EVENT TIMER -SATA SERIE ID -DMAC -REMOVE LINES, PROBLEMATIC and UNUSED -FIX K.P in REBOOT -NVRAM -REAL TIME CLOCK -SLPB -DARWIN / WINDOWS -XHCI -PLUGIN TYPE -HDEF -ARTC -IPIC -TIMR -SBUS -BUS1 -MCHC -ALS0 -SHUTDOWN -UAR1 -LAN -FWHD -USBX -PMCR -PPMC -XSPI -kUSBCompanionIndex -io-device-location -IMEI -EC -PNLF -ARPT -GFX0 -NVME -ACPI-WAKE-GPE -DTGP -HDMI / HDAU --SCREENSHOTS-- -If you want to buy me a beer - Donations with PayPalhttps://tinyurl.com/r2bvzm7 Big Thanks to XLR and your Badass Motherboard, Ultrafast CPU, Coolest Heatsink, Huge Graphics Card, Tonnes of RAM, Gigantic Hard Drive, Lightspeed Disk Burner, Professional Sound Card, Massive LCD Display. -Credits and thanks to the old and new people in the community who developed patches, kexts and bootloaders! Slice, Kabyl, usr-sse2, jadran, Blackosx, dmazar, STLVNUB, pcj, apianti, JrCs, pene, FrodoKenny, skoczy, ycr.ru, Oscar09, xsmile, SoThOr, RehabMan, Download-Fritz, Zenit432, cecekpawon, Intel, Apple, Oracle, Chameleon Team, crazybirdy, Mieze, Mirone, Oldnapalm, netkas, Elconiglio, artut-pt, ErmaC, Pavo, Toleda, Master Chief and family, bcc9, The King, PMheart, Sherlocks, Micky1979, vit9696, vandroiy2013, Voodoo Team, Pike R. Alpha, lvs1974, Austere.J, CVad, headkaze, onemanosx, erroruser, Jenny David, Sampath007, Facebook Hackintosh community, Facebook Olarila community, SchmockLord, daliansky and many, many, many others! We're all here to have fun and learn from each other!1 point
-
Version 10.14.x
41,279 downloads
Patched OSInstaller.framework to allow macOS 10.14 installation on MBR HFS+ partition. To use those patched files you must follow HowTo to create an USB installer. You can't just run the app downloaded from Mac App Store. The patch is made base on 落下爱@pcbeta 10.10.x MBR patch method, and more patch for 10.14 HFS Firmware check by crazybirdy. What is this patched OSInstaller doing? 1. Patch the MBR check, allow macOS 10.14 installation on MBR partition. 2. Patch the Firmware check, bypass the error of "An error occurred while verifying firmware". 3. Patch to stop auto-convert to APFS , "ConvertToAPFS=false" is no longer worked with 10.14. 4. This patched MBR OSInstaller will never convert to APFS, and will always install as HFS+ partition. 5. This patched MBR OSInstaller method works with both MBR HFS+ and GPT HFS+ partition (GPT+recovery). No longer need to set new SMbiosversion, FirmwareFeatures, and FirmwareFeaturesMask with this MBR-patch. What's the difference between createinstallmedia method, MBR-Manual-Method, and MBR-Automatic-Method? As the following.... 1. createinstallmedia method, needs stage 1, stage 2 installation process, which is worked with GUID partition only, always convert to APFS format. 2. MBR-Manual-Method (same as 10.12), install via stage 2 manually, which is worked with both MBR and GUID, HFS+ and APFS, will never convert the partition format. We can manually format as MBR or GPT, HFS+ or APFS on installation screen like as 10.12. We can manually select MBR HFS+ partition to install 10.13 and 10.14 on installation screen now. Needn't to update the MBR-Manual-Method files, it will still work on 10.13, and 10.14 future versions, I think so. It can be installed as Fresh installation on formated blank partition only, but can't be installed as update from previous version. 3. MBR-Automatic-Method (new for 10.13+), install via stage 2 automatically, which is worked with both MBR and GUID, HFS+ and APFS, will never convert the partition format. It can be installed as Fresh installation on formated blank partition, and can be installed as update from previous version. How to make 10.14 installer for MBR (MBR-Manual-Method)? Just use EasyMBR-InstallerMaker to make installer, it works with both MBR and GPT. Read HowTo inside the dmg first, same as 10.12. Read HowTo Q/A Q5. How to patch to work with CPU SSE4.1 only for Mojave? Read HowTo Q/A Q6. How to download the full installer app via swscan.apple.com, instead of App Store? Read HowTo Q/A Q7. How to update 10.14.x combo-update to MBR and GPT with installScript directly? How to make 10.14 installer for MBR (MBR-Automatic-Method)? Just use 14MBRinstallerMaker to make installer, it works with both MBR and GPT. Read HowTo inside the dmg first, same as 10.13. Read HowTo Q/A Q5. How to patch to work with CPU SSE4.1 only for Mojave? Read HowTo Q/A Q6. How to download the full installer app via swscan.apple.com, instead of App Store? Read HowTo Q/A Q7. How to update 10.14.x combo-update to MBR and GPT with installScript directly? And, need a SMBIOS supported with /System/Library/CoreServices/PlatformSupport.plist. Q6. How to download the full installer app via swscan.apple.com, instead of App Store? A6. Some people download installer app from App Store, and get only 18 MB size, not the complete installer app (5.68 GB). You should boot to 10.12, or 10.13 to download it again from App Store, or use script Q6-DownloadFullApp/installScript_1014fullapp to download the full installer app via swscan.apple.com.1 point -

Version 1.0.0
1,460 downloads
iMessage Fixer is an application which helps you to completely reset your iMessage and FaceTime settings. This app will remove all the preferences related to iMessage and iCloud account from your system and it will also remove the NetworkInterface preferences from your system, so please use with caution. If you are having activation issues with iMessage, this application is not the answer but if you already activated iMessage on your Mac or Hack and the Messages is acting up you can use this app to fix it. Your iMessage history will be erased and you might need to sing back in in iMessage and FaceTime. --------------------------------------------------------------------------------------------------------------------------------------------------------------------- This is a quick guide on how to fix iMessage/Messages and FaceTime: There are other issues that can result in imessage/Messages and FaceTime not working properly like using a blacklisted Serial Number or MLB or SmUUID or simply an unactivated AppleID. If that's the case you need to use Clover Configurator 5.2.0.1 (or newer version) to rebuild your SMBIOS data with the most updated details like shown in the picture below: All you have to do is to select the SMBIOS section and then form the SMBIOS selector choose the most compatible SMBIOS with your hardware: Then you need to select the RtVariable section to generate the MLB based on your SMBIOS data and then just click the Generate button next to ROM to automatically generate the MLB and ROM ID based on your SMBIOS and then copy/paste the MLB from the newly generated info into the MLB box next to the ROM filed. Save your new config.plist Once you did the steps above and save the config, close Clover Configurator and the run the iMessage Fixer app and then reboot the computer, once macOS is loaded, login into iMessage or Messages using your AppleID and hopefully you can activate your iMessage and FaceTime. Important Note: If you already signed in AppStore or iCloud using your current config.plist you might need to remove that device from iCloud in order to prevent the Account Lock Up by Apple because once you change the Serial Number, MLB and SmUUID Apple's server will lock your account in order to protect your data and you need to rest the password for your AppleID. I hope you find this helpful. Cheers1 point -
Sorry buddy. But yeah, I had feel the same when I saw some friends with this mobo and they discovered in the hardest way about this... Sure! And another note: USB dongles may can be cause of the sleep/wake issues.1 point
-
So cool, i need patience for that , but you already mentioned it, "I just ignore the ads", so the ignorance will make things easier!1 point
-
Hey Allan, thanks for giving me a bit of your time. I did run your script to disable hibernatemode, autopoweroff and standby. However, the problem persists. Unfortunately, I didn't think about hackintosh when I built this PC one month ago. I really want to try more before I give up, 'cause a new MOBO vai doer no bolso.1 point
-
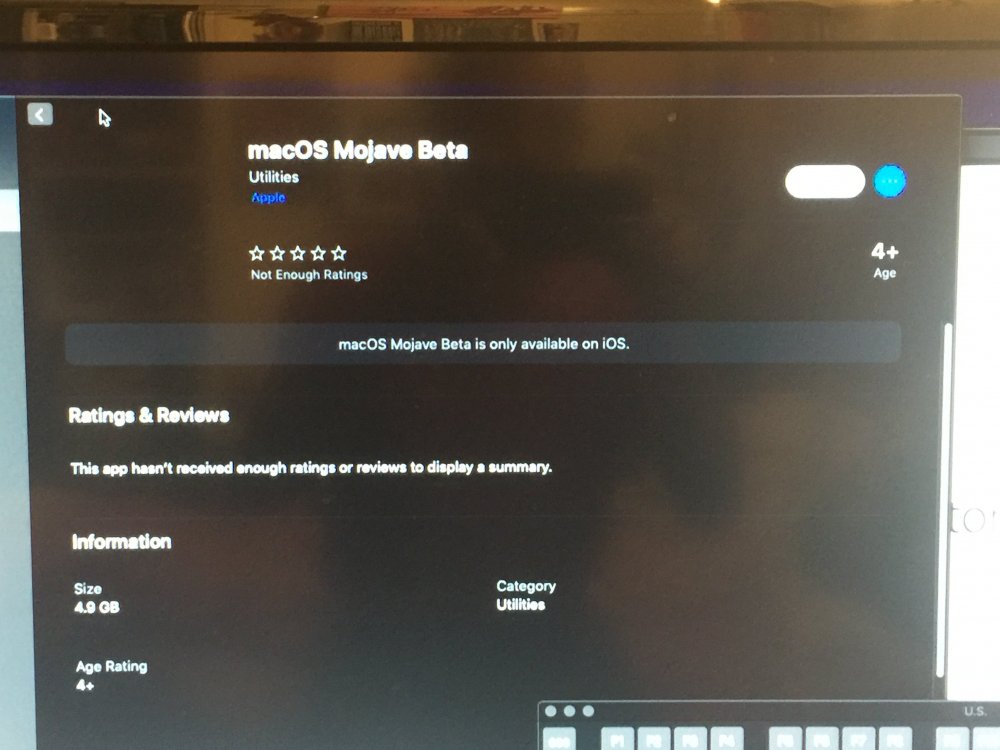
WTF Apple? lol do they know something we do not? HAHAHHA that was me trying to download the new beta update on a Skylake desktop emulating smbios IM18,1
 1 point
 -
Disable the Hibernation file: And FYI, the ASRock mobos have a much issues with sleep/wake.1 point
-
modifica il config con clover configurator, sezione Devices/FakeID/IntelGfx rimuovi il tutto terminale sudo kextcache -i / riavvia Per la batteria devo rifinirti il dsdt la luminosità hai lo slider nelle preferenze di sistema? audio conosci il tuo codec? segui qui e posta il tutto1 point
-
ASUS ROG GL553VD uses optimus. So no luck with dedicated graphic card... you can only disable it and use integrated(ssdt/dsdt patch - use search). It won't work. Bad choice. https://www.notebookcheck.net/Asus-ROG-Strix-GL553VD-7700HQ-FHD-GTX-1050-Laptop-Review.200646.0.html1 point
-
secondo me stai facendo un bel po' di casino senza conoscere bene gli strumenti che usi. Se se formatti in GPT con GParted la EFI da 200Mb in FAT32 flag ESP la devi creare tu manualmente; e poi crei la la partizione in HFS+ per macOS che comunque va poi formattata con disc utility durante l'installazione. Hai un macOS funzionante? se si inizializza direttamente da lì il disco in GUID e disc utility creerà in automatico EFI e partizione macOS... come ti ha consigliato gengik1 point
-
You’re right. It is. But with ./ebuild.sh -fr I don’t get the external drivers anymore. That’s why I switched to ./ebuild.sh —ext-pre. Is there any way to combine the two? Or how to add them to the build? Edit: Nevermind. Apparently ./ebuild.sh --ext-pre -fr works. :)) Not sure if that's how you do it...But...well, works. @Slice I noticed something. The official builds have "-64" added to all the drivers (including external ones). But when I build it, the external drivers don't have that suffix. I was wondering how to add it... Because, otherwise, when I install a Beta version after an official one, I'll get two ApfsDriverLoaders in drivers64UEFI. One is just ApfsDriverLoader. The other one is added by the official build and it's ApfsDriverLoader-64. I was wondering how to fix that.
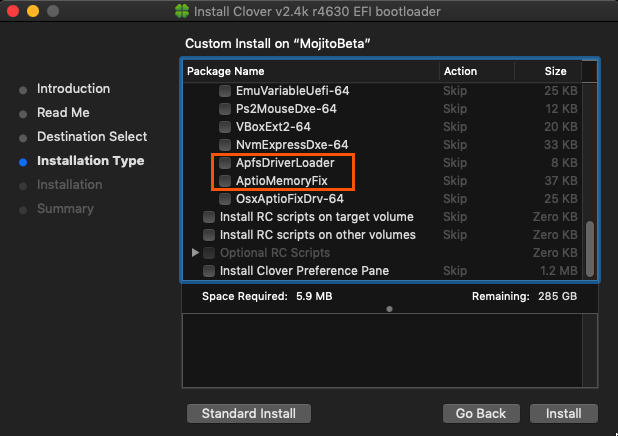 1 point
 -
Some people like ads, do you know that? But I get it1 point
-
Credo che basti il solo DSDT ;)... nel caso dopo proveremo a rimuovere SSDT1 point
-
GRANDE!!! con il tuo DSDT e con il SSDT installazione partitaaaa!!! Vado avanti... :-) GRAZIE!!!!!!1 point
-
please not signal help fixed APPLECPUID error time 60s fixed help ASUSP8P67LE.zip1 point
-
sostituisci DSDT.aml.zip Prova sia con e senza SSDT1 point
-
@ammoune78 just block/hide the ads will not help - As I said, these ads are inside sidebar blocks, you need to hide them to obtain the expected result (to get all editor's icons when editing an existing post).1 point
-
Yeah, with Beta 2, I get this: Active Platform = /Users/jimmy/src/UDK2018/Clover/Clover.dsc Flash Image Definition = /Users/jimmy/src/UDK2018/Clover/Clover.fdf Processing meta-data ... done! Building ... /Users/jimmy/src/UDK2018/MdePkg/Library/BasePcdLibNull/BasePcdLibNull.inf [X64] Building ... /Users/jimmy/src/UDK2018/MdePkg/Library/BaseDebugLibNull/BaseDebugLibNull.inf [X64] make: *** No rule to make target `/Users/jimmy/src/UDK2018/Build/Clover/RELEASE_XCODE8/X64/MdePkg/Library/BasePcdLibNull/BasePcdLibNull/OUTPUT/object_files.lst', needed by `/Users/jimmy/src/UDK2018/Build/Clover/RELEASE_XCODE8/X64/MdePkg/Library/BasePcdLibNull/BasePcdLibNull/OUTPUT/BasePcdLibNull.lib'. Stop. build.py... : error 7000: Failed to execute command make tbuild [/Users/jimmy/src/UDK2018/Build/Clover/RELEASE_XCODE8/X64/MdePkg/Library/BasePcdLibNull/BasePcdLibNull] build.py... : error 7000: Failed to execute command make tbuild [/Users/jimmy/src/UDK2018/Build/Clover/RELEASE_XCODE8/X64/MdePkg/Library/BaseDebugLibNull/BaseDebugLibNull] build.py... : error F002: Failed to build module /Users/jimmy/src/UDK2018/MdePkg/Library/BasePcdLibNull/BasePcdLibNull.inf [X64, XCODE8, RELEASE] - Failed - It does build successfully in the end. But I doubt that this error is ok. Then again, this is with Beta 2... Anything newer than that can't build (error 65), but also no build.py error.1 point
-
Ok...grazie pomeriggio provo, ti aggiorno1 point
-
Wow! the new design is very beautifil. Thank plasplasplas Is visually attractive down a bit the logo and center like sample.
 1 point
 -
Like @arsradu I've error 65 on Clover Prefpane/ Clover Updater when make package with CLT10 Xcode Beta 5 and UDK 2018. Only Xcode 10 Beta 2 don't get errors. Any solutions? Please. Anyway great job for this change1 point
-
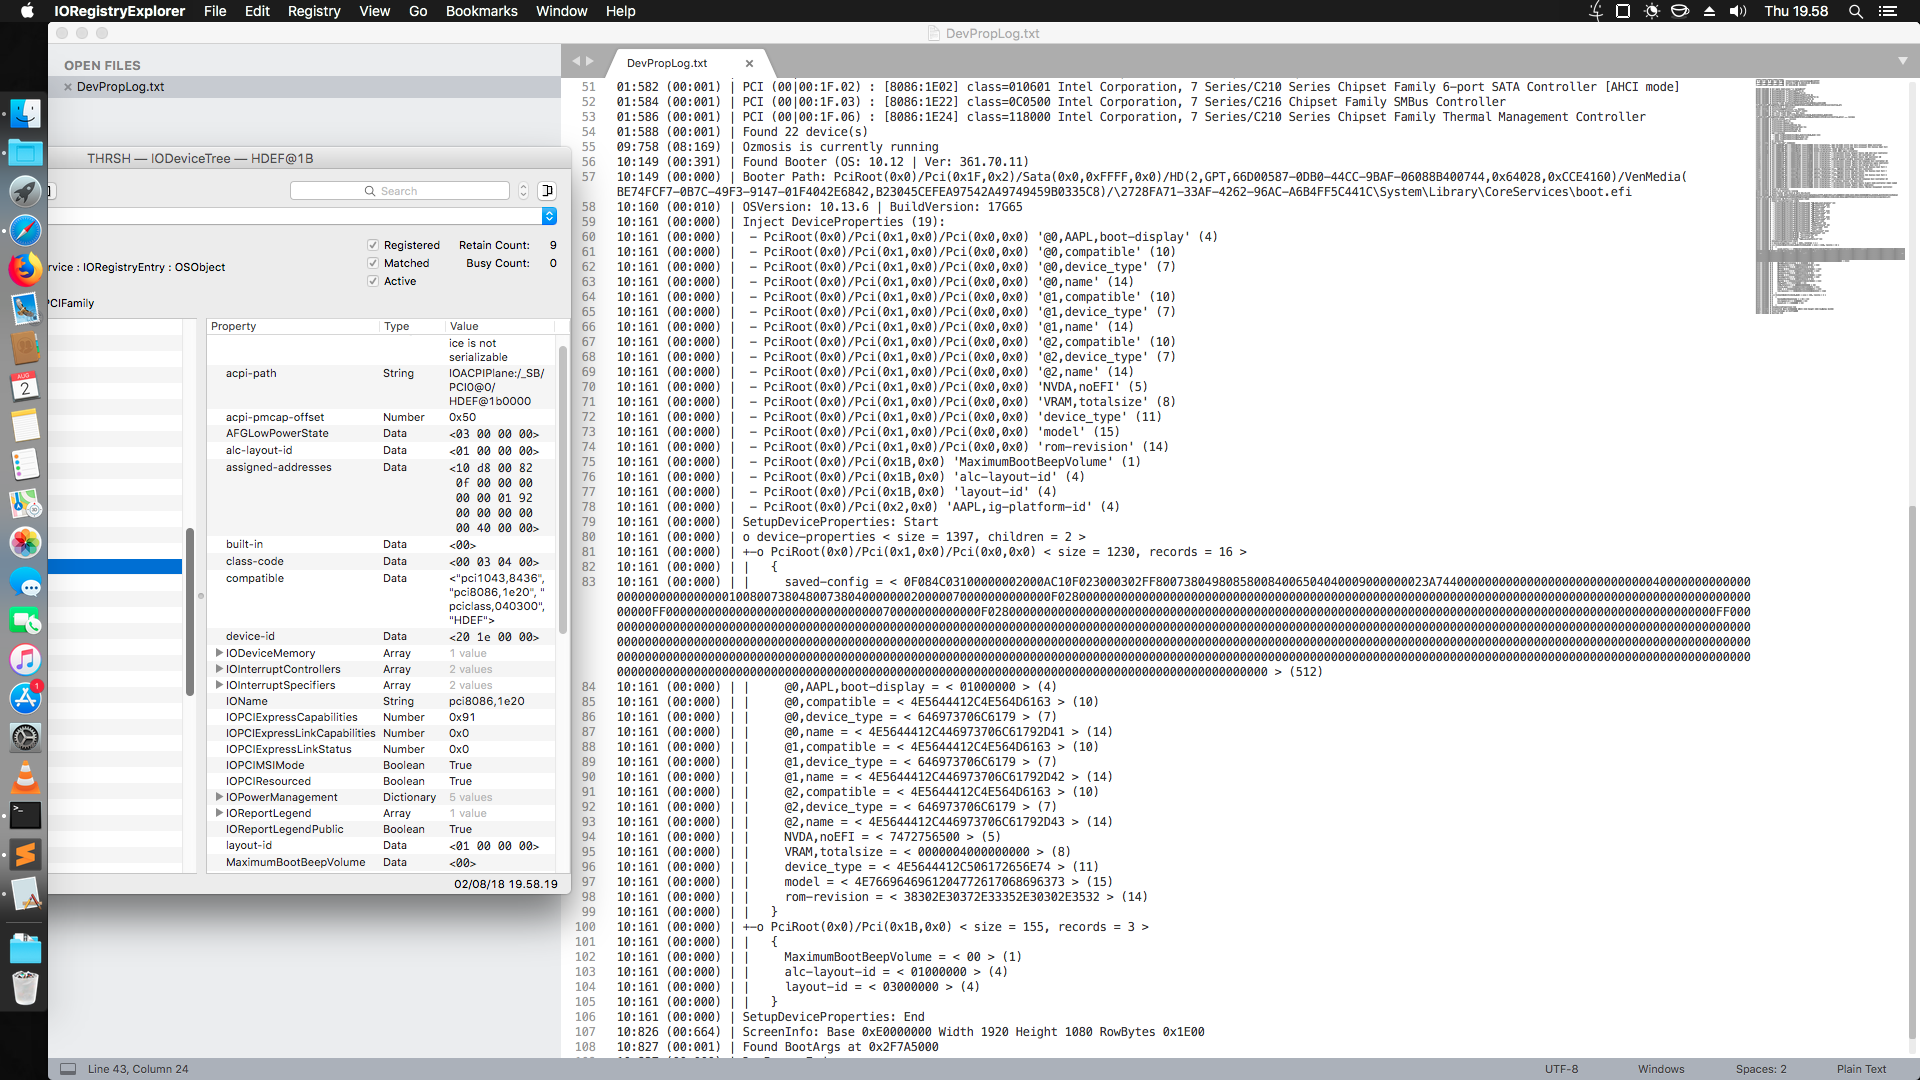
Sorry I mistyped the last digit: you can either use0x0507 and if that didn't work use 0x0705 Use IORegistryExplorer or IOJones to see if the value changes or not. Choose CPU0@0 and look for the cpu-type I have an Intel Core i7 and my CPU type is 0507 I also checked on and Apple iMac with Core i5 CPU and the CPU-type is the same.
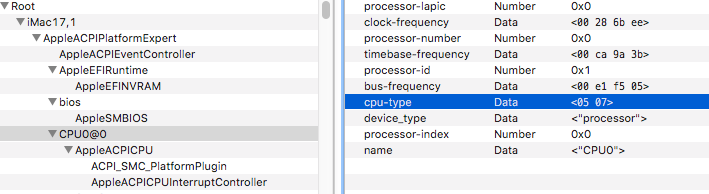 1 point
 -
Thanks Slice and Clovy for the new change great change it was time that there is something new on this side, I had to ask a few years ago I prefere only the New Logo Without icon with arrow that looks a bit like recovery HD Icon, so I mode my own Icon panel Thats what its like now Light Mode Dark Mode EDIT ++ The only Graphics card showing DARK Panel now is my GeForce 210 in Mojave Beta 5 This is Broken for my GT 710 in Mojave Beta 5
 1 point
 -
Hehe! Niice! I wish that someone would find a fix for the Error 65 when building with CLT 10 and UDK2018 (with no extra customisations). I'm currently using 10L221o and...still the same error. With Xcode 10 Beta 2 I don't get this error, but I get a build.py error... So, not sure if THAT was a bug, or this one is. But one thing is for sure, it doesn't seem to work (at least for me) with the latest Xcode 10 and Command Line Tools. Aaand it does work with CLT 9.4.1. Also, when building with CLT 9.4.1, the Clover Updater is white, even in Dark Mode... Not sure if that's intended. Probably yes... But I can't build with CLT 10 in Mojave (get error 65), so I can't test this theory. Anyway, nice job! Congrats guys! Looks cool!
 1 point
 -
hello, in short, i have an 80gb hdd for mac ( had installed high sierra on it now its gone ), and for some reason i can't make my usb bootable again i use transmac and it says restore complete but it doesn't show up in boot menu at all so right now i only have access to windows 10 my specs are i7 3770 - gtx 1060 - gigabyte b75 , 4 gb of ram and i disconnect all usb's but mouse keyboard and all hdd's i'm clueless at what to do where to get a proper mojave dmg file or how to put clover - make it bootable and all that from windows 10, and what is the proper settings needed kexts so if you may help me it would be amazing <31 point
-
I work with a i7-8700 this week. And I can solve that changing some values: http://www.idownloadblog.com/2017/01/13/how-to-modify-about-this-mac-hackintosh/1 point
-
Yes, you can use KU with High Sierra.1 point
-
Many users wonder why we do not support tonymac's products here at InsanelyMac. The reason is that we believe he is a commercial spin-off of the OSx86 scene, and it's not in the spirit of OSx86 to have commercial intents with development. These are the main reasons why we don't approve posting his material here (why he's a commercial spin-off): 1. His software is not open source. This is often confused because most people equate open source software with free software. This is definitely true, but it doesn't grasp the entire scope of open source; open source also includes releasing source code for the product, which tonymac fails to do. The OSx86 community believes everything should be open source. 2. The construction of his site is set up with emphasis on donation buttons and (affiliate) links to Amazon and Newegg, hinting at interests of profit. 3. The intent of gaining profits is basically confirmed by marketing his projects with suggestions of donations as though he deserves it, even though his products (most notably #####) is a compilation of products/drivers developed by others (not himself) that any non-programmer could put together. 4. You must pay for the tonymac software. Although this may seem reasonable considering the effort involved in building a customized installer for specific computer builds, again, it is not in the spirit of OSx86 to charge for software development, so the wiser idea would most likely be not to offer that service at all. Even though it may be nice for newbies, in my opinion it does not encourage education but rather laziness. I say this because the OSx86 movement is designed as an educational movement, where by hacking Mac OS X you can learn more about the operating system works, how computers work, etc., like how many of us do. However, the purpose of OSx86 is not a way to get a cheap Mac, which I personally believe is encouraged by tonymac's software considering it is marketed to perform a task without any sort of explanation of how it works. From another perspective: http://prasys.info/2011/01/tonymac-seriously/ This covers one of the issues brought up by developers. In two sentences: at InsanelyMac, we want to keep moral standards high and safeguard genuine developers. At tonymacx86 they take from others without giving credit. In order to make sure that it doesn't happen any longer, staff have now a new guideline:1 point