Leaderboard


Popular Content
Showing content with the highest reputation on 07/17/2018 in all areas
-
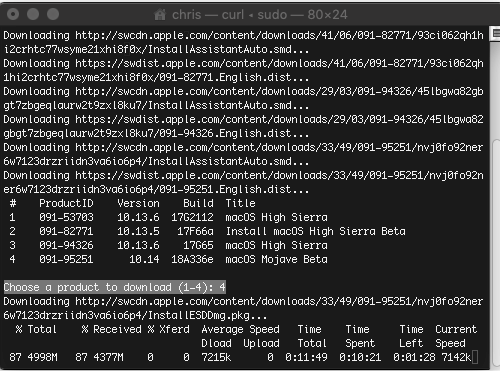
No problème here➤ ➤ ➤ the MacAdmin script ➤ installinstallmacos.py for downloads Beta and release installer.app My GeForce 210 works the same as before update No reinstall packages needed , Thanks Apple
 5 points
 -
Updating "macOS"..
 5 points
 -
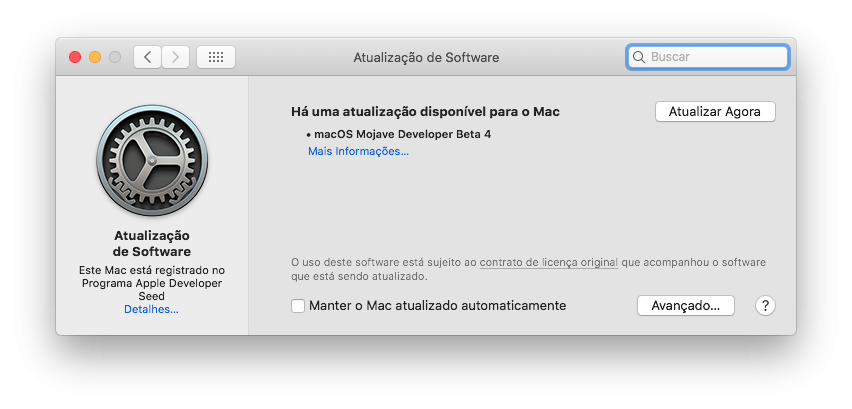
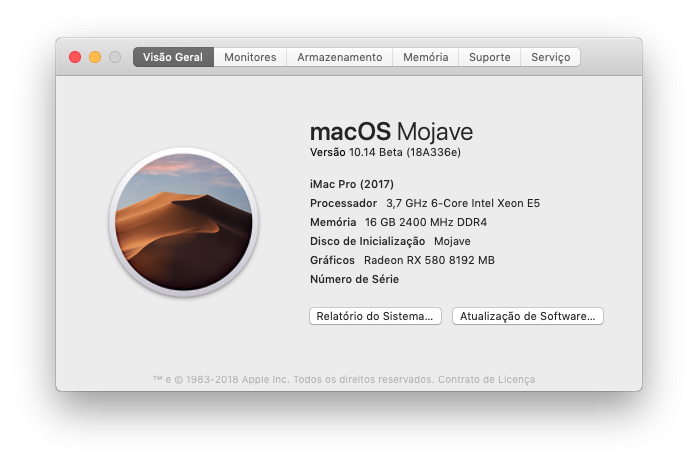
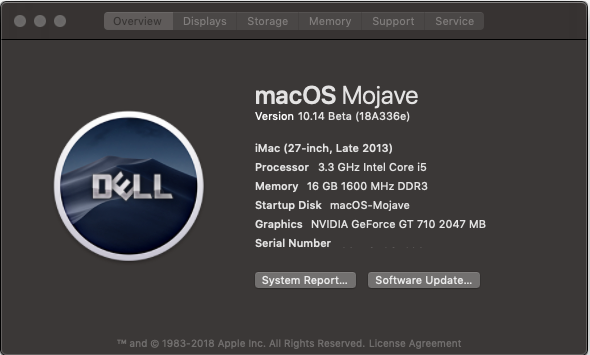
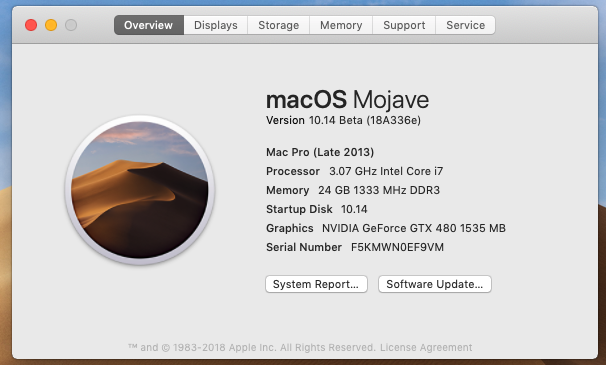
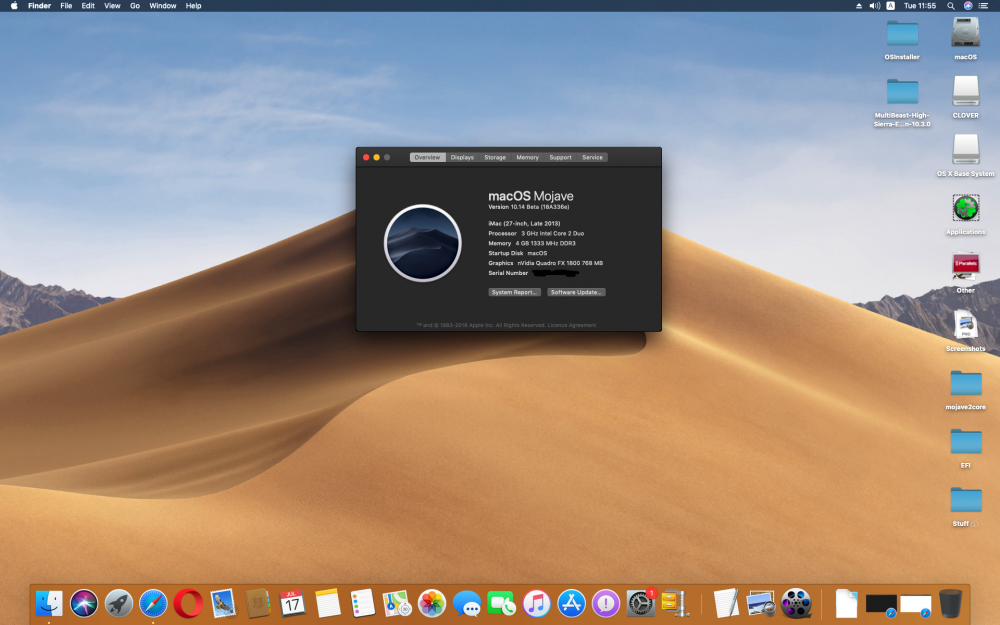
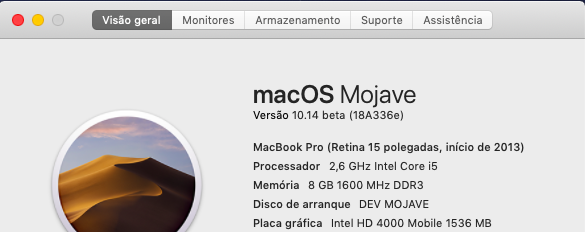
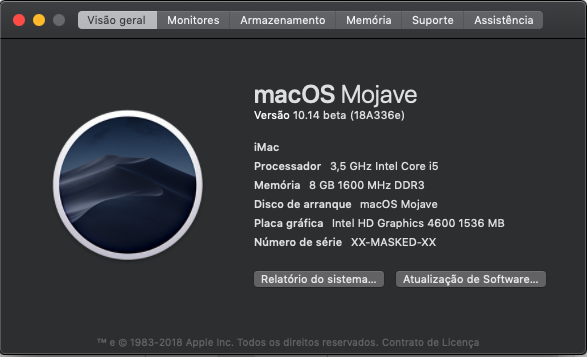
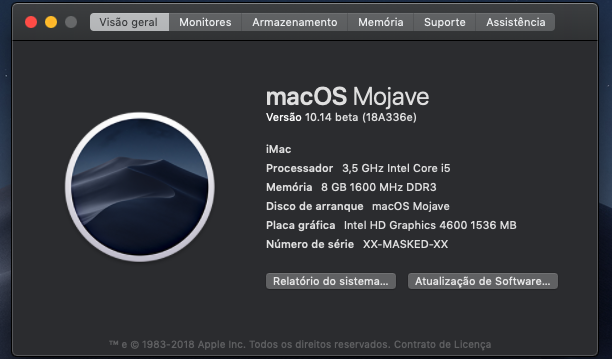
macOS Mojave 10.14 beta 4 (18A336e)5 points
-
Even if the full installer is more meant for a clean install, you still can fully install your new copy over the current, it will simply reinstall (overwrite) all the system files but should not (in principle) delete your files/ folders/downloads. Yeah, it is very similar to what an update does, except that an update contains ONLY updated files. Just be sure to not use Disk Utility (DO NOT ERASE YOUR CURRENT macOS PARTITION), just ignore that step and go directly to the installation step (where it asks you to choose on which partition you want to install your os) and install your new copy on your current macOS partition and watch. Of course, I would suggest to make a save before (I will not be responsible if something turns wrong ) but know just that I already did it under HS (ML as well) and didn't lost any file (within my memories limits ). Please, forget what I wrote above - I didn't see you do not want to create an USB Installer. Sorry You should change the CatalogURL sudo /usr/sbin/softwareupdate --set-catalog [URL] Developer Program Members URL https://swscan.apple.com/content/catalogs/others/index-10.14seed-10.14-10.13-10.12-10.11-10.10-10.9-mountainlion-lion-snowleopard-leopard.merged-1.sucatalog.gz4 points
-
English: https://github.com/acidanthera/WhateverGreen/blob/master/Manual/FAQ.IntelHD.en.md Russian: https://www.applelife.ru/threads/intel-hd-graphics-3000-4000-4400-4600-5000-5500-5600-520-530-630.1289648/ Chinese: https://github.com/acidanthera/WhateverGreen/blob/master/Manual/FAQ.IntelHD.cn.md3 points
-
Easy update Install macOS 18A336e Available
 3 points
 -
Last beta official coffee lake support
 3 points
 -
Hi guys, So, this little tutorial is meant to help people fix a new issue with Mojave: opening jpg files (looks like it happens with larger files, not so much with smaller ones) using Quick Look (on spacebar key pressed) or Preview app, using the dedicated GPUs. The issue is that, when trying to open jpg files (for some reason, it doesn't occur with pngs), the pop-up window would remain in an endless loop. And from that point forward, any other app trying to open the same file will either become unresponsive (in the case of the Preview app) or just stay in endless loop (in case of Quick Look) As a workaround, in case the tutorial below doesn't work for you, you can use Grab (built-in app in MacOS) to open said files. This issue DOES NOT occur using the iGPU. So...if you're comfortable using the iGPU, just switch to that and you should be good to go. You don't need this tutorial. This tutorial is based on @Cyberdevs' research and testing on this topic (especially useful if you're using an RX series AMD video card), and my own very limited time testing this on my rig. I just thought it would be useful to create a new thread for it so that people can discuss this particular issue here. With that being said, I'll just move on to the actual tutorial. New (probably better) method. Switch your SMBIOS in Clover config in regards to the dedicated GPU you're using, instead of the CPU. Take a look here and choose the corresponding SMBIOS closest to your hardware. Yeah, that's it. In case you lose CPU PM with this method, there are multiple ways to fix that, and they do not make the object of this thread. It worked perfectly fine for me though and I didn't need to change anything else. Alternatively, you can also try one of the MacPro SMBIOSes, such as MacPro5,1 or MacPro6,1. It was tested multiple times and it showed good results. Keep in mind that choosing these will most likely not show you an iGPU in System Report, since those machines generally (probably all of them) use Xeon CPUs with no iGPUs either. /!\NOTE: There have been reports saying that using this method (switching SMBIOS to a MacPro one) with newer versions of MacOS may cause iTunes to crash. So...keep that in mind and better try some of the other methods mentioned here. A simple Lilu plugin Thanks to vulgo for the plugin and @Matgen84 for sharing and testing it, we now have yet another possible solution to this issue. It's a Lilu plugin (which means that it requires Lilu.kext in order to work) it's called NoVPAJpeg, and it can be downloaded from here. You use it as a regular kext, alongside Lilu. I prefer (and recommend) using it within the EFI folder, in Clover/kexts/Other. But if you want to use it in S/L/E, that should work just fine. More info can be found in this post here. UPDATE: According to Vulgo, NoVPAJpeg.kext is now deprecated. In case its functionality is needed, use WhateverGreen.kext (alongside Lilu.kext) and add the following boot arguments: shikigva=32 shiki-id=Mac-7BA5B2D9E42DDD94 In case you wanna try alternative medicine ... The main thing we need to do is actually very simple: we need to enable the iGPU (integrated GPU) by default, in BIOS, while actually being connected to the dedicated GPU. For ATI GPUs (curtesy of @Cyberdevs' post here). The discreet GPU should be set as primary in BIOS and your displays should be connected to your discreet GPU The iGD/iGPU/iGFX must be enabled in BIOS/UEFI as the secondary GPU. I removed the DSDT Reconfigured the config.plist to and removed some flags which weren't needed because of the DSDT added the InjectATI + Ornioco Framebuffer (I removed the Orinoco framebuffer because of some weird glitches but it might be useful for other AMD GPUs if you inject the correct framebuffer according to your GPU. No need to inject anything for nVidia GPUs unless your GPU needs it) Added the InjectIntel + ig-platform-id for my intel HD530 (for intel HD 530 I use the 0x19120001 ig-platform-id) Steps 5 to 7 might not be necessary I just did them anyway, if anyone succeeded to get quicklook working without those steps let me know so I can exclude those steps. Also confirmed to work with AMD R9 270X on a SandyBridge rig (without an iGPU) using WhateverGreen + Lilu kexts, which also helped to solve the transparency issue along with the Quick Look problem, it also resolved the buggy Screen Capture (Command+Shift+5) issue as well. Also, do: nvram cleanup kextcache & prelinked kernel rebuild reboot More info on that here. For NVIDIA GPUs (tested on my old MSi GTX 650) This is what I needed for my NVIDIA GPU and the MSI motherboard in the signature (*since then, I upgraded my GPU to my current RX 580). Your milage may vary, depending on your hardware. But, the idea should be the same regardless. For MSi motherboads (check out my motherboard details in the signature) Set your BIOS to use PEG (dedicated GPU) so you can boot. Since you're reading this, chances are that you're already connected to the dedicated GPU and the BIOS is set to PEG. So just go into BIOS and see if you're using the iGPU or the dedicated (PEG) graphics device by default. If you're already using this, skip to Step 3 (the part AFTER Reboot). Reboot (I think you don't necessarily need to boot into the OS...but you do need to reboot at least until Clover UI) Reboot back into BIOS and set it from PEG to IGD (integrated graphics) WITHOUT removing the cable. Save Reboot again. The result should be that the OS is tricked into thinking you're booting with the IGPU when in fact you're using the dedicated GPU. For Gigabyte motherboards Set: Peripherals -> Initial Display Output -> iGFX Chipset -> Internal Graphics -> Enabled DVMT Pre-Allocation -> default 64M. DVMT Total Gfx Mem -> default 256M Save Reboot You should do this with the cable connected to the dedicated GPU. You will also need to patch the iGPU from Clover config. 1. Graphics -> Inject Intel (UNCHECK Inject Nvidia or ATI if it's checked). 2. ig-platform-id (in my case for Intel HD 4600 Desktop) it was: 0x0d220003 And use IntelGraphicsFixup.kext (now included into WhateverGreen.kext) in Clover/kexts/Other. In my particular case, without the kext, I would get freezes in Safari. Another way to activate the iGPU while having the dGPU set as primary is by going into BIOS/SAG/Graphics Configuration/iGPU and setting Multi-Monitor to [Enabled], all the rest remains on [Auto], and set Inject/Intel to [True] in Clover config.*. Thanks to @gjw for the tip. *Motherboard dependent. But the multi-monitor option might be the same regardless of manufacturer. This might be a bug with Mojave and it could be fixed by Apple in the future. but in the meantime, feel free to use this if it helps you fix the issue. For HP motherboards (including laptops), so far no solution, unless the BIOS somehow allows to switch from dGPU to iGPU and vice-versa. Cheers!2 points
-
GTX 480 Replace CoreDisplay from 10.13.4 Just install any original kext via Easykext utility.This is fixed my system. I don’t replace any NV kext. System worked with ORI kexts.
 2 points
 -
Name: com.apple.driver.usb.AppleUSBXHCI Find: 83FB0F0F 83030500 00 Replace: 83FB0F90 90909090 902 points
-
Personally, I don't know. There are already some posts for transparency issue and/or solution in this topic2 points
-
Top Menu's List.. or SpotLight window's outline.
 2 points
 -
@crazybirdy I update with the script with only one restart mojave2core patch work perfect too!
 2 points
 -
That's probably because you use the Public Beta seed. Try to use the developer utility to switch to the dev seed and then check for updates (you could also try a restart, if that doesn't work from the first try).2 points
-
Beta 4 succeed: all works fine
 2 points
 -
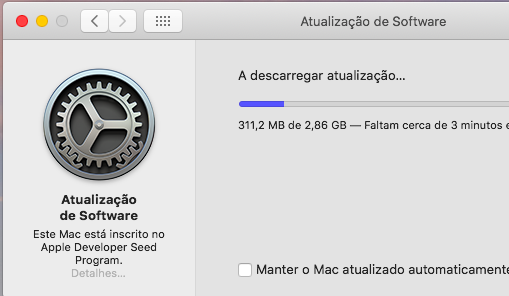
If update is taking longer than 10 minutes to install and you haven't moved your mouse your display will go to sleep automatically, just let it keep going. It should reboot 3 times before it goes into macOS after update. Its a 3 phase install now.2 points
-
olá dev beta 4 build bom hack
 2 points
 -
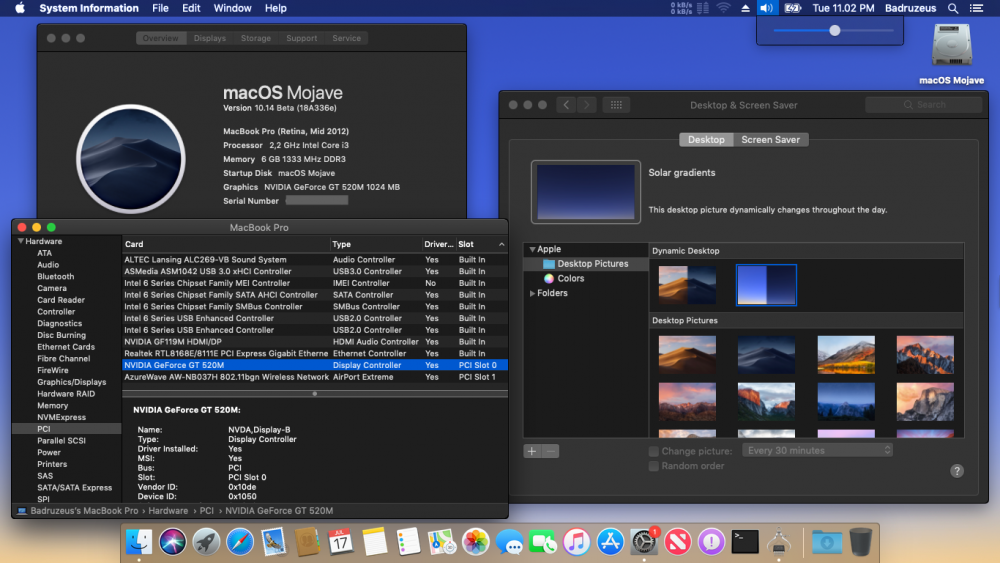
Some findings on beta 4: Working dynamic wallpaper, a new wallpaper "Solar gradients" Coffee Lake framebuffer kexts
 2 points
 -
2 points
-
- Make full service for macOS kexts easily. - Latest Kext Utility v2.6.6 for mac OS 10.5-10.13 macOS "Sierra" Super Speed Edition FULL version with KU_config.plist © cVad 2008-2016 Improved version utility from russian MAC community. Description: Super speed repair permissions for all system folders: /System/Library/Extensions and /Library/Extensions; Starts a update (rebuild) system caches: NEW! Starts a update (rebuild) system kernelcache_* for OS X with Extensions.mkext standart cache file (OS X 10.6): Install multiple kext files simultaneously; Kext Utility.app/Contents/Resources/KU_config.plist for ON|OFF some KU functions; KU can automatically add/remove boot args: "-v" for verbose boot, "kext-dev-mode=1" for load unsigned kexts in MAC OS X "Yosemite" and "rootless=0" for perform any repair permissions operation in com.apple.Boot.plist and Unbelievable! in NVRam ; Patch msdosfs.kext Info.plist for add OSBundleRequired="Console". That provides access to an EFI partition in single user mode (disabled for 10.10 and up); Update a records about the unsigned installed kexts in the AppleKextExcludeList.kext (disabled for 10.10 and up); Pack kext files to mkext cache file; UnPack mkext cache files. Note: The latest KU uses highly modified high-speed method of repair kexts. To all kexts granted the same rights (a little more liberal, than it is necessary). This saves a lot of time and nervous when installing and configuring the MAC OS X. On the system performance, is not affected. After installing and configuring the system, if there is free time, run "Disk Utility", and repair the kexts, according to their native permissions. Default config: Troubleshooting: Some thoughts on the repairing of the kexts permissions: Enjoy ... Feel free to click "like" cvad Kext_Utility.app.v2.6.4.zip Kext_Utility.app.v2.6.4.zip.md5.txt Kext_Utility.app.v2.6.5.zip Kext_Utility.app.v2.6.5.zip.md5.txt Kext_Utility.app.v2.6.6.zip Kext_Utility.app.v2.6.6.zip.md5.txt1 point
-
Surface Pro 2017 - macOS Sierra 10.13.4 with Graphics Acceleration Working Working: - Graphics Acceleration - using clover patch - Audio (Speakers and Headphone Jack, even microphone) - using AppleALC - Type Cover (keyboard works perfectly/ no trackpad gestures) - Brightness - using Rehabman patch Partially Working / Maybe: - Sleep/ Wake - Monitor did sleeps and wake but I'm unsure if the CPU really sleeps Not Working: - WiFi (probably never will) - workaround: USB dongle - Bluetooth - workaround: USB dongle - Camera - Touchscreen (I don't expect it to work anyways) - Trackpad gestures the EFI folder is attached below Installation - make a bootable usb using /createinstallmedia tool on a Mac - install clover onto the bootable usb we've created - while installing, the default config file from the EFI folder I provided will not work, to make it work for installation, change ig-platform-id to 0x12345678 - install macOS - upon installing macOS High Sierra, don't forget to disable APFS conversion, you can follow this guide: https://www.tonymacx86.com/threads/guide-avoid-apfs-conversion-on-high-sierra-update-or-fresh-install.232855/ - boot with the EFI folder attached below - for the first boot, please change ig-platform-id to 0x12345678 and after booting successfully, rebuild kextcache by running "sudo kextcache -i /" in terminal - profit! My newer EFI folder with AppleALC instead of VoodooHDA for audio (Thanks emileet for the suggestion) link: https://mega.nz/#!3BsAGCyI!-wBPvCNHGwxN3pa0HS4i-6OfmpsIILrGIqllhaSL-cQ config.plist1 point
-
Visto che l’i5 8xxx supportano risoluzioni 4K, qualunque assemblato , all’uscita hdmi , ha questa risoluzione? È necessaria una scheda madre apposita? Grazie Inviato dal mio iPhone utilizzando Tapatalk1 point
-
A occhio nudo non cambia niente, almeno per i profani come me . Per fare la prova puoi cercare su youtube o in rete filmati a 1080p a 30Hz e a 60Hz (che è la risoluzione a cui tutti hanno accesso, oggi) e vedere la differenza. Io non la noto.1 point
-
Sì, oggi qualsiasi scheda madre ha la risoluzione 4k (sarebbe meglio dire UHD) però a 30Hz dall'HDMI 1.4 Se vuoi UHD@60Hz dall'HDMI devi cercare una mobo che abbia l'HDMI 2.0 (mi sembra solo la gigabyte, vado così a memoria. Forse anche Asus).1 point
-
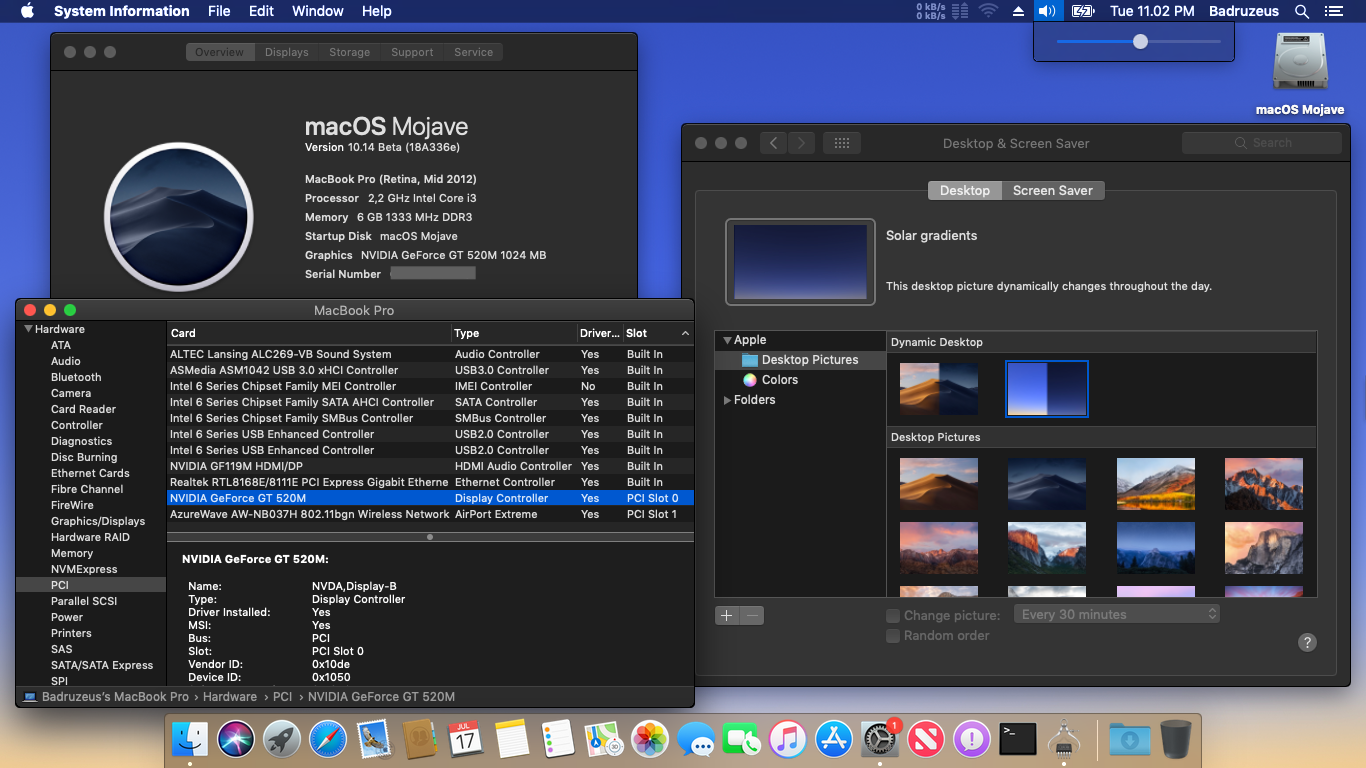
Well, just done with updating to Mojave Beta 4.. Still using CoreDisplay from 1st Beta to reach the Desktop with my Fermi GF119. Seems, lots of improvements with UI on this version; Solar Gradients on Desktop pref, "Splash" when press SpaceBar for QuickLook-ing image.. etc. So far, not so bad.
 1 point
 -
Top menu list in Beta 4 Light mode and Dark mode
 1 point
 -
system preferences only shows me public beta 2 as an update, I restart few times but it's the same.1 point
-
Beta is always update, not combo update. It should work fine, but it's GUID, why don't your update via system preference update?1 point
-
Full installer app, nothing changed with your installation method. Full installer app is supposed to fresh install, if you want to update only, you should go through update method, right?1 point
-
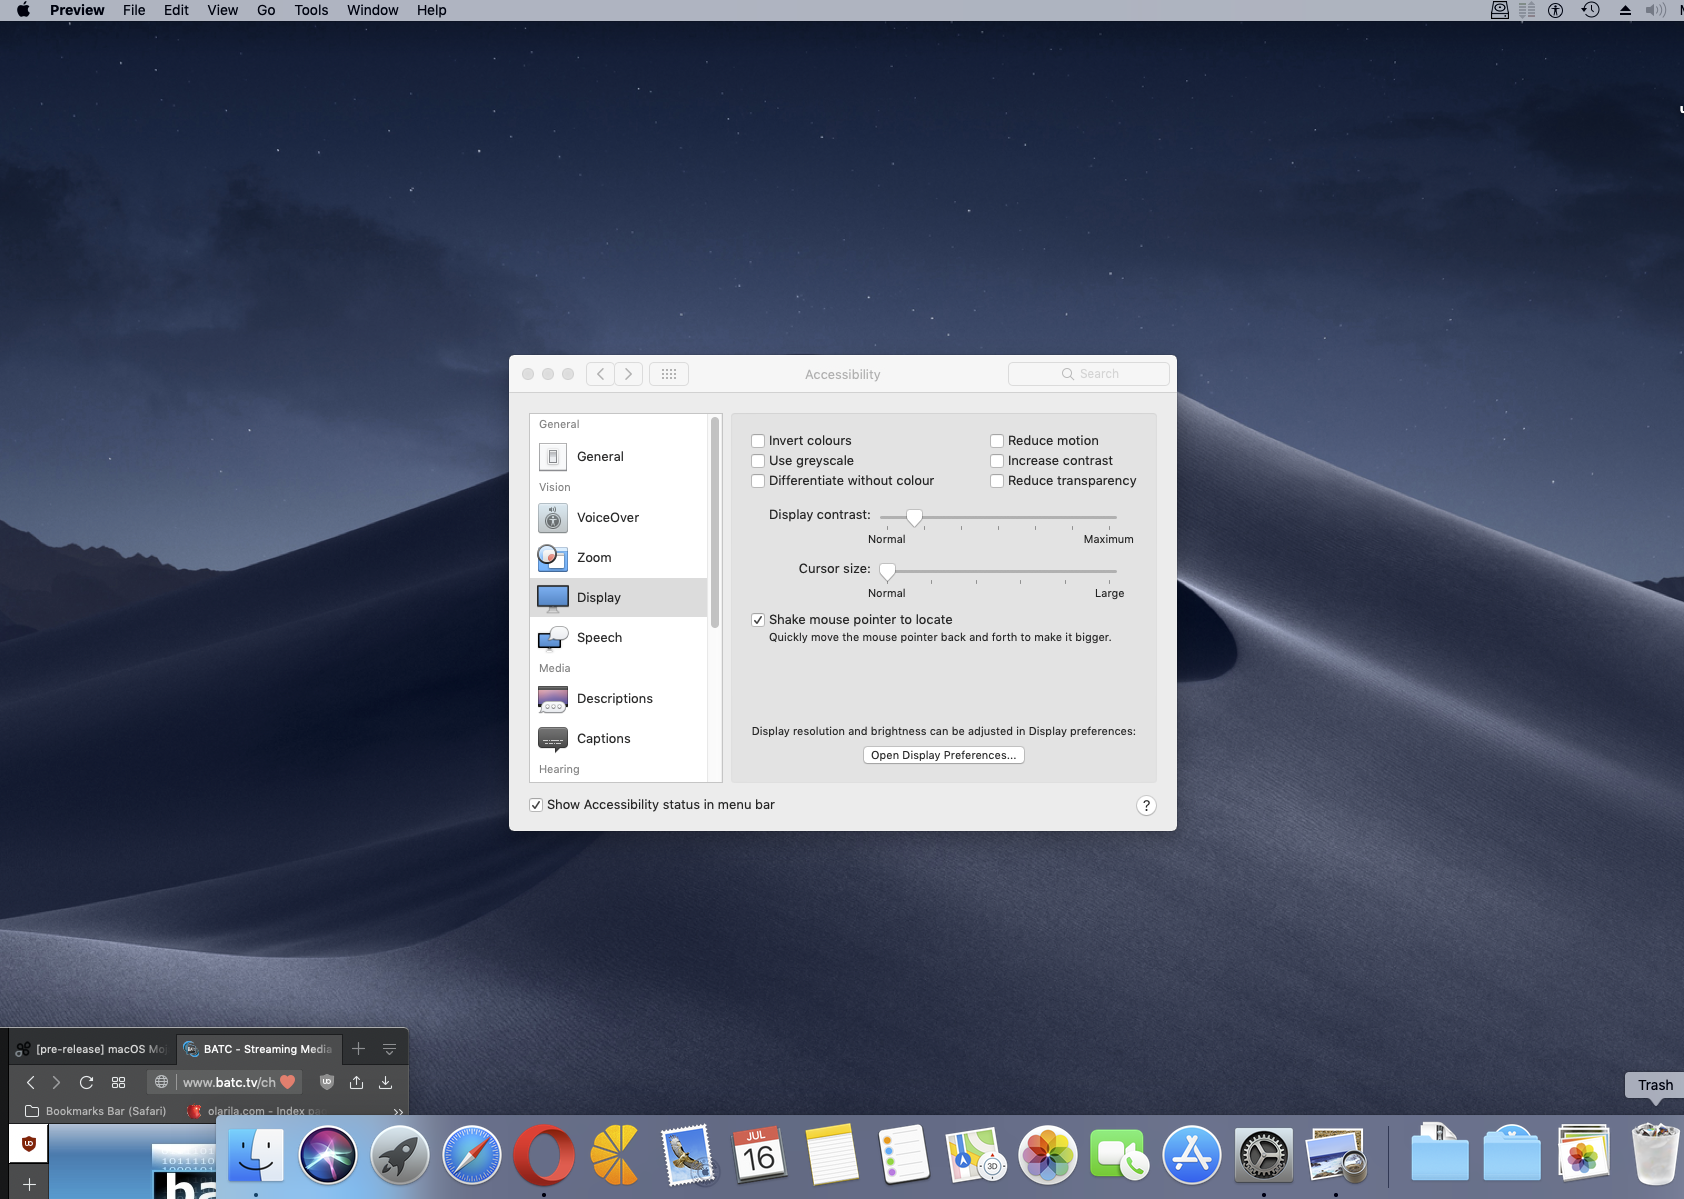
Is "Black Outline" surrounding Menu List still there?1 point
-
1 point
-
Normal mac + iMac pro? Edit See here https://discussions.apple.com/thread/8463496 Sent from my SM-G930F using Tapatalk1 point
-
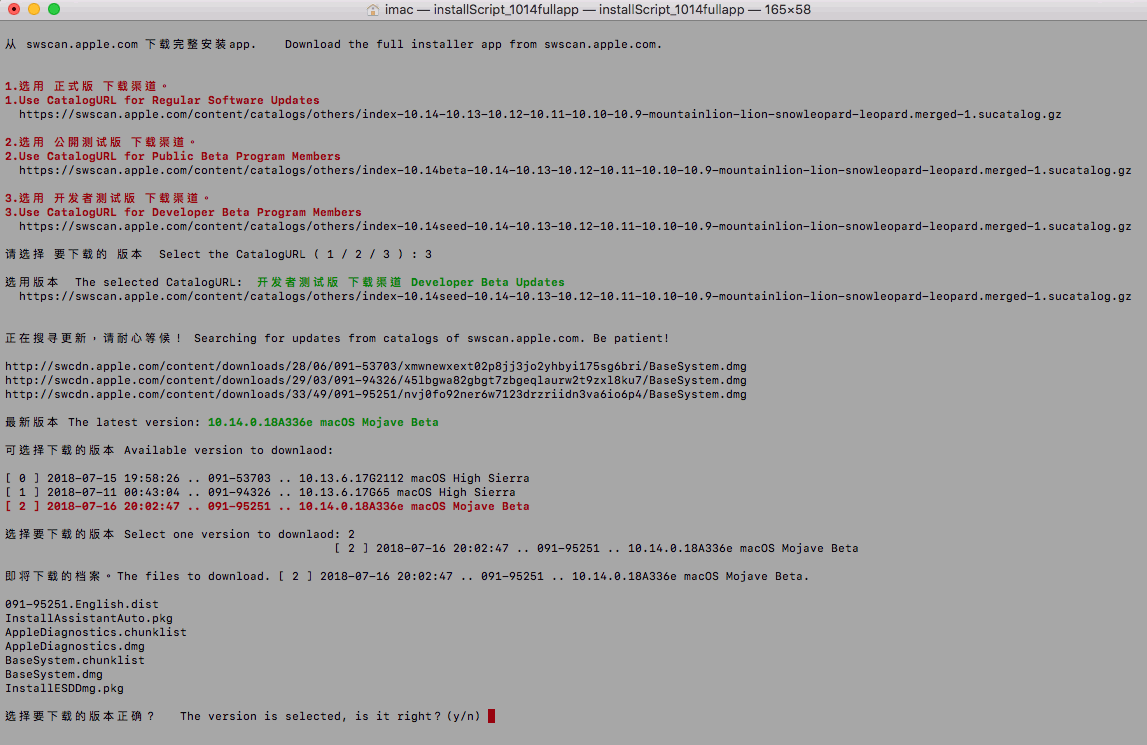
Download full installer app. Mojave MBR HFS Firmware Check Patch/Q6-DownloadFullApp/installScript_1014fullapp1 point
-
Merci beaucoup, @chris11111 point
-
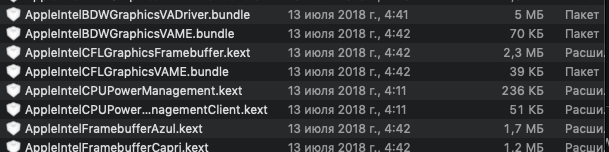
You should be putting all your kexts in EFI>Clover>kexts>Other not S/L/E or L/E1 point
-
Update feito, sem necessidade de re instalar nenhum Kext, e tenho som...
 1 point
 -
Update made, without re install kexts, and I have sound...
 1 point
 -
its probably always been there but noticed a contrast slider which really sharpens up and defines the screen see below (beta 4
 1 point
 -
Hi Nightf4ll¡¡ Beta 4 solves this issue in my hack¡¡ I'm using lilu 1.2.5 + weg 1.2.0 + appleALC 1.3.0. Now mp4 quicklook and preview are working and quicktimeplayer as well ... I hope it works for you¡¡¡1 point
-
So far beta 4 has working quicklook on all files. I have RX-580 set as primary.1 point
-
really amazing! congratz!1 point
-
1 point
-
Thanks. I re-compile Lilu 1.2.5 and delete any boot-args: all work fine in Mojave.1 point
-
Thanks. KernelBooter_kexts KernelPm KernelLapicError KernelLapicVersion These kernel patchers were updated to boot Mojave HFS+j partition fine here, installed with Mojave MBR HFS Firmware Check Patch cause of Mojave can only install as APFS with createinstallmedia method. FYI. Enoch2909boot+diff.zip Enoch (r2909) [2018-07-16 07:12:35] Logging started: 2018/07/15, 23:17:31 [ CPU INFO ] Attempting to scan GPT boot volumes [biosdev=80h]: Attempting to scan FDISK boot volumes [biosdev=80h]: Boot UUID of 'Mac1014db3' (): 938D94D1-8043-3320-8E44-5624EBC06C6C Kernel Cache ignored. Loading kernel from: 'Mac1014db3' () Booting on macOS 10.14 (18A326h) System Integrity Protection status: disabled (Custom Configuration). CsrActiveConfig = 0x67 (101100111) Configuration: Kext Signing: disabled Filesystem Protections: disabled Task for PID: disabled Debugging Restrictions: enabled Apple Internal: enabled DTrace Restrictions: disabled NVRAM Protections: disabled Device configuration: enabled BaseSystem Verification: enabled [ KERNEL PATCHER START ] Will patch for 18.0.0 kernel version compatible. KernelBooter_kexts state: enabled! KernelPm state: enabled! KernelLapicError state: enabled! KernelLapicVersion state: enabled! KernelHaswell state: enabled! KernelcpuFamily state: enabled! KernelSSE3 state: enabled! - Searching for booter extensions pattern: Found High Sierra, Mojave SIP pattern: patched! Found Mojave EXT pattern: patched! 2 substitution(s) made. - Looking for Lapic panic call Start Found Mojave Lapic panic at 0x002D9CFC Lapic Error call removed. - Looking for Lapic Version panic call Start Found High Sierra Lapic Version panic at 0x002D8680 Lapic Version call removed. - Patching kernel power management... Kernel power management patch 10.1x(data2) found and patched Kernel power management patch 10.12 DP1 found and patched Power Managment patch applied. No Haswell-ULT/-E Kernel patch applied for this CPU. - Looking for _cpuid_set_info _panic ... - will patch kernel for OSX 10.14 (from 10.7.4 and newer) switch statement patch location is 0x002BC4E8 cpuid_family address: 0x00C471A0 cpuid_model address: 0x00C4704D family mask: 0x0098ACA9 model mask: 0x0098AB4C Kernel patcher: end!1 point
-
thanks tluck for last release (4600) 2018-July-14 Updated to Clover r4600 Updated Lilu.kext Updated AppleAlc.kext Added USBInjectAll.kext (need if you you change model) Updated config.plist files Added config.plist to test Mojave https://github.com/tluck/Lenovo-T420-Clover/archive/v2018.07.14.zip1 point
-
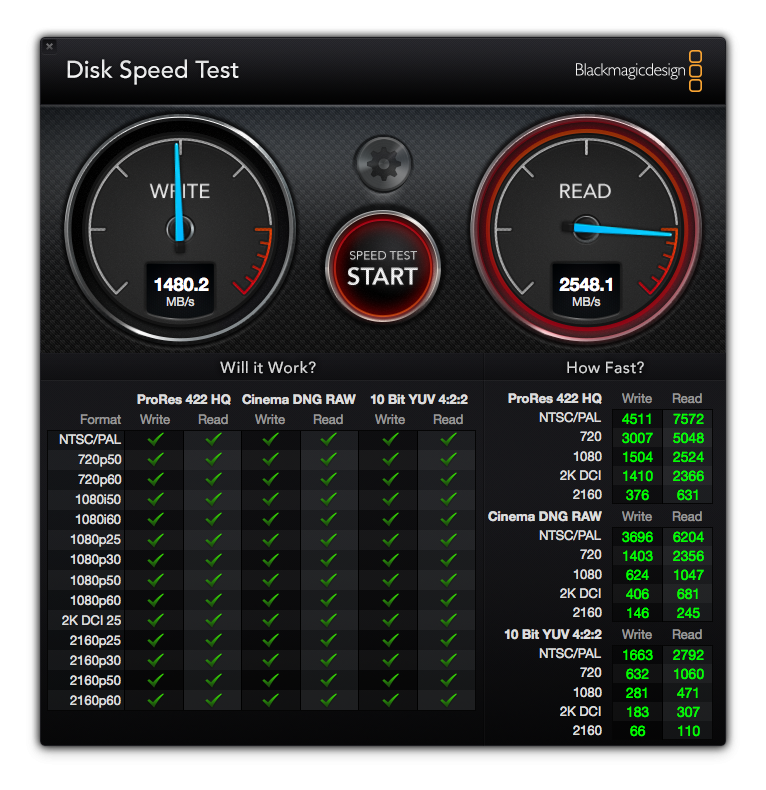
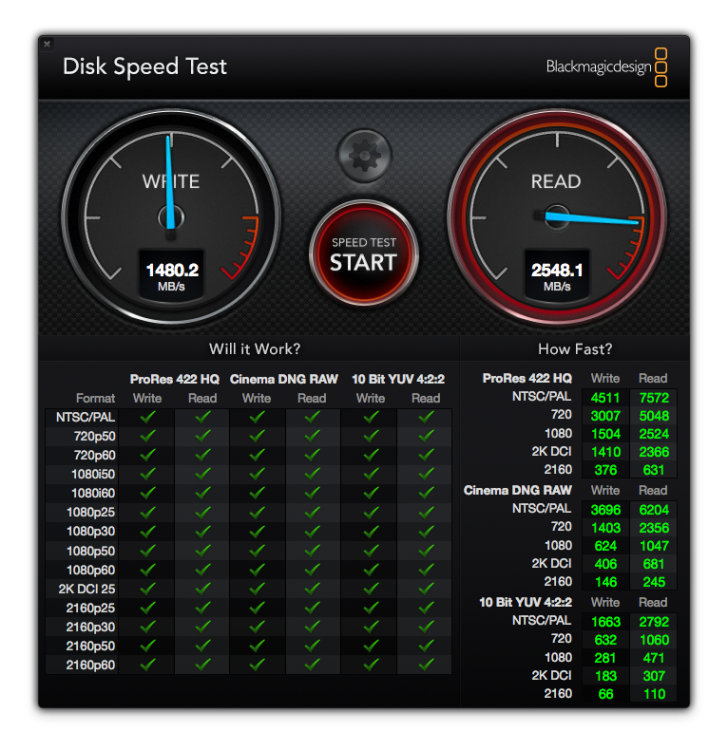
I'm not sure if that matches or beats the HFS+ file system because I haven't used HFS in a while, but the long pause after FIPSPOTS_USER check is gone now. Here's also a bench mark from Black Magic Disk Speed Test.
 1 point
 -
Good to go here. Updated Clover, nVidia Web Drivers and CUDA. Premiere shows all styles of Mercury GPU Acceleration available.
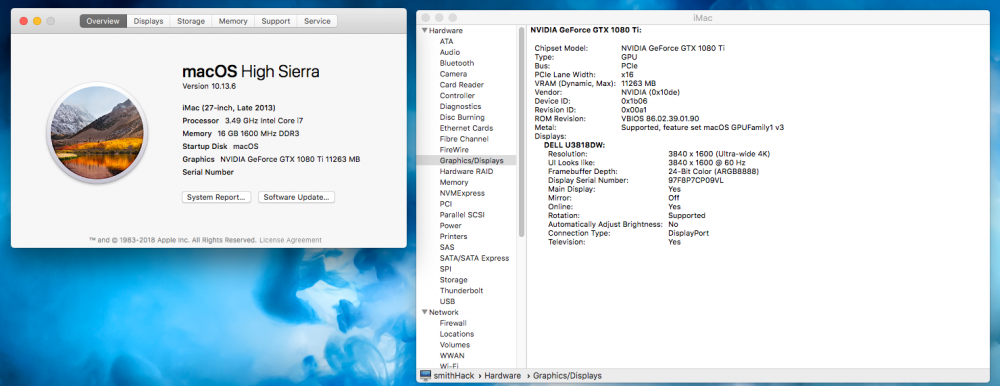
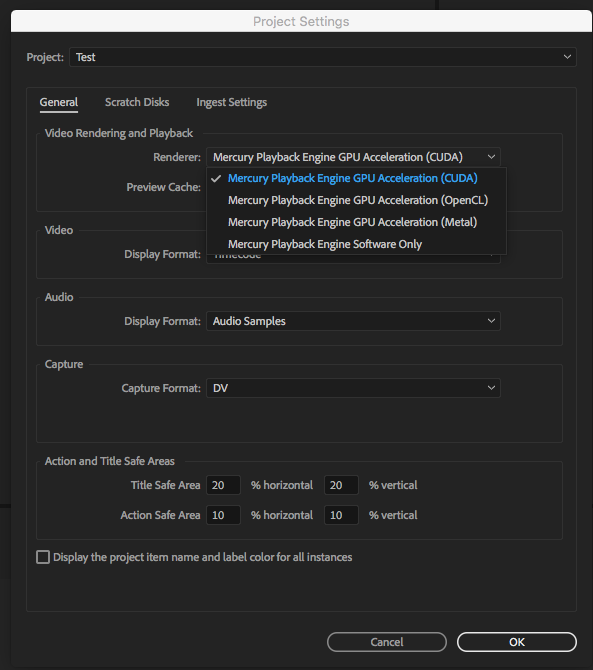 1 point
 -
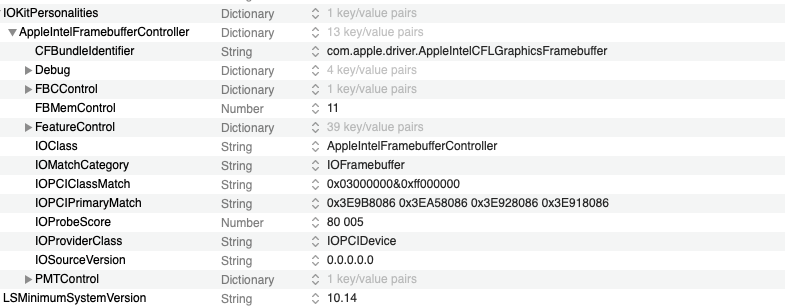
macOS Mojave "MinStolenSize" / DVMT-prealloc Patches @Sherlocks @PMheart i quoted you since im kinda new here and i noticed that you are one of the most active people on this forum (caught my attention). I noticed that during the Beta updates, the "MinStolenSize" patches are changing from what we previously had / on previous betas, after examining the binary files of the 3 respective platforms: KabyLake, SkyLake, Broadwell i noticed that the: on AppleIntelKBLGraphicsFramebuffer.kext Find: 764648FF 05 Replace: EB4648FF 05 values should be enough as it's only in one place in the binary file with a HexFiend search, same for Skylake & Broadwell: Find: 764048FF 05 Replace: EB404FF 05 on 2 of the binary files of the kexts if you try to search such result. so lets take KabyLake as example from my previous post: Kabylake: Name: com.apple.driver.AppleIntelKBLGraphicsFramebuffer Find: 764648FF 05225508 Replace: EB4648FF 05225508 from the code above on the binary file: 764648FF 05E25108 the code highlighted with red (which was present on previous betas of Mojave but kept changing during newer betas), is unnecessary as after verifying that the code: 764648FF 05 is present only once on KabyLake framebuffer binary file and we can replace it with: EB4648FF 05 this way the patch should be update proof "based on the fact that this part of code didn't change across betas. So in short words the code after "05" is/was unncessary and the supposedly Update Proof Patches for: macOS Mojave "MinStolenSize" / DVMT-prealloc Patches KabyLake: Comment: Disable minStolenSize less or equal fStolenMemorySize assertion, 10.14 Credits (Sniki) Name: com.apple.driver.AppleIntelKBLGraphicsFramebuffer Find: 764648FF 05 Replace: EB4648FF 05 SkyLake: Comment: Disable minStolenSize less or equal fStolenMemorySize assertion, 10.14 Credits (Sniki) Name: com.apple.driver.AppleIntelSKLGraphicsFramebuffer Find: 764048FF 05 Replace: EB4048FF 05 Broadwell: Comment: Disable minStolenSize less or equal fStolenMemorySize assertion, 10.14 Credits (Sniki) Name: com.apple.driver.AppleIntelBDWGraphicsFramebuffer Find: 764048FF 05 Replace: EB4048FF 051 point
-
2 years to figure out how to build an arm powered mini or air.. It will flop. Any iMac or MacPro will still need Intel or *AMD* in two years time.1 point
-
I guess it is planned on April 1, 2020??? Right??1 point