Leaderboard


Popular Content
Showing content with the highest reputation on 05/06/2018 in all areas
-
Same here, also very slow loading constantly showing its loading and I have to refresh to stop it from doing that.2 points
-
It will be better to keep FakeSMC and LAN kexts in Other folder because they needed for Recovery too.2 points
-
This version is now only supported for ESXi 6.0 for the latest version please visit http://www.insanelymac.com/forum/topic/328285-macos-unlocker-21-for-vmware-workstation-111214-player-71214-fusion-7810-and-esxi-65/ Support Request Please, please, please do NOT copy vmx or log files inline in a post. Always attach the log file as an attachment. It slows down the forum editor and puts a lot of junk in the actual post, and I cannot analyse unless it is a separate file. Alternatively post a link to a Gist. Download Links InsanelyMac: http://www.insanelymac.com/forum/files/file/339-unlocker/ 14/11/15 - Version 2.0.8 Player 12 on Linux fixes Get latest VMware tools command Removed firmware files Moved to PyInstaller 3.0 16/09/15 - Version 2.0.7 Workstation 12 on Linux fixes 20/06/15 - Version 2.0.6 ESXi 6 patch for smcPresent vCenter compatibility. Thanks Sam! 18/06/15 - Version 2.0.5 ESXi 6 work was greatly helped by Sam B. Thanks to Sam for helping me out and finding the last piece of the puzzle. ESXi 6 working Latest tools from Fusion 7.1.2 24/01/15 - Version 2.0.4 Couple of quick fixes: Added stop and start of VMware View USB Service to Windows batch files Fixed broken GOS Table patching on Linux 03/01/15 - Version 2.0.3 Added new EFI firmware files to remove Server check for 10.5 and 10.6. If you are using a 32-bit installation of OS X: 1. Copy efi32-srvr.rom to guest folder. 2. Edit the vmx file and add: efi32.filename = "efi32-srvr.rom" If you are using a 64-bit installation of OS X: 1. Copy efi64-srvr.rom to guest folder. 2. Edit the vmx file and add: efi64.filename = "efi64-srvr.rom" 14/12/14 - Version 2.0.2 Uploaded a new version, 2.0.2, which removes need for Python on Windows. Packaged using PyInstaller. If you have already used 2.0.0 successfully then you do not need this as there are no other changes. Also added darwin.iso back into the zip file. http://www.insanelymac.com/forum/files/file/339-unlocker/ For installation queries please read MSoK's excellent post http://www.insanelymac.com/forum/topic/290949-how-to-install-os-x-10x-snow-leopard-lion-mountain-lion-mavericks-and-yosemite-in-vmware-workstation-10-or-player-6/. Mac OS X Unlocker for VMware V2.0 ================================= 1. Introduction --------------- Unlocker 2 is designed for Workstation 11, Player 7, ESXi 6 and Fusion 7. If you are using an earlier product please continue using Unlocker 1 Version 2 has been tested against: * Workstation 11/12 on Windows and Linux * Player 7 & Workstation Player 12 on Windows and Linux * Fusion 7/8 on Mavericks and Yosemite * ESXi 6.0 The patch code carries out the following modifications dependent on the product being patched: * Fix vmware-vmx and derivatives to allow Mac OS X to boot * Fix vmwarebase .dll or .so to allow Apple to be selected during VM creation * Fix libvmkctl.so on ESXi 6 to allow use with vCenter * Download a copy of the latest VMware Tools for OS X Note that not all products recognise the darwin.iso via install tools menu item. You will have to manually mount the darwin.iso for example on Workstation 11 and Player 7. The vmwarebase code does not need to be patched on OS X or ESXi so you will see a message on those systems telling you that it will not be patched. In all cases make sure VMware is not running, and any background guests have been shutdown. The code is now Python as it makes the Unlocker easier to run and maintain on ESXi. There are some challenges to write the code as ESXi has a subset of Python 2.7 which constrains some modules that can be used. 2. Prerequisites ---------------- The code requires Python 2.7 to work. Most Linux distros, ESXi and OS X ship with a compatible Python interpreter and should work without requiring any additional software. Windows has a packaged version of the Python script using PyInstaller, and so does not require Python to be installed. 3. Limitations -------------- If you are using VMware Player or Workstation on Windows you may get a core dump. Latest Linux and ESXi products are OK and do not show this problem. +-----------------------------------------------------------------------------+ | IMPORTANT: | | ========== | | | | If you create a new VM using version 11 or 12 hardware VMware may stop and | | create a core dump. There are two options to work around this issue: | | | | 1. Change the VM to be HW 10 - this does not affect performance. | | 2. Edit the VMX file and add: | | smc.version = "0" | | | +-----------------------------------------------------------------------------+ 4. Windows ---------- On Windows you will need to either run cmd.exe as Administrator or using Explorer right click on the command file and select "Run as administrator". win-install.cmd - patches VMware win-uninstall.cmd - restores VMware win-update-tools.cmd - retrieves latest OS X guest tools 5. Linux --------- On Linux you will need to be either root or use sudo to run the scripts. You may need to ensure the Linux scripts have execute permissions by running chmod +x against the 2 files. lnx-install.sh - patches VMware lnx-uninstall.sh - restores VMware lnx-update-tools.cmd - retrieves latest OS X guest tools 6. Mac OS X ----------- On Mac OS X you will need to be either root or use sudo to run the scripts. This is really only needed if you want to use client versions of Mac OS X. You may need to ensure the OS X scripts have execute permissions by running chmod +x against the 2 files. osx-install.sh - patches VMware osx-uninstall.sh - restores VMware 7. ESXi ------- You will need to transfer the zip file to the ESXi host either using vSphere client or SCP. Once uploaded you will need to either use the ESXi support console or use SSH to run the commands. Use the unzip command to extract the files. <<< WARNING: use a datastore volume to run the scripts >>> Please note that you will need to reboot the host for the patches to become active. The patcher is embbedded in a shell script local.sh which is run at boot from /etc/rc.local.d. You may need to ensure the ESXi scripts have execute permissions by running chmod +x against the 2 files. esxi-install.sh - patches VMware esxi-uninstall.sh - restores VMware Note: 1. Any changes you have made to local.sh will be lost. If you have made changes to that file, you will need to merge them into the supplied local.sh file. 2. The unlocker runs at boot time to patch the relevant files and it now survives an upgrade or patch to ESXi as local.sh is part of the persisted local state. 8. Thanks --------- Thanks to Zenith432 for originally building the C++ unlocker and Mac Son of Knife (MSoK) for all the testing and support. Thanks also to Sam B for finding the solution for ESXi 6 and helping me with debugging expertise. Sam also wrote the code for patching ESXi ELF files. History ------- 12/12/14 2.0.0 - First release 13/13/14 2.0.1 - Removed need for Python for Windows 13/13/14 2.0.2 - darwin.iso was missing from zip file 02/01/15 2.0.3 - Added EFI firmware files to remove Server check - Refactored Python code 07/01/15 2.0.4 - Added View USB Service to Windows batch files - Fixed broken GOS Table patching on Linux 18/06/15 2.0.5 - ESXi 6 working - Latest tools from Fusion 7.1.2 20/06/15 2.0.6 - ESXi 6 patch for smcPresent vCenter compatibility 16/09/15 2.0.7 - Workstation 12 on Linux fixes 14/11/15 2.0.8 - Player 12 on Linux fixes - Get latest VMware tools command - Removed firmware files - Moved to PyInstaller 3.0 (c) 2011-2015 Dave Parsons1 point
-

Version 2.9.1
1,995 downloads
VoodooHDA 2.9.1 2018 FULL Pack https://sourceforge.net/projects/voodoohda/1 point -

Version 1.3.0
244,873 downloads
Mac OS X Unlocker for VMware ============================ 1. Introduction --------------- The package is a combination of the Unlocker code written by Zenith432 plus some fixes and scripts written by myself that wrap the actual unlocker code. It has been tested against: * Workstation 8/9/10 on Windows and Linux (32 & 64-bit versions) * Player 4/5/6 on Windows and Linux (32 & 64-bit versions) * Fusion 4/5/6 on Snow Leopard, Lion, Mountain Lion and Mavericks * ESXi 5.0/5.1/5.5 The patch code carries out the following modifications dependent on the product being patched: * Fix vmware-vmx and derivatives to allow Mac OS X to boot * Fix vmwarebase .dll or .so to allow Apple to be selected during creation * Copy darwin.iso if needed to VMware folder Note that not all products recognise the darwin.iso via install tools menu item. You will have to manually mount the darwin.iso for example on Workstation. Also Player is missing vmware-vmx-debug and vmware-vmx-stats files and so an error is shown during patching as the files are not found. This can be safely ignored. OS X guests on ESXi patched hosts cannot be controlled from vCenter, only from the ESXi host itself. This means power operations have to be run directly on the server. The vmwarebase code does not need to be patched on ESXi or OS X so you will see a message on those systems telling you that it will not be patched. In all cases make sure VMware is not running, and any background guests have been shutdown. 2. Windows ---------- On Windows you will need to either run cmd.exe as Administrator or using Explorer right click on the command file and select "Run as administrator". install.cmd - patches VMware and copies darwin.iso tools image to VMware uninstall.cmd - restores VMware and removes darwin.iso tools image from VMware 3. Linux --------- On Linux you will need to be either root or use sudo to run the scripts. You may need to ensure the contents of the linux folder have execute permissions by running chmod +x against the 4 files. install.sh - patches VMware and copies darwin.iso tools image to VMware uninstall.sh - restores VMware and removes darwin.iso tools image from VMware 4. Mac OS X ----------- On Mac OS X you will need to be either root or use sudo to run the scripts. This is really only needed if you want to use client versions of Mac OS X. You may need to ensure the contents of the osx folder have execute permissions by running chmod +x against the 3 files. install.sh - patches VMware uninstall.sh - restores VMware 5. ESXi ------- You will need to transfer the zip file to the ESXi host either using vSphere client or SCP. Once uploaded you will need to either use the ESXi support console or use SSH to run the commands. Use the unzip command to extract the files. <<< WARNING: use a datastore volume to run the scripts >>> Please note that you will need to reboot the host for the patches to become active. The patcher is embbedded in a shell script local.sh which is run at boot from /etc/rc.local.d. You may need to ensure the contents of the esxi folder have execute permissions by running chmod +x against the 3 files. install.sh - patches VMware uninstall.sh - restores VMware Note: 1. System should have a persistent scratch partition - should be OK except for stateless and USB boot on drives less than 4GB http://kb.vmware.com/selfservice/microsites/search.do?language=en_US&cmd=displayKC&externalId=1033696 http://www-01.ibm.com/support/docview.wss?uid=isg3T1013015 http://www.vreference.com/2011/04/28/check-for-esxi-scratch-persistence/ 2. Any changes you have made to local.sh will be lost. If you have made changes to that file, you will need to merge them into the supplied local.sh file. 3. This option runs at boot time to patch the releavant files and it now survives an upgrade or patch to ESXi as local.sh is part of the persisted local state. 6. Zenith432's Unlocker ----------------------- In all cases the unlocker can be run without the scripts but you would need to carry out additional actions which the scripts encapsulate for you especially on ESXi. If you want to run the unlocker directly the parameters are: Usage: Unlocker [-h] [-u] [target_directory] -h: print help -u: remove the patch target_directory: customize location of vmx executables On all platforms you must run it with administrator or root privileges. The source code is provided and Zenith432 makes it freely available for modification. I have modified the code and it is available as per Zenith432's original statement. Thanks to Zenith432 for building the unlocker and Mac Son of Knife for all the testing and support. History ------- 11/10/11 1.0.0 - First release 07/11/11 1.0.1 - Fixed typo in Windows command files 07/12/11 1.0.2 - Updated patcher and tools for latest release WKS 8.0.1 & FUS 4.1.1 10/05/12 1.1.0 - Changed the patching mechanism for vmwarebase .dll or .so & tested against ESXi 5.0 U1 and Tech Previews. 13/07/13 1.1.1 - Changed ESXi scripts to ensure not deleting root /bin folder - Fixed vmwarebase patching on 32-bit Linux - Some other code clean-up in Unlocker.cpp 18/09/13 1.2.0 - Updated vmwarebase pattern matching for WKS 10.0.0 & FUS 6.0.0 25/03/14 1.3.0 - New method to run patcher on ESXi - Fixes crashes when using vCenter - Tested against ESXi 5.5 - Darwin guest tools from Fusion 6.0.2 - Zip file preserves file attributes for Posix based systems © 2011-2014 Dave Parsons1 point -
Unlocker 2.1 for latest VMware products. Important message - ESXi 6.x support has been removed from the Unlocker as it is too unreliable. Several methods have been tried but they cause random disconnects of vCenter and failure of the hostd daemon. Support will be added back if and when a reliable method is found. Support Request Please, please, please do NOT copy vmx or log files inline in a post. Always attach the log file as an attachment. It slows down the forum editor and puts a lot of junk in the actual post, and I cannot analyse unless it is a separate file. Alternatively post a link to a Gist. Download Links Version 2.1.1 - http://www.insanelymac.com/forum/files/file/835-unlocker/ Please continue to use version 2.0.8 for ESXi 6.0. macOS Unlocker for VMware V2.1 ============================== +-----------------------------------------------------------------------------+ | IMPORTANT: | | ========== | | | | Always uninstall the previous version of the Unlocker before using a new | | version. Failure to do this could render VMware unusable. | | | +-----------------------------------------------------------------------------+ 1. Introduction --------------- Unlocker 2 is designed for Workstation 11/12/14, Player 7/12/14, and Fusion 7/8/10. If you are using an earlier product please continue using Unlocker 1. Version 2 has been tested against: * Workstation 11/12/14 on Windows and Linux * Workstation Player 7/12/14 on Windows and Linux * Fusion 7/8/10 on macOS Sierra The patch code carries out the following modifications dependent on the product being patched: * Fix vmware-vmx and derivatives to allow macOS to boot * Fix vmwarebase .dll or .so to allow Apple to be selected during VM creation * Download a copy of the latest VMware Tools for macOS Note that not all products recognise the darwin.iso via install tools menu item. You will have to manually mount the darwin.iso for example on Workstation 11 and Player 7. The vmwarebase code does not need to be patched on macOS systems so you will see a message on those systems telling you that it will not be patched. In all cases make sure VMware is not running, and any background guests have been shutdown. The code is written in Python as it makes the Unlocker easier to run and maintain on ESXi. 2. Prerequisites ---------------- The code requires Python 2.7 to work. Most Linux distros and macOS ship with a compatible Python interpreter and should work without requiring any additional software. Windows Unlocker has a packaged version of the Python script using PyInstaller, and so does not require Python to be installed. 3. Limitations -------------- If you are using VMware Player or Workstation on Windows you may get a core dump. Latest Linux products are OK and do not show this problem. +-----------------------------------------------------------------------------+ | IMPORTANT: | | ========== | | | | If you create a new VM using version 11, 12 or 13 hardware VMware may stop | | and create a core dump. There are two options to work around this issue: | | | | 1. Change the VM to be HW 10 - this does not affect performance. | | 2. Edit the VMX file and add: | | smc.version = "0" | | | +-----------------------------------------------------------------------------+ 4. Windows ---------- On Windows you will need to either run cmd.exe as Administrator or using Explorer right click on the command file and select "Run as administrator". win-install.cmd - patches VMware win-uninstall.cmd - restores VMware win-update-tools.cmd - retrieves latest macOS guest tools 5. Linux --------- On Linux you will need to be either root or use sudo to run the scripts. You may need to ensure the Linux scripts have execute permissions by running chmod +x against the 2 files. lnx-install.sh - patches VMware lnx-uninstall.sh - restores VMware lnx-update-tools.cmd - retrieves latest macOS guest tools 6. macOS -------- On macOS you will need to be either root or use sudo to run the scripts. This is really only needed if you want to use client versions of macOS. You may need to ensure the macOS scripts have execute permissions by running chmod +x against the 2 files. osx-install.sh - patches VMware osx-uninstall.sh - restores VMware 7. ESXi ------- ESXi is no longer supported as there are too many errors on newer versions due to VMware hardening the ESXi image. 8. Thanks --------- Thanks to Zenith432 for originally building the C++ unlocker and Mac Son of Knife (MSoK) for all the testing and support. Thanks also to Sam B for finding the solution for ESXi 6 and helping me with debugging expertise. Sam also wrote the code for patching ESXi ELF files and modified the unlocker code to run on Python 3 in the ESXi 6.5 environment. History ------- 10/10/17 2.1.0 - New version to support ESXi 6.5, Workstation/Player 14 and Fusion 10 - Removed support for ESXi 6.0 - Added ESXi boot option to disable unlocker (nounlocker) 11/10/17 2.1.1 - Removed all support for ESXi 6.x (c) 2011-2017 Dave Parsons1 point
-
Version 2.1.0
36,912 downloads
macOS Unlocker for VMware V2.1 ============================== +-----------------------------------------------------------------------------+ | IMPORTANT: | | ========== | | | | Always uninstall the previous version of the Unlocker before using a new | | version. Failure to do this could render VMware unusable especially ESXi. | | | +-----------------------------------------------------------------------------+ 1. Introduction --------------- Unlocker 2.1 is designed for Workstation 11/12/14, Player 7/12/14, ESXi 6.5 and Fusion 7/8/10. If you are using an earlier product please continue using Unlocker 1 and use Unlcoker 2.0 for ESXi 6.0 Version 2 has been tested against: * Workstation 11/12/14 on Windows and Linux * Workstation Player 7/12/14 on Windows and Linux * Fusion 7/8/10 on Sierra * ESXi 6.5U1 The patch code carries out the following modifications dependent on the product being patched: * Fix vmware-vmx and derivatives to allow macOS to boot * Fix vmwarebase .dll or .so to allow Apple to be selected during VM creation * Fix libvmkctl.so on ESXi 6 to allow use with vCenter * Download a copy of the latest VMware Tools for macOS Note that not all products recognise the darwin.iso via install tools menu item. You will have to manually mount the darwin.iso for example on Workstation 11 and Player 7. The vmwarebase code does not need to be patched on macOS or ESXi so you will see a message on those systems telling you that it will not be patched. In all cases make sure VMware is not running, and any background guests have been shutdown. The code is written in Python as it makes the Unlocker easier to run and maintain on ESXi. 2. Prerequisites ---------------- The code requires Python 2.7 to work. Most Linux distros, ESXi and macOS ship with a compatible Python interpreter and should work without requiring any additional software. Windows Unlocker has a packaged version of the Python script using PyInstaller, and so does not require Python to be installed. 3. Limitations -------------- If you are using VMware Player or Workstation on Windows you may get a core dump. Latest Linux and ESXi products are OK and do not show this problem. +-----------------------------------------------------------------------------+ | IMPORTANT: | | ========== | | | | If you create a new VM using version 11, 12 or 13 hardware VMware may stop | | and create a core dump. There are two options to work around this issue: | | | | 1. Change the VM to be HW 10 - this does not affect performance. | | 2. Edit the VMX file and add: | | smc.version = "0" | | | +-----------------------------------------------------------------------------+ 4. Windows ---------- On Windows you will need to either run cmd.exe as Administrator or using Explorer right click on the command file and select "Run as administrator". win-install.cmd - patches VMware win-uninstall.cmd - restores VMware win-update-tools.cmd - retrieves latest macOS guest tools 5. Linux --------- On Linux you will need to be either root or use sudo to run the scripts. You may need to ensure the Linux scripts have execute permissions by running chmod +x against the 2 files. lnx-install.sh - patches VMware lnx-uninstall.sh - restores VMware lnx-update-tools.cmd - retrieves latest macOS guest tools 6. macOS -------- On macOS you will need to be either root or use sudo to run the scripts. This is really only needed if you want to use client versions of macOS. You may need to ensure the macOS scripts have execute permissions by running chmod +x against the 2 files. osx-install.sh - patches VMware osx-uninstall.sh - restores VMware 7. ESXi ------- You will need to transfer the zip file to the ESXi host either using vSphere client or SCP. Once uploaded you will need to either use the ESXi support console or use SSH to run the commands. Use the unzip command to extract the files. <<< WARNING: use a datastore volume to store and run the scripts >>> Please note that you will need to reboot the host for the patches to become active. The patcher is embbedded in a shell script local.sh which is run at boot from /etc/rc.local.d. You may need to ensure the ESXi scripts have execute permissions by running chmod +x against the 2 files. esxi-install.sh - patches VMware esxi-uninstall.sh - restores VMware There is a boot option for ESXi that disables the unlocker if there is a problem. At the ESXi boot screen press shift + o to get the boot options and add nounlocker. Note: 1. Any changes you have made to local.sh will be lost. If you have made changes to that file, you will need to merge them into the supplied local.sh file. 2. The unlocker needs to be re-run after an upgrade or patch is installed on the ESXi host. 3. The macOS VMwwre tools are no longer shipped in the image from ESXi 6.5. They have to be downloaded and installed manually onto the ESXi host. For additional details see this web page: https://blogs.vmware.com/vsphere/2016/10/introducing-vmware-tools-10-1-10-0-12.html 8. Thanks --------- Thanks to Zenith432 for originally building the C++ unlocker and Mac Son of Knife (MSoK) for all the testing and support. Thanks also to Sam B for finding the solution for ESXi 6 and helping me with debugging expertise. Sam also wrote the code for patching ESXi ELF files and modified the unlocker code to run on Python 3 in the ESXi 6.5 environment. History ------- 10/10/17 2.1.0 - New version to support ESXi 6.5, Workstation/Player 14 and Fusion 10 - Removed support for ESXi 6.0 - Added ESXi boot option to disable unlocker (nounlocker) © 2011-2017 Dave Parsons1 point -
Version 2.1.1
17,218 downloads
macOS Unlocker for VMware V2.1 ============================== +-----------------------------------------------------------------------------+ | IMPORTANT: | | ========== | | | | Always uninstall the previous version of the Unlocker before using a new | | version. Failure to do this could render VMware unusable. | | | +-----------------------------------------------------------------------------+ 1. Introduction --------------- Unlocker 2 is designed for Workstation 11/12/14, Player 7/12/14, and Fusion 7/8/10. If you are using an earlier product please continue using Unlocker 1. Version 2 has been tested against: * Workstation 11/12/14 on Windows and Linux * Workstation Player 7/12/14 on Windows and Linux * Fusion 7/8/10 on macOS Sierra The patch code carries out the following modifications dependent on the product being patched: * Fix vmware-vmx and derivatives to allow macOS to boot * Fix vmwarebase .dll or .so to allow Apple to be selected during VM creation * Download a copy of the latest VMware Tools for macOS Note that not all products recognise the darwin.iso via install tools menu item. You will have to manually mount the darwin.iso for example on Workstation 11 and Player 7. The vmwarebase code does not need to be patched on macOS systems so you will see a message on those systems telling you that it will not be patched. In all cases make sure VMware is not running, and any background guests have been shutdown. The code is written in Python as it makes the Unlocker easier to run and maintain on ESXi. 2. Prerequisites ---------------- The code requires Python 2.7 to work. Most Linux distros and macOS ship with a compatible Python interpreter and should work without requiring any additional software. Windows Unlocker has a packaged version of the Python script using PyInstaller, and so does not require Python to be installed. 3. Limitations -------------- If you are using VMware Player or Workstation on Windows you may get a core dump. Latest Linux products are OK and do not show this problem. +-----------------------------------------------------------------------------+ | IMPORTANT: | | ========== | | | | If you create a new VM using version 11, 12 or 13 hardware VMware may stop | | and create a core dump. There are two options to work around this issue: | | | | 1. Change the VM to be HW 10 - this does not affect performance. | | 2. Edit the VMX file and add: | | smc.version = "0" | | | +-----------------------------------------------------------------------------+ 4. Windows ---------- On Windows you will need to either run cmd.exe as Administrator or using Explorer right click on the command file and select "Run as administrator". win-install.cmd - patches VMware win-uninstall.cmd - restores VMware win-update-tools.cmd - retrieves latest macOS guest tools 5. Linux --------- On Linux you will need to be either root or use sudo to run the scripts. You may need to ensure the Linux scripts have execute permissions by running chmod +x against the 2 files. lnx-install.sh - patches VMware lnx-uninstall.sh - restores VMware lnx-update-tools.cmd - retrieves latest macOS guest tools 6. macOS -------- On macOS you will need to be either root or use sudo to run the scripts. This is really only needed if you want to use client versions of macOS. You may need to ensure the macOS scripts have execute permissions by running chmod +x against the 2 files. osx-install.sh - patches VMware osx-uninstall.sh - restores VMware 7. ESXi ------- ESXi is no longer supported as there are too many errors on newer versions due to VMware hardening the ESXi image. 8. Thanks --------- Thanks to Zenith432 for originally building the C++ unlocker and Mac Son of Knife (MSoK) for all the testing and support. Thanks also to Sam B for finding the solution for ESXi 6 and helping me with debugging expertise. Sam also wrote the code for patching ESXi ELF files and modified the unlocker code to run on Python 3 in the ESXi 6.5 environment. History ------- 10/10/17 2.1.0 - New version to support ESXi 6.5, Workstation/Player 14 and Fusion 10 - Removed support for ESXi 6.0 - Added ESXi boot option to disable unlocker (nounlocker) 11/10/17 2.1.1 - Removed all support for ESXi 6.x (c) 2011-2017 Dave Parsons1 point -
You need power management or ACPI tables patched. Also use AptioMemoryFix.efi, OsxAptioFix 1 and 2 are obsolete. Just use AptioMemoryFix from the clover installer. Also that's the original one that works even less. That does not give you the name of the core storage volume as that is not even created yet from the separate partitions, that looks most likely the preboot from an APFS container.1 point
-
YES, it is:
 1 point
 -
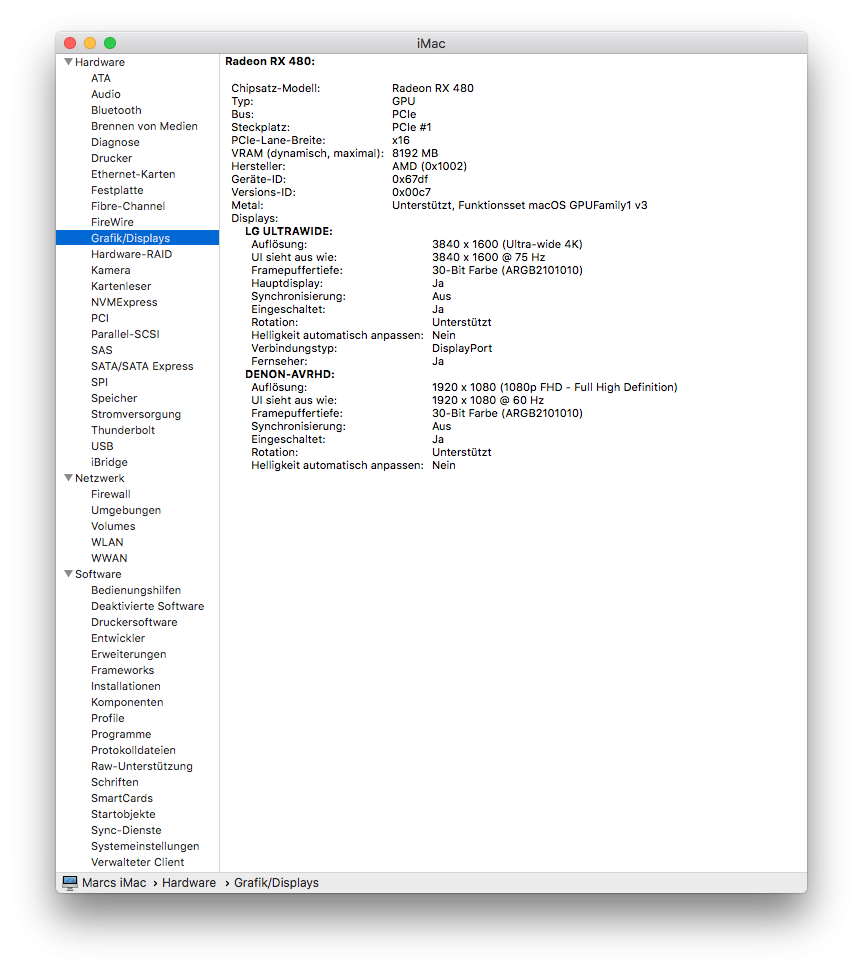
Thats my terminaloutput: DEVICE 0: Name: AMD Radeon RX 480 Metal version: 2+ Registry ID: 0x4E6 Max Threads Per Thread group: MTLSize(width: 1024, height: 1024, depth: 1024) Max Thread group Memory Length: 32768 Recommended Max Working Set Size: 0x0 Depth 24 Stencil 8 Pixel Format Supported: true Programmable Sample Positions Supported: true Read-Write Texture Support: MTLReadWriteTextureTier Headless: false Is Low Power: false Removable: false Made with Sapphire RADEON RX480 Nitro OC1 point
-
Sure that I'm not totally correct, but my point was not boot.efi (in fact my was a question about that, there is a question mark in my last post since I didnt read the entire source Lol). I was referring to functions like OSKextRequestResource(). You can't access the returned path of a kext and it is not a UNIX path ( in the event kext is injected by Clover and so already loaded). TestKext.kext (1.0.0) net.vectorsigma.kext.TestKext EFI\CLOVER\kexts\10.13\TestKext.kext\Contents\Resources How access EFI\CLOVER\kexts\10.13\TestKext.kext\Contents\Resources/firmware.bin or \System\Library\Extensions\TestKext.kext\Contents\Resources/firmware.bin if forced loaded by Clover?1 point
-
I am having several very very annoying problems, first, I've said this several times now but the sign in anonymously does not work correctly. Sometimes it will just update when I know I logged in anonymously, the last login was obscured before when you logged in anonymously. I would definitely like that feature back. I am still having trouble with quoting and commenting, if you quote multiple people the quotes appear outside the reply text box, bigger than the screen, and unable to actually do anything. I am also still having an issue with removing contents from within a quote, it often ends up erasing the whole quote, especially if it has a codebox within...1 point
-
There's many things you can do depending. Your most useful situation is injecting everything you need to boot and not much more, that includes patched ACPI tables and kexts. Install kexts that you don't need to access the installer (or as Slice pointed out, the recovery). Why don't you just write a simple shell script to automate the process? That would be the most practical. Yes, if you need internet recovery, otherwise there is no need, but FakeSMC you should absolutely be injecting all the time, at the minimum.1 point
-
It depends, kexts in Other will be injected for all versions, kexts in 10.xx folders will be injected only for that version. You should not use \S\L\E anymore unless there is an official driver installer like Nvidia web drivers. Use \L\E, but only when you do not need the kext to boot., i.e. bluetooth or network kexts. Apple now recommends only installing user kexts in /L/E not /S/L/E ever since kext signing was enforced. Agreed, but you should try to inject as many as possible but as few as possible too. I know that sounds strange but the more kexts you inject the more problems with memory you are likely to have. On the other hand, you want to inject as many kexts as possible so you don't have to do any work to get upgrades, installers, etc, working without much effort after doing once. The equilibrium I find is just injecting only what I absolutely need to boot, and install everything else in the OS. This is a pretty easy answer, they are all third party kexts and keep injecting them. Third party means made by an organization not directly affiliated with the first party, in this case Apple, second party is like Intel, NVIDIA, or AMD that create components and drivers. If you install them in /L/E or /S/L/E then whenever anything happens like an upgrade or such you probably won't get working boot since it will use a different cache not built from your system (the one that is already prebuilt for the upgrade/installer). Though, you could not inject AppleALC and IntelMausiEthernet, and install those since they are not needed for booting. Yeah, this is probably a must. Not enough information...? What else would you do, you only need to put the kexts (which are folders containing binaries, configurations, and other resources) in the folder. Just replacing them is drag and drop, is it not? I'm confused, you just need to copy the files to the injection folder. The only difference is that kext utility repairs permissions for the files and with injection the file permissions do not matter. You are not correct. Clover injects kexts through the data hub before launching boot.efi, then some other corrections happen to the device tree at exit boot services. You can't inject a kext that is already present in the kernelcache, the kernel will ignore duplicate identifiers. A lot of kexts are placed in the cache regardless of whether they are used/attached to a device because of dependencies and the category of driver, i.e. core, safe, network, etc. I can't remember the actual grouping, but it's not nearly that precise so most kexts in the OS can't be injected because they are already in the cache. You can absolutely access the ESP to inject kexts when they are actually loaded, however other resources that will eventually be loaded (like the audio driver port layouts) will not be accessible from the ESP after exit boot services. These resources will then be loaded from where the identifier of the kext exists (in /S/L/E or /L/E) because that's where the kernel expects the resources to be. You should always inject FakeSMC, you should never ever ever use NullPowerManagement, and any network drivers are pretty much the ones that can absolutely be installed instead of injected since they don't need to be present to boot.1 point
-
Nevermind I figured it out sudo /usr/sbin/softwareupdate --set-catalog https://swscan.apple.com/content/catalogs/others/index-10.13seed-10.13-10.12-10.11-10.10-10.9-mountainlion-lion-snowleopard-leopard.merged-1.sucatalog.gz Then just run normal updates through App Store1 point
-

Version 2.0.8
732,716 downloads
Mac OS X Unlocker for VMware V2.0 Please ask questions in this thread http://www.insanelymac.com/forum/topic/303311-workstation-1112-player-712-fusion-78-and-esxi-6-mac-os-x-unlocker-2/ 1. Introduction Unlocker 2 is designed for Workstation 11, Player 7, ESXi 6 and Fusion 7. If you are using an earlier product please continue using Unlocker 1 Version 2 has been tested against: Workstation 11/12 on Windows and Linux Player 7 & Workstation Player 12 on Windows and Linux Fusion 7/8 on Mavericks and Yosemite ESXi 6.0 The patch code carries out the following modifications dependent on the product being patched: Fix vmware-vmx and derivatives to allow Mac OS X to boot Fix vmwarebase .dll or .so to allow Apple to be selected during VM creation Fix libvmkctl.so on ESXi 6 to allow use with vCenter Download a copy of the latest VMware Tools for OS X Note that not all products recognise the darwin.iso via install tools menu item. You will have to manually mount the darwin.iso for example on Workstation 11 and Player 7. The vmwarebase code does not need to be patched on OS X or ESXi so you will see a message on those systems telling you that it will not be patched. In all cases make sure VMware is not running, and any background guests have been shutdown. The code is now Python as it makes the Unlocker easier to run and maintain on ESXi. There are some challenges to write the code as ESXi has a subset of Python 2.7 which constrains some modules that can be used. 2. Prerequisites The code requires Python 2.7 to work. Most Linux distros, ESXi and OS X ship with a compatible Python interpreter and should work without requiring any additional software. Windows has a packaged version of the Python script using PyInstaller, and so does not require Python to be installed. 3. Limitations If you are using VMware Player or Workstation on Windows you may get a core dump. Latest Linux and ESXi products are OK and do not show this problem. IMPORTANT: If you create a new VM using version 11 hardware VMware will stop and create a core dump.There are two options to work around this issue: 1. Change the VM to be HW 10 - this does not affect performance. 2. Edit the VMX file and add: smc.version = "0" | 4. Windows On Windows you will need to either run cmd.exe as Administrator or using Explorer right click on the command file and select "Run as administrator". win-install.cmd - patches VMware win-uninstall.cmd - restores VMware win-update-tools.cmd - retrieves latest OS X guest tools 5. Linux On Linux you will need to be either root or use sudo to run the scripts. You may need to ensure the Linux scripts have execute permissions by running chmod +x against the 2 files. lnx-install.sh - patches VMware lnx-uninstall.sh - restores VMware lnx-update-tools.cmd - retrieves latest OS X guest tools 6. Mac OS X On Mac OS X you will need to be either root or use sudo to run the scripts. This is really only needed if you want to use client versions of Mac OS X. You may need to ensure the OS X scripts have execute permissions by running chmod +x against the 2 files. osx-install.sh - patches VMware osx-uninstall.sh - restores VMware 7. ESXi You will need to transfer the zip file to the ESXi host either using vSphere client or SCP. Once uploaded you will need to either use the ESXi support console or use SSH to run the commands. Use the unzip command to extract the files. <<< WARNING: use a datastore volume to run the scripts >>> Please note that you will need to reboot the host for the patches to become active. The patcher is embbedded in a shell script local.sh which is run at boot from /etc/rc.local.d. You may need to ensure the ESXi scripts have execute permissions by running chmod +x against the 2 files. esxi-install.sh - patches VMware esxi-uninstall.sh - restores VMware Note: 1. Any changes you have made to local.sh will be lost. If you have made changes to that file, you will need to merge them into the supplied local.sh file. 2. The unlocker runs at boot time to patch the relevant files and it now survives an upgrade or patch to ESXi as local.sh is part of the persisted local state. 8. Thanks Thanks to Zenith432 for originally building the C++ unlocker and Mac Son of Knife (MSoK) for all the testing and support. Thanks also to Sam B for finding the solution for ESXi 6 and helping me with debugging expertise. Sam also wrote the code for patching ESXi ELF files. History 12/12/14 2.0.0 First release 13/13/14 2.0.1 Removed need for Python for Windows 13/13/14 2.0.2 darwin.iso was missing from zip file 02/01/15 2.0.3 Added EFI firmware files to remove Server check Refactored Python code 07/01/15 2.0.4 Added View USB Service to Windows batch files Fixed broken GOS Table patching on Linux 18/06/15 2.0.5 ESXi 6 working Latest tools from Fusion 7.1.2 20/06/15 2.0.6 ESXi 6 patch for smcPresent vCenter compatibility 16/09/15 2.0.7 Workstation 12 on Linux fixes 14/11/15 2.0.8 Player 12 on Linux fixes Get latest VMware tools command Removed firmware files Moved to PyInstaller 3.0 © 2011-2015 Dave Parsons1 point -
yes it works on hight sierra on running 10.13.3, ill take a look at your dsdt decompile with refs.txt first then copy the changes i made here is your dsdt, note you will need lilu.kext and nvidiagraphicsfixup.kext Device (PEG0) { Name (_ADR, 0x00010000) // _ADR: Address Method (_PRT, 0, NotSerialized) // _PRT: PCI Routing Table { Store (One, ^GFX0.HDAE) If (PICM) { Return (AR01) } Return (PR01) } } theis first one enables your hdmi audio pci slot but you may need toleda's clover hdmi ssdt also, nvidiagraphicsfixup.kext also your HDAU device is named NVAF in dsdt maybe rename nvaf to HDAU before adding toledas ssdt Scope (_SB.PCI0.PEG0) { Device (GFX0) { Name (_ADR, Zero) // _ADR: Address Method (_PRW, 0, NotSerialized) // _PRW: Power Resources for Wake { Return (GPRW (0x09, 0x04)) } Method (_DSM, 4, NotSerialized) // _DSM: Device-Specific Method { If (LEqual (Arg2, Zero)) { Return (Buffer (One) { 0x03 }) } Return (Package (0x18) { "@0,connector-type", Buffer (0x04) { 0x02, 0x00, 0x00, 0x00 }, "@0,AAPL,boot-display", Buffer (0x04) { 0x01, 0x00, 0x00, 0x00 }, "@0,built-in", Buffer (Zero) {}, "@0,display-connect-flags", Buffer (0x04) { 0x04, 0x00, 0x00, 0x00 }, "@0,use-backlight-blanking", Buffer (0x04) {}, "AAPL,backlight-control", Buffer (0x04) { 0x01, 0x00, 0x00, 0x00 }, "@0,backlight-control", Buffer (0x04) { 0x01, 0x00, 0x00, 0x00 }, "@0,display-type", "LCD", "@1,connector-type", Buffer (0x04) { 0x00, 0x08, 0x00, 0x00 }, "@2,connector-type", Buffer (0x04) { 0x00, 0x08, 0x00, 0x00 }, "@3,connector-type", Buffer (0x04) { 0x00, 0x08, 0x00, 0x00 }, "hda-gfx", Buffer (0x0A) { "onboard-1" } }) } for this you have to rename original dsm method to xdsm Scope (_SB) { Device (PNLF) { Name (_ADR, Zero) // _ADR: Address Name (_HID, EisaId ("APP0002")) // _HID: Hardware ID Name (_CID, "backlight") // _CID: Compatible ID Name (_UID, 0x0E) // _UID: Unique ID Name (_STA, 0x0B) // _STA: Status Method (_BCL, 0, NotSerialized) // _BCL: Brightness Control Levels { Return (^^PCI0.PEG0.GFX0.EDPD._BCL ()) } Method (_BCM, 1, NotSerialized) // _BCM: Brightness Control Method { Store (^^PCI0.PEG0.GFX0.GCBL (Arg0), Local0) Subtract (0x0A, Local0, LBTN) ^^PCI0.LPCB.EC0.STBR () } Method (_BQC, 0, NotSerialized) // _BQC: Brightness Query Current { Return (LBTN) } Method (_DOS, 1, NotSerialized) // _DOS: Disable Output Switching { ^^PCI0.PEG0.GFX0._DOS (Arg0) } } } DSDT.dsl.zip1 point
-
For people who has similar configuration can use my Config as reference. Working with 10.12 & 10.13 config.plist.zip1 point