Leaderboard


Popular Content
Showing content with the highest reputation on 04/26/2018 in all areas
-
Version r165
1,702 downloads
HWSensor Features Control temperature of Intel and AMD CPU Control temperature of AMD, Intel and NVidia cards Control temperature of motherboard Control FANS Control Voltages Control HDD/SSD state (SATA & NVMe) with S.M.A.R.T. monitoring Control frequencies Laptop Battery Monitoring Different applications support High Sierra compatible Installation to /S/L/E or in the ESP (Clover only) Supported languages: English (base), Russian, Italian, Korean and semplified Chinese Source code: at https://sourceforge.net/p/hwsensors/hwsensors3/code3/HEAD/tree/ Bugs report at https://sourceforge.net/p/hwsensors/hwsensors3/tickets/ Topic for discussion at: https://www.insanelymac.com/forum/topic/299861-hwsensors3/ Chief Developer @Slice, new HWMonitorSMC2.app and package by @vector sigma3 points -
 Works perfectly. Had to disable beam sync for better performance though and I can't get the screen above 1024x768, that's the only resolution listed in display settings. Anyone got any idea how to up it? Tools are installed that came with Unlocker 2.0.4. Workstation 11, Windows 8.13 points
 -
Hello guys, how you doing? The most of you have problems to upload a file in our Downloads section, and to help you guys, I can upload it for you. Follow this steps: Post here the link of the files using the most common services such as DropBox, Google Drive. Post the comments, such as the details. Images - Screenshots with a good quality. And the most important - The credits! Always post the name of the person who deserves the credit for the work, without this, the file will not be uploaded. I hope that I can help you guys. OBS: Please don't flood this topic with unuseful posts, the main objective of it is for help you2 points
-
ok. so here are patched apfs from 17E202 version 748.57.19 apfs.efi2 points
-
New Web Driver - 387.10.10.10.30.107 for 10.13.4 build 17E2022 points
-
@gsull, you could just download a 10.10 VM directly, no need to update from an older Mac OS X version. VMware Workstation for PC version 11.1.2 is out - happy to report latest Unlocker works fine with it on my PC, thank you! Using a Windows 8.1 Pro 64-bit Host OS. Guest OSes - Mac OS X 10.7-10.10.2 points
-
@ Aaron Priest the file is not broken... it works fine here with os x 7zip utility2 points
-
Works like a charm on VM11 !!! Thanks a lot for this great job.2 points
-
On linux vmware workstation 11.1 always crashes when vmware tools finished to install from darwin.iso. but unlocker works. related part of log 2015-04-01T17:16:13.795+05:00| vcpu-0| I120: Stream 7F8A7C02F7D0 creating 2015-04-01T17:16:13.795+05:00| vthread-9| I120: VTHREAD initialize thread 9 "vthread-9" pid 24905 2015-04-01T17:16:13.795+05:00| vthread-9| I120: Stream 7F8A7C02F7D0 ready 2015-04-01T17:16:13+05:00[+0.011]| vcpu-0| W110: Caught signal 11 -- tid 24903 (addr 0) 2015-04-01T17:16:13+05:00[+0.011]| vcpu-0| I120: SIGNAL: rip 0x0 rsp 0x7f8b983d6bc8 rbp 0x55ef8d0 2015-04-01T17:16:13+05:00[+0.011]| vcpu-0| I120: SIGNAL: rax 0x0 rbx 0x55efc68 rcx 0x55eb710 rdx 0xe485a0 rsi 0x7f8b983d6c70 rdi 0x7f8a7c00b7a0 2015-04-01T17:16:13+05:00[+0.011]| vcpu-0| I120: r8 0x451be102 r9 0x16b3521 r10 0x1 r11 0x3246 r12 0xd624fd1470e99cb7 r13 0x52f0280 r14 0x15bbd60 r15 0x16bb360 2015-04-01T17:16:13+05:00[+0.011]| vcpu-0| I120: SIGNAL: stack 7F8B983D6BC8 : 0x00000000007ef5ba 0x0000000400000000 2015-04-01T17:16:13+05:00[+0.012]| vcpu-0| I120: SIGNAL: stack 7F8B983D6BD8 : 0x00000000055eb710 0x00000000055eb710 2015-04-01T17:16:13+05:00[+0.012]| vcpu-0| I120: SIGNAL: stack 7F8B983D6BE8 : 0x00000000000000fa 0x00000004000003e8 2015-04-01T17:16:13+05:00[+0.012]| vcpu-0| I120: SIGNAL: stack 7F8B983D6BF8 : 0x0000000000000004 0x00007f8ba12b6ec0 2015-04-01T17:16:13+05:00[+0.012]| vcpu-0| I120: SIGNAL: stack 7F8B983D6C08 : 0x00007f8a7c011140 0x0000000000000004 2015-04-01T17:16:13+05:00[+0.012]| vcpu-0| I120: SIGNAL: stack 7F8B983D6C18 : 0x00000000004793d1 0x0000000000000000 2015-04-01T17:16:13+05:00[+0.012]| vcpu-0| I120: SIGNAL: stack 7F8B983D6C28 : 0xffffffff00000000 0x00007f8ba12503a8 2015-04-01T17:16:13+05:00[+0.012]| vcpu-0| I120: SIGNAL: stack 7F8B983D6C38 : 0x0000000000499943 0x00000000015ce788 2015-04-01T17:16:13+05:00[+0.012]| vcpu-0| I120: Backtrace: 2015-04-01T17:16:13+05:00[+0.012]| vcpu-0| I120: Backtrace[0] 00007f8b983d6520 rip=00000000005154be rbx=0000000000515290 rbp=0000000000000000 r12=0000000000000004 r13=00007f8b983d7650 r14=00007f8b983d6c48 r15=000000000000000b 2015-04-01T17:16:13+05:00[+0.012]| vcpu-0| I120: Backtrace[1] 00007f8b983d6550 rip=000000000046ce49 rbx=000000000000000b rbp=00007f8b983d6c48 r12=0000000000000004 r13=00007f8b983d7650 r14=00007f8b983d6c48 r15=000000000000000b 2015-04-01T17:16:13+05:00[+0.012]| vcpu-0| I120: Backtrace[2] 00007f8b983d6640 rip=00007f8ba0a40340 rbx=00000000055efc68 rbp=00000000055ef8d0 r12=d624fd1470e99cb7 r13=00000000052f0280 r14=00000000015bbd60 r15=00000000016bb360 2015-04-01T17:16:13+05:00[+0.012]| vcpu-0| I120: Backtrace[3] 00007f8b983d6bc8 rip=0000000000000000 rbx=00000000055efc68 rbp=00000000055ef8d0 r12=d624fd1470e99cb7 r13=00000000052f0280 r14=00000000015bbd60 r15=00000000016bb360 2015-04-01T17:16:13+05:00[+0.012]| vcpu-0| I120: SymBacktrace[0] 00007f8b983d6520 rip=00000000005154be in function (null) in object /usr/lib/vmware/bin/vmware-vmx-debug loaded at 0000000000400000 2015-04-01T17:16:13+05:00[+0.012]| vcpu-0| I120: SymBacktrace[1] 00007f8b983d6550 rip=000000000046ce49 in function (null) in object /usr/lib/vmware/bin/vmware-vmx-debug loaded at 0000000000400000 2015-04-01T17:16:13+05:00[+0.012]| vcpu-0| I120: SymBacktrace[2] 00007f8b983d6640 rip=00007f8ba0a40340 in function (null) in object /lib/x86_64-linux-gnu/libpthread.so.0 loaded at 00007f8ba0a30000 2015-04-01T17:16:13+05:00[+0.012]| vcpu-0| I120: SymBacktrace[3] 00007f8b983d6bc8 rip=0000000000000000 2015-04-01T17:16:13+05:00[+0.012]| vcpu-0| I120: Unexpected signal: 11. 2015-04-01T17:16:13+05:00[+0.012]| vcpu-0| W110: 2015-04-01T17:16:13+05:00[+0.012]| vcpu-0| W110+ Attempting a core dump using an unlimited size limit 2015-04-01T17:16:13+05:00[+0.166]| vcpu-0| W110: Core dumped. 2015-04-01T17:16:13+05:00[+0.166]| vcpu-0| I120: Core dump pipes to process /usr/share/apport/apport %p %s %c %P, core file unreliable 2015-04-01T17:16:13+05:00[+0.166]| vcpu-0| W110: A core file is available in "/localhome/rion/vmware/OS X 10.10/core" 2015-04-01T17:16:13+05:00[+0.166]| vcpu-0| W110: Writing monitor corefile "/localhome/rion/vmware/OS X 10.10/vmmcores.gz" 2015-04-01T17:16:13+05:00[+0.168]| vcpu-0| W110: Dumping core for vcpu-0 2015-04-01T17:16:13+05:00[+0.168]| vcpu-0| I120: Beginning monitor coredump from crashed tid I also see next messages above 2015-04-01T17:13:57.104+05:00| vcpu-0| I120: VTHREAD start thread 4 "vcpu-0" pid 24903 2015-04-01T17:13:57.219+05:00| vcpu-0| I120: Vix: [24903 mainDispatch.c:4291]: VMAutomation_ReportPowerOpFinished: statevar=0, newAppState=1872, success=1 additionalError=0 2015-04-01T17:13:57.219+05:00| vcpu-0| I120: Vix: [24903 mainDispatch.c:4209]: VMAutomationReportPowerStateChange: Reporting power state change (opcode=0, err=0). 2015-04-01T17:13:57.219+05:00| vcpu-0| I120: Vix: [24903 mainDispatch.c:4209]: VMAutomationReportPowerStateChange: Reporting power state change (opcode=2, err=0). 2015-04-01T17:14:28.572+05:00| vcpu-0| I120: Vix: [24903 mainDispatch.c:4209]: VMAutomationReportPowerStateChange: Reporting power state change (opcode=2, err=0). Also tried to install new osx 10.10.2 but crash is the same. --- Ubuntu 14.04 Vmware Workstation 11.1.0 build-2496824 UPDATE: downgraded to Vmware Workstation 10 and used unlocker-1.3. works like a charm. so I believe Vmware Workstation is just unstable for now on linux and we have to wait some future releases. I'm not sure but probably the crashes somehow related to sound system. UPDATE2: hm now it hangs randomly and sound doesn't work ("Failed to set Alsa hardware parameter (snd_pcm_hw_params): Invalid argument") I know it's not a place to discuss vmware problems or old versions of unlocker. So you may just ignore my message.2 points
-
Does this work on ESXi 5.5?2 points
-
Hi InsanelyMacaliens Use this thread to link / talk about of the future Nvidia Web Driver updates for macOS High Sierra. 10.13.6 Nvidia Web Driver - 387.10.10.10.40.140 --> build 17G14042 (thanks to lukazm) New! Nvidia Web Driver - 387.10.10.10.40.139 --> build 17G14033 (thanks to iCanaro) Nvidia Web Driver - 387.10.10.10.40.138 --> build 17G14019 (thanks to TimeLord04) Nvidia Web Driver - 387.10.10.10.40.137 --> build 17G13035 (thanks to fabiosun) Nvidia Web Driver - 387.10.10.10.40.136 --> build 17G13033 (thanks to iCanaro) Nvidia Web Driver - 387.10.10.10.40.135 --> build 17G12034 (thanks to iCanaro) Nvidia Web Driver - 387.10.10.10.40.134 --> build 17G11023 (thanks to TimeLord04) Nvidia Web Driver - 387.10.10.10.40.133 --> build 17G10021 (thanks to phi777) Nvidia Web Driver - 387.10.10.10.40.132 --> build 17G9016 (thanks to iCanaro) Nvidia Web Driver - 387.10.10.10.40.131 --> build 17G8037 (thanks to phi777) Nvidia Web Driver - 387.10.10.10.40.130 --> build 17G8030 (thanks to fabiosun) Nvidia Web Driver - 387.10.10.10.40.129 --> build 17G8029 (thanks to TimeLord04) Nvidia Web Driver - 387.10.10.10.40.128 --> build 17G7024 (thanks to flowrider) Nvidia Web Driver - 387.10.10.10.40.127 --> build 17G6030 (thanks to Extreme™) Nvidia Web Driver - 387.10.10.10.40.124 --> build 17G6030 (thanks to flowrider) Nvidia Web Driver - 387.10.10.10.40.123 --> build 17G6029 (thanks to Badruzeus) Nvidia Web Driver - 387.10.10.10.40.122 --> build 17G5019 (thanks to TimeLord04) Nvidia Web Driver - 387.10.10.10.40.118 --> build 17G5019 (thanks to ReddestDream) Nvidia Web Driver - 387.10.10.10.40.113 --> build 17G4015 (thanks to flowrider) Nvidia Web Driver - 387.10.10.10.40.108 --> build 17G3025 (check here) Nvidia Web Driver - 387.10.10.10.40.105 --> build 17G65 (thanks to sl0wtarget) 10.13.5 Nvidia Web Driver - 387.10.10.10.35.106 --> build 17F77 (check here) 10.13.4 Nvidia Web Driver - 387.10.10.10.30.107 --> build 17E202 (check here) Nvidia Web Driver - 387.10.10.10.30.106 --> build 17E199 (thanks to BreBo) Nvidia Web Driver - 387.10.10.10.30.103 --> build 17E199 (thanks to ricoc90) 10.13.3 Nvidia Web Driver - 387.10.10.10.25.161 --> build 17D102 (thanks to Cyberdevs) Nvidia Web Driver - 387.10.10.10.25.160 --> build 17D2102 (thanks to Cyberdevs) Nvidia Web Driver - 387.10.10.10.25.159 --> build 17D2012 (thanks to cyberdevs) Nvidia Web Driver - 387.10.10.10.25.158 --> build 17D102 (thanks to cyberdevs) Nvidia Web Driver - 387.10.10.10.25.157 --> build 17D2047 (thanks to cyberdevs) Nvidia Web Driver - 387.10.10.10.25.156 --> build 17D47 (thanks to darthsian) 10.13.2 Nvidia Web Driver - 378.10.10.10.25.106 --> build 17C2205 (thanks to KGP-X99) Nvidia Web Driver - 378.10.10.10.25.105 --> build 17C2120 (see this post) Nvidia Web Driver - 378.10.10.10.25.104 --> build 17C205 (thanks to ReddestDream) Nvidia Web Driver - 378.10.10.10.25.103 --> build 17C89 (thanks to Il Francy MacPc) Nvidia Web Driver - 378.10.10.10.25.102 --> build 17C88 (thanks to piiggggg) 10.13.1 Nvidia Web Driver - 378.10.10.10.20.109 --> build 17B1003 (see this post) Nvidia Web Driver - 378.10.10.10.20.108 --> build 17B1002 (thanks to BreBo) Nvidia Web Driver -378.10.10.10.20.107 --> build 17B48 (thanks to piiggggg) 10.13.0 Nvidia Web Driver - 378.10.10.10.15.121 --> build 17A405 (thanks to Asgorath) Nvidia Web Driver - 378.10.10.10.15.120 --> build 17A405 (thanks to phi777) Nvidia Web Driver - 378.10.10.10.15.117 --> build 17A405 (thanks to phi777) Nvidia Web Driver - 378.10.10.10.15.114 --> build 17A365 (thanks to Asgorath).1 point
-
Introduction With Whatevergreen.kext we already have a workaround for the AMD GPU wakeup issue which first arose with the release of El Capitan, but as a workaround is just a second class solution for a problem I decided to trace back the reason for the issue to it's origin and this post is the result of my research. As I used a R9 270X to do my research, which is the only AMD GPU I have, my patch has only been verified to work properly with this chip but according to the information sources I used, I have no reason to believe it won't work on other AMD GPU's too. In case there is still some uncertainty left in a particular point, I will mention this explicitly. Materials Used The Linux kernel sources of the Radeon driver in order to get a better understanding of the GPU's internals: https://git.kernel.org/pub/scm/linux/kernel/git/next/linux-next.git/tree/drivers/gpu/drm/radeon?h=next-20171013 A copy of the ACPI 6.0 specs in order to find out how to dump the chip's control register space. A disassembler, e.g. objdump in Terminal or the trial version of Hopper Disassembler. What I Did As it's been a well known fact that wakeup with AMD GPUs still works with El Capitan and Sierra provided you select the IGPU as primary GPU enabled CSM and use Legacy VBIOS of the AMD GPU in BIOS setup. I was wondering what is different with UEFI VBIOS and decided to I create dumps of the GPU's control register space while using Legacy VBIOS with CSM enabled and while using UEFI VBIOS with CSM disabled in order to find out. Comparing the register space contents it became obvious where the root of the problem lies and how it can be fixed with a DSDT patch. Technical Background Using Legacy VBIOS only the primary GPU is initialized by the VBIOS, i.e. only the IGPU is initialized while the AMD GPU is left untouched. When OS X boots up the framebuffer controller kext will find the AMD GPU in vanilla state, initialize it properly and wakeup will work as expected. That's also the reason why you have to blind boot in this configuration. Using UEFI VBIOS the AMD GPU will be initialized too, provided it has a display connected to one of it's ports. You'll see the BIOS splash screen and will be able to access the BIOS settings but unfortunately macOS's framebuffer controller kext will notice that the GPU has already been initialized and skips the basic setup so that the configuration made by the VBIOS will be used and this is the point where things start to go wrong because this configuration seems to be broken causing wakeup to fail. First of all you have to locate the AMD GPU in your DSDT. In my case it can be found at _SB.PCI0.PEG0.PEGP but it needs to be renamed to GFX0 for AppleGraphicsDevicePolicy.kext (AGDP) to work properly. This can be done manually or using a Clover patch (this is what I did) and I assume that this problem has been already solved before. The reason why I mention it explicitly here, is that you should be aware of it and don't get confused when your AMD GPU has a different name in the DSDT than in IORegistry. Second, we need to get access to the GPU's control register space. According to the Linux sources, PCI Base Address Register 2 (BAR2) is used to address the control register space on Radeon HD5000, HD6000 and HD7000 GPUs. It's a 64bit base address register but newer GPUs (BONAIRE and above, i.e. Radeon HD8000 and HD9xxx) are different as the use BAR5 instead of BAR2. Unlike BAR2, BAR5 is a 32bit base address register. On my R9 270X (PITCAIRN) BAR5 is zero so that I decided to use this as an indication to use BAR2 but I must confess that I haven't checked if it works for all supported GPUs too. In case my patch doesn't work for you, be aware that this might be a pitfall! The Radeon driver's source code tells us that the first display controller engine's registers can be found starting at offset 0x6800. It also tells us a lot about the meaning of the register contents. Using Legacy VBIOS my R9 270X's display controller engine's registers are still at their default values when macOS boots: 00006800 01 00 00 00 08 80 00 0a 00 00 00 00 00 00 00 00 |................| 00006810 00 00 00 00 00 00 00 00 00 00 00 00 00 00 00 00 |................| 00006820 00 00 00 00 00 00 00 00 00 00 00 00 00 00 00 00 |................| 00006830 00 00 00 00 00 00 00 00 00 00 00 00 00 00 00 00 |................| 00006840 00 00 00 00 00 00 00 00 00 00 00 00 00 00 00 00 |................| 00006850 00 00 00 00 00 00 00 00 00 00 00 00 00 00 00 00 |................| 00006860 00 00 00 00 00 00 00 00 00 00 00 00 00 00 00 00 |................| 00006870 00 00 00 00 08 80 00 14 00 00 00 00 00 00 00 00 |................| 00006880 00 00 00 00 00 00 00 00 00 00 00 00 00 00 00 00 |................| 00006890 00 00 00 00 00 00 00 00 00 00 00 00 00 00 00 00 |................| 000068a0 00 00 00 00 00 00 00 00 00 00 00 00 00 00 00 00 |................| 000068b0 00 00 00 00 10 00 00 00 00 00 00 20 00 00 00 20 |........... ... | 000068c0 00 00 00 20 10 00 00 00 00 00 00 20 00 00 00 20 |... ....... ... | 000068d0 00 00 00 20 00 00 00 00 00 20 00 00 00 00 00 00 |... ..... ......| 000068e0 00 00 00 20 00 00 00 00 00 00 00 00 00 20 00 00 |... ......... ..| 000068f0 00 00 00 00 00 20 00 00 00 00 00 00 00 00 00 20 |..... ......... | With UEFI VBIOS the display controller engine's registers look quite different. Using the Linux driver sources you can easily make sense out of these values and will discover that I've got a 4K display connected to my R9 270X which is configured to it's native resolution using 32 bits per pixel. 00006800 01 00 00 00 0a 80 00 0a 00 00 00 00 00 00 00 00 |................| 00006810 00 00 00 00 00 00 00 00 00 0f 00 00 f4 00 00 00 |................| 00006820 f4 00 00 00 00 00 00 00 00 00 00 00 00 00 00 00 |................| 00006830 00 00 00 00 00 0f 00 00 70 08 00 00 00 00 00 00 |........p.......| 00006840 00 00 00 00 00 00 00 00 00 00 00 00 00 00 00 00 |................| 00006850 00 00 00 00 00 00 00 00 01 00 00 00 00 00 00 00 |................| 00006860 00 00 00 00 00 00 00 00 00 00 00 00 00 00 00 00 |................| 00006870 00 00 00 00 08 80 00 14 00 00 00 00 00 00 00 00 |................| 00006880 00 00 00 00 00 00 00 00 00 00 00 00 00 00 00 00 |................| 00006890 00 00 00 00 00 00 00 00 00 00 00 00 00 00 00 00 |................| 000068a0 00 00 00 00 00 00 00 00 00 00 00 00 00 00 00 00 |................| 000068b0 00 00 00 00 10 00 00 00 00 00 00 20 00 00 00 20 |........... ... | 000068c0 00 00 00 20 10 00 00 00 00 00 00 20 00 00 00 20 |... ....... ... | 000068d0 00 00 00 20 00 00 00 00 00 20 00 00 00 00 00 00 |... ..... ......| 000068e0 00 00 00 20 00 00 00 00 00 00 00 00 00 20 00 00 |... ......... ..| 000068f0 00 00 00 00 00 20 00 00 00 00 00 00 00 00 00 20 |..... ......... | The rest was just a little bit of laborious work and trial and error, comparing register contents, understanding their meanings and see what happens when you reset these registers to their default values. If you try to play around with your GPU's control registers a little bit more, be prepared to get a garbled screen for a few seconds. After all I've managed to create a DSDT patch which fixes the wrong registers while preserving screen output during boot and, most important, solves the wakeup issue. The Patch Putting things together I created a DSDT patch to fix the incorrectly initialized registers. With this patch applied, I now have working wakeup with my R9 270X under Sierra (10.12.6) using UEFI VBIOS with CSM disabled in UEFI setup. No kext patches or additional kexts are needed anymore for sleep/wake to work properly with my R9 270X anymore. I can see the BIOS splash screen on my display and can access UEFI setup but the best of all is that there hasn't been a single wakeup issue since I applied this patch. Device (PEGP) { Name (_ADR, Zero) // _ADR: Address OperationRegion (PCIB, PCI_Config, Zero, 0x0100) Field (PCIB, AnyAcc, NoLock, Preserve) { Offset (0x10), BAR0, 32, BAR1, 32, BAR2, 64, BAR4, 32, BAR5, 32 } Method (_INI, 0, NotSerialized) // _INI: Initialize { If (LEqual (BAR5, Zero)) { Store (BAR2, Local0) } Else { Store (BAR5, Local0) } OperationRegion (GREG, SystemMemory, And (Local0, 0xFFFFFFFFFFFFFFF0), 0x8000) Field (GREG, AnyAcc, NoLock, Preserve) { Offset (0x6800), GENA, 32, GCTL, 32, LTBC, 32, Offset (0x6810), PSBL, 32, SSBL, 32, PTCH, 32, PSBH, 32, SSBH, 32, Offset (0x6848), FCTL, 32, Offset (0x6EF8), MUMD, 32 } Store (Zero, FCTL) Store (Zero, PSBH) Store (Zero, SSBH) Store (Zero, LTBC) Store (One, GENA) Store (Zero, MUMD) } } In case you have in-detail questions or need AML code for debugging (code to dump BARs or to dump the GPUs control register space) please let me know. I'm willing to share all my information in order support further research. Below you can find the register dumps I created attached to this post. FAQ Do I still have to select the IGPU as the primary display? No. Although I haven't tried this on my own, user chh1 confirmed that this is no longer required when using the patch (please see http://www.insanelymac.com/forum/topic/328549-tracing-back-the-amd-gpu-wakeup-issue-to-its-origin/?do=findComment&comment=2519884). Nevertheless I still recommend to select the IGPU as primary as there is absolutely no reason not to do so, in particular as the IGPU will be unusable for multimedia acceleration on Haswell based systems when it's not the primary one (IGPU's dev id is different when it's not the primary one). When I boot into macOS I always end up with a black screen. Does your patch solve this problem too? No, it doesn't. This patch solves the wakeup issue, nothin more and nothing less. The black screen after boot is either the result of a connector problem (please create a connector patch for your graphics card using the well-known methods) or the result of a problem with AGPM as certain system definitions (in particular recent iMacs) select special configurations for graphics power management. In order to achieve proper operation of AGPM it is crucial that your GPUs have correct names in the DSDT matching those listed in the AGPM configuration for the system definition (IGPU for the Intel GPU and GFX0 for the AMD GPU on iMac15,1, iMac17,1 and iMac18,x). You may patch your DSDT manually or use a Clover DSDT-patch to fix the device names. Credits vit9696 for developing Whatevergreen.kext and pointing me to the right direction. RehabMan for developing ACPIDebug.kext The Linux Radeon driver kernel developers for providing me with the background information I needed. Legacy.bin.zip UEFI.bin.zip1 point
-
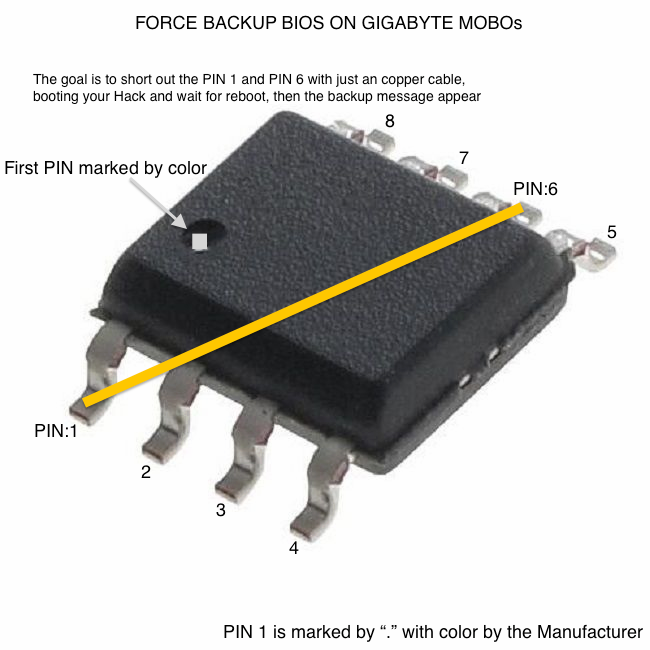
PLEASE READ CAREFULLY THIS GUIDE AS IT'S BEING UPDATED FRECENTLY Notice: THE LATEST ROM's DOESN'T WORK, MANUFACTURER FOUND TRICK FOR THAT BIOSES TO BE CORRUPTED AFTER MODIFICATION Guy's, please, you have to be responsible for your machine as in the same way you want to Hackintosh,but never hurry up to manufacturers technical support, because they can find that files on the M_BIOS, so they do more complications to find our how to hack! Assume that you're aware about to do a bios hack on protected ROM, assume that if something goes wrong. You have to find how to solve the problem, if brick by yourself, search for a solution to help, but never go to the manufacturer! And finally read carefully the guide, i have here, all the things for you, to make your hack ready. So don't forget some steps to lack at some point! Again don't use latest bios updates, just use MMTool the latest supposed to work with 100 Series, and UEFITool. I added to the repository MMTool, to update CPU Microcodes that are important since last CPU Vulnerability! I've tested Z170 chipset and i confirm that it work, but to be in ROM: - Do not try on 64 Mbit chip, because simply it will not let you insert up to 3 files, so don't - Your board must have 128 Mbit chip - Do not change the name of ORIGINAL ROM file that need to be modded, do just save and not save as! - Use UEFITool for replacing modules body and use only save (overwrite that ROM) and not save as! Space on the ROM is more than available on 128 Mbit, and to flash you need FPT-DOS files for 100 Series and do it with USB bootable So you have to decompress "Setup" driver, as we do with CORE_DXE. Once done, you can insert other drivers using MMTOOL or UEFITool and insert them one by one, the first need to be the first the second need to be the second and etc... I'll attach that files one by one for FFS extension: AcpiPatcher and KernextPatcher have to be in the top of the nested Volume, as they are absolutely needed before other drivers get loaded, same thing should happen if on ESP, so one for dropping OEM _DSM, devices rename and the other for Kernel and Kexts to patch. -The oficial UEFTW Patchers from @cecekpawon are available in GitHub repos here these drivers aren't posted here, because of frequently updated, so i have to do that on each update, i prefer to put link for user own download and to get more informations about that tools and for proper knowledge. 1- Btrfs.ffs.zip 2- EXFat.ffs.zip insert it after Btrfs 3- EmuVariableUefi-64.ffs.zip insert it after EXFat and Before HfsPlus 4- HfsPlus.ffs.zip Updated Drivers 1,2,3,4 have to follow the patchers on the Top of the nested Volume 5- HermitShellX64.ffs.zip 6- FakeSMC 234f2 FFS.zip For i7 CPU's 7- FakeSMC 233f10 FFS.zip For i5 CPU's 8- InjectorCompress (Rev1.3).ffs.zip 10 Series [8086:A102] ready, for 20 and 30 Series you need to add it by yourself 9- HorizontalTheme.ffs.zip 10- OzmosisDefaults.ffs.zip - OzmosisDefaults.plist.zip iMac17,1 Full example 11- Ozmosis.ffs.zip High Sierra @cecekpawon version a- Ozmosis.ffs.zip Mojave @TypeThree version b- KernextPatcher.ffs.zip Mojave version but the plist work by @TypeThree, to put on the top of the nested volume with the AcpiPatcher UEFITool Releases page Working Directory: 100 Series.zip IMPORTANT - Now because iMac17,1 uses 2 different SMC's for i5 and i7, edit your already FakeSMC or download the 233f10 if you have i5 and 234f2 if you have i7 - Keep you updated about editing SMBios here - If you got only one error while you're inserting the files on the ROM, don't save it, or don't use it, you don't have to see any error at all Ozmosis related Options: Start-up HotKeys ================ 'Function' || 'Shortcut' || 'Notes' ===================||======================||========= Disable Ozmosis || Escape || Press at start-up, screen will flash red to indicate Ozmosis is disabled. Reset NVRAM || Option+Command+P+R || From F12 menu, Ozmosis GUI, Shell or BIOS Setup. Start Ozmosis GUI || Option/Home || It can be controlled with mouse only for now. Safe Boot Mode || Shift || Verbose Mode || Command+V || Single-User Mode || Command+S || 32 Bit Boot Mode || 3+2 || Start Up In 32 Bit Mode 64 Bit Boot Mode || 6+4 || Start Up In 64 Bit Mode Mac/PC Keyboard Legend ====================== 'Mac' Key || 'PC' Key Option || Alt Command || WinLogo Added the ability to control graphics and audio injection using NVRAM variables, complete list of variables: Default Settings 1F8E0C02-58A9-4E34-AE22-2B63745FA101 ====================================================== 'Key' || 'Value' || 'Note/Example' ==============================||=========||================================== AcpiLoaderMode || INTEGER || Control ACPI Loader UserInterface || BOOLEAN || Display User Interface/GUI TimeOut || INTEGER || Time-out In Seconds DisableAtiInjection || BOOLEAN || De/activate ATI GFX device property injection AtiFramebuffer || STRING || Name of the specific ATI framebuffer DisableNvidaInjection || BOOLEAN || De/activate Nvidia GFX device property injection DisableIntelInjection || BOOLEAN || De/activate Intel GFX device property injection DisableVoodooHda || BOOLEAN || Disables loading VoodooHDA from firmware EnableVoodooHdaInternalSpdif || BOOLEAN || Enable/Disable onboard S/PDIF header when using VoodooHDA from firmware DisableBootEntriesFilter || BOOLEAN || Disables filtering of firmware generated boot entries AAPL,snb_platform_id || INTEGER || AAPL,ig-platform-id || INTEGER || BootEntryTemplate || STRING || $label $guid DarwinDiskTemplate || STRING || $label $platform $major $minor $build DarwinRecoveryDiskTemplate || STRING || $label $platform $major $minor $build Examples: ========= !! Note on VoodooHDA, it covers ONLY the onboard codec and is enabled for the moment only for ALC892/ALC1150 !! !! For discrete graphics HDMI/DP audio AppleHDA is used instead. Those who use internal GPU (IGPU) only will !! !! have to disable VoodooHda and use AppleHda for HDMI/DP audio !! To Disable loading VoodooHda.kext from Firmware sudo nvram 1F8E0C02-58A9-4E34-AE22-2B63745FA101:DisableVoodooHda=%01 To Enable loading VoodooHda.kext from Firmware sudo nvram 1F8E0C02-58A9-4E34-AE22-2B63745FA101:DisableVoodooHda=%00 Changing ATI Framebuffers ========================= sudo nvram 1F8E0C02-58A9-4E34-AE22-2B63745FA101:AtiFramebuffer=Futomaki Or based on VendorSubsystemId sudo nvram 1F8E0C02-58A9-4E34-AE22-2B63745FA101:AtiFramebuffer10029440=Futomaki Or based on pci addressing sudo nvram 1F8E0C02-58A9-4E34-AE22-2B63745FA101:AtiFramebuffer00.01.00=Futomaki Changing AAPL,ig-platform-id ============================ sudo nvram 1F8E0C02-58A9-4E34-AE22-2B63745FA101:AAPL,ig-platform-id=0x01620005 Changing AcpiLoader Mode ============================ Add The Following Values Together For Default Acpi Loader Mode ACPI_LOADER_MODE_DISABLE 0x00000000 ACPI_LOADER_MODE_ENABLE 0x00000001 ACPI_LOADER_MODE_DUMP 0x00000002 ACPI_LOADER_MODE_WINDOWS 0x00000008 ACPI_LOADER_MODE_UPDATE_LEGACY 0x00000040 Default Value : ACPI_LOADER_MODE_ENABLE | ACPI_LOADER_MODE_DARWIN | ACPI_LOADER_MODE_UPDATE_LEGACY = 0x45 To Change sudo nvram 1F8E0C02-58A9-4E34-AE22-2B63745FA101:AcpiLoaderMode=0x45 Note: They can also be controlled by using Defaults.plist placed on boot hard-drive efi system partition and path is /EFI/OZ/Defaults.plist, see bellow for example. WARNING! Defaults.plist will override the one found in firmware and values are used only if variables are not already added. For example if you want to set BiosVersion using Defaults.plist and was already set by Defaults from Firmware, you will need to do a 4 finger NVRAM reset or delete the BiosVersion variable from shell, for the new one to be used. Default Settings Example of Modifications on Defaults.plist =========================================================== // If AcpiLoaderMode NEEDS to be changed, change second line, put desired value, then add both line in Defaults.plist <key>AcpiLoaderMode</key> <integer>0x45</integer> // If UserInterface NEEDS to be enabled on every boot, change second line and set to true, then add both line in Defaults.plist <key>UserInterface</key> <false/> // If TimeOut NEEDS to be changed, change second line and put desired value in seconds, then add both line in Defaults.plist <key>TimeOut</key> <integer>5</integer> // If DisableAtiInjection NEEDS to be enabled, change second line bellow and set to true, then add both line in Defaults.plist <key>DisableAtiInjection</key> <false/> // If AtiFramebuffer NEEDS to be changed, modify second line bellow and set to correct one, then add both line in Defaults.plist <key>AtiFramebuffer</key> <string>ReplaceMe</string> !! WARNING DisableAtiInjection needs to be set to false to function !! // If DisableNvidaInjection NEEDS to be enabled, change second line bellow and set to true, then add both line in Defaults.plist <key>DisableNvidaInjection</key> <false/> // If DisableIntelInjection NEEDS to be enabled, change second line bellow and set to true, then add both line in Defaults.plist <key>DisableIntelInjection</key> <false/> // If AAPL,snb_platform_id NEEDS to be changed, change second line bellow and set to correct one, then add both line in Defaults.plist <key>AAPL,snb_platform_id</key> <integer>0x00030010</integer> !! WARNING DisableIntelInjection needs to be set to false to function !! // If AAPL,ig-platform-id NEEDS to be changed, modify second line bellow and set to correct one, then add both line in Defaults.plist <key>AAPL,ig-platform-id</key> <integer>0x0166000A</integer> !! WARNING DisableIntelInjection needs to be set to false to function !! // If DisableVoodooHda NEEDS to be enabled, change second line bellow and set to true, then add both line in Defaults.plist <key>DisableVoodooHda</key> <false/> // If EnableVoodooHdaInternalSpdif NEEDS to be enabled, change second line bellow and set to true, then add both line in Defaults.plist <key>EnableVoodooHdaInternalSpdif</key> <false/> !! WARNING DisableVoodooHda needs to be set to false to function !! // If DisableBootEntriesFilter NEEDS to be enabled, change second line bellow and set to true, then add both line in Defaults.plist <key>DisableBootEntriesFilter</key> <false/> You don't have to put Fat or PartitionDxe, or EnhancedFat or Extfs! EmuVariableUefi-64 is needed on some Mobo's that have NVRAM writing problem you will have to insert OzmosisDefaults.ffs already ready (must suitable), do the UEFITool at your own risk for only replacing it's RAW body! For flashing the 128 Mbit chip here's the files and how to: 1- Make USB Bootable with RUFUS soft and choose DOS files from the attached zip 2- Copy a whole of files inside the provided zip and paste them into that USB you just created 3- Save a backup ROM using @BIOS 4- Rename your Ozmosis BIOS ROM to bios.bin and copy paste it to the USB 5- Reboot and press F12 to select booting from USB, wait until all the steps finished FPT files are for GIGABYTE Z170 only fpt_DOS-Z170.zip As some 64Mb Mobo ROM's, you'll have to setup the BIOS: - Windows 8/10 WHQL - CSM Disabled - I/O Ports disabled - Super I/O disabled - HPET to disabled - VT-D disabled Here's the efi files for who want to try on Efi\Directory: - EmuVariableUefi-64.efi.zip - EXFat.efi.zip - HfsPlus.efi.zip - Ozmosis.efi.zip - BOOTX64.efi.zip - Defaults.plist.zip iMac17,1 - HorizontalTheme.bin.zip - FakeSMC 234f2 Kexts.zip - Injector (Rev1.3).kext.zip 10 Series [8086:A102] ready - Ozmosis.efi.zip KernextPatcher.efi.zip KernextPatcher.plist.zip Mojave @TypeThree version "they absolutely have to be used together in order to work otherwise fail" Installation inputs: * Your hd must be the first bootable: Disk0 1- Register drivers: a- From F12 boot menu select (UEFI OS) b- fs0: c- cd efi d- bcfg driver add 1 HfsPlus.efi "HfsPlus" [choose what driver to add after HfsPlus as a second 2 and third 3 etc...] You can choose at any time to change that order from bios setup 2- HDD: In some cases, when you open Disk Utility the drive that need to be Formated to install macOS on it doesn't appear, so you have to close Disk Utility go to the Main install screen and then go back to Disk Utility, now you should see the drive 3- ACPI (DSDT or SSDT's) Patched DSDT or some SSDT's are needed in order to reach both the Installation and the post Installation, but you have to care about that this will be Motherboard and/or Manufacturer specific, i'll do it for GIGABYTE boards as it's simple to do it as always # Multiple SSDT: DTGP.dsl.zip - GfxSsdt.dsl.zip - GpuSsdt.dsl.zip - HdfSsdt.dsl.zip Please modify with your ALCXXXX Codec name, Codec-ID and Layout-id desired - LanSsdt.dsl.zip - MeiSsdt.dsl.zip - SatSsdt.dsl.zip - UsbSsdt.dsl.zip They are build with MaciASL 1.4(269) using iASL: 5.0A-20131218 but you can open them with later version and save them # DSDT & SSDT's: - Under GBTBoardSMI module, there are a list of all ACPI Freeform modules that contain them on raw format, it start with DSDT, you just need to extract them as .aml and start patching as you like. - GIGABYTE compiled them with iasl 20160422, so you can start patching them with that compiler version from RehabMan bitbucket MaciASL-2016-0423 and RehabMan bitbucket MaciASL-20161210 which is the same one. [Thanks to RehabMan] - Use UEFITool for only replacing that raw body and overwrite that rom once you finished replacing the ACPI files, don't use save as, always save (overwrite) that rom GIGABYTE 100 Series 128 Mbit Chip repository: This repos will contain only last revision and version for 128 Mbit ROM's with all required files "except AppleALC" on EXTERNAL LINK due to files size, but it require time! If you need to change any FakeSMC or other kexts then you just have to replace them using MMTool, but care that they have GUID number, so you can use cecekpawon yod-KextToFfs.sh , drag your kexts with others by order, in order to have the same GUID number Dropbox Repos ROMs added: GA-Z170X-ULTRA GAMING.F23g GA-Z170X-UD5 TH F22d GA-Z170X-UD5 TH F23f GA-Z170X-Designare F23d GA-Z170MX-Gaming 5 F22c GA-Z170X-Gaming 7 F22i GA-Z170X-Gaming 7-EK F22i GA-Z170X-Gaming 7-EU F22i GA-Z170X-Gaming 6 F23c GA-Z170X-Gaming 5 F23c GA-Z170X-UD3 Ultra F23e GA-Z170X-Gaming GT F22c GA-Z170X-SOC FORCE F20i PLEASE SHARE YOUR SUCCESS HERE FOR OTHERS Here's video tuts: Insert Ozmosis and stuffs on the ROM: FakeSMC SMC update: ACPI Patching on the ROM is the next video, but it need time Quick look-up for GIGABYTE BIOS CHIP: Sorry guys, if it not worked for you, check again what you missed, so remember to not skip some steps! I'm currently updating this guide, more steps or files or tweaks will be added CREDITS: InsanelyMac, The HermitCrab Labs, @Allan, @xpamamadeus, @THe KiNG, @CodeRush, @MaLd0n, @cecekpawon, @TypeThree, @crusher., @Slice, @STLVNUB, @RehabMan, @vit9696, @Mieze, @Rampage Dev, for any kind of help "Tools, rom, kexts, knowledge".... MMTool.exe.zip
 1 point
 -
We are so exciting about this new update. Now we implement all the new features in our Forum. So, if the Forum are a bit slow, please be patience, our Admins are doing a great and hard (very hard) job to keep the Forum amazing as always. View full article1 point
-
Anyways i have a result with just obtained kernel panic for netinstall case of only high sierra. But i don't know it should be commit or not for future and development.1 point
-
Yeah that will suffice but you can also apply thermal pads to the VRAMs of the GPU. check this link. These are the best thermal compounds out there.1 point
-
I forgot the most important part hhh , CPU Thermal paste is enough to go for or should i need specific one?1 point
-
Usually a Philips screw driver will suffice, no soldering is require unless you yank out the GPU die accidentally You can also use rubbing alcohol with a pice of a cotton cloth to clean the old thermal paste. There are plenty of guides on youtube that you can check before performing the disassembly of your GPU. doing that will void your guarantee if it's still valid for your card, just be careful when you want to remove the heatsink. Disconnect all the cables gently and then remove the heatsink, if it doesn't come out gently you might need to check for more screws to unscrew then remove the thermal paste from the GPU die and the heatsink itself and apply the new thermal paste and re-assmble the heatsink. Just one more thing to consider is the ESD (Electrostatic Discharge) in your body. You need to release it before touching the PCB of your GPU and the VRAMs.1 point
-
Well the artifacts mostly happen due to a faulty VRAM and/or overheating and it's never a good sign. What you can do is to make sure that the GPU gets enough air to cool down or just change the game settings to lower resolution. I had an AMD R9 390X GPU which was a monster of a GPU but it had the same issues specially when I was playing games so I had to return it. The question is if the artifacts happen only in macOS or they appear in windows as well? You can also check the thechowerup.com for the lates GPU VBIOS. Addition: To make the GPU run cooler you can change the thermal paste as well but you have to take apart the GPU and clean it very carefully and then re-apply a new thermal paste. It can be risky specially cleaning the old thermal paste which tents to Harden over time and if you're not careful while removing it you might accidentally damage the GPU Die or the VRAMs.1 point
-
Yes i agree with what you said, what i did for my G-Card, i just contacted support of SAPPHIRE requesting a VBIOS, so they sended the latest one, and it do it's own job, never have had problem with that card on OS X, i just have some artifact while playing games for about 2 hours and up, but when playing most recent games, it do it definitely @ 20 minutes, and i don't know how to fix that problem It's an PowerColor and not XFX, take a look at the post that linked eBay, you'll see that it had a Mac EFI modded ROM for real Macs1 point
-
Thanks man it's awesome1 point
-
Without any injection the GPU will be detected as AMD 7xxx Series which is because of the AMD Radeon default Framebuffer and as you mentioned it is only cosmetic and I use clover's on the fly patch to correct the name, you can achieve the same goal by using a patched DSDT/SSDT or by using the WhateverGreen. Although using WEG has it's benefits such as fixing the sleep/wake issue and the correct connectors management.1 point
-
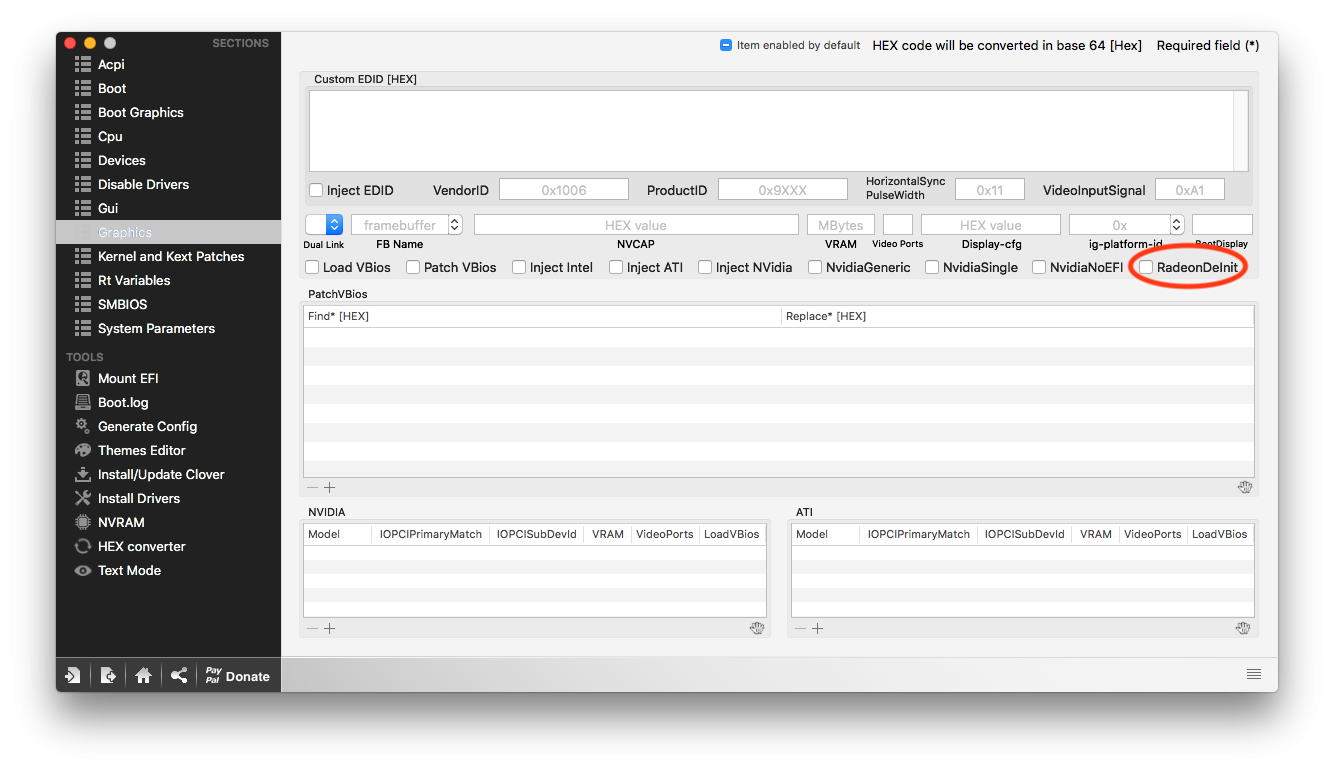
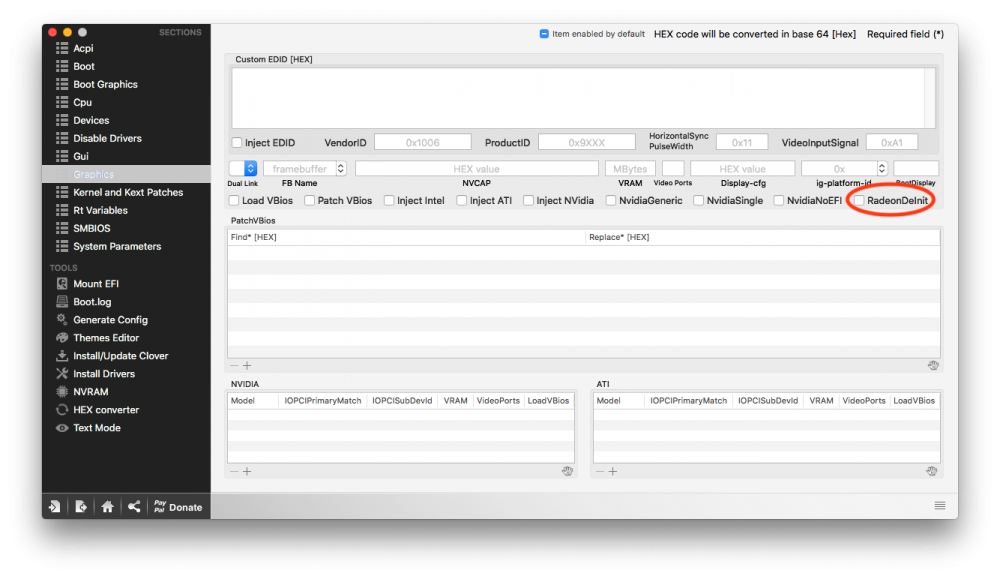
You can use clover configurator to open the config.plist and under the graphic section there's a RadeonDeInit flag or open the config.plist and add the following code to under the Graphics section: <dict> <key>RadeonDeInit</key> <true/> </dict> You might need to update your clover to the latest version because RadeonDeInit won't work in clover revisions prior to 4296 if I remember correctly.
 1 point
 -
I am not used USB for that I install to another macOS SSD Direccly
 1 point
 -
1 point
-
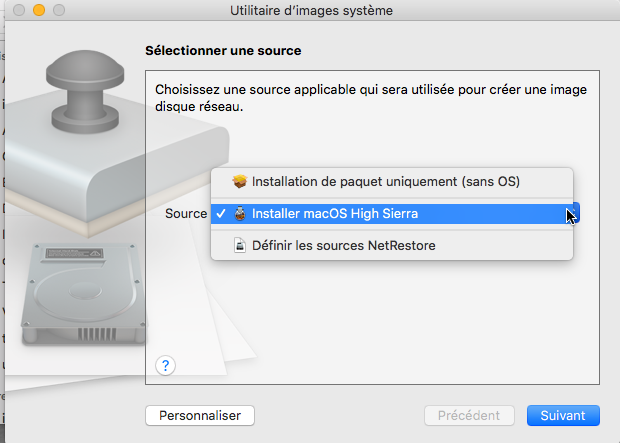
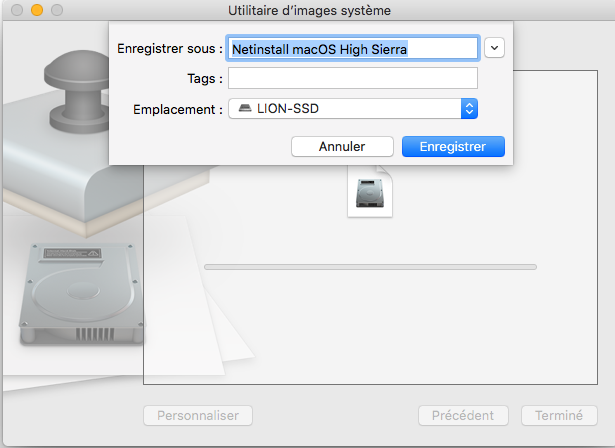
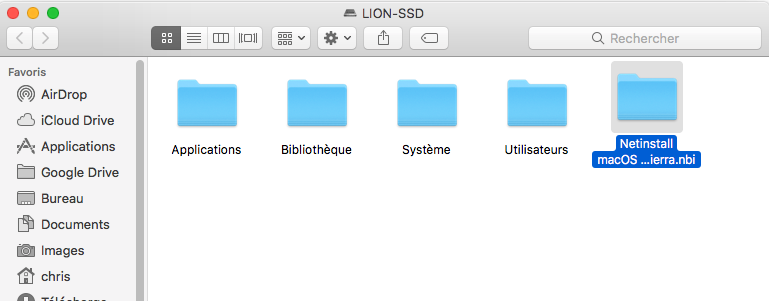
Go to System /Library /CoreSerices/Applications/ System Image Utility.app
 1 point
 -
I removed the arbitrary entries from config.plist.. hot swap works perfectly without ..1 point
-
All work fine here with version 0.76.7b Posted by Blackosx August, 23 in this topic1 point
-
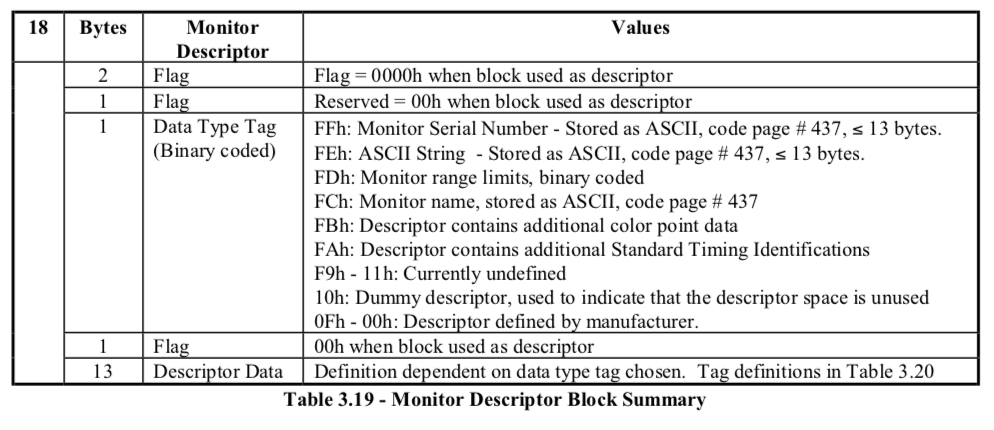
72 bytes looks just the same to me, Ok just define one additional struct for all the four blocks (or an array of structs). edk2 only parse the "Standard Timing Identification" maybe for a good reason for their purpose. Thanks for testing. As soon as I finished the new code I need more tests1 point
-
Guide update to 10.13.4 SU (17E202) New EFI Folder linked and implemented in the guide Enjoy and have fun,

 1 point
 -
Yeah the kexts were loaded but no framebuffer attached. I'll post an ioreg later after work. Edit: I've attached the IOReg with the device ID added to the AMD kexts. Shaneee’s Mac Pro.zip1 point
-
HWMonitor2 v2.1.0rc3:1 point
-
EDK2 is not right. DetailedTimingDescriptions = 4 * 18 - four structures size 18 Full description in http://read.pudn.com/downloads110/ebook/456020/E-EDID Standard.pdf
 1 point
 -
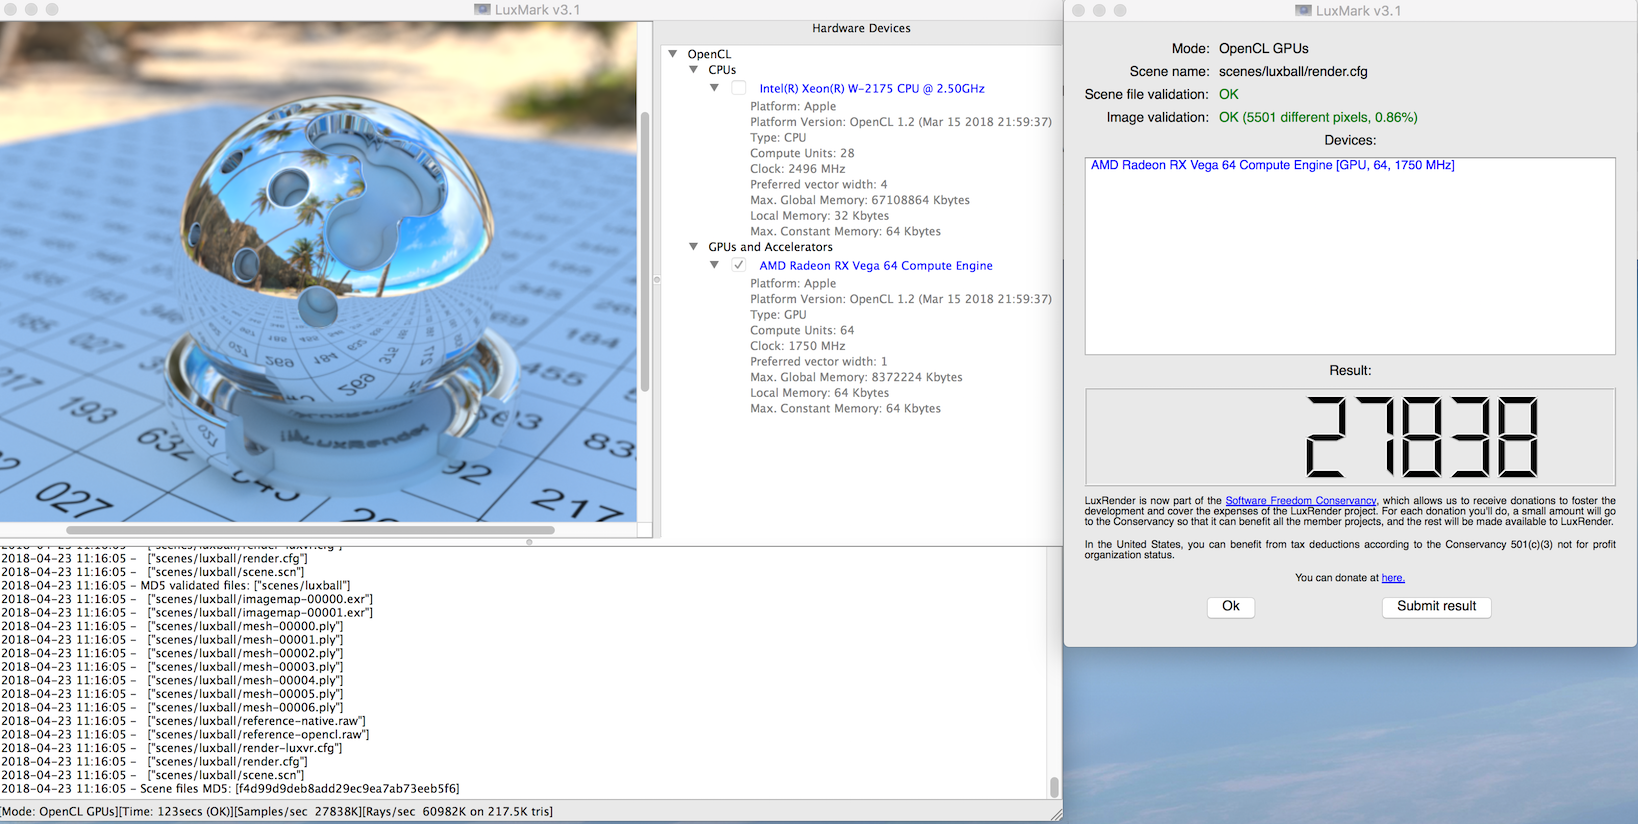
I also tested with my Vega 64 in the mix and it crashed the system. I think it loaded the drivers but conflicted with the integrated graphics and panicked. In verbose I could see the 5000kext and 1000controller loading before the crash.1 point
-
https://www100.zippyshare.com/v/bXi8t5Ri/file.html1 point
-
No embedded@2k1 point
-
You has installed IntelGraphicsFixup.kext and lilu.kext ?1 point
-
Recently i am having some issue with screen flickering...i had this in past but rarely came....but now its everyday issue... so plz anyone help me... and here the flickering video link.... https://drive.google.com/open?id=1UIb93QYPDNT195-rEXZ9tfP3eq12lcZZ
 1 point
 -
Thank you, thank you, thank you!! I've been trying to reinstall Sierra on my Hackintosh for months but finally succeeded by using this link. I can't believe it. I'll delete the Chopintosh install in a few days after finalizing this install.1 point
-
MaLd0n i created my hackintosh but at pci device not show up all device, can help me to makae DSDT My hackintosh specification: ASUS Z270 MAXIMUS IX CODE BIOS 1301 Core i5 7600K overclock 4.8Ghz Memory 16GB AMD RADEON RX 560 Use pci card broadcom wifi & bluetooth DSDT and clover compile RunMe.app1 point
-
This is as far as I can get with the AMD kexts and the device ID added. They load but the frame buffer isn't loaded. I've tried loading all 7 frame buffers included in the X1000 kext with no luck. From the tests Gigamaxx did there seems to be more luck spoofing as Intel graphics there. More support may come from integrated Vega though, hard to tell.1 point
-
Cannot edit first post to change the link, not sure why. Feel free to modify it, I completely recreated the icons by tlock and made some minor changes other than making the icons a little different. iconverticons.com helped a lot with getting the icns files to actually show up during boot, which for some reason did not work using terminal and sips command. Final theme. https://www.dropbox.com/s/vm1qowrx9uz5sma/msi.zip?dl=0 Screenshot: https://www.dropbox.com/s/5doeoxoou6ce9io/screenshot.png?dl=01 point
-
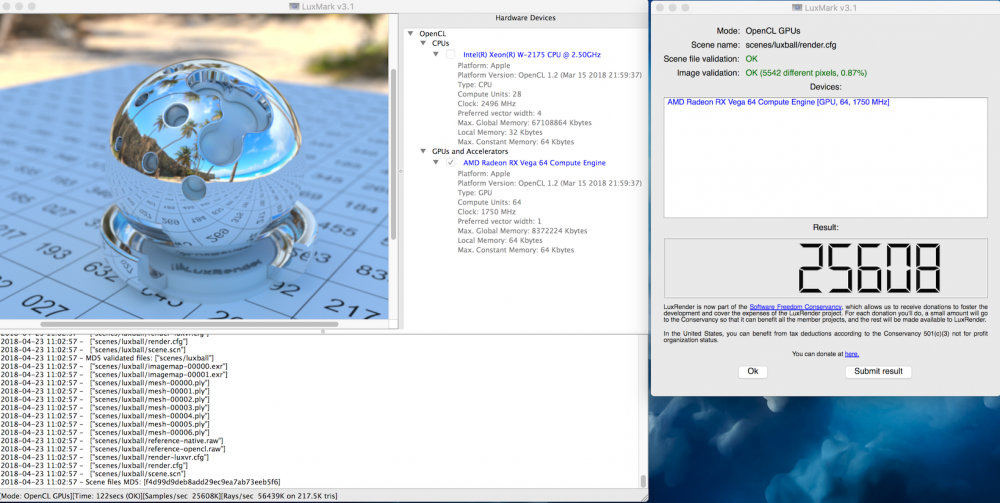
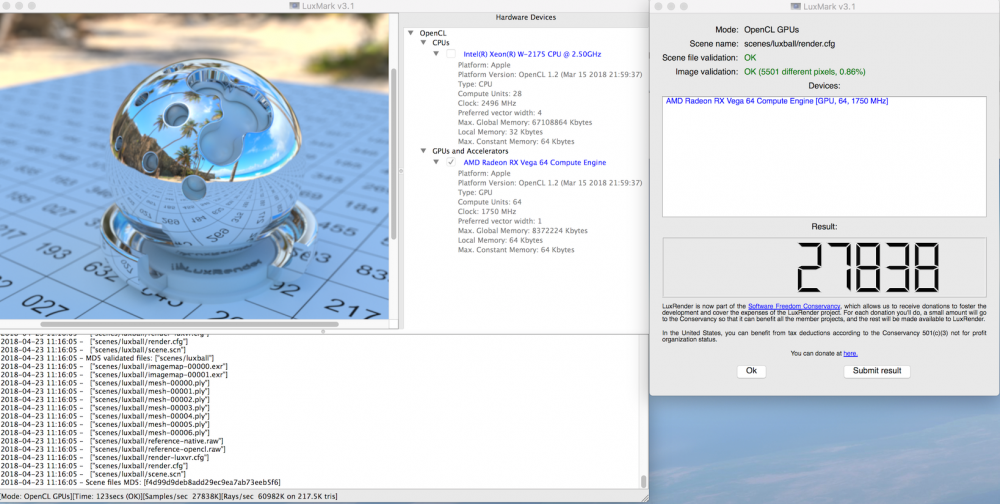
Used your patch on my Vega 64 Liquid with no problems and increased performance. The fan for the cooler is a little more noisy but that's not a big problem.
 1 point
 -
Prova la penultima versione v2.9.9.21 point
-
I have small script to share with you guys to extract Apple efi driver(s) from bios file (FirmwareUpdate.pkg / bit outdated repo). https://gist.github.com/cecekpawon/e38bda384ff115f09e638482849deb2d Please re-adjust the values below: // Bios filename $FF = "MBP143_0169_B00.fd"; // LongSoft UEFIExtract filename $UEFIExtract = "UEFIExtract"; // Array of drivers to extract (guid - label) $aUEFIExtract = array ( array ("35628CFC-3CFF-444F-99C1-D5F06A069914", "EfiDevicePathPropertyDatabase"), array ("961578FE-B6B7-44C3-AF35-6BC705CD2B1F", "Fat"), array ("AE4C11C8-1D6C-F24E-A183-E1CA36D1A8A9", "HfsPlus") );1 point
-
1 point
-
I can confrim that if you add -no_compat_check flag on Clover custom boot args, then hardware compatibility check is bypassed and can be booted fine macOS sierra by using MacBookPro5.1 SMIOS. Otherwise I got an error at boot time: This version of Mac OS X is not supported on this platform Reason: Mac-F42D86C8 Boot arg -no_compat_check will fix it.1 point
-
Great software, thank you very much. I purchased Snow Leopard 10.6.3 and used it with Windows 7 Pro SP1, VMWare Workstation 11.1.2 and Unlocker 2.0.6. I followed the included instructions and had the following problems. When I first created the VM the OS install was failing at the start with "Not a server" or similar message from OS X. I added both efi64.filename = "efi64-srvr.rom" and smc.version = "0" to the .vmx file. After that I progressed to the error "A virtual CPU has entered the shutdown state". OS X 10.6 wasn't available as an option while creating the VM so I had selected 10.7 as the closest. This left me with an entry in the .vmx file of guestOS = "darwin11-64". By changing that to guestOS = "darwin10-64" I got past that error. After that I kept using the Apple Software Update check until I got to OS X 10.6.8 and no more updates were available. At that stage I installed OS X 10.10.4 from the App store. That worked fine so I installed VMWare tools. Hopefully these additional steps will help someone. Lovely job, thanks again.1 point
-
What are the chances of this being updated to work on esxi 6? Is it being worked on? Is it impossible?1 point
-
Hi, today i have upgrade the VmWare Player v.7.0 to v7.1 (installed on WIN 8.1 Notebook), after i run the Unlocker 2.0.4. But when i try to start the Virtual-Machine (OSX Yosemite) dont work and a message error the vmware player displayed : "Could non get vmci driver version : Handke non valid. You have an incorrect version of driver VMCI.sys. Try reinstalling VMware Player. Module DevicePowerOn power on Failed. Failed to start the virtual machine" Samepeople have the same problem when upgrade the VMware Player to V7.1? Help, I need the files into the virtual machine.1 point