Leaderboard


Popular Content
Showing content with the highest reputation on 04/18/2018 in all areas
-
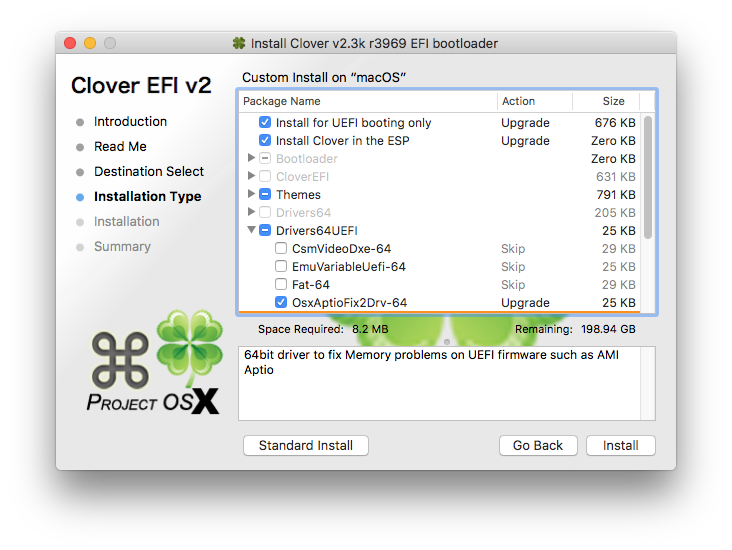
Rev 4442 All Clover utility and prePane will be 64 bits since now. We are waiting 10.14 without 32 bit support.5 points
-
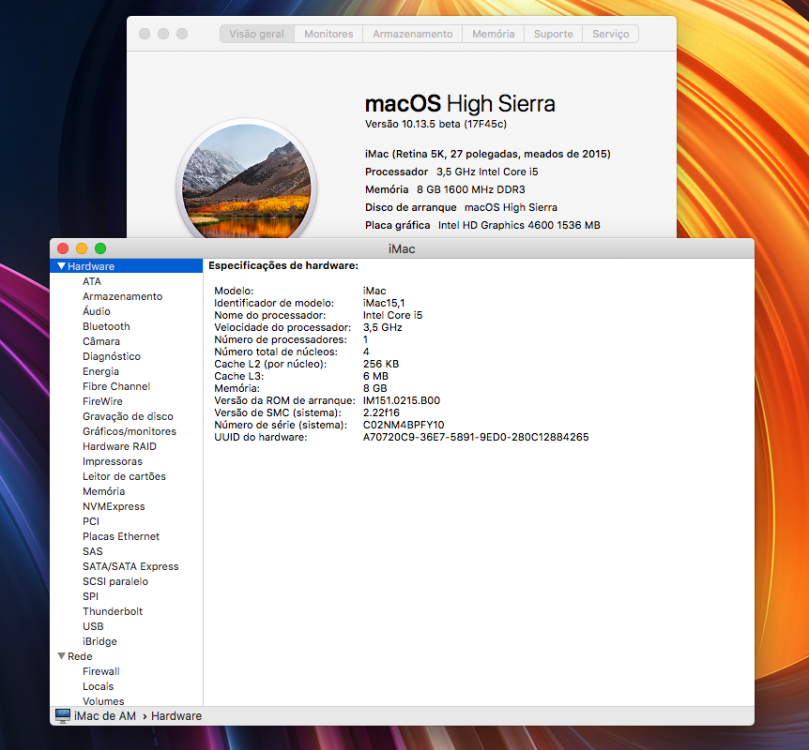
After a first typo with macOS 10.13.4(17E189) last April 02, now we have macOS High Sierra 10.13.5 beta 2 (17B45c)3 points
-
NVIDIA Alternate Graphics Drivers for macOS 10.13.4 (17E199)https://images.nvidia.com/mac/pkg/387/WebDriver-387.10.10.10.30.106.pkg3 points
-
Since now the CloverUpdater will be 64 bits application. Will check others utilities.3 points
-
New update! I am able to get the hotplug using only one SSDT! However always and only the first device is hotpluggable. I imagine then there may be errors and optimizations to do (I'm not at all expert in this ). SSDT-TB3.aml.zip If not work, add this entry (only the first) on clover (UPSB address): Reboot, remove the Arbitrary inject and reboot again. Here is my IOReg with this SSDT. I do not know if the USB-C works because I have such devices, but hopefully we can implement it later. IOReg: TB3 Partial-Hotplug.zip @Loloflat6 GC-Alpine Ridge is identical to Asrock, in fact it has 2 Thunderbolt 3 ports and no USB 3.1 port on the card
 2 points
 -
9380, native card xD2 points
-
Nice job ! I will take a look this evening . On my rig the port@11000 is working with one USB C and one USB 3.1 : i will do some test and attach my IOreg as you done. The Asus TB3 have one USB C and one USB 3.1 ports , the Gigabyte Alpine Ridge have 2 x USB C and 2 x USB 3.1 ports : So we will try to find a way to have your both ports working with Hot-plug , not easy but interresting.2 points
-
I have set up the SF wiki: https://sourceforge.net/p/cloverefiboot/wiki, if you are a member of the project you can already edit. If you would like to edit it please ask and I will give you permission to edit. Is there any one willing to port and update the wiki from here (https://clover-wiki.zetam.org/Home) ?2 points
-
Version 1.9
6,594 downloads
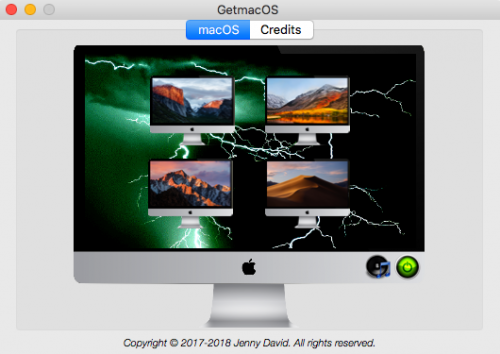
A tool that searches Appstore for missing macOSes. Every year when a new macOS is released, the older ones get missing in Appstore. Making the Appstore's search button completely useless! For example, if you are searching for Sierra or El Capitan now, you may NEVER find it anymore using the search button. As a result, this tool was developed to resolve that issue. Here's an app that communicates with Appstore and allows you to download your desired vanilla macOS (even the older ones). GetmacOS.mov Have a great day and enjoy the tool. Credits: Talat A. Ozcan ~ Outstanding app icon designs. Cyberdevs ~ App's termination code1 point -
Hey guys and gals, Just found this article about how the Linux team discovered a vulnerability in almost all Intel CPUs. Both Windows and Linux are rolling out an update that will decrease all Intel CPUs performance by at least 17% if not up to 25%. Unsure what the macOS timeline is. It has to do with being able to inject code from mundane places by exploiting the speculative instruction feature that attempts to guess what instructions will be coming next in the pipeline to gain access to the kernel memory. There is no security check when this happens apparently and seems like a pretty big deal as the problem appears not to be able to be fixed in hardware at all as Intel says the issue cannot be fixed with a microcode update. https://www.theregister.co.uk/2018/01/02/intel_cpu_design_flaw/ EDIT: This is one of my favorite lines: EDIT2: The scale of this is immense, looks like half the worlds computers might have this vulnerability. They literally have to update the entire Azure, AWS, and GCE clouds because of this. EDIT3: This can be used to cause a virtual machine to bypass the hypervisor mode of the CPU and gain access to the kernel mode of the host machine!!! OMG this is a very very bad vulnerability. EDIT4: I also see reports that some older Intel CPUs may take a performance hit of 30% or more. EDIT5: The performance hit depends on the IPC of the CPU, the presence of CPID feature, and the amount of instructions supported by the CPU since the more instructions, the more the speculative instruction feature includes exceptions/undocumented instructions that can be exploited. EDIT6: For reference, IPC for specific CPUs models.1 point
-
I'm considered lenovo ideapad. Not sure whitelist in bios to replace broadcom wifi card to use wifi. If can replace wificard without modded bios, its good product. But still if it has a whitelist, i'm not consider lenovo laptop. Because I don't like usb type wifi. Thank you so much To users, sorry off topic for conversation. Thanks 나의 LG-F800S 의 Tapatalk에서 보냄1 point
-
From what I have seen and read, there has already been someone who appears to have succeeded! (video link). There is more info on this QCA in competition forums. But honestly, I did not dare to test some of the hypotheses presented, namely with ROM modding since they seem to me risky. https://youtu.be/XMNK3BP-bII https://www.insanelymac.com/forum/forums/topic/299732-atheros-9k-series-rom-modding-tools-and-recovery-kit/ For Lenovo for now, a viable and inexpensive option is this... https://www.tp-link.com/br/products/details/cat-11_TL-WN725N.html1 point
-
Almost couldn't believe my eyes first! But... SUCCESS FOR ME!! Used this SSDT and just hotplugget my Focusrite Clarett 4Pre multiple times, tried both turning on and off the device and pulling the thunderbolt cable out and in. The ioreg shows red when disconnected and green when reconnected. WOW! I have a GB Z270x Gaming 5 with a GB Alpine Ridge Rev 1.0, Strange this is that after sleep the device don't disconnect properly and is unusable, so strange! And sleep with TB is the main thing I'm after lol! Any ides about it not working when waking from sleep. It seems in the ioreg that it doesn't disconnect properly when going in to sleep, bios related?1 point
-
MaLd0n, thanks for the DSDT, I'm gonna try it asap! Meanwhile, would you try to patch this one? ASUS Rampage V Extreme (latest unlocked bios) Intel i7 5820k gigabyte GTX 980 OC 4GB SSD 850 evo Asus thunderboltEXII DeckLink Mini Monitor PciExpress video acquisition card FireWire card PciExpress High Sierra 10.13.4 fresh install Her are proper files. Thanks https://www1.zippyshare.com/v/aAIEJl8G/file.html1 point
-
Rev 4443 - 4444 Clover correctly recognized the name of all Mac OS series Mac OS X/OS X/macOS and type of macOS installation too.1 point
-
i dont think so, the driver is quite old and i failed to create a version improved for more recent mac os versions and inputs on that does not works too and the only output working is the main output with the kx audio driver instaed you can use almost all the outputs of a sound blaster, and also not all the 8738 card are going to work with drivers you can find, some, like the pcie versions does not works, maybe the only thing which the cmi8738 could do better on mac os is the support for multiple frequencies, something that the kx audio driver still lacks (but i am working on it) and also the kx audio driver is not made me, is modifyed by me.1 point
-
I have take a look at yours SSDT and IOReg : The problem was perhaps on : Device (UPS0) Device (DSB0) Those line were missing to removal status : Method (_RMV, 0, NotSerialized) // _RMV: Removal Status { If (Zero) { Return (One) } Return (Zero) } So i added this. Can you try this SSDT. SSDT-TBARLOLO.aml.zip1 point
-
I got same trouble. In my case I solved that by putting kexts in clover kexts/Other directory. Fred1 point
-
Dsdt patch, for iMessage it's mostly luck, about iCloud you need to set a correct SMbios.1 point
-
Prova. sostituisci1 point
-
This is the keyboard backlight patch, about icloud and imessage, yes I got them working pretty well. # Patch by EMlyDinEsH (www.osxlatitude.com) # # Enables 4 keyboard backlight levels control to work using my kexts AsusNBFnKeys and Smart Touchpad # This patch meant for Kabylake notebooks and may work for others. # # Insert backlight auto off control sync field for Smart Touchpad and Asus Fn Keys driver into device label ATKD code_regex Name\s\(BOFF,\sZero\) remove_matched; into device label ATKD insert begin Name (BOFF, Zero) end; # Insert method SKBL for setting keyboard backlight level into method label SKBL parent_label ATKD remove_entry; into Device label ATKD insert begin Method (SKBL, 1, NotSerialized)\n {\n If (Or (LEqual (Arg0, 0xED), LEqual (Arg0, 0xFD)))\n {\n If (And (LEqual (Arg0, 0xED), LEqual (BOFF, 0xEA)))\n {\n Store (Zero, Local0)\n Store (Arg0, BOFF)\n }\n Else\n {\n If (And (LEqual (Arg0, 0xFD), LEqual (BOFF, 0xFA)))\n {\n Store (Zero, Local0)\n Store (Arg0, BOFF)\n }\n Else\n {\n Return (BOFF)\n }\n }\n }\n Else\n {\n If (Or (LEqual (Arg0, 0xEA), LEqual (Arg0, 0xFA)))\n {\n Store (Arg0, BOFF)\n }\n Else\n {\n Store (And (Arg0, 0x7F), KBLV)\n }\n }\n Store (0x0900, Local0)\n Add (Local0, 0xF0, Local0)\n \_SB.PCI0.LPCB.EC0.WRAM (Local0, KBLV)\n Store (DerefOf (Index (PWKB, KBLV)), Local0)\n \_SB.PCI0.LPCB.EC0.ST9E (0x1F, 0xFF, Local0)\n Return (Local0)\n }\n end; # Remove existing 16 backlight levels list if exist into device label ATKD code_regex Name\s\(KBPW,\sBuffer\s\(0x10\)\s*\n\s*\{\s*\/\*\s0000\s\*\/\s*0x00,\s0x11,\s0x22,\s0x33,\s0x44,\s0x55,\s0x66,\s0x77,\s*\/\*\s0008\s\*\/\s*\s0x88,\s0x99,\s0xAA,\s0xBB,\s0xCC,\s0xDD,\s0xEE,\s0xFF\s*\}\) remove_matched; # Remove existing 4 backlight levels list if exist into device label ATKD code_regex Name\s\(PWKB,\sBuffer\s\(0x04\)\s*\n\s*\{\s*0x00,\s0x55,\s0xAA,\s0xFF\s*\}\) remove_matched; # Insert 4 backlight levels into Device label ATKD insert begin Name (PWKB, Buffer (0x04)\n {\n 0x00, 0x55, 0xAA, 0xFF\n })\n end; # Insert method GKBL for reading keyboard backlight level into method label GKBL parent_label ATKD remove_entry; into Device label ATKD insert begin Method (GKBL, 1, NotSerialized)\n {\n If (LEqual (Arg0, 0xFF))\n {\n Return (BOFF)\n }\n Return (KBLV)\n }\n end;1 point
-
Hi Is there a way in bdmesg to tell if clover has been booted in UEFI mode? Of course i can tell it myself, but im just curious in bdmesg. What string should i look for in bdmesg output?1 point
-
Hi MaLd0n, i´m surprised! Is your built-in Qualcomm Atheros 93xx working? If so, what's the secret? Edit: Humm... ok, I think they're different! Yours is the AR93xx and mine is QCA93771 point
-
Nice, thanks for the explanation! I will buy one for me!1 point
-
Penso tu possa aggiornare i driver tranquillamente.1 point
-
here is also some code to show you how the model detect system works int ret=0; lack_ac97=0; have_ac97=0; // autodetect if(device==0x00041102) // 10k2 is_10k2=1; if(device==0x00041102 && chiprev==4) // a2 is_a2=1; if(device==0x00081102) // a2value, ... with p17v { is_10k2=1; is_a2=1; is_k8=1; // this is assumed: // if((subsys&0xf0000000)==0x10000000) // any ca0108 // is_k8=1; if((subsys&0xf0000000)==0x20000000) // any zsnb is_cardbus=1; if((subsys&0xf0000000)==0x40000000) // any e-dsp v2 is_edsp=1; if((subsys&0xff000000)==0x42000000) // any e-dsp v2 cardbus is_cardbus=1; } if(is_edsp) lack_ac97=1; if(is_10k2) is_51=1; // assume 10k2 is always at least '5.1' busName=CardBus(0); busName=PCI; Products productName = SoundBlaster; switch(subsys) { case 0x40011102: productName = EMU; if(is_10k2==0) // [1] { strncpy(tmp_str,"EMUAPS",KX_MAX_STRING); is_aps=1; lack_ac97=1; } else { strncpy(tmp_str,"EM8810",KX_MAX_STRING); // [110] - 1010 v1 is_edsp=1; lack_ac97=1; } break; case 0x00201102: // [2] strncpy(tmp_str,"live! CT4670",KX_MAX_STRING); // live! value break; case 0x00211102: // [3] strncpy(tmp_str,"live! CT4620",KX_MAX_STRING); // live! standard break; case 0x80221102: // [4] strncpy(tmp_str,"live! CT4780",KX_MAX_STRING); // value digital break; case 0x80231102: // [5] strncpy(tmp_str,"PCI 512 CT4790",KX_MAX_STRING); // 512 break; case 0x80251102: // sb0040 ? too // [6] strncpy(tmp_str,"live! CT1140",KX_MAX_STRING); // MB break; case 0x80261102: // [7] strncpy(tmp_str,"live! CT4830",KX_MAX_STRING); // value digital break; case 0x80271102: // [8] strncpy(tmp_str,"live! CT483X",KX_MAX_STRING); // value digital break; case 0x80281102: // [9] strncpy(tmp_str,"live! CT4870",KX_MAX_STRING); // value break; case 0x80291102: // [10] strncpy(tmp_str,"live! CT4872",KX_MAX_STRING); // value break; case 0x802a1102: // [11] strncpy(tmp_str,"live! CT4890",KX_MAX_STRING); // k256 break; case 0x802b1102: // [12] strncpy(tmp_str,"PCI 256 CT4891",KX_MAX_STRING); // 256 break; case 0x002F1102: // M002/M003 // [13] strncpy(tmp_str,"live! CTM002",KX_MAX_STRING); // MB break; case 0x80311102: // [14] strncpy(tmp_str,"live! CT4831",KX_MAX_STRING); // value break; case 0x80321102: // [15] strncpy(tmp_str,"live! CT4871",KX_MAX_STRING); // value break; case 0x80331102: // [16] strncpy(tmp_str,"live! CT4893",KX_MAX_STRING); // k256 break; case 0x80351102: // [17] strncpy(tmp_str,"live! CT0060",KX_MAX_STRING); is_51=1; has_surdac=1; break; case 0x80401102: // [18] strncpy(tmp_str,"live! CT4760",KX_MAX_STRING); // live digital entertainment/platinum break; case 0x80501102: // [19] strncpy(tmp_str,"live! CT4750",KX_MAX_STRING); // was 4820?! k512 break; case 0x80511102: // [20] strncpy(tmp_str,"live! CT4850",KX_MAX_STRING); break; case 0x80611102: // [21] strncpy(tmp_str,"live! 5.1 SB0060",KX_MAX_STRING); // live 5.1 is_51=1; has_surdac=1; break; case 0x80621102: // [22] strncpy(tmp_str,"live! 5.1 SB0100",KX_MAX_STRING); // live 5.1 is_51=1; has_surdac=1; break; case 0x80631102: // [23] productName = Generic; strncpy(tmp_str,"DXW MB",KX_MAX_STRING); break; case 0x80641102: // [24] strncpy(tmp_str,"live! 5.1 SB0102",KX_MAX_STRING); // live 5.1 is_51=1; has_surdac=1; break; case 0x80651102: // [25] strncpy(tmp_str,"live! 5.1 Digital SB022X",KX_MAX_STRING); is_51=1; has_surdac=1; break; case 0x80661102: // [33] strncpy(tmp_str,"live! 5.1 SB0228",KX_MAX_STRING); // Russ's is_51=1; has_surdac=1; break; case 0x100a1102: if(!is_10k2) { if(chiprev==0xa) strncpy(tmp_str,"live! 5.1 SB0229",KX_MAX_STRING); // [34] - LS else strncpy(tmp_str,"live! 5.1 SB022b",KX_MAX_STRING); // [33] is_51=1; has_surdac=1; } else { strncpy(tmp_str,"Audigy 2 SB0246",KX_MAX_STRING); // Audigy2 gateway oem [88] } break; case 0x80671102: // [32] strncpy(tmp_str,"ive! 5.1 Digital SB0220",KX_MAX_STRING); is_51=1; has_surdac=1; break; case 0x80681102: // [26] strncpy(tmp_str,"live! 5.1 CT0061",KX_MAX_STRING); is_51=1; has_surdac=1; break; case 0x80691102: // [27] strncpy(tmp_str,"live! 5.1 SB0101",KX_MAX_STRING); // value is_51=1; has_surdac=1; break; case 0x806a1102: // [28] strncpy(tmp_str,"live! 5.1 SB0103",KX_MAX_STRING); is_51=1; has_surdac=1; break; case 0x806b1102: // [29] strncpy(tmp_str,"live! 5.1 SB0105",KX_MAX_STRING); is_51=1; has_surdac=1; break; case 0x806C1102: // [30] strncpy(tmp_str,"live! 5.1 Digital SB0221",KX_MAX_STRING); is_51=1; has_surdac=1; break; case 0x80711102: // [31] strncpy(tmp_str,"PCI 512 SB0150",KX_MAX_STRING); // PCI512 is_51=1; has_surdac=1; break; case 0x00401102: // ?.. dead audigy [50] strncpy(tmp_str,"Audigy SB0090",KX_MAX_STRING); // audigy break; case 0x00411102: strncpy(tmp_str,"CT4820",KX_MAX_STRING); // [51] break; case 0x00421102: strncpy(tmp_str,"CT0070",KX_MAX_STRING); // [52] break; case 0x00431102: strncpy(tmp_str,"CT007X",KX_MAX_STRING); // ct0073? // [53] break; case 0x00511102: // [54] strncpy(tmp_str,"Audigy SB0090",KX_MAX_STRING); // audigy with golden connectors break; case 0x00521102: // [55] strncpy(tmp_str,"Audigy SB016X",KX_MAX_STRING); // audigy: plastic + gameport (no 1394) // unknown: sb0162 -- audigy w/midi jack + plastic jacks break; case 0x00531102: // [56] strncpy(tmp_str,"Audigy SB0092",KX_MAX_STRING); // audigy OEM / Player SB0092 break; case 0x00541102: // [57] strncpy(tmp_str,"Audigy SB0161",KX_MAX_STRING); // audigy break; case 0x00551102: // [58] strncpy(tmp_str,"Audigy SB0192",KX_MAX_STRING); // audigy break; case 0x00561102: // [59] strncpy(tmp_str,"Audigy SB0191",KX_MAX_STRING); // audigy break; case 0x00571102: // [60] strncpy(tmp_str,"Audigy (OEM) SB0091",KX_MAX_STRING); // audigy break; case 0x00581102: // [61] strncpy(tmp_str,"Audigy (OEM) SB0095",KX_MAX_STRING); // audigy break; case 0x00591102: // [62] strncpy(tmp_str,"Audigy SB0230",KX_MAX_STRING); // audigy break; case 0x005A1102: // [63] strncpy(tmp_str,"Audigy SB0231",KX_MAX_STRING); // audigy break; case 0x005B1102: // [64] strncpy(tmp_str,"Audigy SB0232",KX_MAX_STRING); // audigy break; case 0x005C1102: // [65] strncpy(tmp_str,"Audigy SB0238",KX_MAX_STRING); // audigy break; case 0x10021102: // [80] strncpy(tmp_str,"Audigy 2 SB0240",KX_MAX_STRING); // Audigy2 break; case 0x10031102: // [81] strncpy(tmp_str,"Audigy 2 SB0243",KX_MAX_STRING); // Audigy2 break; case 0x10041102: // [82] strncpy(tmp_str,"Audigy 2 SB0242",KX_MAX_STRING); // Audigy2 break; case 0x10051102: // [83] strncpy(tmp_str,"Audigy 2 Platinum EX SB0280",KX_MAX_STRING); // Audigy2 Platinum Ex; sb244, sb250, sb290 is_a2ex=1; lack_ac97=1; break; case 0x10061102: // [86] strncpy(tmp_str,"Audigy 2 (OEM) SB0245",KX_MAX_STRING); // audigy2 gateway oem break; case 0x10071102: // [84] strncpy(tmp_str,"Audigy 2 (OEM) SB0244",KX_MAX_STRING); // audigy2 oem [riva's] break; case 0x10081102: // [85] strncpy(tmp_str,"Audigy 2 Platinum EX SB0320",KX_MAX_STRING); // Audigy2 Platinum Ex (with ac97 codec!) + sb290 is_a2ex=1; break; case 0x10091102: // [87] strncpy(tmp_str,"Audigy 2 SB0249",KX_MAX_STRING); // Audigy2 unk break; case 0x20011102: // [101] if(is_k8) { strncpy(tmp_str,"Audigy 2 ZS Mobile SB0530",KX_MAX_STRING); // audigy2 ZS Notebook is_zsnb=1; is_cardbus=1; lack_ac97=1; busName=CardBus(3); busName=NoteBook; } else // [90] { strncpy(tmp_str,"Audigy 2 ZS Platium Pro SB0360",KX_MAX_STRING); // audigy2 ZS Platinum Pro + sb290 is_a2ex=1; } break; case 0x20211102: // [105] if(is_k8) { strncpy(tmp_str,"Audigy 2 ZS Mobile SB2021",KX_MAX_STRING); // audigy2 zs notebook [?] is_zsnb=1; is_cardbus=1; lack_ac97=1; busName=CardBus(3); busName=NoteBook; } break; case 0x20021102: // [91] strncpy(tmp_str,"Audigy 2 ZS SB0350",KX_MAX_STRING); // audigy2 ZS retail + sb250 break; case 0x20031102: // [92] strncpy(tmp_str,"Audigy 2 ZS SB0352",KX_MAX_STRING); // audigy2 ZS ? break; case 0x20041102: // [95] strncpy(tmp_str,"Audigy 2 ZS SB035X",KX_MAX_STRING); // Audigy2 zs sb0350/sb0355 / Gateway OEM break; case 0x20051102: // [96] strncpy(tmp_str,"Audigy 2 ZS SB035X",KX_MAX_STRING); // Audigy2 zs SB0350/359 break; case 0x20061102: // [94] strncpy(tmp_str,"Audigy 2 ZS SB035X",KX_MAX_STRING); break; case 0x20071102: // [93] strncpy(tmp_str,"Audigy 4 PRO SB0380",KX_MAX_STRING); // audigy4 PRO break; case 0x10001102: // [103] strncpy(tmp_str,"Audigy 2 SB1000",KX_MAX_STRING); // audigy2 value [?] break; case 0x10011102: // [100] strncpy(tmp_str,"Audigy 2 SB0400",KX_MAX_STRING); // audigy2 value // has ac97 codec break; case 0x10211102: // [102] { strncpy(tmp_str,"Audigy 4 SB0610",KX_MAX_STRING); is_a4=1; is_10k3 = 1; // has ac97 } break; //FIXME find subsys id for audigy 4 and put them here /* case 0x10201102: { strncpy(tmp_str,"Sound Blaster Audigy 4 SB0660 10k2 CA10300",KX_MAX_STRING); is_a4=1; }*/ case 0x10221102: // [104] strncpy(tmp_str,"Audigy 2 SB1022",KX_MAX_STRING); // Audigy2 value ? break; case 0x10241102: strncpy(tmp_str,"Audigy RX SB1550",KX_MAX_STRING); // audigy rx experimental // has ac97 codec is_10k3 = 1; is_10k2 = 1; is_a4=1; busName=CardBus(1); busName=PCIExpress; //ret=-1; break; case 0x11011102: // [106] strncpy(tmp_str,"Audigy SA SB1101",KX_MAX_STRING); // Audigy SA ?? break; case 0x40021102: if(!is_k8) strncpy(tmp_str,"EMU E-0404",KX_MAX_STRING); // [111] else strncpy(tmp_str,"EMU E-0404",KX_MAX_STRING); // [120] is_edsp=1; lack_ac97=1; break; case 0x40031102: if(!is_k8) strncpy(tmp_str,"EMU E-1010",KX_MAX_STRING); // [112] else strncpy(tmp_str,"EMU E-1010",KX_MAX_STRING); // [121] is_edsp=1; lack_ac97=1; break; case 0x40041102: // [123] productName = EMU; if(is_k8) { strncpy(tmp_str,"EM8960",KX_MAX_STRING); // EM8960: 1010 PCI is_edsp=1; lack_ac97=1; } else { strncpy(tmp_str,"Un4004",KX_MAX_STRING); // ?? } break; case 0x40051102: productName = EMU; if(is_k8) { strncpy(tmp_str,"EM8984",KX_MAX_STRING); // EM8984: 0404 PCIe is_edsp=1; lack_ac97=1; busName=CardBus(1); busName=PCIExpress; } else { strncpy(tmp_str,"Un4005",KX_MAX_STRING); // ?? } break; case 0x40071102: // EM8982 - 1010 ('PCIe' series) { productName = EMU; if(is_k8) { strncpy(tmp_str,"EM8982",KX_MAX_STRING); is_edsp=1; lack_ac97=1; } else strncpy(tmp_str,"Un4007",KX_MAX_STRING); } busName=CardBus(1); busName=PCIExpress; break; case 0x42011102: // [122] productName = EMU; strncpy(tmp_str,"EM8950",KX_MAX_STRING); // 1616 CardBus v2 is_edsp=1; lack_ac97=1; is_cardbus=1; break; default: productName = Generic; strncpy(tmp_str,"Generic card",KX_MAX_STRING); busName=CardBus(4); busName=other; ret=-1; break; } char tmp[KX_MAX_STRING]; char product[KX_MAX_STRING]; switch (productName) { case SoundBlaster: strncpy(product, "SB ", KX_MAX_STRING); break; case EMU: strncpy(product, "E-MU ", KX_MAX_STRING); break; default: strncpy(product, "KX Audio Driver ", KX_MAX_STRING); break; } strncpy(tmp, tmp_str, KX_MAX_STRING); //strncpy(tmp_str, "", KX_MAX_STRING); strncpy(tmp_str, product, KX_MAX_STRING); strncat(tmp_str, tmp, KX_MAX_STRING);1 point
-
the drivers uses exactly a switch for that, but i have used a more complex naming system for the sound cards, becuase it can be from 2 different brands, and instead of rewriting sound blaster i used an enum and the object of the struct which represents the soiund cards has a property which tells if it's a sound blaster or an e-mu or an unknown card, and then which model is it, but you sound blaster audigy 2 zs will work with the driver, i have one and works great!1 point
-
Nella gui di clover nelle opzioni seleziona add clover boot options for all entries Poi riavvia, entra nel bios e controlla se puoi impostare altre opzioni per il boot1 point
-
hi @MaLd0n, please share your ssdt ...or dsdt...tkx1 point
-
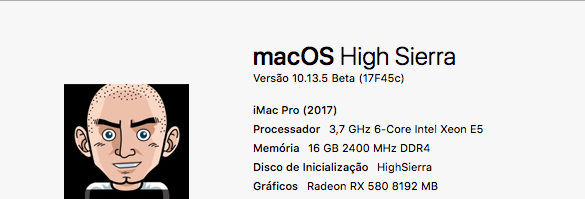
Olá a todos, Por aqui o update correu as mil maravilhas, tudo funciona... depois de substituir o AppleALC.kext, de resto tudo funciona como deve ser... Cumprimentos
 1 point
 -
interesting.. now it's there again. It wasn't when I went there right before I asked my question. I even tried a different browser and a different theme to make sure it's not a browser issue. So that was just a temporary forum glitch. Thanks RobertX!1 point
-
Here it is a useful new tool for Oz made by mackie100 called Ozmosis Configurator.1 point
-
Here IONetworkingFamily.kext.zip1 point
-
Scusa non me ne ero accorto, ho editato il post precedente, dovrebbe essere ok adesso si esatto ssdt va collocato insieme al dsdt1 point
-
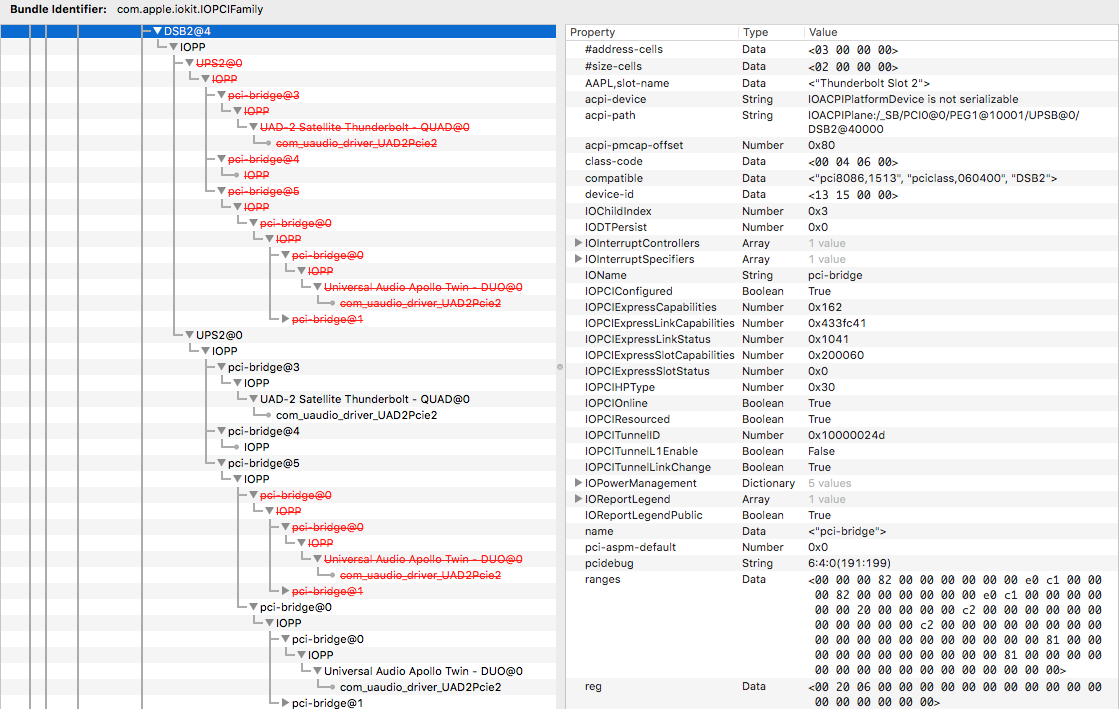
Success!!! Finally I managed to enable the hotplug in my Gigabyte Alpine Ridge on MB Z370! However there are still some corrections to be made, because currently only the first device in the chain is hotpluggable. Special thanks to everyone who helped and contributed to making this possible! By combining @maleorderbride's method and @Matthew82's SSDT I can now connect my devices whenever I want. However only the first device reconnects correctly, so I tried the @Loloflat6's SSDT (adapting it to my ACPI paths), but the result is the same with the only difference that the various pci-bridge@# are not renamed in DSB#@. It was enough to add this Arbitrary inject (DSB1 pcidebug): Also adding this Arbitrary inject (not mandatory), the information in the PCI system info is displayed (UPSB pcidebug): As I said before, however, only the first device in the chain connects correctly. The second device (APOLLO TWIN) even if switched off, is not disconnected correctly until I turn off the first device (UAD 2 Satellite). You probably need to make changes to the SSDT to get the pci-bridge managed differently. Here's how my devices behave now: As you can see, the hotplug is limited to pci-bridge@3. By making a comparison with the IOReg of my MacBook Pro (same connected/disconnected devices), we see the difference: I specify that even my Belkin dock is hotpluggable, but subsequent devices behave as described above. I think that now we are almost there and this could be the way to finally activate the hotplug even in the MB series 100/200/300. Could someone help me edit or create a proper SSDT? All those created so far only work with the first connected device, so I think it can be useful to everyone. I am at your disposal SSDT by Matthew82.aml.zip SSDT by Loloflat6.aml.zip


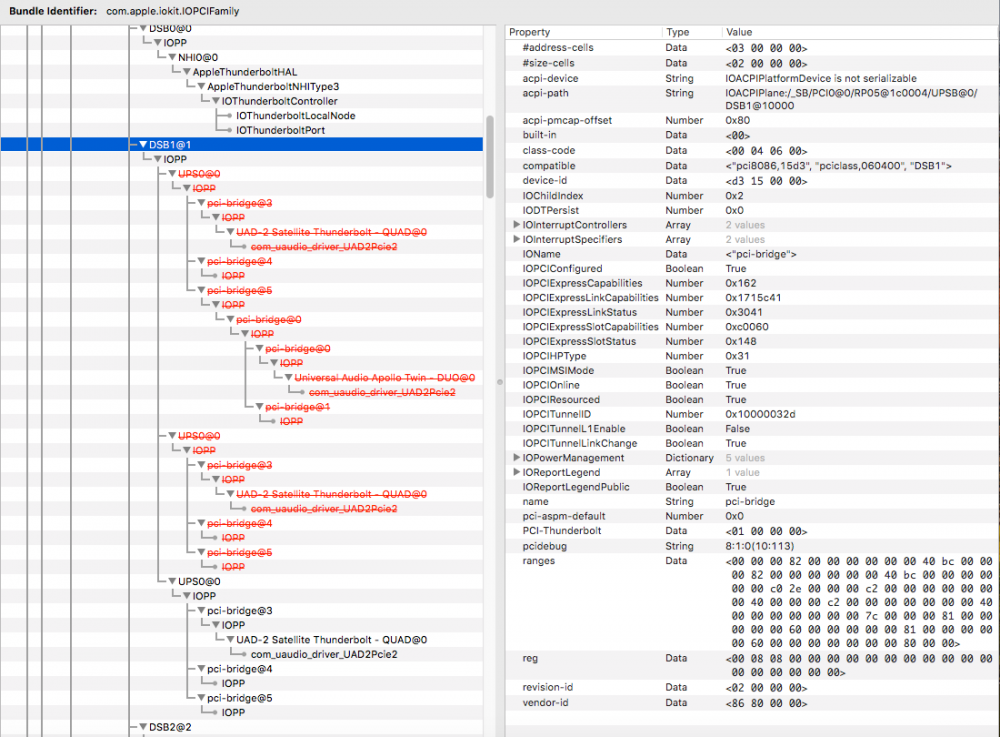
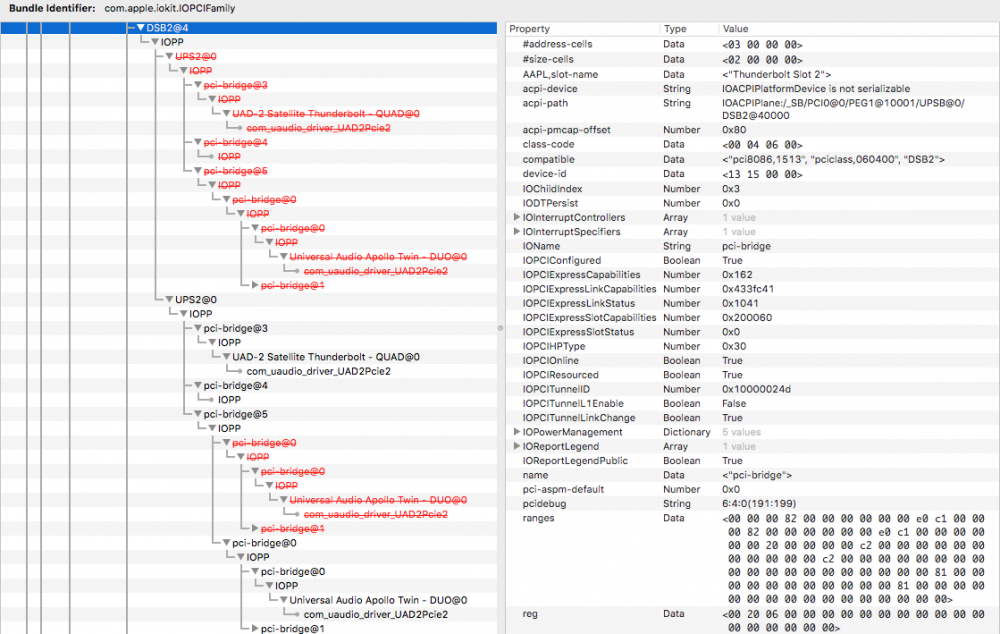 1 point
 -
Non so se hai già creato un ssdt per il pm1 point
-
i have not released it yet, because i still need to do some extra debugging and adjust some thing into the interface, then it will be released1 point
-
Would be a great idea to update it. If anyone have the complete knowledge about Clover, we can create a "second" Wiki here in IM. What do you think?1 point
-
Hmmm, I never used this patch for these new Intel HD iGPUs, but I'll do a look in a solution around. If I find something useful for you, I'll post here.1 point
-
git is for beta versions, svn is for release version. As well git has no native enumeration. We know version number exclusively due to svn.1 point
-
1 point
-
ho quotato gli ultimi messaggi non per rispondere, ma per ringraziarvi della pazienza che avete per rispondermi proprio ora sto ricreando la penna con la guida in firma di Genkik vi farò sapere ancora grazie mille....incrocio le dita1 point
-
i have forgot to answer to your post, thank you to appreciate my work, i like to collect sound cards and for my job i am a developer on apple platforms, using apple alc for the sound blaster cards is not the best since the driver is for patching the sound driver that come with mac os, the pcie cards uses the chip in a different way, so we need something to set the pci properties to get it working with apple alc like the on board audio, with things like hack the pcie registers and putting the card to be fully working with apple alc (that dose an excellent job, the audio with that kext is clean and works well on supported cards), for the audigy rx the bad thing abut the kx audio driver is that for now only output works, but they works fine, even when you manually set the card in 7.1 mode, but i still need to add proper support for the front audio header and for the dac, it is a lot of work and i need to find also some sources of a linux driver to take a look and see what they have done, and also it needs some more proper pcie initialization to get commands like volume change to work with less latency, i am also checking out other audio solutions like the cmi8738 based cards, because they are really cheap anche can be decente replacements for non working on board audio1 point
-
UPDATE: I've done a lot of experimenting and researching and here are my findings: - Freezes are caused by a mismatch between the ports defined in the driver's frame buffer table and the physical ports in the laptop. I fixed them by loading the second frame buffer table which limits the driver to 1 LVDS port. I don't use HDMI or VGA so I don't mind. I think the same could be done by patching the first table to match BOTH port number and type. I prefer DSDT since it's cleaner. "AAPL,snb-platform-id", Buffer (0x04) { 0x00, 0x00, 0x02, 0x00 //load the 2nd frame buffer table (0x02) }, - Artifacts are caused by IGPU memory corruption due a clover bug. Clover somehow messes with the BIOS-reserved memory for IGPU. apianti and Slice know about the issue and couldn't fix it (very long ago) Slide=0 as boot-arg reduces the artifacts significantly. Installing 8GB of RAM also seems to fix it. I haven't tried that. Hope this helps1 point
-
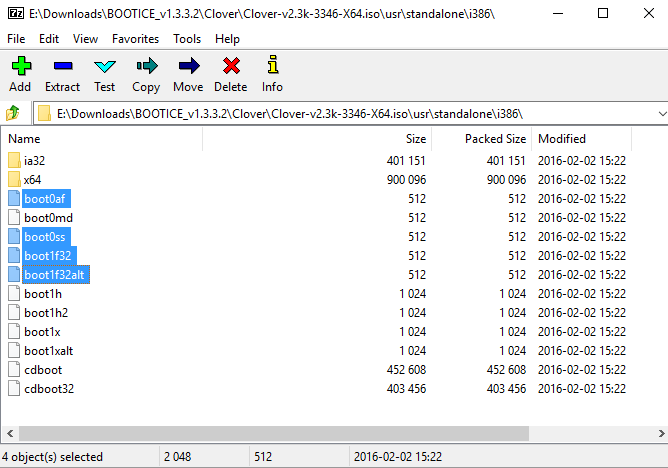
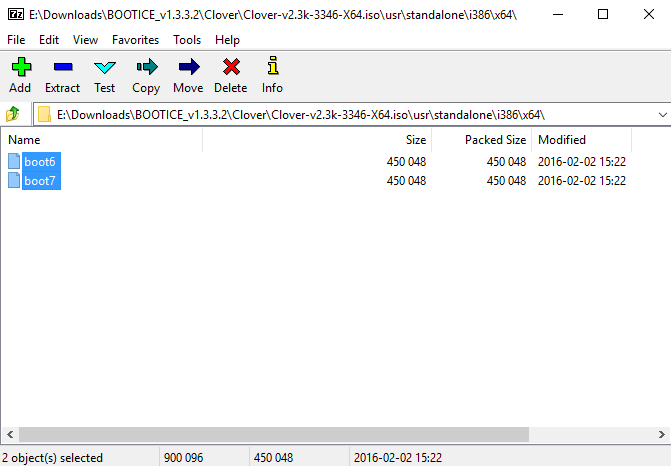
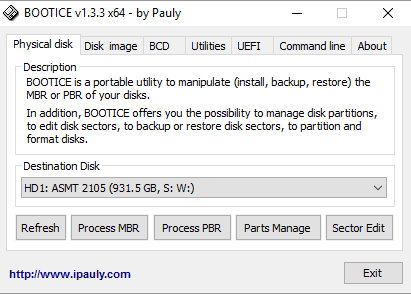
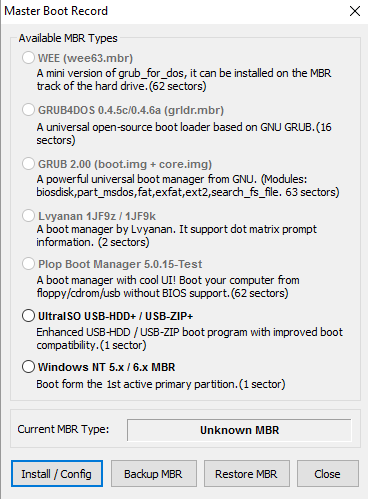
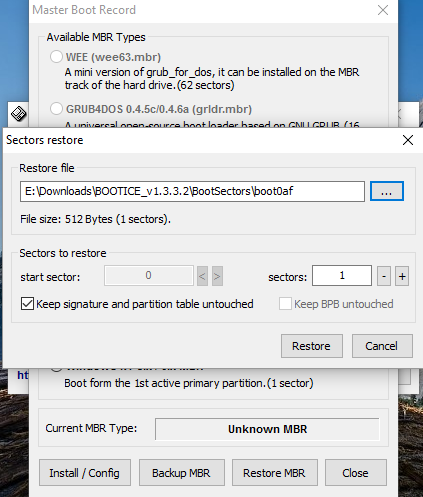
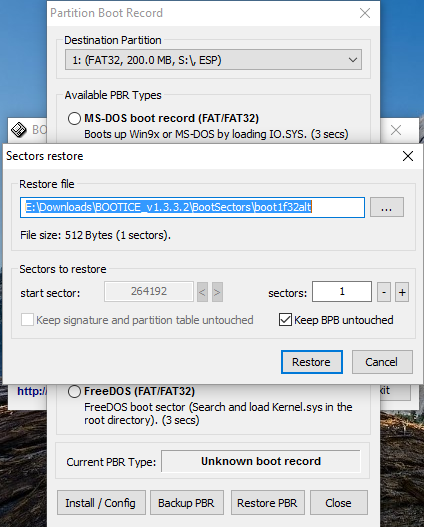
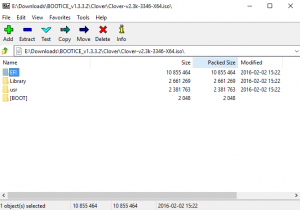
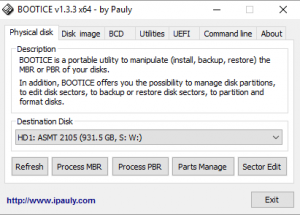
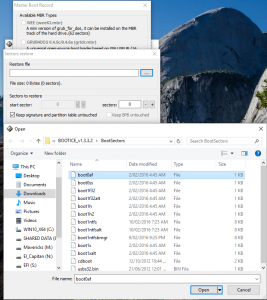
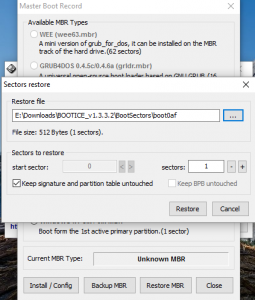
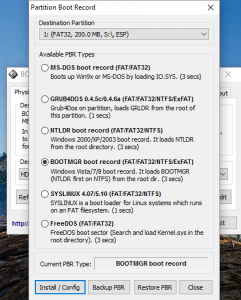
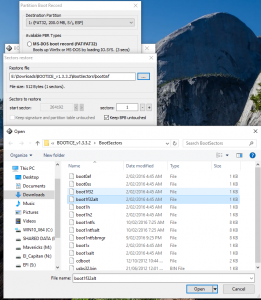
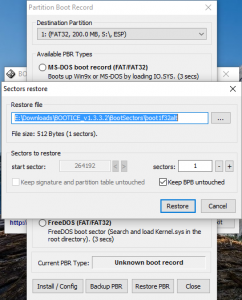
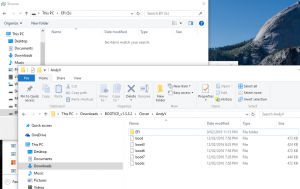
Manually Install Legacy Clover and prepare GPT disk in Windows (for dual boot UEFI Windows and OSX) Prerequisites 1. GPT FDisk aka "GDisk" 2. 7-Zip 3. Windows X64 4. Bootice program 5. Clover ISO downloaded from Sourceforge Erase Hard Disk to RAW state with Diskpart.exe Open an administrative command prompt and type the following lines, followed by the <Enter> key after each line.... diskpart list disk sel disk # (where # is the disk number of the disk you wish to erase) clean exit Use GDisk to convert the Hard Drive to GPT and create partitions for dual booting UEFI Windows and OSX In this example, I have a 1 TB hard disk which I plan to divide up as follows.... Partition 1: 200MB EFI System Partition Partition 2: 128MB Microsoft Reserved Partition Partition 3: 60GB NTFS Partition for Windows Partition 4: 871GB HFS+ Partition for OSX Notes - EFI System Partition is preferably made the first partition for compatibility with OSX. I usually leave 128MB of free space before and after the HFS+ partition or OSX Disk Utility will complain about a lack of "loader space". 1. Open an administrative command prompt and cd to the gdisk installation folder 2. Type gdisk64 #: (where # is the disk number of the disk you are creating partitions on - in this example it is disk 1) 3. Use the following gdisk options: n to create a new partition x to access the experts menu a to change partition special attributes (needed for EFI System Partition) m to return to the main gdisk menu p to print the partition table w to finalize and write changes to the disk Eg 4. Use Diskpart to assign drive letters and format the EFI and Windows Partitions to FAT32 and NTFS respectively.... Install legacy Clover bootsectors in Windows Overview The Clover wiki describes the legacy booting process: Essentially BIOS--->MBR--->PBR--->boot--->CLOVERX64.efi--->OSLoader In terms of the bootsectors we will be using in this tutorial BIOS--->boot0af in MBR--->boot1f32alt in the PBR of the EFI System Partition--->boot6 in ESP--->CLOVERX64.efi in ESP--->OSLoader Procedure 1. Download the CloverISO tar.lzma file from Sourceforge and extract the ISO with 7 Zip 2. Copy the following boot files from \usr\standalone\i386 folder boot0af, boot0ss, boot1f32, boot1f32alt and boot6, boot7 from \usr\standalone\i386\x64 to somewhere convenient The EFI folder will also be needed later.... 3. Open the Bootice program and click Process MBR from the main menu 4. At the Master Boot Record screen, click restore MBR 5. For the Restore file, browse to the boot0af or boot0ss file we extracted in step 2 6. Click the Restore button and you should get a confirmation that the operation completed successfully. Click the close button. 7. Click Process PBR from the main menu 8. At the Partition Boot Record screen, select the FAT32 EFI System Partition as the destination and click the Restore PBR button. 9. For the Restore file, browse to the boot1f32 or boot1f32alt file we extracted in step 2. In this example, I used the alternate booting PBR (boot1f32alt), which gives a 3 second pause to enable the user to input his/her choice of boot file during bootup (default is boot6). 10. Click the Restore button and you should get a confirmation that the operation completed successfully. Click the close button and exit the program. 11. Open Task Manager as administrator and open a new task. Browse "all files" and navigate to the EFI System Partition (which we assigned the drive letter S: earlier). You should now be able to copy the EFI folder from the Clover ISO (as well as boot6 and boot7) into the EFI System partition. If you used boot1f32 for your PBR, rename "boot6" to "boot". 12. Make the necessary edits to the EFI\CLOVER\config.plist for your system and make sure you have FakeSMC.kext in EFI\Clover\kexts\Other. If you have a DSDT &/or SSDTs that works for your system, place them in /EFI/CLOVER/ACPI/patched. 13. Reboot the computer and it should boot to the Clover Main Menu .


 1 point
 -
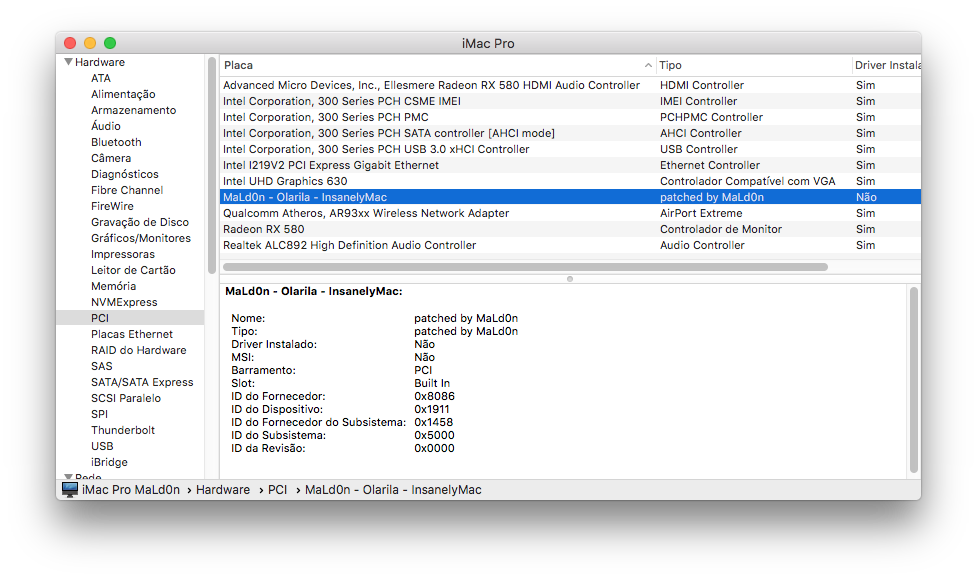
--------------> Piccola nota per Post Installazione Quando avete installato,in caso di necessità di aiuto per post installazione, aprite un topic nella sezione corretta Ricordatevi, se non l'avete già fatto, di mettere in firma il vostro hardware in modo dettagliato, per farlo andate sul vostro profilo, voce signature. Scaricate Hack_Info (1).zip Doppio click sopra...attendete che abbia terminato. Allegate sul vostro topic lo zip che avrà creato su vostro desktop --> HackInfo_Report Scaricate IORegistryExplorer.zip aprite l'app su file, save as, salvate comprimete e postate l'output Scaricate DPCIManager.zip fate la foto alla parte Status e PCI list,postale entrambe Tutto questo fornisce informazioni utili a chi vorrà aiutarvi a risolvere i vostri problemi -------------------------------------------------------------------------------------------------------------------------------------------------1 point
-
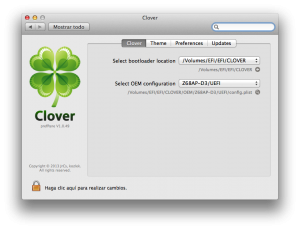
Clover Configurator Download and Information Clover PrefPane by Kozlek Download and Information
 1 point
 -
Clover Builder.app v1.2.4 (Use UDK2018) Small tool to download sources, compile and build the latest Clover distr. Copy to Mandatory drivers64UEFI: ApfsDriverLoader.efi, AptioMemoryFix.efi, AptioInputFix.efi. Copy to \EFI\CLOVER\tools\: CleanNvram.efi. VerifyMsrE2.efi. Make Clover_v2.4k_rNNNN.pkg without FakeSMC.kext. Make CloverISO-NNNN.tar.lzma with FakeSMC.kext. Corrected makeiso error. Used Xcode toolchain and UDK2018. macOS Mojave ready. You can safely edit working script in app Resources. Latest version Enjoy Feel free to click "like" cvad Clover_Builder.app.v1.2.4.zip1 point
-
Lenovo T420 Clover Guide Release on GitHub Updated to Clover r5142 OpenCore (0.7.6) as an alternative boot manager Recent highlights: Added older versions of IntelMausiEthernet for 10.12, 10.13, 10.14, 10.15 Force DualLink for the 1600x900 configs Update Theme (icons and boot chime option) Use WhateverGreen.kext for GFX patching and properties by default VoodooPS2Controller.kext - with new SSDT option for custom key map AppleALC.kext - merged properties for T420 (changed Layout 12 to 14) Update T420s with SSDT for PS2K device config.plist changes: Revised to common config.plist for simplicity Changed config.plist file to use audio layout id 14 (or 13 for dock) Update config.plist files to set slide=0 by default Removed ACPI patching by Clover (except Fix_Regions) since patching is already in provided in the DSDT Provide alternate config.plist files and DSDT files for testing glitchy 1600x900 LCD 3 alternate configs: EDID-2e2, EDID-2e3, EDID-366 - 60 and 50 Hz modes T420 Clover Guide and Steps Overview The zip file is a complete ESP/kext pack for the Lenovo T420 using Clover on macOS. This file set and method works for Sierra and High Sierra. Full Clover ESP file set - config.plist + required custom kexts + custom ACPI files (DSDT/SSDT) The actual zip bundle releases are posted on GitHub.com * For Mojave (10.14.x) and Catalina (10.15.x) - use dosdude1 installer method + this ESP bundle Apple removed support of HD 3000 Graphics see the "dosdude1" method to create an installer for unsupported Macs: http://dosdude1.com/software.html combine the methods outlined here with dosdude1 method (add Clover to EFI) tested on: 10.12.6, 10.13.5, 10.14.x and 10.15.x Non-maintained Mountain Lion Kext Bundles for 10.8.4 are in post #241 and 10.8.5 in post #397 Also for L420 Guide, see the one by kosakgroove Why Clover vs Chameleon? Native UEFI boot support for macOS (and Windows) on GPT disks. Native Apple macOS Installers and App Store Updates. Supports Recovery HD for system recovery, iMessage, Find My Mac, etc. Dynamic DSDT and Kext patching. Caveat: My system is a T420 with 1600x900 LCD and dedicated Intel HD 3000 Graphics Only. This zip contains what is working for me on this specific model. The related models - such as T420s, T420i, T520 and W520 family - may work as is or need some changes to config.plist and/or the DSDT. In the DSDT source (.dsl) file, the changes are indicated by notes and comments. If your HW is the same as mine, the included DSDT and configuration files may need to be retrofitted to work for your system. The guide has 2 parts or phases: How to create a USB installer to install macOS, and How to complete the OS installation to run macOS BIOS settings Recommended is BIOS v1.46 (and stay on 1.46 if you want use a modded bios - but there are later mods now) Recommended: reset to defaults. Most defaults settings will work - but check these settings: Set Config / Serial ATA (SATA) / SATA = AHCI Set Security / Memory Protection / Execution Prevention = Enabled Disable Discrete Nvidia/Optimus (use integrated HD 3000 only - unless you really know what you are doing!) Note: The custom DSDT is based off BIOS v1.46 (flashed with whitelist mod or original) Terms: GPT = GUID Partition Table MBR = Master Boot Record ESP = ESP = EFI System Partition, the ESP is created automatically as the first (hidden) partition by the Disk Utility when the GPT option is selected for partitioning a disk. Part 1 - OS Installation These steps and procedure is for a complete new fresh installation using an USB Installer. If you are upgrading to High Sierra from an older working version of macOS (say El Capitan or Sierra is on your HD downloaded from the App Store), skip down to Part 2, Step 3 to update your ESP. You must replace or merge in the changes from the EFI/CLOVER files to your HD ESP before you perform the upgrade. 1.1 Overview and Downloads Download and expand (extract) the zip file contents from here: GitHub Lenovo T420 Clover Latest Release. This same file set will be installed on the USB and the HD for UEFI boot. Download macOS from the App Store - they are freely available. One can build a macOS USB installer with the standard macOS installer app downloaded from the "App Store". Install macOS to a GPT formatted disk using the standard Install macOS.app downloaded from the Apple Store. 1.2 Create a standard macOS USB installer Partition an 8GB (or larger) USB formatted with GUID Partition Table (GPT) use the Partition Options... menu to change from MBR to GPT Name the partition - USB - the install process will rename it, but it matches the script below. Use format: Mac OS Extended (Journaled) (formerly OS X Extended) Note: if you have a larger USB (say 16GB) you can split into 2 8GB partitions, so you can have 10.13 and 10.12 installers on the same USB key Run this command to copy the bits to the USB key: sudo /Applications/Install\ macOS\ High\ Sierra.app/Contents/Resources/createinstallmedia --volume /Volumes/USB --applicationpath /Applications/Install\ macOS\ High\ Sierra.app –nointeraction Note: if using an older version of macOS, replace with the corresponding app name. 1.3 Put Clover installation on USB Install Clover on the USB sudo mkdir /Volumes/ESP-USB sudo mount -t msdos /dev/disk1s1 /Volumes/ESP-USB cp -a ~/Downloads/Lenovo-T420-CloverYYYY.MM.DD/EFI/ /Volumes/ESP-USB/EFI Manually mount the ESP of the USB (there is script - espmount.bash - that you can use later in the Utilities folder as an option) If not done already, expand the downloaded Zip to ~/Downloads/LenovoT420-Clover-YYYY.MM.DD (this file set is the Zip) Copy the EFI directory to the ESP directory of the USB For example, assuming the USB is disk1: Note: run "diskutil list" on the command line to find your USB and HD disk devices 1.4 Boot Clover from USB Installer and select Install macOS Install the OS on your GPT disk on the macOS partition. Make sure the drive is formatted using: Scheme: GUID Partition Map (GPT) Partition Name: macOS Format: APFS - use macOS Extended (Journaled) for Sierra Dual BOOT tip: If you plan to dual boot Windows from the same HD - DO NOT make the 2nd partition NTFS or ExFAT with the Disk Utility app. For now make the all partitions "APFS" or "Mac OS Extended (Journaled)" Size the 2 partitions appropriately - later you will delete and reformat the 2nd unused partition space for Windows 1.5 GUI Install of macOS Click through the install menus and wait for the installation to fully complete - on a spinning disk takes about 30-45 minutes. Follow these Notes and Tips: When the installer screens shows: "To pair a Bluetooth keyboard, turn it on and wait for your computer to connect to it.” Hit the Space Bar to get past this step. When installer seems to hang at: "About a second remaining” Don’t Panic, this "second" may take about 10 minutes or more to finish. Just wait for the installer to reboot the computer and continue the installation. The whole install process takes about 1 hour to complete. On the first boot from the HD when asked: "How Do You Connect?” Select: “My computer does not connect to the Internet” You can set up the network later after installation of the NIC driver kext - but it may already be working. The stock Intel WiFi will not work. Period. Part 2 - Post OS Installation and Setup on HD/SSD 2.1 Boot Clover from USB On startup, hit F12 and select USB boot - but now in Clover select the newly installed disk/partition to start macOS. Note: You may see 3 Volumes instead of the expected 2 on the HD - macOS + Recovery HD - make sure you pick the volume that is NOT labelled Recovery HD. See step 3 below to remove the logical volume eliminates the confusion. 2.2 Complete the installation steps - boot up and login Boot up macOS with Clover injecting the custom kexts from the USB. Login and start a terminal session. 2.3 Install Clover on the Boot Drive ESP Download (or transfer) the same Zip files to the HD. (See below for details) In general, the provided kexts do not require any modification. Backlight should work if using WhaterEvergreen kext. Details for Installing Clover Bundle on the Boot Drive ESP Now make the ESP contents on the boot drive exactly like the ESP used to setup the USB installer above. Manually mount the ESP of your HD on /Volumes/ESP. (See first 2 commands below.) Replace the ESP installed by Clover in the previous step -- means you copy/replace these 2 directories /Volume/ESP/EFI/CLOVER and BOOT with the ones from the Zip file. Just as you did for the USB, the config.plist is renamed from the one that matched your LCD. Mount and install the ESP bits to your HD/SSD (disk0) by following the same procedure as for the USB. Note: If you previously installed Windows, be careful to not lose the EFI/Microsoft contents. Note: The Clover config.plist default volume name (the volume to boot automatically) is set to "macOS" - meaning your new volume is assumed to be named "macOS". If you use a different name - like "Macintosh HD" change the volume name or edit the name in config.plist to match. sudo mkdir /Volumes/ESP sudo mount -t msdos /dev/disk0s1 /Volumes/ESP cp -a ~/Downloads/Lenovo-T420-Clover-YYYY.MM.DD/EFI/ /Volumes/ESP/EFI 2.4 For 1600x900 LCD - Recommended Option: Install (copy) the DisplayVendorID-* directories Many have GFX problems (glitches/lines) with 1600x900, so there are 3 configurations that inject an alternate EDID and set DualLink=1. Gfx freezes and glitches can be minimized by these alternate configs. If the default doesnt help - try the other EDID-* configs ( 2e2 or 2e3) which is the same as config.plist) first - copy one to replace the default config.plist. Then, these matching display options can help remove glitches with display speed/size options. The override files also provide a more natural color correction and gamma curves as well as more screen sizes for select Lenovo LCD models. These files are included in the Zip file and should be copied (via sudo) to /System/Library/Displays/Contents/Resources/Overrides. NOTE: For Catalina you may need to mount / (root) as read/write. SIP should already be disabled so you can write to the destination. Note: For Yosemite or earlier versions, these files go in /System/Library/Displays/Overrides sudo cp -a ~/Downloads/Lenovo-T420-Clover-YYYY.MM.DD/\:System\:Library\:Displays\:Contents\:Resources\:Overrides/DisplayVendorID-* /System/Library/Displays/Contents/Resources/Overrides/ Note: for Catalina you need to make / (root) read/write - to do this step, issue this command before the above command: sudo mount -uw / 2.5 Remove the USB and Reboot to load Clover from the HD Notes: For this first boot, hit the spacebar on your boot selection (macOS) and use verbose mode. See below for other tools and scripts for to help with sleep/wake issues. Enjoy your Hackintosh! Optional Steps (no longer required) 1) Install the all custom kexts to your OS /Library/Extensions folder Note: These days, Clover can "Inject" all the custom kexts from the ESP - so you no longer have to copy/install them into your system OS. However, if desired install the custom kexts from the Zip kexts directory to the /Library/Extensions directory by running: cd ~/Downloads/Lenovo-T420-Clover-YYYY.MM.DD/EFI/CLOVER/kexts/ sudo ./_kext-install.command 2) Ethernet Device Installation If you do not already have an ethernet device created as en0 - you can check the System Preferences/Network tool - this step loads the ethernet kext and resets network device order to have ethernet as en0. Seems to help with AppStore and iMessage etc. Note: macOS may already have configured the ethernet, so this step may be unnecessary but it will not hurt anything either for a fresh installation. Run this set of commands: sudo kextload /Library/Extensions/IntelMausiEthernet.kext sleep 10 sudo rm /Library/Preferences/SystemConfiguration/NetworkInterfaces.plist 3) Optional: Create a customer injector.The included/pre-made AppleBackLightInjector kext may work "as is" if you have a common Lenovo LCD. This kext gives full uniform brightness range for the LCD. You can create a custom Backlight Injector kext for your LCD Panel if needed. This script will update the kext in the ../../EFI/CLOVER/kexts/Other directory - which is the unzipped package location. This AppleBacklightInjector kext replaces the (obsolete) IntelBacklight.kext and the kext install script will remove the old one if on 10.12.4 or later. You may manually remove that kext if present. To create this custom kext, run this procedure script: cd ~/Downloads/Lenovo-T420-CloverYYYY.MM.DD/Utilities/Create_AppleBacklightInjector_kext/ sudo ./createAppleBacklightInjector.command Post Installation - Known Issues and Random Tips: GFX distortion/stretching: See Step 2.4 - sometimes DualLink is not set right for 1600x900 LCD. WIFI: The stock Intel WiFi will not work. The common approach is use a modded BIOS 1.46 (or later) and replace the WiFi with a Broadcom or Atheros chip. Bluetooth: Enable (turn on and leave on) Bluetooth so the green light is showing on the LCD bezel (do from Windows or Ubuntu). Also make sure the side switch is set to green too! "Black" Screen - hit "Pause" (or FN Home) key to increase LCD brightness sometimes the saved value in the nvram is out of sync or zero so LCD seems to be off. Audio: When using external headphones or speakers, may need to plug and unplug 1 or 2 times for recognition. Suggested settings if you don't want or use hibernation: sudo pmset -a hibernatemode 0 rm /var/vm/sleepimage Hibernation - Use OsxAptioFix2Drv-64.efi instead of OsxAptioFixDrv-64.efi UEFI driver for restart from hibernation. (Have not tested this in a long time). For hibernation, then set hibernate mode to 7 (mode 7 is like mode 3 but without encryption) - may need to manually edit this value into the plist file now. Note: Booting up from the hibernated image may have jumbled or blank LCD until you do a sleep/wake cycle to reset the LCD. sudo pmset -a hibernatemode 7 If you still have HFS+ formatted part vs APFS, Clover may present 2 options for main OS partition if using Logical Volume vs Standard Volume. You can revert the logical volume, so Clover will not get confused and present duplicate options. Just "revert" using: sudo diskutil corestorage revert / Note: Bluetooth seems to have some issues in High Sierra (early version) the workaround seems to be turning off BT before sleep. This process can be automated by installing the Sleepwatcher tools - which handles the sleep/wake scenario. Optionally one can install "Clover" scripts which turn on/off all networks during shutdown via LoginHook and LogoutHook. The are scripts to re-enable all networks up login or during boot up. Go the Utility Folder in the zip and run these command: ./install_tools.command ./install_sleepwatcher.command ./install_clover_scripts.command Fixed: iMessage/Messages/FaceTime may not register without overriding the Clover generated values for ROM and MLB values. Search thread for ROM to get more info. Otherwise define and inject using RtVariables -- see wiki for details - there are placeholders in the config.plistFixed: TrackPoint may not be responsive on startup (very random occurrence anymore) - a sleep/wake cycle should revive it. Fixed: With WhateverGreen or ACPIBacklight.kext installed, boot with lid open or LCD will be black when you open it. Fixed: Not needed anymore: Add boot option darkwake=0 if you would like to disable power nap - and have the lid wake the gfx instead of hitting extra key. OBSOLETE: After installing the kexts to /L/E, sometimes the symbolic link to the actual binary file referenced in AppleHDA_20672.kext is not right. Fix this link by running this script: cd /Library/Extensions/AppleHDA_20672.kext/Contents/ MacOS sudo rm AppleHDAsudo ln -s /System/Library/ Extensions/AppleHDA.kext/Contents/MacOS/AppleHDA sudo touch /System/Library/Extensions Notes on Custom Kexts FakeSMC.kext - Core hack mechanism. Using Kozlek's version + plugins + custom FakeSMC Info.plist - 2 Custom SMC keys are added to Kozlec's standard FakeSMC - FNum (to find the Fan) and ACID (for AC power and eliminate powerd syslog messages every 30 seconds). - A Custom package is included in the Utilities folder so you can install HWMonitor.app - it just selects these 2 Plugins Sensors: ACPI and CPU. Lilu.kext - by acidanthera - for use with certain kexts such as AppleALC, NightShift, WhateverGreen AppleALC.kext - by acidanthera - Keep original/unmodified AppleHDA.kext in /S/L/E and use this kext to add full audio support for CX20672/CX20590. There are 2 layout-id profiles: (1) ID 14 for normal laptop ports and (2) ID 13 which adds the audio ports on the Docking Station. Thanks to Manwe150's fix/additions for dock ports. The "dock" version adds the second channel output called "Headphones" and a second Input which shows up as either "Line In or Built-in Microphone" - these ports are physically on the Docking Station itself. IF you have a dock and want to use the extra ports, then set/inject Audio ID 13 in the Clover config.plist - IF you DO NOT have a dock, then use everything as is (and not be confused by the extra Input/Output options!!!) WhateverGreen.kext - by acidanthera - for Graphics and Backlight patching ACPIBatteryManager.kext - by RehabMan - show/track battery info on menu bar - Note: most Info.plist items are set to False instead of True Bluetooth_Injector_T420.kext - adds ProductID 8575 to make BT work better (provides on/off capability). IntelMausiEthernet.kext - Mieze's Intel LAN kext that supports TSO, EEE and other features. Put this kext in /Library/ Extensions and remove or disable AppleIntelE1000e.kext IOAHCIBlockStorageInjector.kext - configured to make just the DVD device appear internal so iDVD player works. USBInjectAll.kext - helps with USB properties VoodooPS2Controller.kext (v1.9.2) - RehabMans's PS2 Keyboard/TouchPad/TrackPoint SSDT are used to modify options instead - and can be used to setup alternate FN/key maps. keyboard mappings have 3 or 4 finger swipe left/right to back/forward configured for Safari browser vs space swipe • Obsolete: AppleBackLightInjector.kext - RehabMan's Injector method - modified for Lenovo T420 to incrementally scale brightness in 17 levels from 0 to 4882 (0x1312). Note: The template file has 2 models: T420 and T460. To create a customer Injector, run the Utilities createAppleBacklightInjector script to create a custom Panel definition specific to your LCD. It will put the new injector in the kexts/Other folder. Install it along other kexts with _kext_install.bash script. cd ~/Downloads/Lenovo-T420-Clover-YYYY.MM.DD/ Utilities/Create_AppleBacklightInjector_kext/sudo ./ createAppleBacklightInjector.command AppleIntelE1000e.kext (v2.4.14) - Ethernet (gigE) - can go in /System/ Library/Extensions vs Plugins so OSX re-installations or patch updates will not delete it. IntelBacklight.kext (v1.0.10) - RehabMan's kext for smoother/enhanced LCD backlight (dimming) control. In 10.12.4 (or later) this kext does communicate with Brightness keys or System Preferences Display Slider. So remove this kext unless on a version older (less) than 10.12.4 AppleHDA_20672.kext (v999.99) Keep original/unmodified AppleHDA.kext and add this kext to /L/E for full audio support for CX20672 (same as CX20590). Note: requires matching DSDT sections for Conexant Codec and layoutID 12. and Kext Patch via Clover. Also has Manwe150's fix/additions for dock ports. Credit and thanks to vladichimescu. There are 2 files in AppleHDA_20672.kext/Contents/Resources Platforms.xml.zlib.dock and Platforms.xml.zlib.nodock The "dock" version adds the second audio output called "Headphones" and a second Input "Line In" - both of which are on the Docking Station itself. • - IF you have a dock and want to use these ports - then just replace the Platforms.xml.zlib file with Platforms.xml.zlib.dock • - IF you DO NOT have a dock, then use the new kext as is! (and not be confused by the extra Input/Output options!!!) General Notes, Fixes, and Features Installing Clover from the .pkg file: If you would like to run the included installer package, Clover_v2.5k_rxxxx.pkg, to install the related tools and latest bits into the OS and ESP of this HD, there is an installer package in the Utilities directory. Select (check box) at least first 2 items! This picture shows a good set of overall options: After you close the pkg installer, then follow these step to replace the ESP with the zip contents (step 4 above) There are extra Clover configuration files (config.plist) that use the custom DSDT and WITH extra Clover patching for EDID Certain config files inject an alternate EDID - rather than the default/built-in EDID for your LCD. These EDID were extracted and corrected (set to RGB only mode etc) from other LCD vendors such as LGD that seem to work better than the common/inferior standard from AUO. Historically, these fix problems such as white screen, glitches, and ring buffer hangs. config.EDID-2e2.plist config.EDID-2e3.plist config.EDID-366.plist One should start with config.plist if there are freezes or glitches, then try config.EDID-2e2 or EDID-2e3 Note: The Model should be set to MacBookPro8,1 to get proper Graphics patching - DP/HDMI/DVI/VGA FrameBuffers config.patchDSDT.plist - does some patching. config.plist (default) - only fixes regions Some folks were seeing problems when Clover was asked to patch the DSDT - most of the patching was redundant with the provided DSDT. So there are 2 generic versions - (1) does a number of patches to patch the built-in DSDT (i.e. when you don't provide one) and (2) a config.plist that does almost nothing to patch the DSDT. Over the years - way before the current SSDT/hot-patch approach was devised - manual edits were made to the DSDT. Clover does dynamic patching Patch for AppleIntelSNBGraphicsFB.kext - The included patch replaces the 4th port/buffer (DVI on dock) with VGA on left side. The 4 ports after patch are: LCD, DisplayPort on side, DisplayPort on dock, VGA on side. If you need DVI on the dock - then disable this patch! Or modify the edit scheme to change the 2nd or 3rd port (DP) to be the DVI if still want the VGA port. Patch for IOAHCIBlockStorage.kext - adds SSD TRIM function for a 3rd Party SSD - one can use the "trimforce" command now Patch for SATA ultra bay Note: Lilu+AppleALC will patch AppleHDA.kext for audio codec Conexant 20590/20672 chipset The Zip includes Clover files and custom kexts with kext install script: _kextinstall.command (but this is not really needed anymore) Gfx parameter files in Displays/Overrides offer more natural color gamma curves and screen options Newer Thinkpad theme - adds macOS Icons that may not be in the standard clover installer. Special keys on laptop (not USB or Bluetooth keyboard) without keymap remap SSDT : FN keys LCD Brightness are controlled by these 2 button pairs to change brightness up/down: Fn+Home/End or ScrLck/Pause Audio Levels: The 3 buttons above F1-F3 control volume (except mic mute) Insert key is the CD/DVD eject. Blue ThinkVantage button - toggles fan to highest speed. The Alt key is the Mac Command key and Microsoft flag key is the Mac Option key. Fn+PgUp - turns on the light! DSDT Notes Some of the DSDT tweaks (beyond manwe150's original version) are listed here. DSDT includes source and binary The "EDID" versions of DSDT.aml be use override removes infamous HD 3000 glitches and buffer hangs or so-called artifacts for 1600x.900 LCD. Added MaxBeepBootVolume to DSDT to rid AppleHDA assertion on startup Shutdown fixes in DSDT _PTS and _WAK (thanks to TimeWalker75, RehabMan and Manwe150) Change/fixes to reset LEDs for proper sleep/wake status Battery fixes to use native/current ACPIPlatform.kext with Rehabman's ACPIBatteryManager.kext - no need to rollback or patch AppleACPIPlatform.kext anymore. PNLF additions from RehabMan provide smoother/wider LCD backlight control with IntelBacklight.kext DSDT mods to KBD device - renamed to PS2K and added LENOVO OEM-ids for VoodooPS2Controller to use. The PS2 Keyboard is identified as id LENOVO table-id T420 which will pickup the custom VoodooPS2Controller settings. For El Capitan+, removed the _PRW method from some of the devices in the DSDT DSDT for "heat-step" (DSDT.heat-step.aml) has a modified method to incrementally control the fan speed vs automatically by BIOS. Follow the installation recipe to use this approach: copy/replace the default DSDT.aml file with the DSDT.heat-step.aml file in the ESP (cp DSDT.heat-step.aml patched/DSDT.aml) make sure the ACPIPoller.kext is in use (move from Misc to Other folder) to active the method - changes fan speed vs CPU temperature. reboot For Example: mkdir /Volumes/ESP sudo mount -t msdos /dev/disk0s1 /Volumes/ESP cp -a /Volumes/ESP/EFI/CLOVER/ACPI/DSDT.heatstep.aml /Volumes/ESP/EFI/CLOVER/ACPI/patched/DSDT.aml cp -a /Volumes/ESP/EFI/CLOVER/ACPI/kexts/Misc/ACPIPoller.kext /Volumes/ESP/EFI/CLOVER/kexts/Other/ Scripts and tools will be put in /usr/local/bin. A directory ~/Library/ssdtPRGen will be created with other related data Script creates P and C states to match system CPU. One can hand-edit to modify values for lower power consumption. Copy ssdt.aml to your ESP ACPI/patched folder: /Volumes/ESP/EFI/CLOVER/ACPI/patched
 1 point


.thumb.jpeg.7082d67b3394c9399e80144027a7b397.jpeg)