Leaderboard


Popular Content
Showing content with the highest reputation on 04/17/2018 in all areas
-
new seed ...
 5 points
 -
I have set up the SF wiki: https://sourceforge.net/p/cloverefiboot/wiki, if you are a member of the project you can already edit. If you would like to edit it please ask and I will give you permission to edit. Is there any one willing to port and update the wiki from here (https://clover-wiki.zetam.org/Home) ?5 points
-
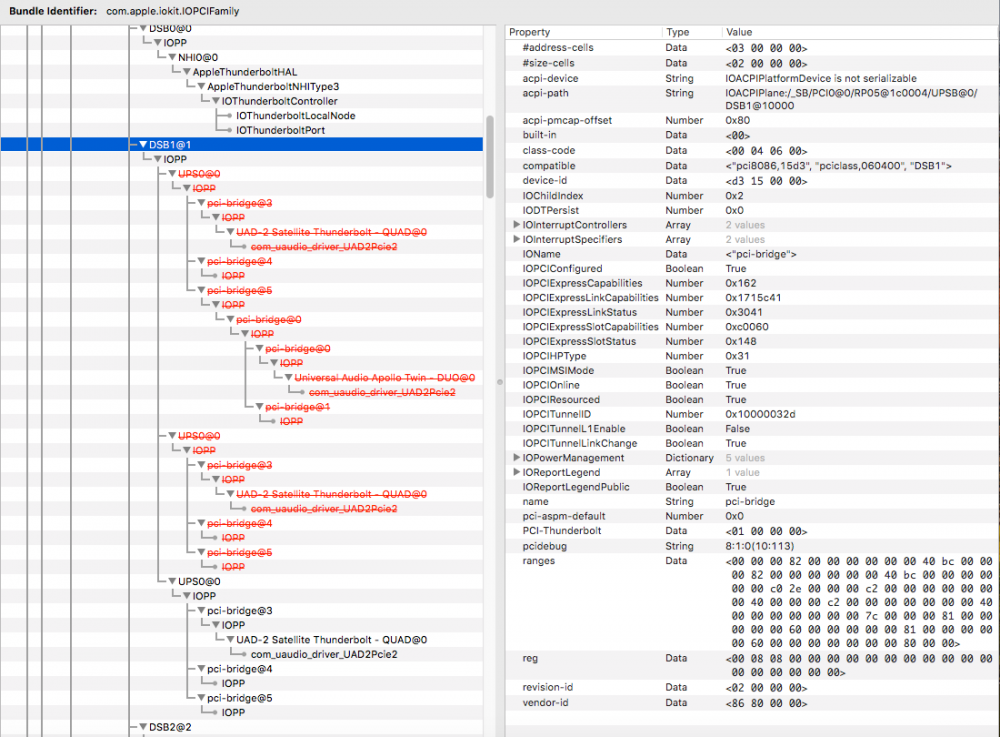
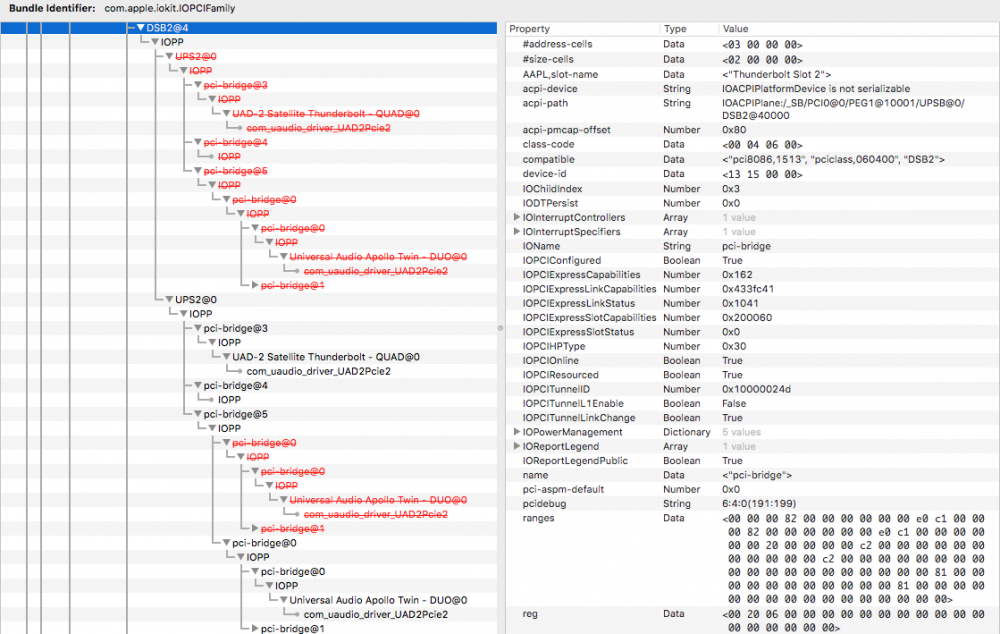
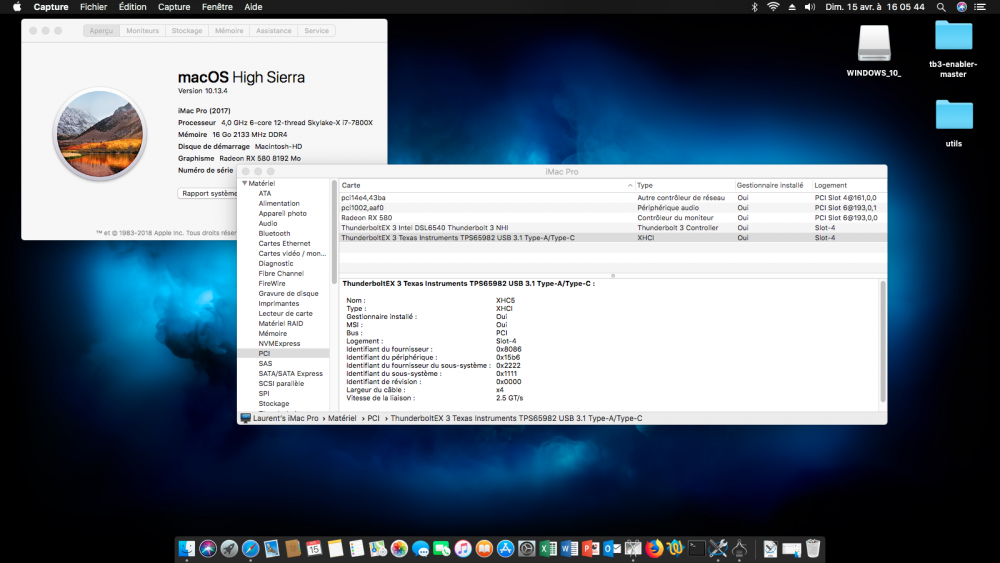
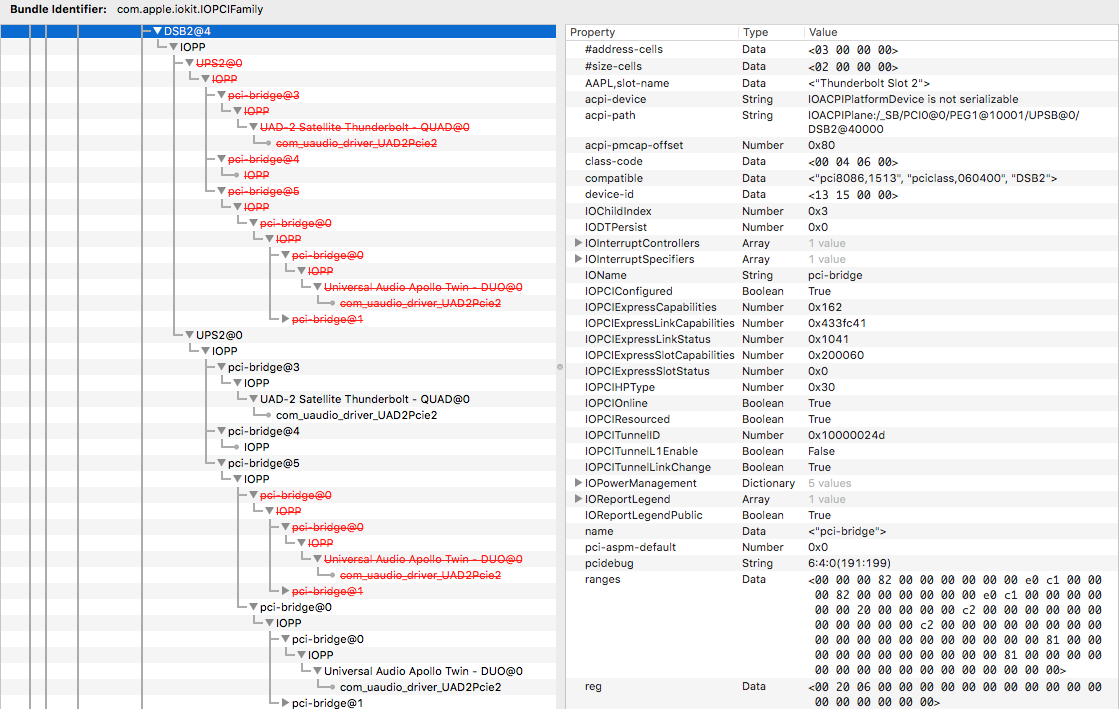
Success!!! Finally I managed to enable the hotplug in my Gigabyte Alpine Ridge on MB Z370! However there are still some corrections to be made, because currently only the first device in the chain is hotpluggable. Special thanks to everyone who helped and contributed to making this possible! By combining @maleorderbride's method and @Matthew82's SSDT I can now connect my devices whenever I want. However only the first device reconnects correctly, so I tried the @Loloflat6's SSDT (adapting it to my ACPI paths), but the result is the same with the only difference that the various pci-bridge@# are not renamed in DSB#@. It was enough to add this Arbitrary inject (DSB1 pcidebug): Also adding this Arbitrary inject (not mandatory), the information in the PCI system info is displayed (UPSB pcidebug): As I said before, however, only the first device in the chain connects correctly. The second device (APOLLO TWIN) even if switched off, is not disconnected correctly until I turn off the first device (UAD 2 Satellite). You probably need to make changes to the SSDT to get the pci-bridge managed differently. Here's how my devices behave now: As you can see, the hotplug is limited to pci-bridge@3. By making a comparison with the IOReg of my MacBook Pro (same connected/disconnected devices), we see the difference: I specify that even my Belkin dock is hotpluggable, but subsequent devices behave as described above. I think that now we are almost there and this could be the way to finally activate the hotplug even in the MB series 100/200/300. Could someone help me edit or create a proper SSDT? All those created so far only work with the first connected device, so I think it can be useful to everyone. I am at your disposal SSDT by Matthew82.aml.zip SSDT by Loloflat6.aml.zip


 4 points
 -
Thanks for the links and notes. Just as you said, the use cases for such functionality could broadly vary. 4 years ago, when AppleALC was not even planned, Lilu prototype was actually a modern replacement to SIMBL. However, when it comes to software modification there are two points to think about: Security Target audience SIMBL was pretty impressive several years ago, where numerous developers created their extensions to patch different things. Later on their enthusiasm disappeared, and even though SIMBL still works on modern macOS versions (with some hacks and SIP workarounds), its userbase is largely dead. Basically the same with Cydia Substrate and Jailbreak itself, which no longer belong to the common sense. More than that, SIMBL or a working Lilu-based solution with a SDK opens a possibility for malware writers and similar shady people to write harmful software at no effort. And that's if we forget about other possible bugs. Regarding the "kernel privileges and stuff". We followed the exact model you described during the creation of an initial prototype of MiniSubstrate with 07151129. And it was badly wrong. Making it possible to let the user to dynamically load an extension during the system runtime causes an extreme security risk, having a plugin management system injected in every process is an additional risk to system stability, and a possibility to swap one dylib with another is another great security risk. The only way it could actually appear (and is actually implemented in Lilu) is to have a kext that is bundled with all the extensions with a defined process list, which is only loaded at boot time. If you think of it, this is similar to how Cydia Substrate works with a 'respring'. Do not take me wrong though, obviously nobody executes any code with kernel privileges, it uses app privileges and is no different from any other dylib. As a bonus this approach is in fact more performant. All in all, while I still consider a possibility of this project going live, I remain unconvinced about the existence of an audience, which would actually write useful plugins. Perhaps, more actual projects and demand could work better here, but such a revival will take time.3 points
-
I've got this laptop, fully working minus keyboard brightness, that's working but its not dimmable with shortcut Keys... there is actually no way to use the latest voodooi2c when the i2c device is in ETPD and the CPU is a Kaby, tried with the help of alex.daud, driver is loading, pinning is ok, but still no movement from the trackpad... Alex.daud said it's a problem about the Asus dsdt implementation... Latest version working is 1.0.4 P.s. I was trying to debug the Keys to remap them, but seems that the keyboard, that's usb, cannot be seen by acpidebug...2 points
-
@Alpha22, thanks, your looks fine now. Can be and also due to a wrong logic. Please test this: [removed] I'm working on. running it in Xcode you should see where is crashing. P.S. some code commented and moved, needs a clean up.2 points
-
under your name... settings/account setting.....sidebar2 points
-
i have not released it yet, because i still need to do some extra debugging and adjust some thing into the interface, then it will be released2 points
-
So, i have completed a new pre-release of TINU which fixes varius problems with 10.13.4, especially for who wants to use TINU from the recovery or the installer of macOS, i need just to adjust some small ui things and then to do some testing. Feel also free to tell me everything about this app that you want that i improve, for example suggestions, improvements, design improvements, bugs, missplacements, ... everything, because i want to create the best tool i can, and i'd like to know all your opinions about this app to work on it and improve it, i know the majoir thing you want is clover support, but which clover settings and drivers should i use by default to install clover? i will offer some "generic clover templates" which should work on most systems for both uefi and legacy installs , i will also leave an advanced clover install mode, which will let you choose manually all the otpions to install clover and will allows you to edit the config.plist using clover configurator, only restriction i will give for that is that you have to install clover in the EFI partition of the usb drive, and also something of usefould will be to have tinu creating copyes of some software you will need on your usb drive, like clover configurator.2 points
-
Since now the CloverUpdater will be 64 bits application. Will check others utilities.2 points
-
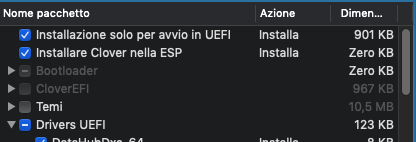
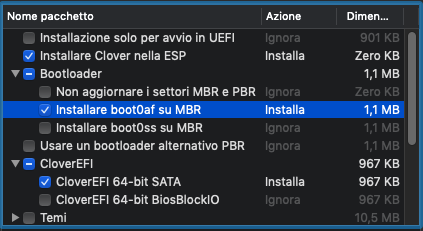
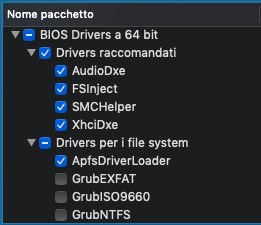
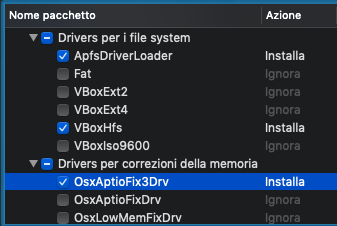
Ciro82==>>Thanks Uno dei tre Requisiti: Hack funzionante Mac vero Macchina virtuale Impostazioni Bios per il boot: Cercate una voce del tipo “Sata Mode”e settatela in AHCI Secure Boot: disabilitare o altri sistemi operativi CSM: UEFI o LEGACY, oppure a secondo del tipo di installazione VT-x / VT-d disable *Nota: Secure boot e csm valido solo per bios UEFI Materiale Occorrente "OS X (Versione App.Store)” USB 8GB *nota: nel caso di usb superiori dovrà essere partizionata, in modo da avere una partizione su cui "lavoreremo,di questa dimensione ShowAllfiles kext Wizard Bootloader Clover_2.3k_r xxx: http: //sourceforge.n.../cloverefiboot/ Clover Configurator: http: //mackie100proj...a.org/download/ FakeSmc.kext: https://github.com/kozlek/HWSensors/releases In allegato,a fondo pagina troverete un "pacchetto" contenente : ShowAllfiles, Kext Wizard, FakeSmc.kext: App alternative: ESP Mounter Pro: per montare la partizione EFI Vi illustrerò tre metodi per creare la usb, ma sono ben distinti… quindi usatene soltanto uno Metodo 1: “Install Mac_OS_X.command” Metodo 2: “Create Install Media di Apple” Metodo 3: Metodo Manuale Alla fine delle preparazione dell’installer, tutti i metodi necessitano l’installazione del Bootloader Clover sulla a vostra USB. “CONDIZIONI OBBLIGATORIE” PUNTO 1: che la vostra usb sia stata preventivamente nominata USB (caratteri maiuscoli) Tabella di partizione GUID e la formattazione in Mac esteso Journaled. PUNTO 2: che l’installer di OSX si trovi in Applicazioni Utility Disco Selezionate la pendrive, andate su “partizione”, selezionate “1 partizione”, impostate Mac OS esteso journaled e date il nome USB, poi in basso cliccate su opzioni e scegliete Tabella partizione (GUID), poi “applica”. Immagine Riporto nuovamente l’operazione sopra citata adoperando dal nuovo Utility Disco introdotto su El Capitan. Rimane ovviamente invariato nome della usb in ==>> USB (maiuscolo), la formattazione in Mac esteso Journaled e sia la mappa partizione in GUID Da utility disco selezionate la usb, cliccate su inizializza. dal menù a tendina scegliete la relative impostazioni Immagine Procedura effettua da High Sierra è la stessa della precedente, l'unica attenzione e operazione da aggiungere in primis è cliccare nel menù a tendina in alto sulla sinistra di utility disco e selezionare "mostra tutti i dispositivi" Immagine ===================== METODO 1: "Install_Mac_OS_X.Command" Lo script che trovate allegato in fondo alla guida permette la creazione dell’installer in maniera automatica Include la possibilità di scelta di tre versioni di osx Yosemite El Capitan Sierra Il risultato finale è come quello del metodo "manuale" descritto nella guida, per cui l'installazione avverrà in un solo passaggio, non in due come con il metodo createinstallmedia. Offre inoltre la possibilità di inserire un kernel patchato, utile, per esempio, per chi usa AMD. Rimane invariato il nome dato alla usb in USB, mappa partizione e tipo di formattazione Se la vostra usb non sarà rinominata nel modo corretto, verrete avvisati dal terminale, quindi non dovrete far altro che apportare la relativa modifica e rilanciare nuovamente lo script Esempio =========================== Metodo 2 L'intento è quello di usare la procedura fornitaci direttamente da Apple, "createinstallmedia", introdotta con Mavericks. Tale metodo prevede l’uso del terminale che via via se ne sta perdendo il “valore e l’uso” Inizialmente per i neofiti potrà sembrare problematico ma alla fine non è così. Durante il post installazione alcune operazioni ne richiedono l’ uso. Perciò mi sono chiesto perchè, qualora uno volesse, non far conoscere da subito un po’ questo “strumento”??? Per favorirvi vi ho allegato i comandi già “pronti”, i quali li potrete copiare ed incollare sul terminale. A questo punto aprite il terminale, copiate ed incollate il comando sottostante e premete invio, digitate la vostra password e premete nuovamente invio. Comando per creare USB con Yosemite: sudo /Applications/Install\ OS\ X\ Yosemite.app/Contents/Resources/createinstallmedia --volume /Volumes/USB --applicationpath /Applications/Install\ OS\ X\ Yosemite.app --nointeraction Comando per creare USB con El Capitan sudo /Applications/Install\ OS\ X\ El\ Capitan.app/Contents/Resources/createinstallmedia --volume /Volumes/USB --applicationpath /Applications/Install\ OS\ X\ El\ Capitan.app --nointeraction Comando per creare USB con Sierra sudo /Applications/Install\ macOS\ Sierra.app/Contents/Resources/createinstallmedia --volume /Volumes/USB --applicationpath /Applications/Install\ macOS\ Sierra.app/ --nointeraction Per creare USB con Hight Sierra o Mojave usate --> C_I_M (aggiornato per 10.14) Funziona con il drag & drop sul terminale, in questo caso non vi è necessità che la usb sia nominata in un determinato modo ed essendo basato su create install media ovviamente funziona da 10.9 a 10.14.... BENE…IL PROCESSO DI CREAZIONE E’ INIZIATO… AVREMO CIRCA 20/30 MINUTI DI TEMPO LIBERO A CUI DEDICARSI A CIO’ CHE VOGLIAMO……………………………………….. COLGO L’OCCASIONE PER FARVI NOTARE LA VELOCITA’ E LA SICUREZZA DI QUESTO METODO CONFRONTATE QUESTO CON IL TERZO METODO E NOTERETE CHE CON UN SOLO PASSAGGIO, OSSIA IL COMANDO DATO AL TERMINALE, FACCIAMO IN UNA SINGOLA OPERAZIONE TUTTI I VARI STEP DESCRITTI SULL’ ALTRO METODO. DETTO QUESTO, MOLTO IMPORTANTE E’ SOTTOLINEARE CHE COSI’ FACENDO EVITEREMO ERRORI DI DISTRAZIONE RIGUARDO AI PASSAGGI O FRAINTENDIMENTI. Immagine Potete adesso passare ad installare il bootloader Clover sulla vostra usb. *NOTA*: Avendo usato questo metodo l'installazione si dividerà in due fasi, perciò dopo il primo riavvio e necessario far partire nuovamente l'installer, selezionare lo stesso disco senza formattarlo. Finita questa ulteriore fase , l'installazione sarà terminata ========================= METODO "MANUALE".... (lascio per futura memoria-Compatibile fino a 10.12) ========================== Bootloader **Nota:** Installazione in UEFI dipenderà dalla scheda madre in vostro possesso, quindi se non supporta tale opzione , il bootloader dovrà essere installato in modalità Legacy. Vi invito, qualora non sapeste questa informazione, a recarvi nel sito ufficiale del produttore e controllare le informazioni a riguardo Fatto questo dobbiamo installare Clover sulla usb. A seconda del tipo di Bios o al tipo di installazione che vogliamo fare UEFI o Legacy avremo ovviamente configurazioni diverse in questa fase. Lanciate il pkg. Immagine Cambiate la destinazione di installazione ad USB oppure Install Mac_OS_X (a secondo del tipo di creazione eseguita) Successivamente clicchiamo su "Ad Hoc" Per Installazione UEFI Mettete i flag : Installazione solo per avvio UEFI : installare Clover nella ESP : Driver64UEFI AptioMemory --> (consigliato) -> Link download Può essere solo aggiunto manualmente scaricando dal link sopra e collocandolo nella rispettiva cartella NOTA: in questo caso non selezionare nessun OsxAptioFixDRV durante l'installazione di clover oppure rimuovetelo successivamente. : Driver64UEFI ApfsDriverLoader --> (consigliato) --> sostituisce l'uso del driver apfs.efi : Selezionate l'altri driver come da successiva immagine, *Nota: Altri driver che si possono usare al suo posto sono: informazioni Proseguite con l’installazione. Immagine ** Ricordate che avrete accesso a questa cartella dopo aver montato la partizione EFI** =========================== Per installazione Legacy Immagine =========================== Impostazione per config.plist: Con clover configurator “montate” la partizione EFI della usb. 1) Per fare questo nel menù di sinistra, cliccate su “Mount EFI” 2) individuate la partizione relativa alla vostra usb, a questo punto montiamo la relativa partizione EFI selezionando l’apposito pulsante “Mount Partition” Immagine 3) Successivamente cliccate su “Open Partition”.. recatevi in EFI/Clover ed aprite il config.plist 4) Sezione ACPI: Disabilitate tutti i fix sia del menù 1 che del menù 2 Immagine 5) Sezione BOOT: Sole se si sta installando Yosemite mettete il flag su kext-dev-mode=1 Immagine 6) Sezione RT Variables: Se si sta installando El Capitan oppure Sierra, aggiungere i valori: BooterConfig= 0x28, CsrActiveConfig= 0x67 Immagine 7) Sezione System Parameters: Su inject kext mettete YES Immagine =========================== Nota: Su El Capitan, è stato introdotto SIP (System Integrity Protection) Info: =========================== Recatevi in EFI/Clover/kext/10.x X= alla versione di osx che state installando. Per esempio se installerete Yosemite dovrete recarvi nella cartella 10.10, con El Capitan in 10.11….ecc Se non ci fosse tale cartella, createla e nominatela voi a “modo”. Copiatevi all’interno FakeSmc.kext *Nota se venite già da altre vostre configurazioni, oltre kext sopra citato ,potete mettere gli altri necessari per il vostro hardware Stessa cosa se avete DSDT e/o SSDT potete copiarli in EFI/Clover/Acpi/Patched Immagine  Per High Sierra: Scaricare il driver apfs.efi a fine guida, collocarlo: --> EFI/clover/Driver64UEFI se stiamo usando UEFI --> EFI/Clover/Driver64 se stiamo usando Legacy Per chi volesse continuare ad usare HFS vi rimando a questo post: Come installare High Sierra in HFS direttamente dalla usb Utenti Laptop: Nel 99% è obbligatorio disattivare la grafica discreta Nvidia/Amd per installare questo nuovo osx Quindi aggiungete --> SSDT-Disable_DGPU.aml.zip in EFI/Clover/acpi/Patched della usb -------------------------------------------------------------------- Per Mojave: Scaricare il driver apfs.efi per 10.14 a fine guida, collocarlo: --> EFI/clover/Driver64UEFI se stiamo usando UEFI --> EFI/Clover/Driver64 se stiamo usando Legacy Versione di clover non antecedente a V_4015 Volete usare HFS? E' possibile fare un installazione diretta su altro disco o partizione, nel caso può essere usato anche per effettuare aggiornamenti... nel caso guardate... Mojave in HFS Oppure direttamente da usb Fatto questo avrete la vostra USB bootable per installare OSX. ………Non scordatevi Fakesmc.kext da mettere nella relativa cartella…. senza il quale non farete mai il Boot...... *NOTA: se usato il terminale per la creazione della usb, l'installazione si dividerà in due fasi, perciò dopo il primo riavvio e necessario far partire nuovamente l'installer, selezionare lo stesso disco senza formattarlo. Finita questa ulteriore fase , l'installazione sarà terminata **NOTA** Se avete processori Broadwell,Skylake o Kabylake...usate FakeSmc.kext e relativi sensors che trovate all'interno del secondo pacchetto.. (potete usarlo anche sui precedenti senza problemi, essendo una versione più aggiornata ha ulteriore supporto per le cpu più recenti) Update: Fakesmc e sensors versione 6.26 Post installazione... post #2 Buon Hack…..  Aggiornamento:Install_Mac_OS_X.command.zip (compatibile da 10.10 a 10.12) le info le trovate a questo post Ringrazio @Ciro82 che mi ha aiutato nel preparare questa guida. Pacchetto.zip Pacchetto-2.zip Pacchetto-Fake+Sensors 6.26.1440.zip C_I_M.zip

 1 point
 -
interesting.. now it's there again. It wasn't when I went there right before I asked my question. I even tried a different browser and a different theme to make sure it's not a browser issue. So that was just a temporary forum glitch. Thanks RobertX!1 point
-
https://github.com/alexandred/VoodooI2C-Patches/blob/master/Windows/Windows_10.txt disable xosi in clover1 point
-
then add windows 10 patch and remove xosi1 point
-
Here it is a useful new tool for Oz made by mackie100 called Ozmosis Configurator.1 point
-
Ho attivato anche l'audio con apple alc e lilu1 point
-
yours is working the same as my brightness levels, except i have slider, ive tried cant be of more help well that shouldnt happen did you delete appleintellpssi2c.kext1 point
-
ive checked and 0x47 is right, i cant think why its not working. sorry1 point
-
im checking your apic pin is correct https://voodooi2c.github.io/#GPIO Pinning/GPIO Pinning1 point
-
1 point
-
yes exactly same touchpad as mine, im on rog gl702vm yes you can pinch zoom and 3 finger swipe etc. the ioreg indicates the touchpad is working i renamed here replace all dsdt/ssdt patched 3.zip1 point
-
did you have brightness slider with either? theres nothing missing regards backlight patches, the patches are working maybe rename pegp to gfx0 also voodooi2c sometimes doesnt work if you boot with usb mouse plugged in1 point
-
I'll post 2 ioregs one with the first patched ACPI and one with the second one with unmodified brightness First: https://www5.zippyshare.com/v/EUSxyrAH/file.html Second: https://www9.zippyshare.com/v/BCmgjXP5/file.html1 point
-
1 point
-
try this, i changed backlight back to how it was with no slider patched 2.zip1 point
-
Okay rebooting now let's hope it works1 point
-
ok so im available for a while, install the acpi files i sent to you with and post your ioreg ok so i think ive fixed your touchpad try this zip patched 2.zip1 point
-
Per creare ssdt usa SSDT_Automator PM.. power management della cpu...1 point
-
Prova AptioMemoryFix.efi dovresti risolvere , ho letto e sembra hai già la configurazione nella tua USB avviabile .... Basta copi la cartella Clover e la sovrastavi a quella presente in SDD\HDD1 point
-
ok so im available for a while, install the acpi files i sent to you with and post your ioreg1 point
-
Test HWMonitorSMC2.app_Test31 point
-
@RobertX already has answered you here:1 point
-
Oh okay, but the brightness levels are still messed up and there's still no slider should I do something on my side?1 point
-
you dont understand, ive already given them to you. the _DSM method for pci0.peg0.pegp i added for you in ssdt-8.aml1 point
-
vai al secondo post della mia guida1 point
-
theyre in ssdt-8.aml1 point
-
1 point
-
You are saying that thunderbolt hotplug works natively on your machine with no edits of any kind? I don't think that is the case as you would be the only person in the world to have this. It seems more likely you have other files or pieces still in place. It is quite possible this method simply will not work for your purposes. Note, this is "PCI hotplug" not actual native Thunderbolt hotplug, so it may not work here. Also, some devices do not support either thunderbolt hotplug, or do not support PCI hotplug. You would need to check in the Info.plist of your device kexts to see if they even contain IOPCITunnelCompatible=Yes, or perhaps other settings.1 point
-
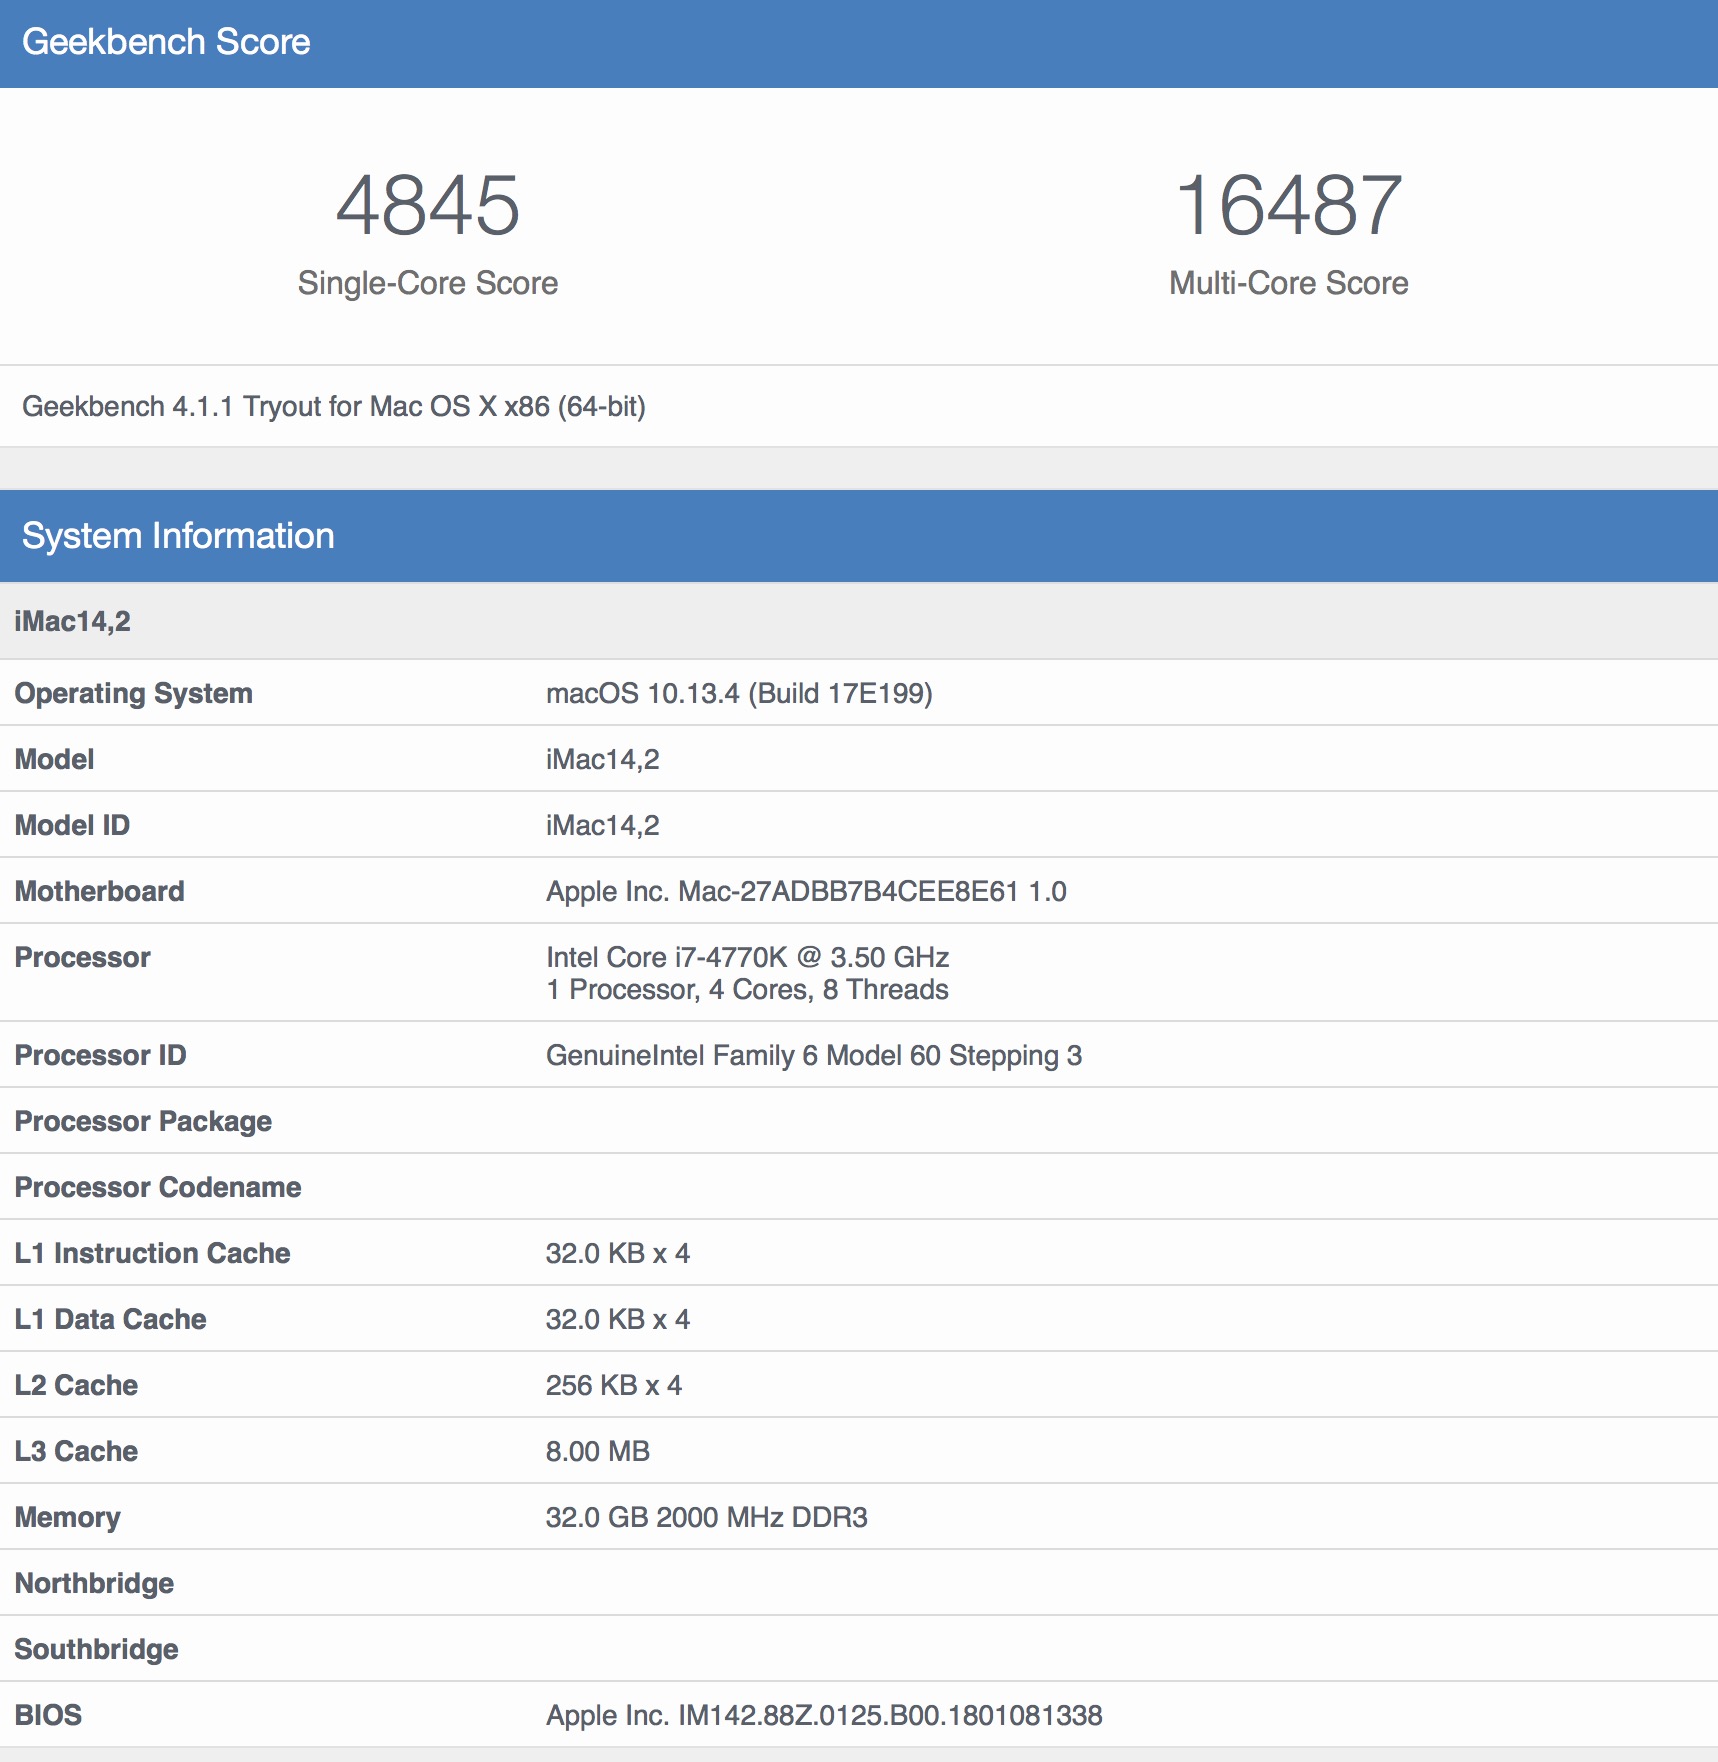
There's something really wrong with your system, we basically have the same setup (except i'm running nvidia 980ti) your cpu score are way too low, look at mine for the same CPU. With a little overlock our CPU should be able to bench scores of 18,500.
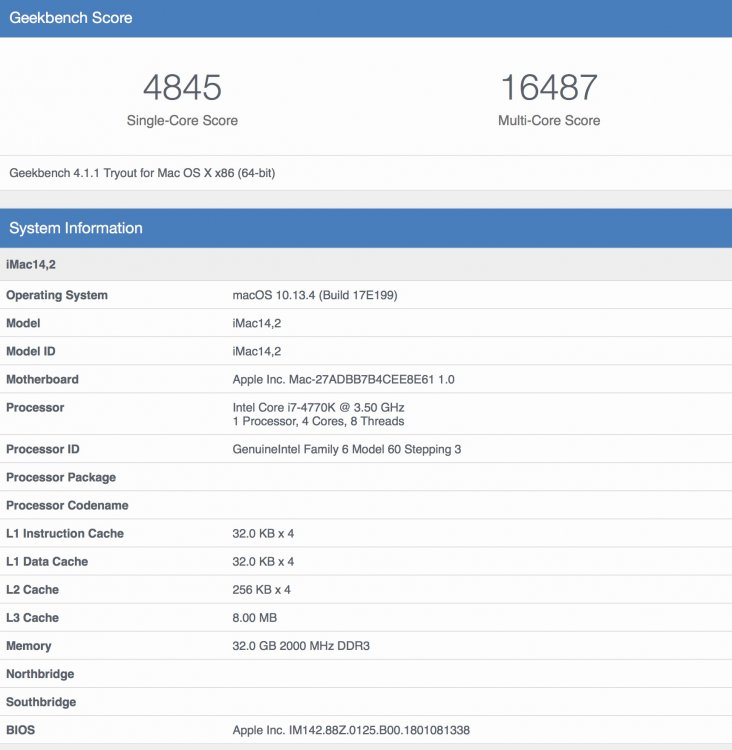 1 point
 -
I use this workaround https://derflounder.wordpress.com/2018/04/12/32-bit-application-alert-message-in-macos-10-13-4/1 point
-
That app is a 32bit app and Apple, starting yesterday in 10.13.4, began showing that message when you run 32bit apps. They will end support for 32bit soon. IDK when. Maybe on 10.14.1 point
-
ok, i have been trying for 2 days to implement the frequency switching, but at the end nothing worked, so now i can release a version of the kx audio driver with 44,1 khz as default frequency and then if you want to use a different one, you need use a boot arg and also rebooting. To mod the driver, do you know someone who can help me? like one of the famous hackintosh developers for audio or someone from the kx audio driver project? i will try to contact some of the developers of the kx audio dirver and i will also try to commit my audigy rx improved compatibility for the original driver, because it lacks support for all the i/o of the audigy rx, which can be added using a very simle mod to the existing code1 point
-
So I set config.plist/SystemParameters/BacklightLevel to null (empty), and guess what? now the brightness level is saved after boot!1 point
-
@Slice, @Alpha22 please tell me if this is better: HWMonitorSMC2.app_Test3.zip1 point
-
Using first syntax is the best way, already discussed many posts ago. If u use second one, clover will try to patch everything matching that name ... no good, because if patch can be applied (if no luck) probably system will not be able to reach desktop. Fred1 point
-
Thanks Matthew82 ! : After a week of severals issues : 1/ Bios recommended parameters + Pci devices set as Legacy 2/ I added this from your post on my config.plist 3/ I created my own SSDT What is working : - Hot plug USB or HDD pluged on USB 3.1 or USB C : eject and re-plug OK ( My WINDOWS_10_ HDD connected up right ) Not working ( working in Windows 10 ) - Display sreen connected on USB C SSDT-TB3U2.aml.zip
 1 point
 -
Por lo que he encontrado parece que tu CPU no es compatible con macOS. Encontré también un hilo sobre la creación de un kernel que habilite el uso de CPUs incompatibles pero con resultados negativos. Y has podido iniciar con Chameleon probablemente porque es un loader legacy, en Clover puedes probar con KernelCPU o FakeCPUID.1 point
-
Rehabman made a config_HD510.plist that should be usable for an HD 500 as well. But unfortunately I have not been able to hackintosh my Intel NUC6CAYH with Intel Celeron Quad Core Processor J3455, Intel HD Graphics 500. See: https://www.tonymacx86.com/threads/poor-mans-hackintosh.231034/ Any ideas here? I found out, that the J3455 misses SSE4-instructions, which are required as of macOS Sierra.1 point
-
--------------> Piccola nota per Post Installazione Quando avete installato,in caso di necessità di aiuto per post installazione, aprite un topic nella sezione corretta Ricordatevi, se non l'avete già fatto, di mettere in firma il vostro hardware in modo dettagliato, per farlo andate sul vostro profilo, voce signature. Scaricate Hack_Info (1).zip Doppio click sopra...attendete che abbia terminato. Allegate sul vostro topic lo zip che avrà creato su vostro desktop --> HackInfo_Report Scaricate IORegistryExplorer.zip aprite l'app su file, save as, salvate comprimete e postate l'output Scaricate DPCIManager.zip fate la foto alla parte Status e PCI list,postale entrambe Tutto questo fornisce informazioni utili a chi vorrà aiutarvi a risolvere i vostri problemi -------------------------------------------------------------------------------------------------------------------------------------------------1 point
-
no. i literally just told you that my setup is the same. your an ignorant muppet haven't i helped you enough? learn to do it for yourself like i did0 points


.thumb.jpeg.7082d67b3394c9399e80144027a7b397.jpeg)