Leaderboard


Popular Content
Showing content with the highest reputation on 04/15/2018 in all areas
-
Would be a great idea to update it. If anyone have the complete knowledge about Clover, we can create a "second" Wiki here in IM. What do you think?3 points
-
k replace DSDT DSDT.aml.zip and replace UsbInjectall too, use this version USBInjectAll.kext.zip2 points
-
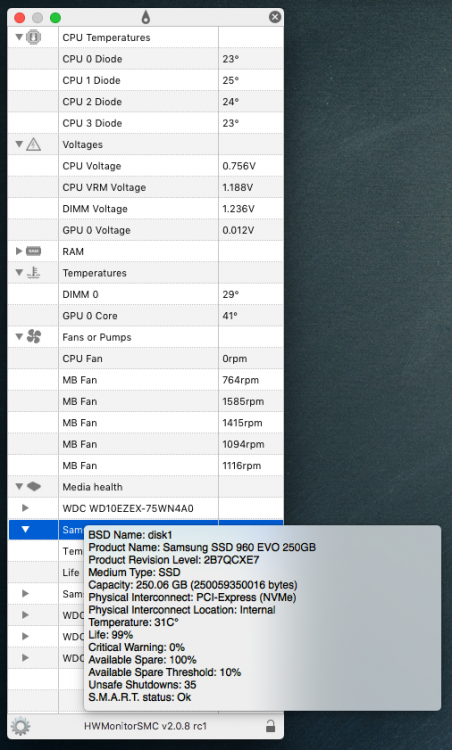
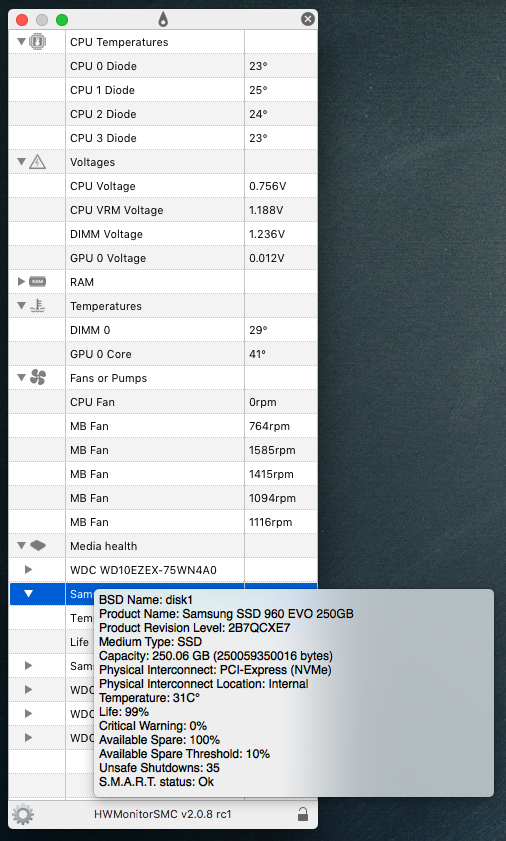
Guys this package: HWSensors-3_r118.pkg.zip contains an improved version of HWMonitorSMC2.app: - new SMART core made in swift (world first?) that can read s.m.a.r.t. attributes from ATA and finally from NVMe disks - on right click over any rows (not all but most of it) show detailed info about: CPU (brand string, system usage) RAM S.M.A.R.T. attributes with detailed informations about your disks (BSD name, vendor name, serial etc.), Battery (laptops) with capacity, max capacity, cycle count, temperature etc. (anyway not with VoodooBattery but works with Rehabman's kext or in a real mac) SYSTEM with info about processes, threads and more. POWER (if supported), with info about cpu limit, thermal level etc. Please show a screen shot about S.M.A.R.T on SATA and NVMe because I worked hard on this. Big thanks goes to @fabiosun for tens and tens of tests made who helped me a lot debugging smart on mechanical and nvme drives (which I did not own). Thanks goes also to SystemKit.framenwork, now embedded into the project and smartmontools for the reverse engineering that make possible acquire smart datas for NVMe drives on macOS! TODO: - do a better layout of the datas showned when you right click fixed - find gpu information somehow @Slice, soon (tonight) I'll commit those changes, just waiting some tests here EDIT commited2 points
-
the sb0570 is the audigy se which is not compatible with this driver, you have to own sound cards based on the 10k1 or 10k2 or similar chipsets to work with this driver, yours uses a totally different architecture, but if you want to test it, compatible sound cards like sopund blaster live are cheap to get and compatible, for pcie you can use the sound blaster audigy rx2 points
-
Hi ITzTravelInTime. I am new to hackintosh world. I have a Sound Blaster Audigy SE SB0570. I tried your driver and it is not working, as expected. I would like to help you in some way, I am a developer. Please fell free to ask me for tests or anything. Thanks for your effort!2 points
-
If Clover is going to GitHub, having a GitHub wiki would be easier for people to update, and translate.2 points
-
I have 3 Radeon HD 5450 testing in HighSierra and its working like Sierra no difference here2 points
-

Version 2.9.1
1,995 downloads
VoodooHDA 2.9.1 2018 FULL Pack https://sourceforge.net/projects/voodoohda/1 point -
successfully installed high Sierra on my Acer V3-571G Follow the Steps : 1- download the image of High Sierra from this link : https://drive.google.com/open?id=0B3USSct6ujF6bHRxZElVWU5oaVk 2- Write it to your USB Flash (8 gb or higher) with Suse image writer (https://github.com/downloads/openSUSE/kiwi/ImageWriter.exe) Fairly Stright forward 3- First disable dual graphic in your laptop bios, and make sure VT-d is disabled. 4- install through your USB, two step installation, then after installation boot your hard disk from USB again. 5- install clover configurator then mount EFI partition to install bootloader, download the latest clover or just copy the clover folder inside EFI folder in USB 6- next after u installed clover bootloader , install attached kext to : Library/EXtensions not System/Library/Extensions (see the attachments) 7- Do the Repair cache and restart, Enjoy full QC High sierra boom I love it What is working : - BCM 57785 working, however when u restart It wont wake up until u shut down ur laptop !!!!!! - ALC269 working fully with my KEXT attached and layout injection 28 in clover devices tab - Wifi natively supported ( I chaned to the card that natively supported) - Graphic fully working HDMI but not VGA (inject this id 0x01660003) - Trackpad is also fully working with the attached kext. - my DSDT.aml and SSDT.aml attached in clover folder. Awesome operating system I love it Acer V3-571G.rar
 1 point
 -
ur old clover folder, config.plist, etc kill _DSM, the problem is there1 point
-
Good news and Bad news. DP audio working, Shutdown working. But No more PCI info and internal Audio. TT
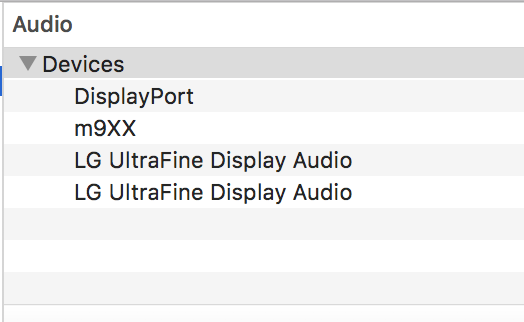
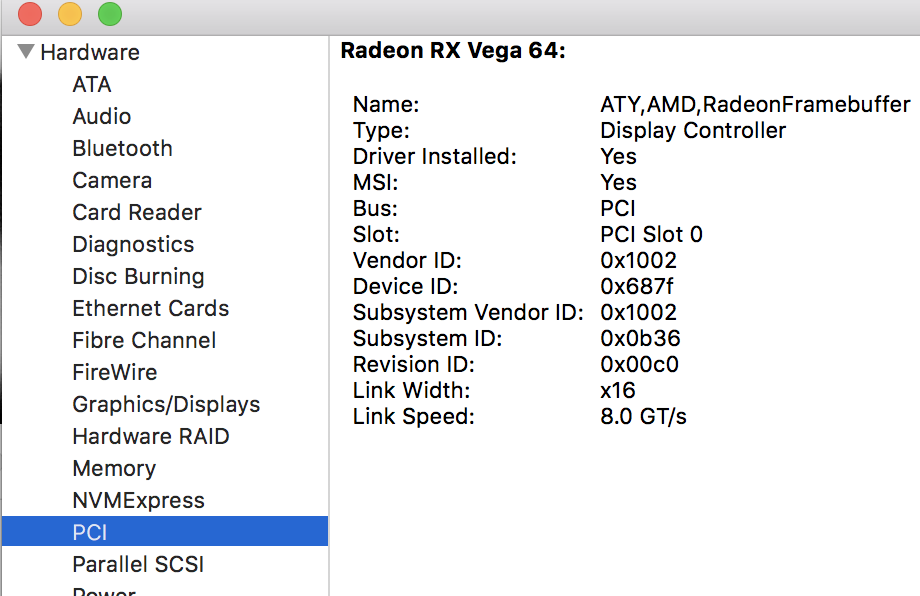 1 point
 -
for the sample rate stuff i can make the driver to work at 44.1 khz as default frequency but i am figuring out how to change sample rate whithout rebooting, as i have seen in the perform format change event i have to change the buffer of my audio stream or to rebuild it to work at a different frequency1 point
-
You make it sound easy because you know EVERYTHING THERE IS TO KNOW! But I don't know where PlugIn type is or where or what the heck Apply a Name _SUN. You are way to smart and I can't keep up! Do you have links on DSDT and SSDT tutorials? I would love to learn!1 point
-
No, u can use same file, CPU is just a PlugIn type and video i apply a Name _SUN Boca, send me new SEND_ME, i need check log1 point
-
Very good! No matter the kexts you installed unless too old.1 point
-
@vector sigma Nice work Thanks a lot man. Everything seems to be working fine. I just have to say I'm using my previous sensors. Haven't tested my rig with the sensors included in the package. I'll test them later and report back.
 1 point
 -
Giusto, ho messo anche quello per xhcimux, però non vengono caricati da quanto riporta hack_info1 point
-
Hi Maldon. I just realized when I insert a USB (2.0 or 3.0) it says "USB Accessory Needs Power" (see pic below) Here are my RunMe File results https://drive.google.com/file/d/1ZMQvbbBizbjkU_AjY0moeTUSxV7jEME_/view?usp=sharing
 1 point
 -
regurding driver source code, i have seen that new commits of the original kx audio driover have been made, but nothig that will change the mac os side, the only this is a minor change in a buffer size, that i have applied to mine branch, and also from testing i have seen tat the driver boots up and seems to work with the 44.1 khz sample rate, so now i have only to figure out how to change the sample rate from the driver side, maybe i can make as a default frequency 44,1 khz, you can try this with the latest source of the driver, just go into audio engine file and change the value of the sampling_rate variable in the init function, note that the value is in hz and not khz, so 44,1 is 441001 point
-
Ionetworking è il kext di sistema, quello che ti usavi era uno che veniva patchato ma da poi hanno fatto il fakepciid. Se hai pazienza quando arrivò a casa si può guardare meglio. Intanto scaricati dpcimanager ( li trovi in uno dei link nella mia firma) e posta immagini di status e pci list. Fai anche un hack info (lo trovi sempre nel link )1 point
-
Sposta pure i kext in 10.13 poi invece di un riavvio spegni il pc e avvialo. Controlla tutto, la rete dovrebbe esserci Per l’audio devi selezionare l’uscita giusta in preferenze di sistema probabilmente.1 point
-
Meglio evitare apfs se puoi, ma se hai una ssd telo farà automaticamente. Ci penseremo dopò eventualmente. Perché Sierra? Non dovevi installare High Sierra? Comunque la scelta è giusta perché altrimenti avresti fatto partire nuovamente l’installer1 point
-
you're most welcome i would really like if all the inputs and outputs working without any problem1 point
-
Hello, what about USB3? I have Z620 but have errors only with USB.1 point
-
Se hai SSD installerà APFS credo , in automatico .....1 point
-
<string>com.apple.driver.usb.AppleUSBXHCI</string> <string>AppleUSBXHCI</string> same?1 point
-
Se li ho messi in una cartella a parte ci sarà un motivo. Quando sarai sul desktop li metterai insieme agli altri. Metti il DSDT allegato in EFI/CLOVER/ACPI/patched (non in origin mi raccomando) e sostituisci il config con il config 3. Quando avrai fatto l'installazione sposta come detto sopra i file in Post-Install insieme agli altri in 10.13, riavvia e controlla il funzionamento del problema. Un appunto riguardo la Ethernet, funziona perfettamente però sparisce se si fa un riavvio, bisogna sempre fare un avvio a "freddo", cioè spegnere e riaccendere il pc. DSDT.aml 2.zip config.plist 3.zip Per la nvidia dovrai usare i driver web e selezionare Nvidia Web nella sezione System parameters del config. Purtroppo oggi pomeriggio sono in via, ma ci sarà sicuramente chi ti dà una mano. Per avere avvio UEFI anche con Clover su HDD/SSD c'è una procedura da fare, gengik la conosce meglio di me. Se hai qualche problema metti la grafica integrata come principale nel bios con shared memory 32Mb1 point
-
Hai una mobo Z77 HW simile al mio + Nvidia , quindi la cartella ti ho passato è perfetta x te dovresti poi sistemare la VGA Nvidia , con quel configplist gestisce tutto Clover PM, fix, dovrebbe funzionarti con quello dovresti solo adeguare le Kext all'HW , comunque Jolly ne sa più di me di certo , buona domenica a tutti1 point
-
Try installing voodoo to system/library/extensions instead1 point
-
Se sono in post-install li metterai in 10.13 dopo l’installazione. Passa le tabelle ACPI1 point
-
I don't think I understand 100%. When I select Internal speaker I don't get any sound. I haven't tried headphones but I will buy some in the morning. I'm not sure what you mean by "change ato in some layout ids" Thank you Maldon1 point
-
u can check in system preferences sound if audio onboard appears there and change
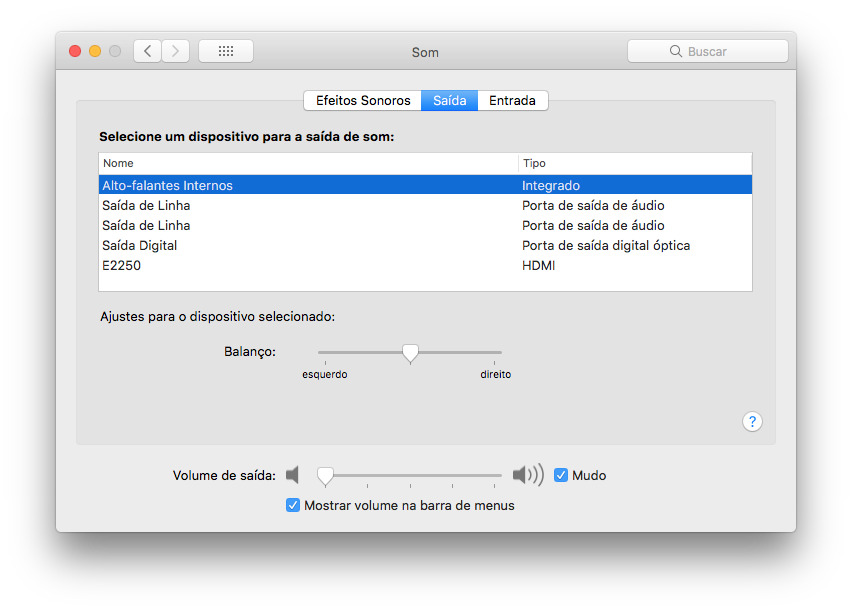 1 point
 -
u inject, save and reboot, one by one?1 point
-
Yes, that DSDT worked great! I have audio HDMI, Internal Speaker & Digital Out... but I don't see line green out for speakers I plug into the green rear output. I am using 5 inject in cover configurator. Should I try different inject numbers you suggested earlier (5,7,11,12,13)?1 point
-
use my folder, but replace DSDT, use it DSDT.aml.zip1 point
-
Absolutely perfect guide, thank you! I just installed 10.13.4 and got almost everything working instantly. Only 2 things is Power Management and Audio as the guide says DSDT work for both (see below) and I still don't know how to do DSDT work yet. The Guide says Power Management: 4 Generation+ Intel Processors, use PluginType=1 in DSDT, SSDT or Clover config.plist Audio: Use DSDT + AppleAlc I was wondering if someone can take a look at my RunMe results and help me with DSDT/SSDT for Power Management and Audio. Specs: Mac OSX 10.13.4, HP Pavilion 550-036, I3-4170, Intel HD Graphics 4400 Here are my RunMe results: https://drive.google.com/file/d/1ooH2oForI42pyM2cD_-0HJ2ZymtHdFAz/view?usp=sharing1 point
-
Google translate translation is wrong. My awareness is to replace the IGPU with an HD4000 CPU, such as the i3-3225 i5-3475s. These IGPUs are all HD4000. Can they be supported?1 point
-
looks good, test all usbs ports, sleep, shutdown, etc let me know1 point
-
replace, reboot and send me new SEND_ME with new files CLOVER.zip1 point
-
use options for install Clover
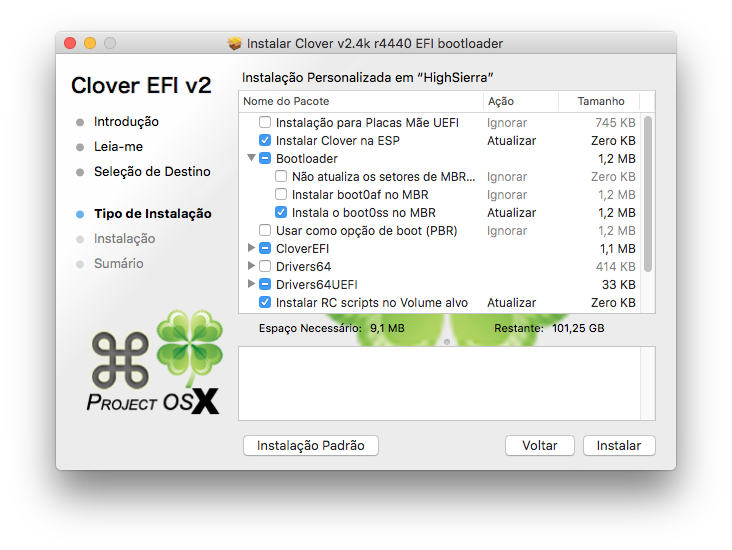
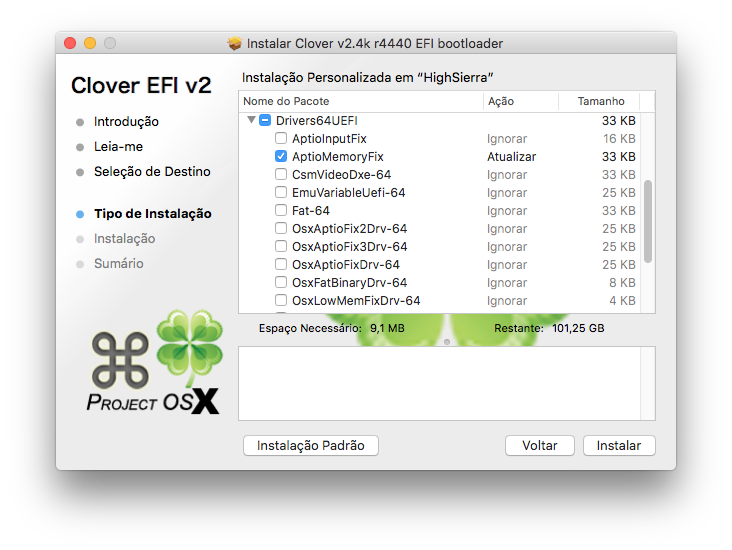
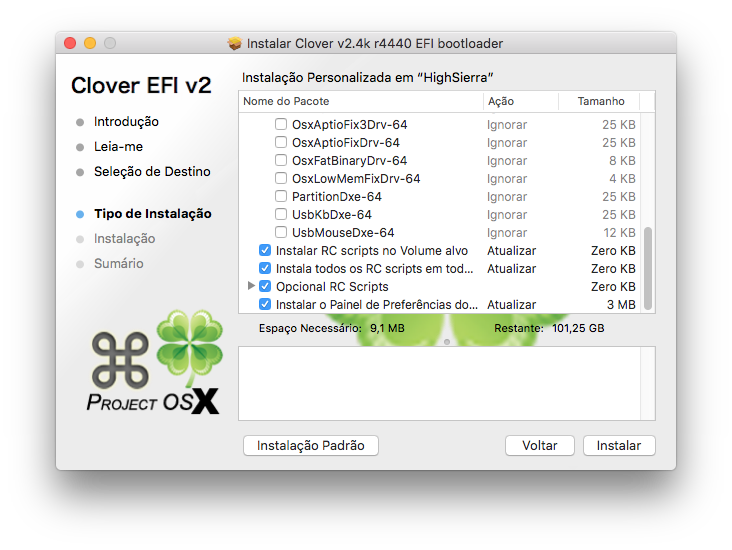 1 point
 -
https://www119.zippyshare.com/d/qrGexFS3/30128/CLOVER.zip u dont need a fakecpuid generate all info SMBIOS with Clover Configurator u need post ur files, check first post Yes, have a some dependencies with OEM SSDTs U can use it for good rename and solve dependencies problems change GFX0 to IGPU 47465830 49475055 change HDAS to HDEF 48444153 48444546 change HECI to IMEI 48454349 494d4549 change SAT0 to SATA 53415430 53415441 change GLAN to GIGE 474c 414e 4749 47451 point
-
post a full dump, i'll check RunMe.app.zip1 point
-
I think HDD mechanical is the cause, thats not append with a SSD1 point
-
Either use whatevergreen and lilu or use InjectATI=True don't use both, you card has built-in support in macOS and you won't be needing to add anything to your config.plist, However if you use WhateverGreen and lilu it will help macOS to detect the correct connectors for your GPU. Is the iGPU enabled in BIOS? if so disable it and set primary to PEG or PCIe. You can also send your EFI folder or the config.plist to see if there's a problem. Remove "Apple" folder, Serial Number, MLB, UUID from config.plist before posting it.1 point
-
Here is the last update Nvidia update for release OS X 10.11.6 (15G20015) : https://images.nvidia.com/mac/pkg/346/WebDriver-346.03.15f13.pkg1 point
-
It's a help thread, desktop, notebook... Ure Welcome! I'll check! Check, need test CLOVER.zip1 point
-
I was able to get 10.11.6 to successfully install and boot, and have eliminated most problems with it. This is my specific hardware. USB3 and Ethernet were tracked down in ioreg. I cant guarantee this will work for any other model, but this should help at least some people. Intel Core i7-2640m - Series 6 - HM67 chipset - 6GB DDR3 - HD3000 1366x768- Realtek RTL8105 Ethernet - Fresco Logic FL1009 USB3 - Azureware Broadcom BCM94352HMB wifi/bluetooth (this is replaced from the OEM Intel Centrino card) Rehabman was a HUGE help in figuring this all out. First off, previous posts state that if you had Realtek 8100 ethernet you had Renesas/NEC USB3, and if you had Realtek 8111 Gigabit you had Fresco Logic USB3. Turns out, this particular laptop has 8100 Fast Ethernet with Fresco Logic FL1009 USB3. Im not going to write a guide on how to put the El Capitan installer from appstore onto a usb stick. There are plenty of guides out there. I used a 16GB USB 2.0 stick. USB stick is GUID and formatted HFS+J Ill give the specific details on what I did unique to make this all work: Clover r3625 Options checked on clover install customize: Install for UEFI only Bluemac theme OsxAptioFixDrv-64 from Drivers64UEFI After install, download HFSPlus.efi from https://github.com/JrCs/CloverGrowerPro/raw/master/Files/HFSPlus/X64/HFSPlus.efiand copy it to copy it to /EFI/Clover/drivers64UEFI Remove the folders EFI/CLOVER/kexts/10.6, 10.7, 10.8, 10.9, 10.10, leaving just 'Other' In the Other folder install the following Kexts: https://github.com/RehabMan/OS-X-FakeSMC-kozlek https://github.com/RehabMan/OS-X-Voodoo-PS2-Controller https://bitbucket.org/RehabMan/os-x-usb-inject-all/downloads In google, type injector kext + FL1009 + rehabman. Choose the first result from google. In the 2nd post download the file USBXHCI_FL1009.kext . Place this file in the Other folder as well. Next we need to install a config.plist file that matches our hardware. https://github.com/RehabMan/OS-X-Clover-Laptop-Config/archive/master.zip From the file, we need config_HD3000_1366x768.plist. Copy it to your desktop and rename it config.plist Before putting it in our EFI/Clover folder, we need to modify it, or we will get a kernel panic in AppleIntelCPUPowerManagement. Use a plist editor, like Xcode or similar to open the .plist file. In conflig.plist/ACPI rename DropTables to ##DropTables and then rename #DropTables to DropTables Next under config.plist/ACPI/SSDT/Generate, change CStates and PStates to true for both (YES in Xcode) Save the changes and place the config.plist file on your desktop in /EFI/Clover/ overwriting the file thats there. Done, boot from USB, select the installer and it should do its magic. From this point update Clover onto the HDD, and install all kexts to the system volume. You'll still need to install kexts and/or DSDT edits for wifi, battery, audio, ethernet, bluetooth, brightness slider, etc. Im not going to get into these. There are several guides out there for these and they are straight forward.1 point
-
Config.plist settings Sometimes it is hard to find what values should be set in config.plist. Especial because most documentation is in Russian language. (Good their are online translators ) I have created this post about values that can be set in your config.plist, with help from Clover developers. Remember that you only need listed settings in your config.plist, if you want to change their default values. Useful Links: config.plist example. All strings in config.plist. SystemParameters prev-lang:kbd - (Language:keyboard-code, default: ru:0): Sets the Clover GUI language and keyboard type. Languages available: en - english ru - russian it - italian es - spanish pt - portuguese pl - polish de - german id - indonesian ko - korean fr - french ua - ukrainian boot-args - -v (verbose mode) -x (safe mode) npci=0x2000 (PCI Configuration Fix) darkwake=0 (for setting the "Deep sleep" mode in Lion/ML) slide=0 (Only needed for ML): Sets boot-flags to be used for booting OS X. Not all flags may be needed: e.g. safe mode LegacyBoot - (set to: PBR): But could also be LegacyBiosDefault or PBRtest. It's just the method of legacy booting, it probably won't make a difference. For some users using another method could fix legacy booting. (info by apianti) BacklightLevel - (default: 0xFFFF): Changes the luminosity of the back light of a laptop display. 0x0 is none, 0xFFFF is full back lighting. (info by apianti) CustomUUID - You have to boot OS X with Chameleon to set this value. After booting with Chameleon, open System Report, copy the Hardware UUID and paste it here. But see InjectSystemID first! InjectSystemID - (Yes/No, default: No): See this postby dmazar. iCloudFix - (Yes/No, default: Yes): May be enabled to get iCloud to work. Dropped Pointer Enable - (Yes/No, default: Yes): Enables or disables the mouse-pointer in the Clover-GUI. Speed - (default: 8): If enabled, sets the mouse-pointer movement speed. DoubleClickTime - (default: 500): Set the double-click reaction time. Mirror - (Yes/No, default: No): Rotate the mouse-pointer direction. (?) Graphics GraphicsInjector - (Yes/No): Needed for unsupported GPU's to get full resolution/QE. If set to Yes, e.g. nVidia GeForce 450 GTS becomes EVGA nVidia GeForce 450 GTS (if supported). VRAM - (auto) Set the given GPU RAM value (MB-format), e.g. 1024. LoadVBios - (Yes/No, default: No): Also available in Chameleon. You will have the ability to load a custom VBIOS for the GPU. VideoPorts - (auto): Number of video outputs to map. FBName - (auto): Has something to do with ATI Radeon cards. NVCAP - (auto): Option for nVidia-cards. Don't know what it does exactly (something to do wich (output)-port to be used). display-cfg - (auto): See this topic for information about this key. DualLink - (auto?): InjectEDID - (Yes/No, default: Yes): See Wikipedia about EDID. Try to use Yes, if you get a blank screen while booting. CustomEDID - (auto): Set a CustomEDID if non-DDC monitor. See this post for more information about this key. PatchVBios - (Yes/No, default: No): Set to Yes, to auto patch Clover-GUI video resolution. Using PatchVBiosBytes is the recommend method. PatchVBiosBytes - (custom): See this post for using this with nVidia GPU. More information how to get your GPU to work (Radeon, etc.), see this post. PCI PCIRootUID - (Number, default: 0): If OS X can't find the GPU PCI-UID location. A patched DSDT is recommend to fix this problem. If a custom DSDT.aml cannot be used set the correct PCI-UID here. (More Info) StringInjector - (Yes/No, default: No): Inject EFI-strings for GPU, ethernet, audio, etc. See key DeviceProperties. DeviceProperties - (auto): If StringInjector it set to Yes, paste the generated EFI-string here. LpcTune - (Yes/No, default: No): I believe that LpcTune actually doesn't have a purpose now as it was abandoned by Slice cause it didn't work correctly or something, Idk there's a conversation about it we had earlier. InjectClockId is needed to recover USB devices from sleep. (info by apianti) HDAInjection - (Yes/No/Hex.., default: Detect): See this post for more info. Set to No, if using a patched DSDT.aml and AppleHDA.kext. USBInjection - (Yes/No, default: Yes): Needed to get resume by keyboard to work. But if it is not working for you, set to No. InjectClockID - (Yes/No, default: No): InjectClockId is needed to recover USB devices from sleep. (info by apianti) USBFixOwnership - (Yes/No, default: Yes): Fixes USB-ownership problems in UEFI-mode. ACPI See information from here, here and here to set the correct ACPI-settings. DsdtName - Filename to be used for a generated DSDT-file or set to BIOS.aml if Clover needs to generate one for you. (See FixDsdtMask) DropOemSSDT - (Yes/No, default: No): DropOemSSDT should only be used if you are injecting a patched SSDT or if you enabled GenerateCStates/GeneratePStates. I recommend to generate a last SSDT-7/SSDT-8.aml file with freq/power-values that matches the system's CPU. Place it in the /ACPI/Patched folder to solve the hanging CPU-freq issue. A way to generate this file, is by using Revogirl's ssdtPRGen.sh. To terminate the last SSDT-number, dump to origin tables in Clover with the F4-key. DropDMAR - (Yes/No, default: No): Needs to be enabled to fix the AppleACPIPlatform.kext boot problem in 10.8.2. DropBGRT - See post from =)(= GenerateCStates - (Yes/No, default: No): Set to Yes, if booting gives you weird ACPI_SMC_PlatformPlugin errors. GeneratePStates - (Yes/No, default: No): Same note as GenerateCStates. PLimitDict - (Number, default: 0): Limit the maximum CPU P-state, by number. UnderVoltStep - (Number, default: 0): Limit the maximum CPU Voltage, by number. DoubleFirstState - (Yes/No, default: No): ?? ResetAddress - (should be: 0x64): Restart address ResetValue - (should be: 0xFE): Restart address EnableC6 - (Yes/No, default: No): Enable/disable CPU C6 reporting. (CPU-power saving) EnableC4 - (Yes/No, default: No): Enable/disable CPU C4 reporting. (CPU-power saving) EnableC2 - (Yes/No, default: No): Enable/disable CPU C2 reporting. (CPU-power saving) C3Latency - (should be: 0x03e9): If CPU supports Turbo, you may set to 0x00FA. EnableISS - (Yes/No, default: No): This should be Enabled to fix ACPI_SMC_PlatformPlugin console errors. smartUPS - (Yes/No, default: No): For MacPro - cosmetic. PatchAPIC - (Yes/No, default: No): ?? FixDsdtMask - (Mask): See this topic. If you want to disable DSDT fixing: 0x0000 FixDsdtMask should be avoided for actual DSDT patches. (info by apianti) RememberBIOS - (Yes/No, default: No): See this post SMBIOS Set a custom iModel. Clover will set the model that matches your system. But you can provide custom data here. (Chameleon Wizard, champlist can be used to get SMBios information) CPU Users should dissuade from using any of the CPU keys besides Turbo, as they should be set automatically. I believe it's also set automatically to whether the cpu supports turbo in the first place though. (info by apianti) Read this post for CPU-values that can be set. KernelAndKextPatches Debug - (Yes/No, default: No): Needed to debug Clover at boot. KernelCpu - (Yes/No, default: No): Enable to patch the kernel for unsupported CPU's. (Atom, Ivy, Pentium 4) AsusAICPUPM - (Yes/No, default: No): AppleIntelCPUPowerManagement.kext patch. No needed if using a patched BIOS. AppleRTC - (Yes/No, default: No): Patch that fixes AppleRTC.kext boot problem. Needed for 10.6 and above. KextsToPatch - (custom): See this post and this post. Volumes See this post and this post. Thanks goes out the developers. Just try to help new users.1 point


.thumb.jpeg.7082d67b3394c9399e80144027a7b397.jpeg)