Leaderboard


Popular Content
Showing content with the highest reputation on 04/13/2018 in all areas
-
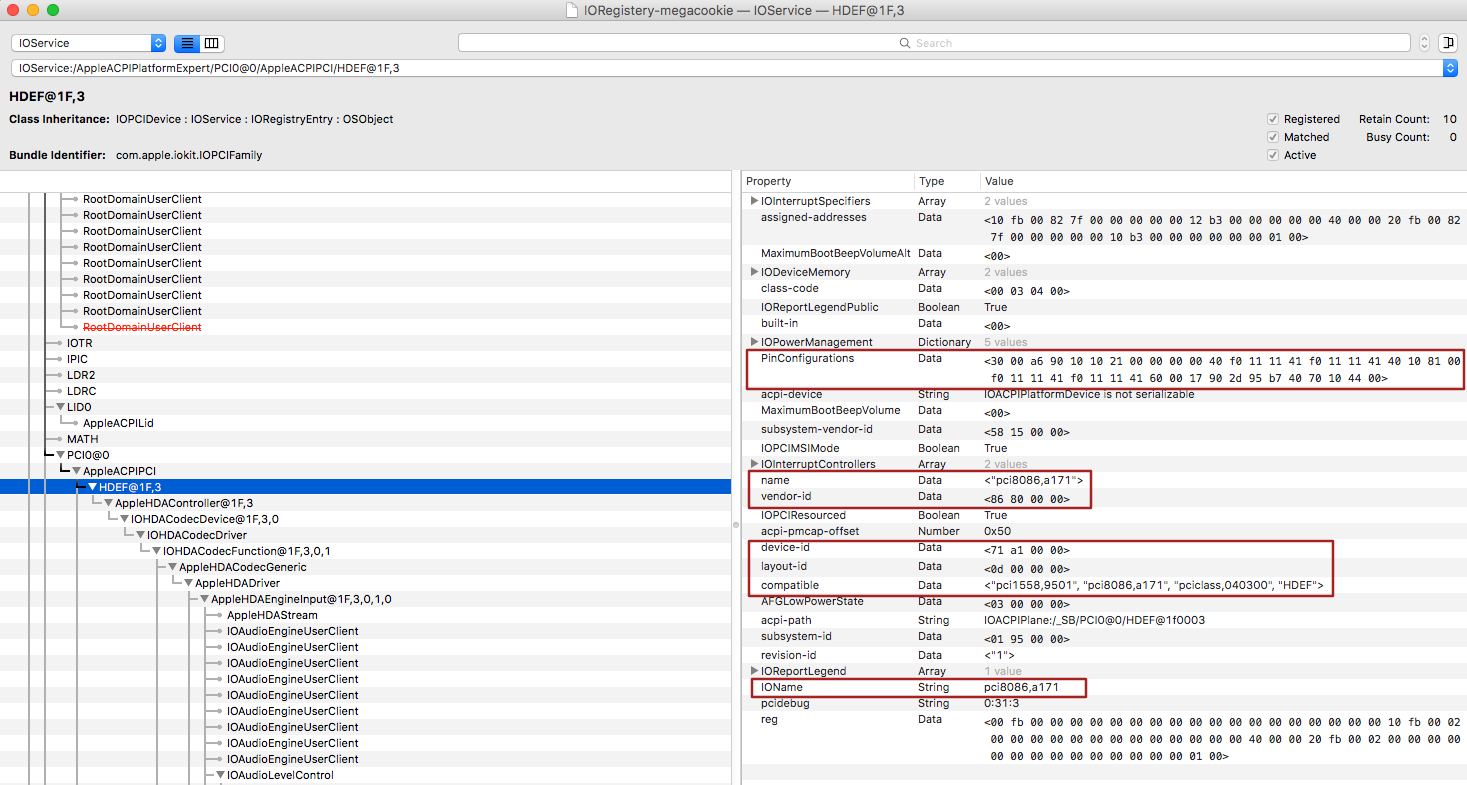
TODO. 1. We have a patch FixRegions but it works only in DSDT. In some cases Regions present in SSDTs and we should take them into account like GetBiosRegions(SSDT) 2. ArbitraryProperties should be rewritten to accept xml like gfxutil (DarwinDumper) <key>PciRoot(0x0)/Pci(0x1b,0x0)</key> <dict> <key>PinConfigurations</key> <data> AA== </data> <key>layout-id</key> <data> DAAAAA== </data> </dict> <key>PciRoot(0x0)/Pci(0x1c,0x4)/Pci(0x0,0x0)</key> <dict> <key>built-in</key> <data> AQ== </data> <key>device_type</key> <string>ethernet</string> </dict> 3. FixAirport causes crash. 4. FixUSB is not good for PCIe XCHI controllers. 5. I propose to make special kind of DSDT binary patches like Rename. Such patch should search all occurrence of device _SB.PCI0.RP01.PXCS but not _SB.PCI0.RP02.PXCS assuming check for partial defines Scope (_SB.PCI0) { Device (RP01) { ... 6. DropOEM_DSM can be excluded. Any help from programmers will be appreciated.4 points
-
Rev 4438 New feature for theme designers. Automatic choose "yourtheme" or "yourtheme@2x" if monitor is 2k or larger. The criteria is ScreenHight > 1100. For example if I choose theme=metal then I will use theme from folder "metal" on monitor 1920x1080 and a theme from folder "metal@2x" on monitor 2048x1560. So I expected our artists will prepare new copy of their themes with 2x larger pictures and fonts. It is better then scale 2x.4 points
-
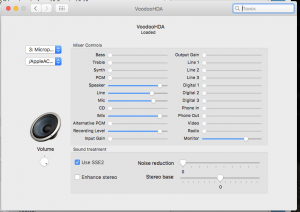
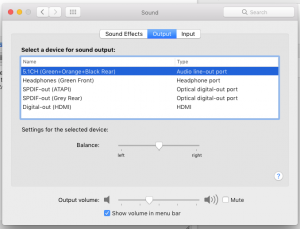
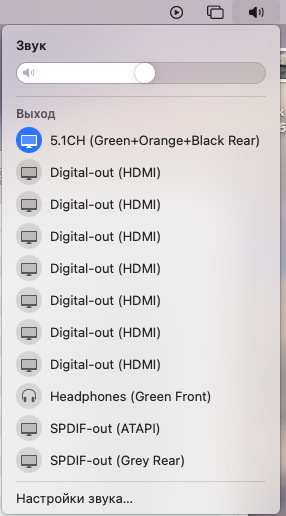
How to make it working under Big Sur 11.3+ How to resolve a problem in Sonoma About sound quality Some users claim that using VoodooHDA they hear loud bump at system start and sound in system comes with noise. Although this can be repaired with existing drivers I propose a version that do this automatically. It started silently and have very clear output. The file is compiled as 32/64 and works from 10.6 up to 10.12. VoodooHDA.kext-289.zip The sources is in my signature. There is a VoodooHDA,prefPane compatible with Sierra VoodooHDA.prefPane-289.zip Now there is a version 2.9.0 by Zenith432. It can work with multichannel sound and play it on 5.1 analog system. VoodooHDA.kext-2.9.0d8.zip 27.04.2017 d10 - Fix issues involving AudioControls VoodooHDA.kext-2.9.0d10.zip 20.11.2018 Fix issue with scratch on slow CPU VoodooHDA.kext-291SSE.zip 04.05.2019 More checks for memory allocation. More clear sound anyway. VoodooHDA.kext-292.zip IOAudioFamily.kext.zip -- it's a pity this kext works up to 10.14.5 and is not working in 10.14.6 and up. AppleHDADisabler.kext.zip 10.10.2020 The version is compiled under BigSur and is working here VoodooHDA.kext-295.zip AppleHDADisabler is not used. DSDT has a device HDAS and not HDEF so why there is no conflict with AppleHDA. Version 2.9.8 - corrected one possible error may leading to KP. VoodooHDA.kext-298.zip Version 2.9.9 - some corrections to Mic detecting. Use these version with precaution. Be ready to return to 298. VoodooHDA.kext-299.zip Version 3.0.2 - compiled with XCode 14.1 under Ventura and worked under Ventura and Sonoma VoodooHDA.kext-302.zip
 1 point
 -
THE GREAT GUIDE SIERRA + Z820 *** 02/17/2018 (from El capitan's guide) Introduction: Hi everybody. Yes I know. Maybe it is a little late for Sierra but I need a stable system and I always go to for final release. In my opinion, High Sierra is a beta. Anyway, yes, it’s late, but I didn’t have too much time last year. WORK- Everything except Sleep and common graphical issues related with non-supported graphic cards and nvidia drivers. Some important topics: 1. The update. Some procedures are now easier and shorter, and with the help of DSDT patched, an/or DSDT auto-patches, I hope it will be easier for everybody. This is a guide DSDT-centric. If you have the right bios version, you will be able to get it quick and easy. If not, I’ve described how do it anyway. But I strongly recommend update the bios to 3.91. It´s a safe process from windows. 2. Credits. I’m not an expert. Best improves of this guide has been possible thanks to some people. All credit for them. -Thanks for the audio fix for macpeet and Rockey12 -Thanks for the Lsi driver patched for Sierra to despeinao -Thanks for DSDT patching to Maldon -Thanks for SSDT patching info for 26x7 and 26x3 models to Hugodlc 3. Please, help to improve this guide. Consider any part of this guide open to discuss. If you see something wrong, or which could be improved, please, just say it, and I’ll fix it. English is not my native language. If you can’t understand some step, or something could be best written, please, just say it (via pm if you want ) and I’ll fix it too 4. Some important considerations about hardware: In short, there are V1 versions (for E5-Xeons V1, Sandy Bridge) and V2 (for E5-Xeons V2, Ivy bridge). Both of them are identical in generic specs (audio, usb, ethernet, pci, etc), but their bios are slightly different. Remember that DSDT is related to bios version. And SSDT is related to CPU model. Don’t exchange them. I provided DSDTs for 3.91 in V1 and V2 versions. If you have other version, and you don’t want or you can’t update, just follow the full guide to patch your DSDT. Anyway, with patches, edit DSDT is easy. But, I’m still recommeding extract your DSDT and SSDT and patch them. IMPORTANT WARNING FOR 26x7 and 26x3 USERS!!!. These models have a special cpu definitions in SSDT, causing the “Should have XX threads but only found YY” error. Please, go to Appendix (under construction). 5. And please, (this is for "anonymous" users) don't PM me with questions. No need for that. Any question can be answered openly. Ok, let’s go. ________________________________________________________________________________________________________________________ PART I 1-BIOS SETUP This guide is for UEFI systems. This is not important to follow this guide except in Clover installation section. Keep in mind it to adapt some settings if you need it, use legacy-bios mode. If you don’t need any special option, and you have been playing with options, reset the bios to default settings. 6. The main BIOS options are: In storage options: set ACHI mode (IMPORTANT). Set boot order. UEFI first, (for me), USB first and HD second. Security options: Device Security: I like disable unused devices (scu controller Disable Vt-d. IMPORTANT and serial port). Optional Disable Secure boot. Enabled. (For boot with non signed OS). In power options: I use UEFI boot, but I keep legacy support active. Set Runtime power management to Enabled.This option will allow Power (This is optional.) Management later. In power options: In Advanced: About the rest of options, I’m not sure of the impact in Set PXE, Storage and Video to EFI. (for me). performance. If you have a graphic card non EFI-compliant, you can set video in Legacy, keeping an UEFI boot. Don’t forget set thunderbolt policy in Legacy mode. ________________________________________________________________________________________________________________________ PART II: INSTALLATION 7- MEDIA CREATION (This guide assume you have a MacOs running. I have no idea how do it on PC) -Important: Download Sierra dmg only from Apple. Don´t use suspicious dmgs or Isos. It’s not longer available to search in Apple Store, but you can find one link to download it from Apple Store. ("get os mac os sierra" link) It’s 10.12.6. Let the file in Applications folder. (and keep one compressed copy for future attempts). -Download my stuff folder with all necessary stuff. -Format one USB stick with common settings: Go to erase tab, select GUID partition table in options, and Mac Os Extended (Journaled) as Filesystem. Name the partition as “USB”. Ok to Apply. -On a terminal window, type (copy and paste) : sudo /Applications/Install\ macOS\ Sierra.app/Contents/Resources/createinstallmedia --volume /Volumes/USB --applicationpath /Applications/Install\ macOS\ Sierra.app --nointeraction -Enter and type your admin password. It will take 10-15 minutes. (When it finish, you’ll see the prompt again) 8. INSTALL CLOVER. -Download Clover from here . Version used to make this guide: Clover_v2.4k_r4359 ((Sierra requires r3994 or newer) ) -Download Clover Configurator from here. It makes easier edit config.plist file -Download plisteditor pro demo for edit info.plist files. -Download additional tools for install kexts, fix permissions and rebuild cache. I use Kext helper from rampage’s dmg, although I need always forcequit. An alternative is Kext Utility. -Maybe EFI mounter (from download sections). CloverConfigurator mounts EFI too, but maybe with this utility is easier. -Install Clover in the USB. On first screen, don’t forget change the install location in order to do not install on your Internal HD. Select your USB stick. -Click on Customize. -Choose “Install for UEFI booting only” and “Install Clover in the ESP” as main options (if your system is UEFI-based) -This is optional: choose your favorite Theme. -In Drivers64UEFI select: / EmuVariableUefi-64 / OsxAptionFix2Drv Let the rest of option unselected and Click on Install. 9- CONFIGURE CLOVER When clover finish, It will mount EFI partition. Time to modify it. You’ll find all necessary files in my folder. There are three things to modify: config.plist, drivers, and kexts -Owners of CPU models 26x7 or 26x3 see appendix 2. (It’s not finished yet) 9.1 Config.plist The default config.plist is not useful for us. Replace it by mine (folder n.2) But take a look to options (with clover configurator) to understand my options in order to be able to adapt them for your specs or your preferences. It’s a basic config.plist. I could add more options or fixes. but is a good idea install with minimum options. Acpi. All fixes in ACPI section has been removed except some minor fixes in 2 subsection, smart ups option, etc. SmartUps it’s not important now, but it will be later. So I prefer activate this option. The most important, The rename usb devices patches are included. Boot Bootflags needed are only -v and npci=0x2000. Of course -v is optional only to see the boot process. You can deactivate it when you finish. Any option activated in Boot Graphics/ Cpu/Device/Disable driver Gui options. These are only personal preferences. Graphics. Any Graphic injection and any option activated. At least, no needed for my 1080ti card. Check it out for your card video. An essential section. Kernels Patches needed RT Variables booterConfig, and Csr to deactivate security policy in Sierra. The info values are taken from smbios. One important change from El cap’s guide. SMBIOS is set to Mac Pro 6,1. We will be able to avoid the black screen later, with the right kexts. IMPORTANT—> press “generate new” repeatedly to get one random fresh serial number System parameter: 9.2 -Drivers64UEFI folder. You’ll see more drivers installed than you selected. That is because some of them are mandatories. That is fine. As usual, delete VBoxHfs-64 driver and replace it by HFSPlus.efi. (from my folder). 9.3 Kexts: Add Kexts from my stuff to /EFI/CLOVER/Kexts/10.12 They are: -FakeSMC.kext ,(from rampagdev, dual cpu dmg or X79 ) Without lpc sensor plugin. This plugin sometimes causes KP -VoodooTSCync.kext, to avoid boot with -x (from rampagdev, dual cpu dmg or X79.dmg) You’ll find several versions into my folder. One generic version ans several for every core number. I haven’t noticed any change using the generic or the specific version. I think that is not important for our platform. I provided the generic version and customized versions for every cpu. Anyway, try if you want.The customize method is: Anyway, I provided of all VoodooTSCync.kext versions already patched. -IntelMausiEthernet.kext. One better kext for the ethernet card from rehabman. (2017-0914 version) -UsbInjectall, for USB2 from rehabman ( 2017-1214 version) And add to /EFI/CLOVER/Kexts/others -Lilu kext (from here , 1.2.0 version 1.2.2 version) -NvidiaGraphicsFixup.kext ( from here , 1.2.1) This couple of kexts avoid black screen booting with 6,1 smbios. Is quite important keep in mind the versions of these kexts. 1.2.1 works only with lilu 1.2.0. In a future, is important keep the right versions among this kexts. Thats all. We have our usb installer ready. Copy in a folder all stuff necessary to repeat the process and copy it to the USB stick. You will have it available after first boot. Reboot from the USB stick and install Sierra. 10- INSTALLATION Some advices: -The internal HD have to be connected to grey internal sata connectors labeled as AHCI 6Gb/s into HP's doc. -Use only USB2 ports, and only in the front USB2 port. -Don’t use USB hubs, or cable extenders… (personal issues) -Unplug any other usb device -The boot process may be slow, (and with terrible and apocalyptic errors). Be patient -Maybe, the boot stucks with the error “consideredRebuildKernel …. blabla”. Just reboot again. -If you have two monitors, shutdown one can help with graphical errors. -Plug your graphic card in PCI Slot 2. -For inexperienced users, to install: On first screen, go to disk utility and erase the Volume. (Mac Os Extended (Journaled) and GPT). Quit the utility and return to first screen. Choose Install. -Now the process is splitted in two steps. The first step promises take only 8 minutes. Nope. It will take 30-40 minutes. Move the mouse from time to time to refresh the screen. Again, be patience. -After this first reboot, select in clover the new internal sierra installer partition, not the usb installer. It will finish the process. This step, yes, takes 10min aprox (using a SSD) -To boot again, keep booting from USB but choose internal HD as boot volume. ________________________________________________________________________________________________________________________ PART III: FIRST BOOT 11. Optional updates. If you are interested in install security updates, now is the right moment. If not, jump to next point. There are two security update for 10.12.6 : "2017-002" and "2018-001". Forget completely the 2018-001. It’s probably that it causes KP. ( I tried and I screw up it). You can use this update using versionn 1.2.2 of LILO kext. (version updated in the sutff folder.) You can install the 2017-002. thought it’s not longer available in Apple store. But there is a direct link to download it. Just open it, reboot, wait for the process, and you will be back at the same point. With this update, the Mac OS Version is 16G1114 . Anyway, I repeat it , it's optional. 12- Install Clover. On first reboot, install clover again on HDD, repeating same process and same options than with the USB installer , but keep in mind you have to add some options on clover’s screen install: -Install RC scripts on target volume -Optional RC scripts -Install Clover Preference Panel. … and install clovermanager.app. This is optional but it’s the best way to manage the themes and find a good theme, because the default themes are… well, I have no words. In my folder you´ll find mine (a customized version from El Capitan’s theme). Bootcamp is another theme for those who doesn’t like the clover’s catalogue. And maybe the most appropriate for a professional environment. Of course, left this for later. Install clover and add same files used on the USB: config.plist , hfsplus driver and kexts. Reboot. You can now extract the USB installer and reboot from the internal HDD. After boot, go to clover preference panel and set it to auto mount EFI partition. It will be useful along this process. Disable this when you finish and you get stable your system.1 point
-
No Did you disable hibernate and unsupported sleep modes? Your beyond help1 point
-
A suggestion here but not critic Can you add button for not scrolling the entire page to go up or down. i mean: go to Top page or down? because with the new design, all things appear big, so if a page is full, the scrolling bar become too small, and you have to continue scrolling until down, it will be so cool if with only one click1 point
-
OK great! I will test as soon as I finish backing up my drive so I don't mess it up again Thanks Allan for all your help! I will report back hopefully in an hour or so.1 point
-
Test: config.plist.zip And this kext folder too: Other.zip1 point
-
-Wno-varargs has been present in EDK2 for XCODE5 for a few months now (and was in Patches_for_EDK2 for even longer)... make sure Conf/tools_def.txt is up to date in your EDK2 workspace.1 point
-
OK that's good news and important info on BIOS. I tried the DSDT but it is still rebooting on wake. But like I said, I ruined my Sierra 10.13.4 drive and had to redo it this morning. I am not a pro and I'm not sure if all the files/kexts/.plist, etc are still the same. Can you take a look and see if everything is OK on this new install. I put your DSDT in but it still reboots when it wakes. Here are my current files: https://drive.google.com/file/d/1gJ3sQma5d_CmtvAuo6jy3wU0tHuJgLgv/view?usp=sharing1 point
-
Don't worry, the DSDT will be the same even if you change your macOS version. DSDT will only change if you upgrade the BIOS, doing that you'll have new tables, everything will be new.1 point
-
Ok Nice now we know that the ADGC cause the Black screen Maybe repair permission and rebuild cashe help i look Later on it i'm not home right now.1 point
-
no Quicktime don't support mkv files use other player like IINA1 point
-
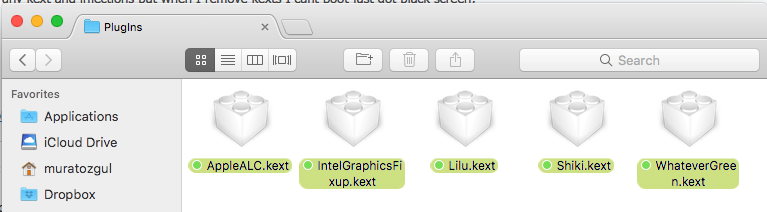
please test this config.plist and delete shiki intelgraphicsfixup and Whatevergreen and Lilufriend and Put Usbinjectall Lilu and appleALC to clover repair permissions and rebuild kernel cache then reboot make sure you have a backup USB to boot from it if this don't work config.plist.zip1 point
-
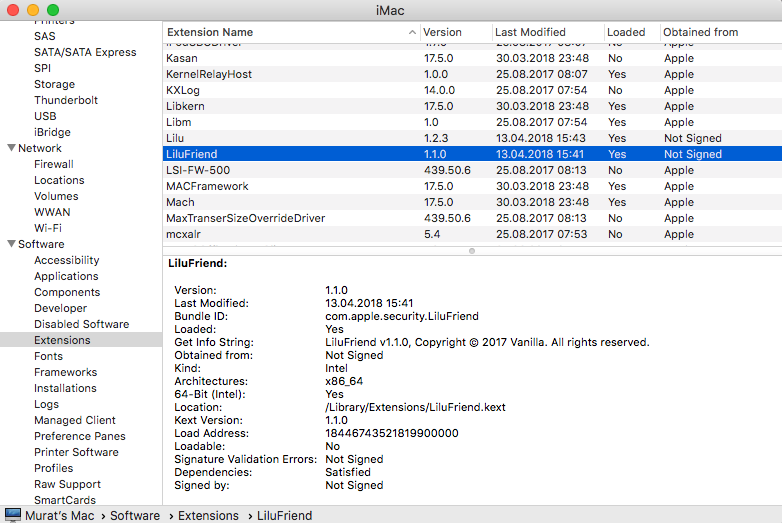
I think yes boots now in 14 sec after clover boot screen. FakeSMC and Ethernet kexts inside of Clover/Others L/E USBInjectAll.kext and LiluFriend.kext Inside of LiluFriend; Another question; With this code HEVC video will work; Or this just for Airplay; 'cause when I try HEVC video with Quicktime I am getting this error; <dict> <key>IOGVAHEVCDecode</key> <string>1</string> <key>IOGVAHEVCEncode</key> <string>1</string> </dict>
 1 point
 -
here you go DSDT.aml.zip no you don't need this you can delete it1 point
-
upload your DSDT I edit it for you SBUS device need a fix why its load MKY0 this cause other problems1 point
-
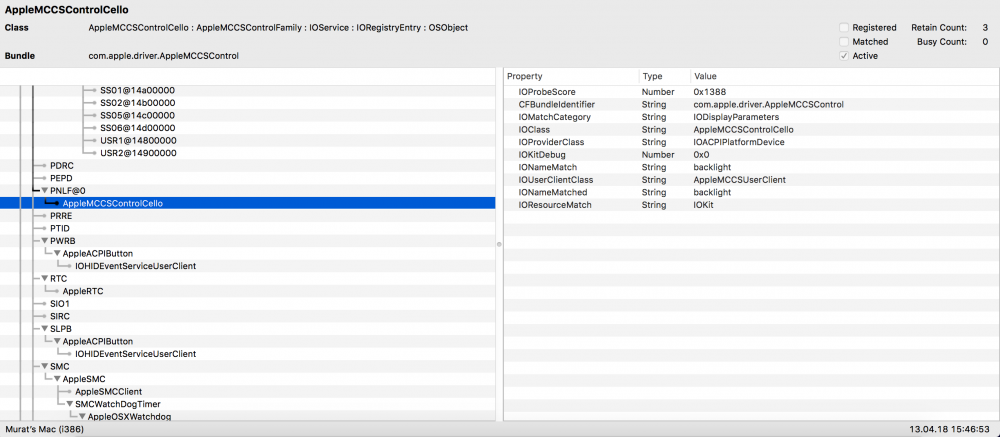
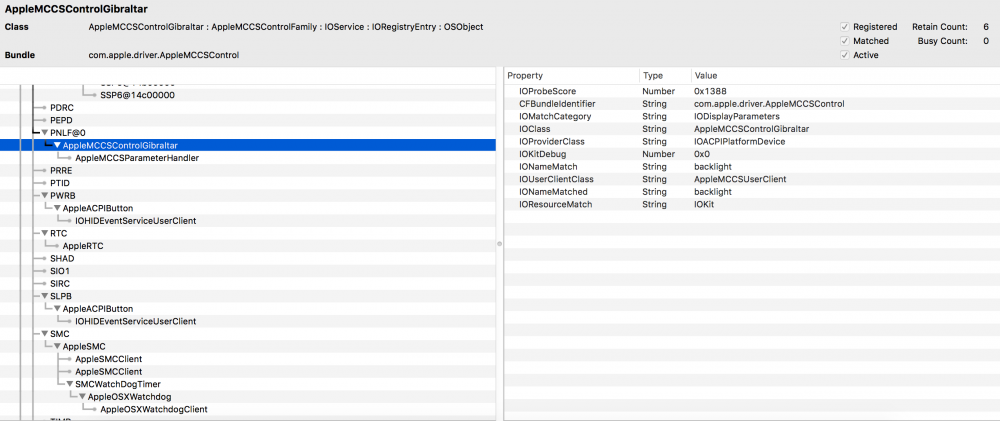
i see your PNLF don't load correctly this cause a long boot time you need to fix it in the DSDT should be look like this
 1 point
 -
You can add a hidden custom entry that matches all macOS installer type, then press F3 to unhide it when you need it. Also you probably did need to upgrade clover as there was an issue with the newest installers. EDIT: Forgot some words.1 point
-
RX560 use AMDBaffinGraphicsAccelerator this one should work FakeSMC.kext.zip1 point
-
Thank you. I installed now and everything looks working. Thank you again.
 1 point
 -
1 point
-
Same here ! respectfully !1 point
-
@Shaneee Unfortunately, I'm not the hardware or device expert. Presumably, vit9696 can tell more why AMD devices are not working. Maybe it's somehow FakeID's or FakeSubID's. No idea. So far it has never worked with AMD. Many problems on AMD. AppleHPET and AppleLPC is not loaded. Also often important for sound. This is an example of a laptop with ALC1220 I am currently working on with ID13: Your devices: try this: The nodes of the VoodooDump are not much different to the other LayoutID's. You can try with 15 (0F). But I do not have much hope. trial_ryzen_layoutID15 (0F).zip

 1 point
 -
i think Ellesmere is for RX570 and above cards and RX560 and below use Baffin. need to check it to be 100% sure.1 point
-
It is not Clover affair.1 point
-
Many many thanks for your help Allan .but how to Use this patches in my config.plist . I never did it before. Please share video tutorial or step by step guide please...I really need it.1 point
-
Test this: DSDT.aml.zip1 point
-
Even put the SSDT-DGPU.aml at CLOVER/ACPI/pacthed folder, and using the DropOem option in your config.plist?1 point
-
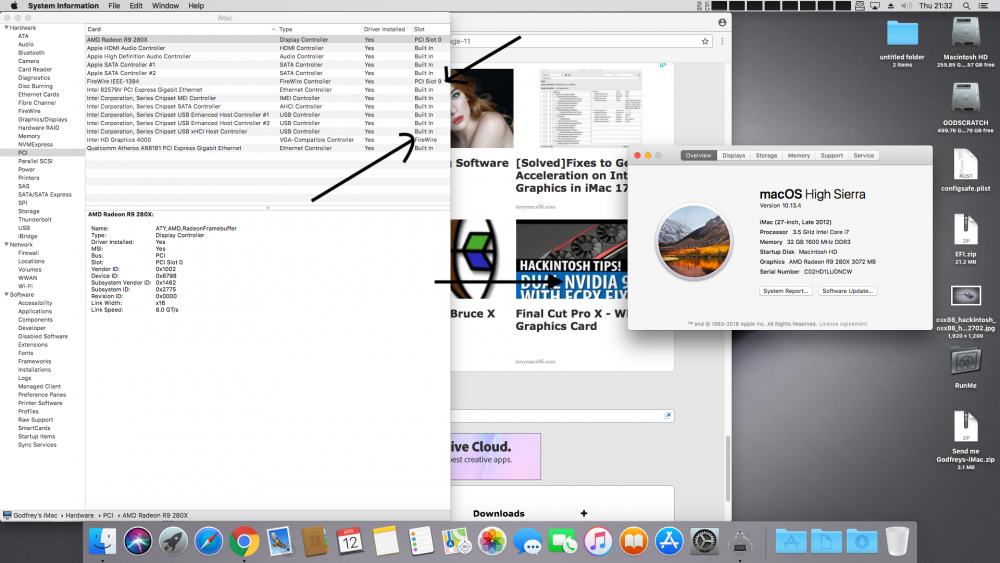
MaLd0n here is the runme updated clover folder with the last DSDT that you corrected... the only question I have is the slot location as highlighted on the screen shot... Send me Godfreys-iMac.7z
 1 point
 -
after yosemite, kext GenericUSBXHCI broke many things1 point
-
your Welcome you can do this with HDA Hardware Config Resource and other things so you can leave original untouched and inject with AppleUSBHostMergeProperties or AppleUSBMergeNub1 point
-
No, sorry... It looks like GPU Cayman (Radeon HD69xx, FairePro V5900 and V7900) is problematic in 10.12 x. Look for a solution for Radeon HD6970. If not, then I recommend upgrading to FairePro W5000 or W7000. or downgrade to FirePro V4900(Turks)1 point
-
That's the first actual response I've gotten to any of my posts about bugs/not working components, so I think my question was justified. I can't even properly use the forum because there are so many problems where I accidentally quote someone or don't and I have to either start over or erase posts just so they make sense because the quoting is broken. I would think that markdown editor in a forum would be number one priority. Not to mention that I am getting timeouts or page does not exists errors constantly and when a page does load it's very slow, so it's getting annoying to have to spend thirty minutes writing a post when it's like a two minute post....1 point
-
Thanks for replying @yapan4, I'd almost given up on getting any help. Maybe I should have posted in a different section to have more chance of an answer? I already did edit AMD6000Controller.kext : Changed 0x6704(AMD Firepro V7900) to 0x6707 (My card, AMD Firepro V5900). Here's the thing : In Yosemite the AMDRadeonX3000.kext plist file, there is a key/section for Cayman cards <key>AMDCaymanGraphicsAccelerator</key>, and inside it there is : <key>IOPCIMatch</key> <string>0x67181002 0x67191002 0x67041002</string> In Sierra however, this key has been removed, and the 6704 is no longer present anywhere in the AMDRadeonX3000 info.plist. I imagined that they took it out the 0x67041002 because it's an old card (2011), so when I saw the file AMDLegacySupport.kext (file not present in Yosemite) I imagined that it might be there instead, and it is. So I edited that instead. Do you have any other ideas for getting this to work?1 point
-
Yeah so far the Ryzen 5 2400G is running great. There's a couple bugs in the kernel but they don't affect how it performs. I plan on working those out. As for the iGPU I've got a couple ideas for that but it's for when I've got more time.1 point
-
We have a new contender in the ring shaneee now has a Ryzen 2400g. He has made several kernels for AMD. Hopefully soon there will be more progress on this chipset and he’s going to look into the IGPU aspect as well. Let’s all give him some support not only for the work he has already done but for future prospects. He is a Master of AMD hacks and will be a great resource for Ryzen users. my overall impression with this Zen + hardware is that it does have better GPU benchmarks versus the original Ryzen series. My testing with AMD RX 460, 480, and Vega 64 show it performing at levels similar to my Intel hacks. My Ryzen 1700 always has a 5- 15 % performance drop for GPUs versus the Intel at similar frequencies. There are some kernel related bugs though that probably need to be worked out especially for High Sierra 13.4 as apple has added new kernel related security measures but I’m sure with a little time we will have things running smoothly.1 point
-
I hope theme designers will create new set of theme 2x larger for big monitors. Clover 44381 point
-
@MaLd0n Thanks for the custom Clover.zip with DSDT, it works great.1 point
-
Rev 4435 Fix a rare case that osversion cannot be read and cleanup for maintenance and new macOS ready - checked all macOS installation with test from 10.6 to 10.13.4 for osversion detection and improved osversion read1 point
-
just a patch driver or u need a installer? Update nvidia-update.command.zip Patcher NvidiaPatcher.command.zip1 point
-
I was going to create a new thread on how to install macOS Sierra on Asus P8Z68V LX i5-2500k, but I search and found this one, so here how I did mine. These 2 videos should make it clear how to install it. - If you use SSD, connect to gray 6GB sata port. - Use iMac13,2 SMBIOS for the turbo to work. Cheers, Louis PS: If you don't have mac to create os installer go to this post for how to use bootdiskutility.1 point
-
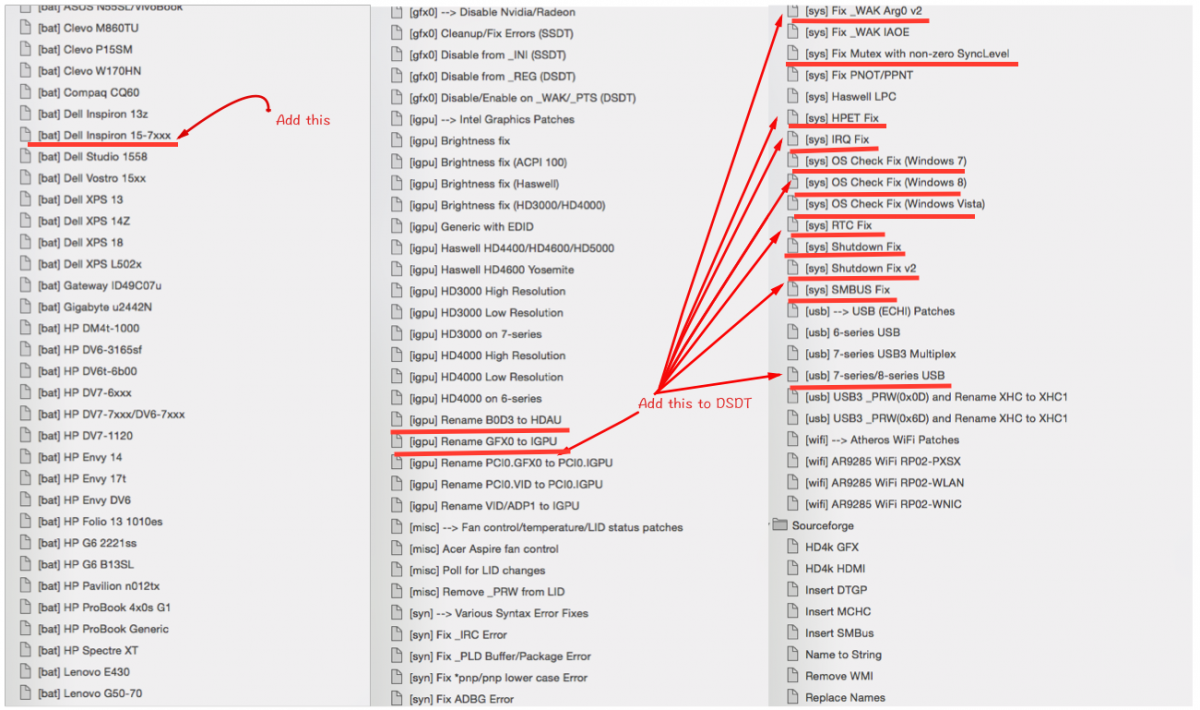
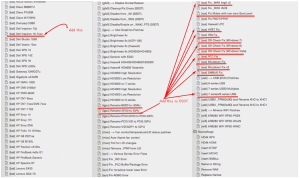
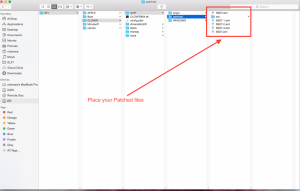
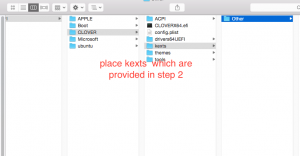
Guide to install Yosemite on Dell Inspiron 3x37 - 5x37 -7x37 series !!!!! mainly Dell Inspiron 3437 3537 3737 5437 5537 5737 7437 7537 7737 This original guide is this and all credit goes to "pokenguyen"(thanks bro) Please note!!! It's always better to perform a full system+data backup of your current system. What's working/not working: Built in webcam not working!! By replacing Intel WiFi card with BCM4352HMB WiFi +BT working flawlessly(the card that i used is this ) Requirements. 8 GB or more USB flash drive(16GB required for El cap) Empty/ ready to empty HDD/SSD to install OS X system alongside with your laptop.This guide can even use wisely to install most of the laptops with Intel processor with integrated graphics. Internet connection(for some steps) PRE-INSTALLATION:- STEP 1: Create a bootable USB In this step you'll need to access to a real mac (or existing mackintosh) create a bootable usb.(if you have problems regarding how to create a bootable usb simply google it ) STEP 2: CREATE OUR CLOVER USB DRIVE : Now we can create our clover usb for clover boot loader create a partition 'size>300Mb' and place this folder inside that usb (for this step it's better if you can use separate USB flash drive for this task) STEP 3: Bios Setup Update your system bios to latest version (currently A13), Disk: AHCI Intel Rapid Storage: Disabled UEFI Boot: Enabled Secure Boot: Disabled Legacy Rom: Enabled STEP 4: Boot into OS X : Now turn off your laptop and plug both clover USB and bootable OS X USB and boot from your clover USB.(press F12 at boot) If everything goes well Clover boot-loader screen will show up !!! Then you need to press F4 button to extract DSDT/SSDT for your laptop(don''t worry i'll explain this later -Just follow the guide carefully) Extraction DSDT/SSDT may take while(about 5-6 seconds) so please wait until complete the process(you can feel that while extraction DSDT/SSDT system may not response to your key presses). select Boot OS X Install from "name of your OS X Installer partition"). If you're get lucky to get into welcome screen(most of time you should) use Disk Utility to format your drive as GPT, create a Mac OS X Extended (Journaled) partition to install Yosemite/El Capitan. After installation complete (may take about 20-30 minuets-depending on your HDD/SSD speed) After installation completed system will ask to restart the machine and this stage also you must boot with your clover usb and then select partition which you installed OS X Yosemite.(it's better not to sign in to your apple id and back off from apple services until you get a stable rig) If everything goes well, you can boot in to Yosemite desktop POST INSTALLATION:- STEP 5: After finished the pre-installation,there are several methods to complete the post installation so here i'll be guiding you the simplest method with great tool ( thanks to pokenguyen for creating such tool) Download this tool here .and select CloverUEFI RTL8111 (for 7x37) or RTL8100 Ethernet (for 3x37-5x37) Tools > IASL Tools > Clover Configurator. Tools > SSDTGenerator. Fixes > Hibernate Mode > Disable Hibernate STEP 6: After installation finished of the above step the EFI partition will mounted automatically. Copy config.plist from your USB to (/EFI/Clover/ of EFI partition), then use "Clover Configurator" to IMPORT config.plist (in EFI partition) and edit those values: Uncheck: ACPI > Generate PStates/CStates. SMBIOS: create your new SMBIOS (Macbook Pro 11,1 or Macbook Air 6,2) with appropriate Serial Number. Then EXPORT config.plist to /EFI/Clover/ of EFI partition.(not to your usb path) Copy from (/Extra/SSDT.aml ) to (/EFI/Clover/ACPI/patched/) STEP 7: Now navigate to (/EFI/Clover/ACPI/origin/) from USB (which dumped by F4 at Clover screen). Create a "DSDT" folder on desktop then copy only DSDT.aml, SSDT-*.aml files to DSDT folder.(it is important "only" word because if you copy unwonted Go to terminal and type: cd ~/Desktop/DSDTiasl -da DSDT.aml SSDT*.aml The decompiled *.dsl files will be created in DSDT folder. Now get this MaciASL IDE and install from here (thanks to RehabMan tool) configure MaciASL to, Go to Preferences, set Compiler options to ACPI 5.0 Go to Sources tab then add : Name: Laptop patches URL: http://raw.github.com/RehabMan/Laptop-DSDT-Patch/master STEP 8:Patching DSDT.. Go to Desktop>DSDT and find dsdt.dsl and apply close preference panel and press "patch" button and apply following code: (Original codes by "pokenguyen" ) # Syntax errors into definitionblock code_regex External\s+\(_SB_\.PCI0\.PEG0\) remove_matched; into definitionblock code_regex External\s+\(_SB_\.PCI0\.PEG0\.PEGP\) remove_matched; into definitionblock code_regex External\s+\(_SB_\.PCI0\.RP05\.PEGP\) remove_matched; into definitionblock code_regex External\s+\(_SB_\.PCI0\.PEG0,\sUnknownObj\) remove_matched; into definitionblock code_regex External\s+\(_SB_\.PCI0\.PEG0\.PEGP,\sUnknownObj\) remove_matched; into definitionblock code_regex External\s+\(_SB_\.PCI0\.RP05\.PEGP,\sUnknownObj\) remove_matched; into method label _L69 code_regex Notify\s\(\\_SB\.PCI0\.PEG0\.PEGP,\s0x02\) remove_matched; into method label ADBG replace_content begin Return(0) end; into method label HRPR code_regex (OperationRegion.*)\\_GPE.MMTB\s+\(0x04\), replace_matched begin %1\\_GPE.MMTB, 0x04)\n end; into method label HRPR code_regex (Field\s+\(HRPE.*\n.*\n.*\n.*\})\) replace_matched begin %1 end; into method label _WAK code_regex Store\s\(\\_GPE\.MMTB\s\(Local2,\s\\_GPE\.OSUP\s\(Local2\)\),\sStore\s\(Local1,\sREG6\)\) remove_matched; into method label _INI code_regex Store\s\(\\_GPE\.MMTB\s\(Local3,\s\\_GPE\.OSUP\s\(Local3\)\),\sStore\s\(Local2,\sREG6\)\) remove_matched; into method label _INI parent_label _SB.PCI0 code_regex (Store\s\(\\_GPE\.MMTB.*) replace_matched begin // %1 end; into method label _WAK code_regex (Store\s\(\\_GPE\.MMTB.*) replace_matched begin // %1 end; # Prevent freeze caused by WMI into method label WMIA replace_content begin // nothing end; # Force BAT0 device into method label _STA parent_label BAT0 replace_content begin Return (0x1F) end; # Fix PNOT method into method label PNOT replace_content begin // nothing end; # Enable functions keys # Override DSDT oemId (for Clover, since it patches with "Apple ") into method label _DSM parent_label PS2K remove_entry; into device label PS2K insert begin Method (_DSM, 4, NotSerialized)\n {\n If (LEqual (Arg2, Zero)) { Return (Buffer() { 0x03 } ) }\n Return (Package()\n {\n // Note: Function key part seems to not be necessary // "AAPL,has-embedded-fn-keys", Buffer() { 0x01, 0x00, 0x00, 0x00 },\n "RM,oem-id", "DELL",\n })\n }\n end; # Inject Audio info into method label _DSM parent_label HDEF remove_entry; into device label HDEF insert begin Method (_DSM, 4, NotSerialized)\n {\n If (LEqual (Arg2, Zero)) { Return (Buffer() { 0x03 } ) }\n Return (Package()\n {\n "layout-id", Buffer() { 0x03, 0x00, 0x00, 0x00 },\n "hda-gfx", Buffer() { "onboard-1" },\n "PinConfigurations", Buffer() { },\n })\n }\n end; and press compile if no errors Press again patch and paste this code: into method label _DSM parent_label PS2K remove_entry; into device label PS2K insert begin Method (_DSM, 4, NotSerialized)\n {\n If (LEqual (Arg2, Zero)) { Return (Buffer() { 0x03 } ) }\n Return (Package()\n {\n "RM,oem-id", "DELL",\n "RM,oem-table-id", "HSW-LPT",\n })\n }\n end; Press compile, if no errors: Click Patch again, then apply extra patches from Laptop patches (Require Internet connection): Rename GFX0 to IGPU 7/8-series USB IRQ Fix SMBUS Fix RTC Fix Shutdown Fix 2 HPET Fix OS Check Fix AC Adapter Fix Add MCHC Fix _WAK arg0 2 Add IMEI here are those patches: Press compileClick Compile if no errors, you're good to go!!! Save it to ACPI Machine Language Library Name DSDT.aml to /EFI/Clover/ACPI/patched/ (of your EFI partition). STEP 9:Patching SSDT files.. Again go to Desktop>DSDT and find ssdt-7.dsl and apply Rename GFX0 to IGPU Haswell HD4400/HD4600/HD5000 Brightness fix (Haswell) Click Compile,if no error, go ahead and save the file > File Format: ACPI Machine Language Library, name> SSDT-1.aml to [/EFI/Clover/ACPI/patched/ ] There is a model with nvidia/AMD separate graphics chip.. if you have that model find SSDT-8.dsl and apply: (Original codes by "pokenguyen" ) into scope label \_SB.PCI0.GFX0 remove_entry; into definitionblock code_regex External\s+\((.*_SB_\.PCI0\.GFX0\.DD02\._BCM),\s+IntObj\) replace_matched begin External(%1, MethodObj) end; into method label _BCM parent_label DD02 code_regex Return\s+\(([^\)]*)\)\n.*Arg0 replace_matched begin %1(Arg0) end; into method label _BCM parent_label DD02 code_regex Return\s+\(([^\)]*)\)[^\n]*\n.*Arg0 replace_matched begin %1(Arg0) end; into method label WMMX code_regex If\s\(CondRefOf\s\(\\_SB\.PCI0\.GFX0\._DSM[^}]*\} replace_matched begin //nothing end; # rename GFX0 into_all all code_regex \.GFX0 replaceall_matched begin .IGPU end; into_all all label \_SB.PCI0.GFX0 set_label begin \_SB.PCI0.IGPU end; # call _OFF from _SB.PCI0.RP05.PEGP into method label _INI parent_label \_SB.PCI0.RP05.PEGP code_regex . insert begin _OFF()\n end; Click Compile , If no error, save the file with File Format> ACPI Machine Language Library, name >SSDT-2.aml to [/EFI/Clover/ACPI/patched/ ] if there is SSDT-9.dsl>>patch:apply this: into definitionblock code_regex External\s+\((.*_SB_\.PCI0\.GFX0\.DD02\._BCM),\s+IntObj\) replace_matched begin External(%1, MethodObj) end; into method label _BCM parent_label DD02 code_regex Return\s+\(([^\)]*)\)\n.*Arg0 replace_matched begin %1(Arg0) end; into method label _BCM parent_label DD02 code_regex Return\s+\(([^\)]*)\)[^\n]*\n.*Arg0 replace_matched begin %1(Arg0) end; into method label WMMX code_regex If\s\(CondRefOf\s\(\\_SB\.PCI0\.GFX0\._DSM[^}]*\} replace_matched begin //nothing end; # rename GFX0 into_all all code_regex \.GFX0 replaceall_matched begin .IGPU end; into_all all label \_SB.PCI0.GFX0 set_label begin \_SB.PCI0.IGPU end; Click Compile, If no error, save the file with File Format >ACPI Machine Language Library, name >SSDT-2.aml to [ /EFI/Clover/ACPI/patched/ ] STEP 10:Installing the essential kexts get those:(thanks to RehabMan) https://bitbucket.org/RehabMan/os-x-voodoo-ps2-controller/downloads https://bitbucket.org/RehabMan/os-x-acpi-battery-driver/downloads https://github.com/RehabMan/Lenovo-U430-Touch-DSDT-Patch/archive/master.zip https://github.com/RehabMan/OS-X-Fake-PCI-ID ( FakePCIID_HD4600_HD4400.kext+FakePCIID_BCM94352Z_as_BCM94360CS2+FakePCIID.kext) and install using kext utility/kexts wizard STEP 11:Get working WIFI+BT with BCM4352 follow this guide Fix ALC 283 audio:(thanks to RehabMan ) Use this repo to add config patches and install AppleHDA_ALC283_kext to fix audio STEP 13 : reset network settings - Go to /Library/Preferences/SystemConfiguration/ and delete these files: CaptiveNetworkSupport com.apple.airport.preferences.plist com.apple.network.eapolclient.configuration.plist NetworkInterfaces.plist - Go to System Preferences > Network, delete all connection. Then restart!!! Try mentioned Steps carefully ,you'll be able to install OS X on your laptop very easily Good Luck!!!!!!

 1 point