bofors Posted January 21, 2006 Share Posted January 21, 2006 (edited) Edit: This is such a good thread that after talking with Bofors, we're going to move it to the Genius Bar so that others can learn from his work. I've consolodated a few posts for the sake of simplicity. - Mashugly My OSx86 Box FedEx just delivered the my Antec Sonnata II case and the rest of my parts, so I am starting to build my first OSx86 box right now. I am going to probably start with the motherboard, processor and heatsink / fan assembly. I bought some Artic Silver to use there, but I have not done this part before so I might be a little bit slow. Otherwise, since I have no floppy drive, it looks like I am probably going to have to load Windows to update my BIOS before proceeding to the OSx86 installation. Here are all the parts that I'm using! Part :: Model Number :: Vendor :: Price Motherboard :: Intel D945GNTLKR :: OnSale.com :: $126.99 This board is supposed to support EFI and BIOS, it has FireWire 400, Gigabit Ethernet, Intel's GMA 950 integrated graphics, 16x PCIe, 4 SATA channels and supports RAID (ICH7R Southbridge). According to the OSx86Project's HCL's and other sources, this is a very well supported board that should be fully operational with 10.4.3. Moreover, well informed people believe that the new Core Duo Macs use Intel's 945 chipset. NOTE: This board sold out at OnSale.com by the time my order was processed, I got it from ZipZoomFly for $139.99 with free 2nd day air shiping. However, there has been a run on these boards in the last two weeks and it is sold out a ZipZoomFly and some other vendors. Yet similiar boards, perhaps lacking Gigabit Ethernet, Firewire or TPM, and perhaps in a different form factor, are also avaible, but do NOT get one with the Sigmatel 9223 chipset (the ones with optical audio out, like the D945GNTLR) because they are not supported yet. CPU :: Intel Pentium D 920 :: OnSale.com :: $255.99 This Presler looks like the closest chip to a Yonah (or Conroe) that is available right now (65nm process, 2.8 GHz, 2 x 2 MB cache and 800 MHz front side bus). Looking over the Intel CPU line, this clearly looks like the high performance best value right now. CPU Cooing :: Arctic Silver 5 :: ClubIT.com :: $5.97 I ordered the CPU "in box" which means it is supposed to come with a heat sink and fan. I will be sticking with the stock CPU fan for now, but it looks like using this "grease" between the heatsink to the CPU is good idea for better thermal dissipation. Case / PSU :: Antec Sonata II / 450W ClubIT.com :: $99.97 This is a highly rated "silent" case and power supply that is supposed to come with all the SATA connectors that I will need. While I was tempted to blow a lot more money on a top-of-line aluminum case (Lian-Li or Silverstone), this looks like a much better value and also has a FireWire 400 port on the front of the case. The only issue with this case is that include an CPU cooling duct which may be poorly designed and left uninstalled. Case Fan :: Antec Smartcool 120mm :: OnSale.com :: $12.99 The Antec Sonata II includes a rear 120mm "Tricool" fan (3-speed swith) which I believe is for exhaust, but also includes mounts for a CPU air duct fan, GPU fan and front case fan. RIght now I am sticking with the "stock" CPU fan and not installing a PCIe graphics card, however I want to install some 10K RPM Raptors which might get hot, so this "Smartcool" (automatic temperature sensor speed adjustment) is suppose to go in the case's front fan bracket to cool them. RAM :: Corsair ValueSelect :: NewEgg.com :: $169.00 x 2 DDR-667 / PC5300 VS2GBKIT667D2 (2 x 1GB) While 4GB of RAM might sound like overkill, I would actually consider going with more if the OSx86 motherboards I like supported it, but I think 2GB is what I would recommend for most folks around here. OS X is big time RAM-hog compared with Windows and Linux. I was originally going to get 4GB of "pqi" RAM from NewEgg at $163.44 per 2GB kit, but then I saw this Cosair RAM which I think is higher quality/performance for $169.00. I believe that the "pqi" RAM has a CAS latency of 4 while the Corsair is 3. EDIT: This is definitely not CL 3 RAM that I bought, it is CL 5. EDIT 2: My motherboard detects this RAM's default timings as 5-5-5-15, but AnandTech claims this stuff is rated for 4-4-4-12 at the board memory voltage of 1.8V: http://www.anandtech.com/mb/showdoc.aspx?i=2797&p=17 Hard Drives :: Western Digital Raptor SATA 10K RPM WD360GD :: ClubIT.com :: $105.99 x 2 36 GB WD740GD :: NewEgg.com :: $135.00 (after $20 rebate) 74 GB OK, I know I went a little wild here, three Raptors, but I wanted to play with SATA RAID (striped for 2x speed) with two of the 36 GB drives, and well the price on the 74 GB drive was too good to pass up (the rebate offer ended today). Anyways, it is somewhat unclear what I will end up with in my "Hackintosh" but my G5 PowerMac has an empty bay, so one of these might end up in there as a "swap" partition for virtual memory. Optical Drive :: Pioneer DVR-110D :: ClubIT.com :: $43.97 16x16 Double Layer DVD +/- RW Apple typically uses Pioneer DVD burners, so at this price I see no reason to mess around with anything else. Monitors :: Dell 2005FPW :: Dell.com :: $490.90 (w/ sales tax) 20" (1680 x 1050) :: $429.77 (w/ sales tax) AnandTech has a great article comparing the Dell 2005FPW with Apple's 20" Cinema Display. While their have been some quality problems with the 2005FPW it uses the same panel as Apple's 20" Cinema Display. While not quite a cool, the Dell panel has many more features than the Apple and clearly a much better value. Instead of buying one larger panel, I buy two smaller panels and run them together, again, it is a much better value. But until the ATI x1600 video card is fully supported on "unsupported" OSx86 boxes, I am not going to buy a video card and just use the Intel D945G motherboard's GMA 950 to run a single display. So, I was only going to order one 2005FPW now and plan to get another later (when I get a ATI x1600 or whatever supported video to run dual displays). Anyways, the Dell guy offered my $60 bucks off if I ordered the second 2005FPW last night, so I did. I was then planning on canceling my first 2005FPW order to just get one at the better price, but Dell has already shipped them both after telling me the expected ship date would be 1.19.06. I still might decline to receive or otherwise send back the more expensive order, but not likely now. Dell is the only vendor who charged me State sales tax. Keyboard Apple USB Keyboard OnSale.com $29.00 I was looking at some others like the Kensington's and MacAlly's, but I really just an Apple. Having the all the right keys all in the right places will make my Hackitosh feel more like the real thing. Apple keyboards are high quality and the price is right, otherwise, my only issues are the lack of USB 2.0 ports (the have USB 1.1), white keyboards get dirty and I would like a flatter keyboard. I will actually probably sticking this keyboard with my Cube and instead use one of my older flatter black Apple keyboards with this machine. Mouse :: Logitech MX510 :: ClubIT.com :: $27.97 I was really close to ordering a Mighty Mouse, but I have never used one and I know that it is a little "different". The only issue with Logitech is OS X drivers, apparently we are suppose to use USB OverDrive which is suppose to be good but I have yet to check if it has been ported to x86 yet (so I may be stuck using something else for while). Otherwise, MX510 has gotten great reviews, the price is right and it has eight buttons. NOTE: MacGirl reported above that "USB OverDrive" is not working on OSx86 yet, so one must use "Mouse Steer" instead. Shipping :: $34.00 Dell ships for free and ClubIT shipped for free on every but the Arctic Silver and mouse. Once shipping costs were included NewEgg lost some of my business to ClubIT, who in particular shipped the case for free. Otherwise, I am in no rush here and should get all these parts by next weekend. Total :: $2260.81 The only other things I expect to add to this system later is a video card (probably an ATI x1600) once they are supported on "unsupported" OSx86 hardware, a video card fan and possibly a better CPU fan or cooler. That should put the grand total a little under $2500. Now, let's subtract the Dell panels ($920.67), the Raptors ($345.4), the 4GB of RAM ($338), and add an NVIDIA GeForce 6600 256MB video card (~$125), a Hitachi 250GB SATA (~$125) and 512 MB RAM (~$75) instead. That comes out to be $981.74. Now, for an even more fair price comparison my system with stock Dual 2.3GHz PowerMac G5 at the actual discounted price I could buy it for of about $2332 (a little more than 10% off retail price plus the State sales tax that Apple charges me), let's go ahead and add in about $170 for nice Lian-Li or SilverStone aluminum case: Dual Hackintosh Pro: ~$1150 Dual PowerMac G5: ~$2300 Half off... Edited November 4, 2006 by bofors Link to comment Share on other sites More sharing options...
skyliner34 Posted January 21, 2006 Share Posted January 21, 2006 Good luck. Please keep us updated with your progress Link to comment Share on other sites More sharing options...
bofors Posted January 21, 2006 Author Share Posted January 21, 2006 (edited) Thanks and I will be posting my results and progress in this thread. I will also provide a detailed list of what I bought, why I bought it, where I bought it and for what price. By the way, I made a related post for people wanting to covert a .dmg to an .iso and then patch it on a Mac here: http://forum.osx86project.org/index.php?showtopic=7389 Edited January 21, 2006 by bofors Link to comment Share on other sites More sharing options...
bofors Posted January 21, 2006 Author Share Posted January 21, 2006 (edited) I have just read over the Artic Silver instruction and it looks like I to first remove the thermal "pad" on my stock Intel heat sink. This is some kind of waxy material that Artic Silver is meant to replace and that company says to use of some plastic and or a specific solvent. It look like the "pad" should peal off fairly easy with a plastic knife. Note I am wearing examine latex gloves when working with Artic Silver, the processor and and heat sink / fan assembly for two reasons: (1) hands have oil (and dirt) that will interfere with the function on the ArticSilver and otherwise I want to keep all surfaces very clean and (2) ArticSilver is pretty toxic. Edited January 21, 2006 by bofors Link to comment Share on other sites More sharing options...
dungeon Posted January 21, 2006 Share Posted January 21, 2006 Thanks and I will be posting my results and progress in this thread. I will also provide a detailed list of what I bought, why I bought it, where I bought it and for what price. thank you. cant wait Link to comment Share on other sites More sharing options...
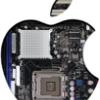
bofors Posted January 21, 2006 Author Share Posted January 21, 2006 (edited) Here is picture of the wax-like thermal "pad" on the bottom of the heatsink-fan assembly: I manage to gently peel and scrape most of it off with a flexible plastic ruler (don't use anything that can scratch the soft copper ): But that was just not good enough, this surface must clean of that wax {censored}. It directly interferes with the Artic Silver. So, a proper solvent must be used. Ideally one would use xylene (like benzene) here. Acetone would be good too (but nail polish remover is not recommended and absolutely do not use anything oily nor apply heat , i.e. no hot water). I had neither so I went with hold house isopropyl-alchohol (rubbing alochol) and that worked pretty good with lens paper. Again, the point to get the copper surface very clean while being carefull not to scratch. Rubbing it is actually good because the surface polishes: Edited January 21, 2006 by bofors Link to comment Share on other sites More sharing options...
skyliner34 Posted January 21, 2006 Share Posted January 21, 2006 Lookin Good Link to comment Share on other sites More sharing options...
Swad Posted January 21, 2006 Share Posted January 21, 2006 bofors, Is this a box that will theoretically be compatible with 10.4.4? Link to comment Share on other sites More sharing options...
Careless Posted January 21, 2006 Share Posted January 21, 2006 noooooooooooooooooooooooooooooooooooooooooooooooo why did you get a Pentium D?! you should have purchased the same processor as mine. I'm getting benches and speeds as fast as the FX-60 processor for about 1/4 the price =( and thats on stock voltage. but that HSF looks nice =) i have to redo the artic silver on my processor. i found that the first time i did it, it was too thick, so its actually creating an insulated surface, rather than a dissipitating one. so im gonna go do that again soon. and remember to let the AS5 heat cycle. i found that it was the best way of achieving the best curing for the AS5. leave it on for a day, then turn it off for 8 hours. do that for one whole week, and your temps will drop 7 to 10'C I'm anxious to see how this turns out. if only i had a better video card i can tell my games are struggling to keep up with my CPU because of my crappy video memory. And i have such a nice setup too, but the vid card is being a poo-head Link to comment Share on other sites More sharing options...
bofors Posted January 21, 2006 Author Share Posted January 21, 2006 (edited) bofors, Is this a box that will theoretically be compatible with 10.4.4? Hey Mashugly... Yes, I got an motherboard that supports EFI, an Intel D945GNTKLR, so once we get the new OSx86 "issues" worked out it will certainly work with 10.4.4+. Here is the thread where we were discussing motherboards: http://forum.osx86project.org/index.php?showtopic=7192 Edited January 21, 2006 by bofors Link to comment Share on other sites More sharing options...
Careless Posted January 21, 2006 Share Posted January 21, 2006 also... i found that trying to make a smooth layer of AS is hard. whether you use a razor or not, its probably going to be too much. what i would do is just plop a dab of the stuff right in the center... but make it like the shape of a BB pellet. the heatsink, if put on directly straight, will work perfectly, and will distribute the AS all over the integrated heat spreader by itself. and after all, the entire IHS doesnt have to be smoothered in AS5, because the core is directly under the center (on AMD processors anyways)... so thats really the only area that needs attention. too much artic silver is a bad thing. hey bofors.. isnt EFI sorta like a serial code check though? I mean, wont the EFI program on the board you bought sorta send the wrong info to the EFI request... causing it to halt? or is all EFI detection just a "yes" "no" deal? Link to comment Share on other sites More sharing options...
bofors Posted January 21, 2006 Author Share Posted January 21, 2006 (edited) why did you get a Pentium D?! Well of course, I would have probably rather gone with AMD and perhaps I will in the future. But I am focusing on maximum comptability here. This means the Intel 945 chipset and the GMA 900/950 graphic's chip. So AMD was not an option for me right now. Anyways, I am pretty happy with the processor's specs and price. I got a Pentium D 920, Presler (65nm), 2.8GHz (2 x 2MB cache), 800MHz Front Side Bus (FSB). This is the closest thing to a Yonah right now with twice as much cache, albeit unshared and a faster FSB, it should be compariable. We can get do some benchmarking later. And, oh yeah, this Pentium D 920 was only $250... what i would do is just plop a dab of the stuff right in the center... but make it like the shape of a BB pellet. the heatsink, if put on directly straight, will work perfectly, and will distribute the AS all over the integrated heat spreader by itself. ... too much artic silver is a bad thing. That is my plan, and yes too much Artic Silver would be bad, very little is needed. Like the volume of a rice grain and I am not going to try spreading it much at all, only rotating the heatsink a little once it is one the heat spearder. The heat of processor should spread very thoroughly and evenly over time. Apparently some 200 hours are need as well as full cooling cycles to room temp. hey bofors.. isnt EFI sorta like a serial code check though? I mean, wont the EFI program on the board you bought sorta send the wrong info to the EFI request... causing it to halt? or is all EFI detection just a "yes" "no" deal? There are a lot of EFI issues that we are just beginning to understand. Normally EFI has no serial code or anything, however it is possible to combine EFI with the on-board TPM chips to create signed (or even encrypted) firmware. But I really doubt that Apple would have gone that far simply because just like BIOS, the EFI firmware will need to be updated and anything like that would cause huge problems for really little benefit. We will get through this EFI learning curve soon enough and probably really like all the cool features that it offers... but it is not just a "yes or no deal". The EFI isn't just detected, but rather EFI loads operating system and device drivers (like for the ATI x1600 graphics chips). I do not want to turn this into an EFI thread though. This one should be used for loading operating systems and general EFI discussion: http://forum.osx86project.org/index.php?showtopic=6969 And this thread should be used for discussing EFI and the ATI x1600 graphics drivers: http://forum.osx86project.org/index.php?showtopic=7174 Edited January 22, 2006 by bofors Link to comment Share on other sites More sharing options...
Careless Posted January 21, 2006 Share Posted January 21, 2006 awesome. i thought you were buying just a regular box and going to use it as a OSx box no the side. but if your intention is to make it 100% compatible, then i guess you got it right on the money, d00d! *high5* i wouldnt even twist the heatsink on too much after puttting it on, i'd say like one or two degrees in either direction. creating swirls in the AS5 will create air pockets too, you just wanna slowly grind it into both small crevices of the IHS and the HSF. But i think you know what you're doing man. im not gonna bother explaining stuff. I'd see it as an insult to your intelligence, which is not what i wanna do. and dont use the grain of rice example from the AS5 site. it's so weird. its like One quarter of the size of one uncooked long grain white rice. LOLOLOLOLOL... wtf is that. Link to comment Share on other sites More sharing options...
bofors Posted January 21, 2006 Author Share Posted January 21, 2006 (edited) Now, back to my hardware installation. I think I am going to put the motherboard in the case and then attach the heat sink and fan assembly, but I am not sure about this. I need to look over the Intel motherboard and Antec instructions again on this question. If anybody knows whether I should install the heat sink and fan assembly before I but the mother in the case please let me know promptly. Anywas, I have been getting the case ready for the motherboard and I had to take out Antec's CPU/GPU cooling duct: Then I had replace the stock I/O panel with the special one that came with my board which has a FireWire port amoung other things: Next, I was going install a 120mm "intake" fan, near the front of the case to help cool the hard drives (I bought two 10K RPM Raptors for this box): But that fan came with four screws that I thought I was supposed to use to mount it in the case (on the right). I spent a long time trying to figure out if they were supposed to be self-tapping or what, because I could not see how to use them in case. I was about to put the front 120mm aside and get back to it later, but I noticed that the case came with four silicone rubber plugs that are supposed to be used here (on the bottom left). I know this because I can that these are exactly what Antec used to fasten the 120mm rear exhaust fan. Also, this is supposed to be a quiet case with noise dampening rubber here and there: So, I am going to mount the front 120mm next and they try to figure out whether I should put the motherboard in before or after I attach the heatsink and CPU fan assembly. Edited January 21, 2006 by bofors Link to comment Share on other sites More sharing options...
Careless Posted January 22, 2006 Share Posted January 22, 2006 definately put the heatsinnk on before. it will give you a better feel for if you're seating it correctly. just support the heatsinnk as your moving it around. my HSF weighs almost 1 kilogram (860 grams) and it will crack my mobo to pieces if it carry it around like a hot plate. btw... that mouse. its almost the same as the mx1000 which i have. how do we get the forward and back buttons to work on the side? Link to comment Share on other sites More sharing options...
bofors Posted January 22, 2006 Author Share Posted January 22, 2006 (edited) definately put the heatsinnk on before. it will give you a better feel for if you're seating it correctly. just support the heatsinnk as your moving it around. Hmm... Intel says to put the chip in the socket, install the motherboard and then attached the heat sink. But since we are dealing with Artic Silver here, I think I will take your advice and install the heat sink first and then motherboard.. btw... that mouse. its almost the same as the mx1000 which i have.how do we get the forward and back buttons to work on the side? The mouse is a LogicTech MX510 and "USB Overdrive" is supposed to be used with it and OS X. I would assume that "USB Overdrive" has no problems on OSx86, but that is still an open question for me: http://www.usboverdrive.com/ Edited January 22, 2006 by bofors Link to comment Share on other sites More sharing options...
Careless Posted January 22, 2006 Share Posted January 22, 2006 Hmm... Intel says to put the chip in the socket, install the motherboard and then attached the heat sink. But since we are dealing with Artic Silver here, I think I will take your advice and install the heat sink first and then motherboard.. Intel, InShmell.... they only tell you that because they're using their stock HSF, right? and you should be using another HSF, as that would void the warranty but anyways. install it out of the case, and carefully put it into the case as one unit. you may need to put a backing plate on it or something anyways, so you cant do that when it's in there. since i am right handed... this is what i would do. 1) put case on its side. 2) put mobo on a leveled table. 3) apply thermal paste accordingly. 4) put the screws and a screw driver on the right side of the mobo, where your better hand is. 5) put the heatsink on the chip, guiding it with your right hand (from the sides) and putting your left hand ontop of the heatsink, so that you can press down. 6) remove right hand, and keep left hand there, to press down, as you install screws or clips. most important step 7) tighten screws cross wise... top left, bottom right. never let go of that pressure hand (left hand) 8) if you let go of your left hand, or relieve pressure, you must restart, as you just introduced air into the thermal paste. 9) dont press down too hard y0o0o0o0o! you wanna just seat it correctly, but not crush the mobo and its underpins. 10) carefully move mobo into case. its not that hard, but the best advice is to have the HSF seated correctly at ALL times. and plan ahead before you put it down....its sort of awkward when you have your left hand on the HSF, trying to keep it steady, and you notice that the screwdriver and screws are on the left of the motherboard. it happened to me and i felt stupid for it, because it was the one time that i applied the thermal paste perfectly. oh and thanks for the drivers =) i might test them now. Link to comment Share on other sites More sharing options...
whoistylerdurden Posted January 22, 2006 Share Posted January 22, 2006 I find it much easier to put the heat sink on the board before installing the board. Your Arctic Silver application is right on. I clean my heatsinks and heat spreaders (the metal over the chip) with rubbing alcohol before applying a rice grain sized amount of AS5 to the spreader. Then I lock the heat sink into place. Having the motherboard out of the case makes it easier to line up and clamp down the heat sink. Looking good so far! --SS Link to comment Share on other sites More sharing options...
bofors Posted January 22, 2006 Author Share Posted January 22, 2006 (edited) Intel, InShmell....they only tell you that because they're using their stock HSF, right? and you should be using another HSF, as that would void the warranty but anyways. install it out of the case, and carefully put it into the case as one unit. you may need to put a backing plate on it or something anyways, so you cant do that when it's in there. since i am right handed... this is what i would do. Well Intel's instructions so obfuscated by using the way they organized them, that they are really difficult to follow and any person with half-a-brain would have sorted them by language not by instruction like Antec did, so you can just pick you language and then read continously. Intead I have to deal with something the size of a road-map cluttered with all this stuff. It is like the "Tower of Babel" and this part just cracks me up: "NOTE: Installation instructions are not part of the Three Year Limited Warranty" Do they actually mean their useless "paper" is not covered under warranty? Anyways, here is the "intake" fan pre-loaded with the silcone plugs: I had to use some "needle-nose" pliars but it went in fairly easily: Guys, thanks for your all the suggestions, I going to print them out now, look them over, and get the processor and heat sink fan assembly attached to the motherboard now. Edited January 22, 2006 by bofors Link to comment Share on other sites More sharing options...
Careless Posted January 22, 2006 Share Posted January 22, 2006 is that where the front fan goes? because on my case there is a hole in the front where it gets air from and sucks it into the case. air is supposed to come in from the front, and leave from the back. Link to comment Share on other sites More sharing options...
Baliw Posted January 22, 2006 Share Posted January 22, 2006 If you still have the budget better change your HSF with something like Zalman or Thermaltake, the one that came with your CPU is {censored}. Link to comment Share on other sites More sharing options...
Careless Posted January 22, 2006 Share Posted January 22, 2006 If you still have the budget better change your HSF with something like Zalman or Thermaltake, the one that came with your CPU is {censored}. it should be fine for his application. i dont think he's overclocking it. switching to AS5 from the stock thermal pad is good enough. Link to comment Share on other sites More sharing options...
Baliw Posted January 22, 2006 Share Posted January 22, 2006 I got an Intel D640 and i used the one that came with my CPU and you know what ..... it idles at 50 c and shoot to 70 c at full load that's the reason i changed mine to Zalman. Just my .0002 cents and now idles at 30 c and 42 at full load. Link to comment Share on other sites More sharing options...
bofors Posted January 22, 2006 Author Share Posted January 22, 2006 (edited) is that where the front fan goes?because on my case there is a hole in the front where it gets air from and sucks it into the case. Yeah, I was wondering about that too, but that's where it is suppose to go. The front of the case actually has an washable air filter, but I don't think most people use a front fan on the Antec Sonata II. Here is the Pentium in the 775 socket on the motherboard, I cleaned the "heat speader" with Isopropyl Alchohol fairly well: Some fraction of a rice grain or BB of Artic Silver (hopefully not too much): I them laid the heatsink fan assembly on top of the Pentium aligning it's spring-loaded fasteners to the holes in the motherboard and they rotate it a +/- just a few degrees, keepting the fasteners in their sockets (but not attacted yet). Then one-by-one, I pushed the four fasteners throught their hole in the motherboard and until they "popped" and lock in place. Here is the back side of board where I could tell the heatsink fan assembly was properly secure: I got an Intel D640 and i used the one that came with my CPU and you know what ..... it idles at 50 c and shoot to 70 c at full load that's the reason i changed mine to Zalman. Just my .0002 cents and now idles at 30 c and 42 at full load. Yeah, I know there are much better CPU coolers and I will probably looking at those later. But I am not overclocking here and just trying to keep things simple for the moment. I also just went with a basic power supply and case, where in the future I will probaby switch to a Lian Li case and some other power supply. As a Mac user, it is has been a while since I built my own machine and I still have a lot to learn, so I appreciate your input here. Usually, I just pay Steve Jobs to do this stuff... Edited January 22, 2006 by bofors Link to comment Share on other sites More sharing options...
Baliw Posted January 22, 2006 Share Posted January 22, 2006 (edited) I understand And you sure got a screamer there and enjoy your new build Edited January 22, 2006 by donicci Link to comment Share on other sites More sharing options...
Recommended Posts