Ravi J Posted December 13, 2010 Share Posted December 13, 2010 Hey, Im bought a G5 Case, just waiting for delievery, and if your wondering got it for 31 usd = 20 gbp And I was wondering, what do you need to take the front panel off, is there a screw or is it more complex, (on about the power, usb, firewire + audio) Link to comment Share on other sites More sharing options...
Zoran Bogunovic Posted December 14, 2010 Author Share Posted December 14, 2010 Hey Ravi, The front panel has a removable metal shield which can be easily removed with a flat head screw driver, then there are two Phillip head screws that secure the front panel I/O board to the chassis. Hope that helps. Link to comment Share on other sites More sharing options...
an1r0n Posted January 10, 2011 Share Posted January 10, 2011 Hey Ravi, The front panel has a removable metal shield which can be easily removed with a flat head screw driver, then there are two Phillip head screws that secure the front panel I/O board to the chassis. Hope that helps. I wonder how none commented on your Optimus Maximus keyboard ; ) Btw, your name reveals you're coming from Balkans, right? Great mod man! Real class... Link to comment Share on other sites More sharing options...
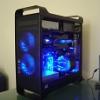
Zoran Bogunovic Posted January 18, 2011 Author Share Posted January 18, 2011 I wonder how none commented on your Optimus Maximus keyboard ; ) Btw, your name reveals you're coming from Balkans, right? Great mod man! Real class... Hey an1ron, well I guess the KB isn't what we're to discuss - but you are the first to notice I guess (gold star sticker for you )... My name does originate from the Balkans however I've always been based in Australia. All, got some updated pics of the StealthMac: Replaced the two vertical disk enclousures with an all in one SAS enclosure (pictured is the SATA model Front view of the enclosures. Much more streamlined. Current layout from a far using flash to get past the bright blue LEDS, here you can see the addition Ballistix Tracer memory... money well spent! Shot with out flash... The new array enclosure fits perfectly and also allows for more valuable airflow to pass. Next stage is upgrade the PSU allowing for the graphics to upgraded to the latest spec. This is the Kingwin 1220W Mach 1... Will be awesome to get the fitted - however that will require a full tear down and some dremel action to get it fitted. Pictures are great but Videos are better. I've put together a quick tour of the machine so you can get a better feel of what this thing is like. Thanks again for all your support guys, this build aint over yet, nor do I think it will be for sometime. Link to comment Share on other sites More sharing options...
grady.lynch Posted January 20, 2011 Share Posted January 20, 2011 That is going to be one serious computer! Incredible work! Be sure to keep us updated Link to comment Share on other sites More sharing options...
Zoran Bogunovic Posted January 22, 2011 Author Share Posted January 22, 2011 Sorry Guys, more updates. Was testing out the new PSU, also bought a new DVD drive and modified the activity LED... I'm going to paint this drive matte black also so it ties in with the case an PSU. Something I realized when I got the DVD drive is that there's a smiley face (is upsidedown in this pic), I found that rather amusing. Link to comment Share on other sites More sharing options...
grady.lynch Posted January 25, 2011 Share Posted January 25, 2011 How did you attach the fans magnetically? Link to comment Share on other sites More sharing options...
Cengiz sevinir Posted January 28, 2011 Share Posted January 28, 2011 more photo zoran ı'm following this topic Link to comment Share on other sites More sharing options...
Zoran Bogunovic Posted February 1, 2011 Author Share Posted February 1, 2011 UPDATE TIME...AGAIN. Touch dry DVD-ROM drive panels baking in the hot Aussie sun. Finished product before install. PSU and matte black optical drive installed after more Dremel action. Kingwin 1220W Mach 1 PSU, this will be more than enough power - this thing has active cooling also, the sticker on the side is the chart detailing this. Front awesomeness so you can see the RAID array. Link to comment Share on other sites More sharing options...
Zoran Bogunovic Posted February 25, 2011 Author Share Posted February 25, 2011 Hey again, Since getting all my memory installed I've noticed that there's a nice amount of heat pooling between all the DIMMs then I got to thinking "It's mod time again" but how to design a RAM cooler that would complement the rig as a whole. Then I found this which is made by the same company (Crucial), personally I think it'll be a great addition plus it was designed to be used with my memory. Link to comment Share on other sites More sharing options...
Zoran Bogunovic Posted March 1, 2011 Author Share Posted March 1, 2011 Yeah... Another update! Got the RAM cooler - must say it is well built The RAM LEDs light up the fans which give a nice effect on the fan blades The new side view At night... Arrggghhh Lights A lil more side on with a low light exposure out of the lot I'm actually quite of this shot (Download HighRes Shot HERE) open in photo view using full screen, it's awesome. Enjoy Link to comment Share on other sites More sharing options...
Alex//3oo1 Posted March 1, 2011 Share Posted March 1, 2011 Hi Zoran your case is the best. I've never seen one better than yours... please help me to create the back as yours. How did you do it? What have you used? Another case? Link to comment Share on other sites More sharing options...
Zoran Bogunovic Posted March 1, 2011 Author Share Posted March 1, 2011 How did you do it? What have you used? Another case? Your questions don't seem very direct. I did the mods in steps improving as a went along (see all the pics). What have I used? In what regard? Tools, materials? My computer specs can be found in my sig. Another case... not sure I understand the question. Link to comment Share on other sites More sharing options...
Alex//3oo1 Posted March 2, 2011 Share Posted March 2, 2011 I'm sorry, it's my fault... I wrote "case", but I mean "chassis". However, I'd like to know how you have created the back I don't want to cut it, but if I need to do that, I'd like to do it like yours EDIT: This here is the end of the first stage of modding here I used a Lian Li Mobo tray to hold all the components and after cutting away the ugly hole left by the previous modder I patched it up by mounting the the tray onto the chassis this you will see in my second stage mods. ops Link to comment Share on other sites More sharing options...
Zoran Bogunovic Posted March 3, 2011 Author Share Posted March 3, 2011 I think you're talking about the mobo tray! its the Lian Li PC6X... I cut mine so i could get a proper fit around the latch and other areas. Link to comment Share on other sites More sharing options...
InsideMac Posted March 6, 2011 Share Posted March 6, 2011 This is a great Mod! Its very sexy.. I just bought a PowerMac G5 and I myself will be doing some modding! Don't think it will look as good as yours though Link to comment Share on other sites More sharing options...
snackole Posted March 7, 2011 Share Posted March 7, 2011 Hey Zoran or anyone else could tell an idiot what color wires go where? Link to comment Share on other sites More sharing options...
Zoran Bogunovic Posted March 8, 2011 Author Share Posted March 8, 2011 Sorry for the delay in response. From the view you've given starting from the left going to the right. Active - The Brown (or Red) wire Earth - The Green & Yellow (or just Yellow) wire (very important) Neutral - The Blue (or Black) wire ------------------------------------------------------- Something to remember! the only pin you need to get right is the earth. Even if you accidentally crossed the Active and Neutral wires it would work as you are dealing with an Alternating Current (AC power), however best practice is to follow my guide above. Again as I've advised in the past if unsure seek assistance. 1 Link to comment Share on other sites More sharing options...
snackole Posted March 8, 2011 Share Posted March 8, 2011 Thanks alot now I just got to find a right angle plug and can finally finish this thing. One more question if you don't mind. How much space do you have from the back of your power supply to the back of your case? I think I may have mounted mine a little too close. Link to comment Share on other sites More sharing options...
Zoran Bogunovic Posted March 8, 2011 Author Share Posted March 8, 2011 Space is dependent on the size of your PSU. I'm using a 1220W PSU (180mm long) and needed every spare millimeter I could find so I'm 45mm (or 1 3/4 Inches in your speak) from the rear which was just enough to get past the chassis bolts. Currently a very precise fit. When I had a standard PSU which normally measures 150mm x 150mm I would have been something like 55mm+ from the back, this also allows for any changes in cable management later on. hope that helps. Link to comment Share on other sites More sharing options...
Zoran Bogunovic Posted January 3, 2013 Author Share Posted January 3, 2013 damn, looks like all the pics that i had posted in this topic have disappeared... not to worry i still have then saved.... might need to run a dedicated blog by the looks. Link to comment Share on other sites More sharing options...
Mr.D. Posted January 3, 2013 Share Posted January 3, 2013 I would love to see the pics.. from your avatar it looks like a great system. If you do get the change, please either re-post the pics or host them and link! Thanks! Link to comment Share on other sites More sharing options...
Recommended Posts